24
3. Select a desired searching filter by moving the joystick
rightward or leftward.
Note:
The illustration is an example in which "CAMERA"
has been selected for the searching filter.
4. To determine the filter setting, press the CAM (SET) but-
ton.
The searching filter window will be displayed on the
monitor.
Note:
The searching filter window differs depending on
the searching filter selected in Step 2. Refer to p. 25
Searching filter windows for details on each win-
dow.
5. Filter recording events. (Refer to p. 25 earching filter
windows.)
6. To exit the searching filter window, press the MON
(ESC) button. The searching filter window will be
closed, and the recording event list window will be dis-
played again on the monitor.
Note:
Refer to Step 3 for the screenshot.
7. Select a desired recording event by performing one of
the following.
• Move the 3D joystick controller to up or down.
• Rotate the JogDial clockwise or counterclockwise.
• Press the + or – button.
Note:
To move to the next or previous page, perform
either of the following.
• Move the zoom wheel controller to the right or left.
• Rotate the shuttle ring clockwise or counterclock-
wise.
8. Press the PLAY button.
The playback of selected recording event will start.
9. To exit the search mode, press the MON (ESC) or EXIT
button.
The live image will be displayed again on the monitor.
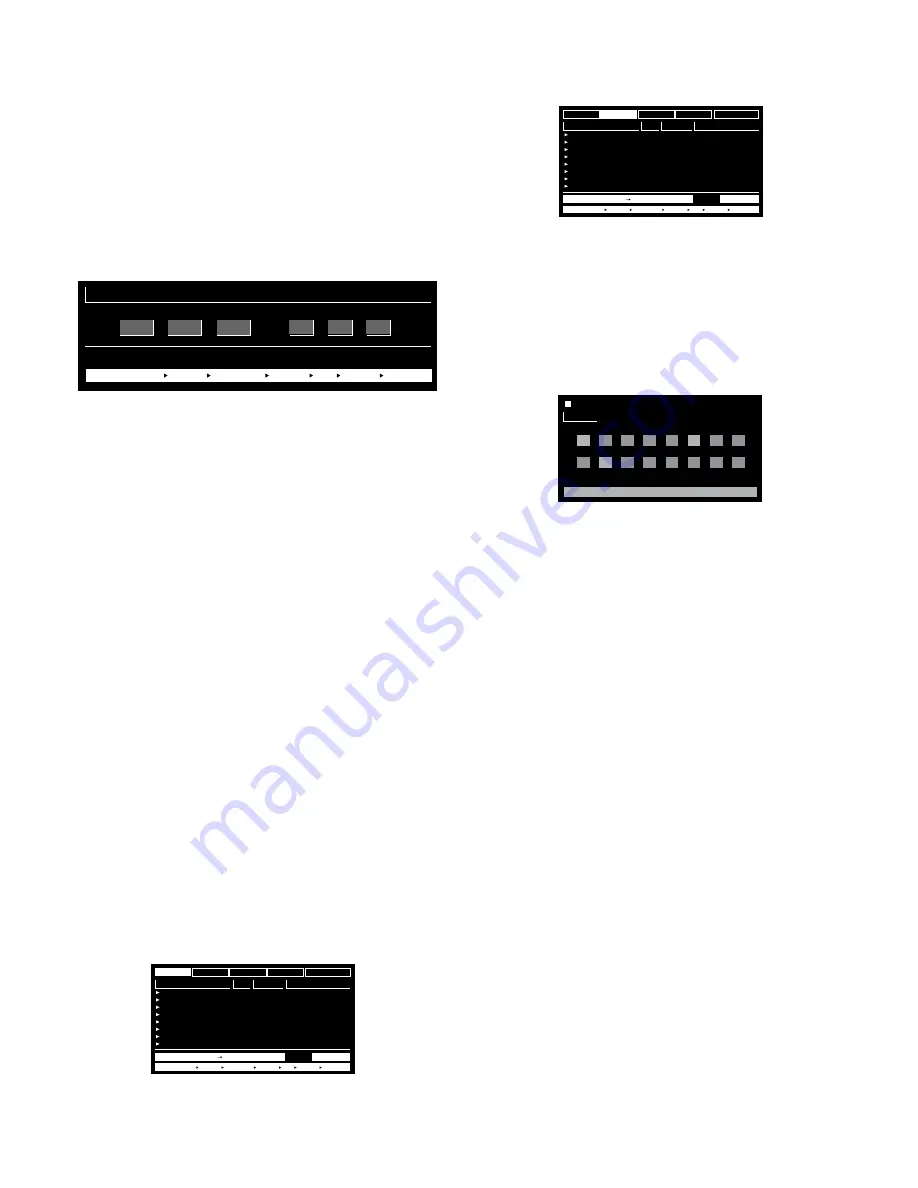
• Date-and-time Search Playback
The recorded images can be searched for through the date
and time.
1. Enter the recorder mode. (Refer to p. 19 Recorder
Mode.)
2. Press the SEARCH/T&D SEARCH button repeatedly
until the date-and-time entry form appears on the moni-
tor.
The date-and-time entry form will appear on the center
of monitor.
Note:
The factory default setting is the current date and
time.
3. Enter the desired date and time by performing either of
the following.
• Rotate the JogDial clockwise or counterclockwise.
• Press the + or – button.
The cursor can be adjusted by moving the 3D joystick
to the right or left.
4. Press the PLAY/PAUSE or CAM (SET) button. After the
search through the date and time, the recorded image
will be played.
5. To exit the entry form, press the MON (ESC) or EXIT
button. The live image will be displayed again on the
monitor.
• Recording event search
You will select a searching filter from "TIME&DATE", "CAM-
ERA", "REC EVENT", and "TEXT". Playback pictures will be
searched by the selected searching filter.
1. Enter the recorder mode. (Refer to p. 19 Recorder
Mode.)
2. Repeat pressing the SEARCH/T&D SEARCH button
until the recording event list window is displayed on the
monitor. The recorder will enter the searching mode.
TIME&DATE
01ch
01ch
01ch
01ch
01ch
01ch
01ch
01ch
MANUAL
MANUAL
MANUAL
MANUAL
MANUAL
MANUAL
MANUAL
MANUAL
CAM
REC EVT
ABCDEFGHIJKLMNOP
ABCDEFGHIJKLMNOP
ABCDEFGHIJKLMNOP
ABCDEFGHIJKLMNOP
ABCDEFGHIJKLMNOP
ABCDEFGHIJKLMNOP
ABCDEFGHIJKLMNOP
ABCDEFGHIJKLMNOP
TEXT
APR.25.03*12:34:56 AM
APR.25.03*12:34:56 AM
APR.25.03*12:34:56 AM
APR.25.03*12:34:56 AM
APR.25.03*12:34:56 AM
APR.25.03*12:34:56 AM
APR.25.03*12:34:56 AM
APR.25.03*12:34:56 AM
TIME&DATE SEARCH REC EVENT SEARCH VMD SEARCH MARK
TIME&DATE
CAMERA
REC EVENT
TEXT
UNLOCK FILTER
TOTAL
APR.25.03*12:34:56 AM
APR.25.03*12:34:56 AM
100
TIME&DATE SEARCH REC EVENT SEARCH VMD SEARCH MARK
START
.
.
:
:
FEB
2
04
12
00
00
AM
TIME&DATE
01ch
01ch
01ch
01ch
01ch
01ch
01ch
01ch
MANUAL
MANUAL
MANUAL
MANUAL
MANUAL
MANUAL
MANUAL
MANUAL
CAM
REC EVT
ABCDEFGHIJKLMNOP
ABCDEFGHIJKLMNOP
ABCDEFGHIJKLMNOP
ABCDEFGHIJKLMNOP
ABCDEFGHIJKLMNOP
ABCDEFGHIJKLMNOP
ABCDEFGHIJKLMNOP
ABCDEFGHIJKLMNOP
TEXT
APR.25.03*12:34:56 AM
APR.25.03*12:34:56 AM
APR.25.03*12:34:56 AM
APR.25.03*12:34:56 AM
APR.25.03*12:34:56 AM
APR.25.03*12:34:56 AM
APR.25.03*12:34:56 AM
APR.25.03*12:34:56 AM
TIME&DATE SEARCH REC EVENT SEARCH VMD SEARCH MARK
TIME&DATE
CAMERA
REC EVENT
TEXT
UNLOCK FILTER
TOTAL
APR.25.03*12:34:56 AM
APR.25.03*12:34:56 AM
100
1
2
3
4
5
6
7
8
9
10
11
12
13
14
15
16
CAMERA FILTERING
CAMERA
SET : [ SET ] CANCEL : [ ESC ]
Summary of Contents for WJ-SX 150A
Page 8: ...9 FEATURES OF THE MATRIX SWITCHER SYSTEM ...
Page 22: ...23 DETAILED PRODUCT DESCRIPTION ...
Page 29: ...31 INSTALLATIONS AND SYSTEM CONNECTIONS ...
Page 54: ...57 WJ SX150A SETUP PROCEDURES ...
Page 100: ...103 OPERATING PROCEDURES TERMINAL MODE ...
Page 119: ...123 OPERATING PROCEDURES PS DATA ...
Page 125: ...129 EXPANDED FUNCTION ...
Page 147: ...151 APPENDIX ...


