– 66 –
Chapter 5 Basic Operations — KEY
Fine-tuning the generated chroma key signals
Fine-tune generated chroma key signals.
1
Select the <ME1>/<ME2> button
→
[KEY1], [KEY2]
→
[Chroma] tab.
2
Select an item in [Narrow] in the [Adjust] column.
[Off]
Does not adjust the width of the chroma key signal.
[0.5], [1.0], [1.5]
Adjusts the width of the chroma key signal. The key signal width can be adjusted horizontally in 0.5 (half-pixel)
increments.
3
Select [Phase Adjust] in the R menu, and set [Phase] in the encoder menu.
f
Adjust the horizontal phase of the chroma key signal. The key signal position can be adjusted horizontally in 0.5 (half-pixel) increments.
Masking the key signals
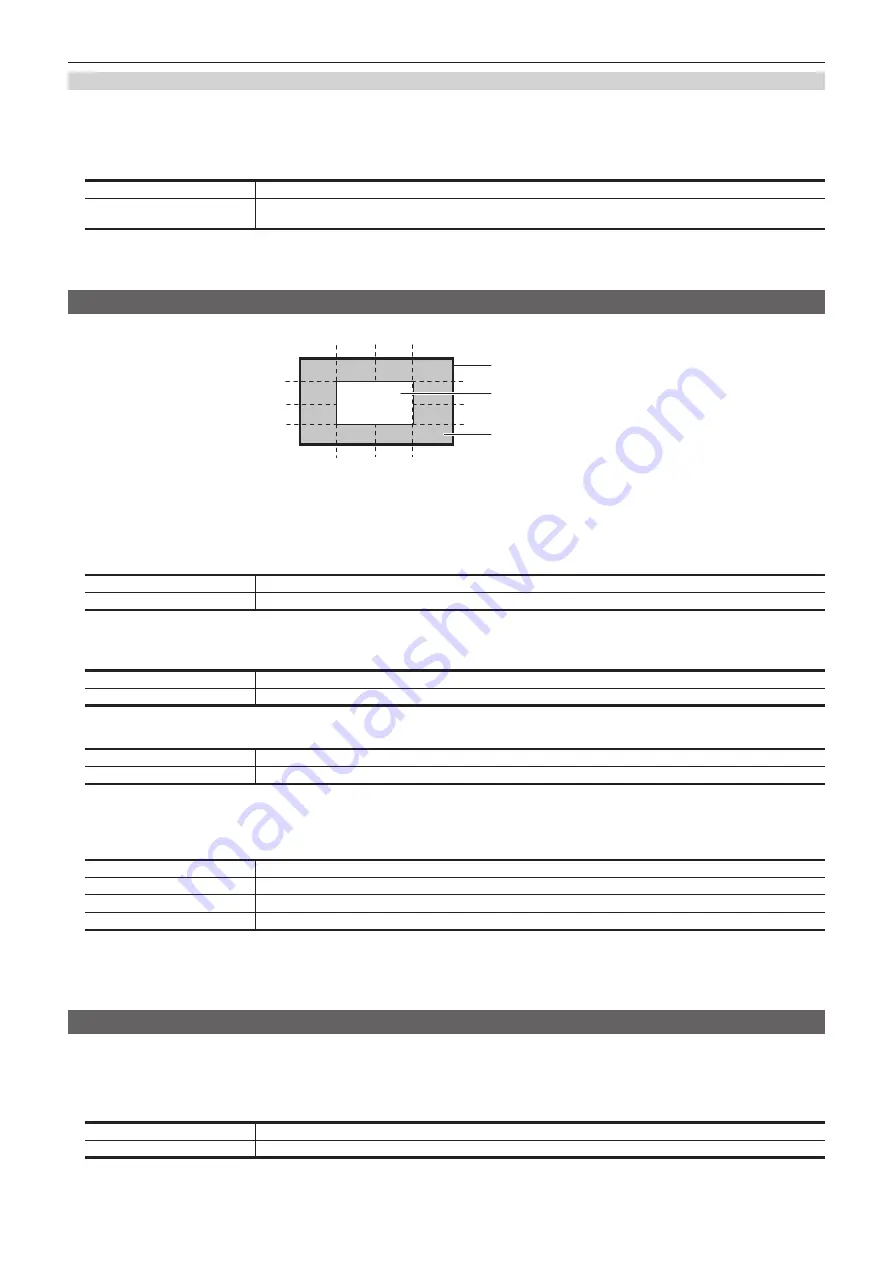
Mask the key signals using the mask signal of the box pattern. The following figure is the status when [Type] is set to [FG], and [Invert] is set to [OFF].
Area where the key signal is effective
Video signal range
Area masked
[Right]
[Left]
[Top]
[Bottom]
[50]
[25]
[0]
[
−
25]
[
−
50]
[
−
25]
[
−
50]
[25]
[0]
[50]
1
Select the <ME1>/<ME2> button
→
[KEY1], [KEY2]
→
[Key Setting] tab.
2
Select an item in [Mask] in the [Mask] column.
f
Set the mask method.
[OFF]
Does not mask the key signals.
[ON]
Select [Mask Adjust] in the R menu, and mask the area to be set with the encoder menu.
3
Select an item in [Type] in the [Mask] column.
f
Set the image to be masked.
[FG]
Masks the foreground and displays the background.
[BG]
Masks the background and displays the foreground.
4
Select an item in [Invert] in the [Mask] column.
[ON]
Inverts the mask signal.
[OFF]
Does not invert the mask signal.
5
Select [Mask Adjust] in the R menu, and set [Left], [Top], [Right], and [Bottom] in the encoder menu.
f
Set the area to be masked. The [Left] setting cannot exceed the [Right] setting (and vice versa), and the [Top] setting cannot exceed the [Bottom]
setting (and vice versa).
[Left]
Masks the key left position.
[Top]
Masks the key top position.
[Right]
Masks the key right position.
[Bottom]
Masks the key bottom position.
f
The parameters can also be changed with the Positioner.
Set the behavior with [Positioner] in the encoder menu. [Positioner] switches between [L/T] and [R/B] each time you select it.
- [L/T]: [Left] and [Top] are changed.
- [R/B]: [Right] and [Bottom] are changed.
Setting box matte
A matte can be added under the key.
1
Select the <ME1>/<ME2> button
→
[KEY1], [KEY2]
→
[Key Setting] tab.
2
Select an item in [BOX Matte] of the [BOX Matte] column.
[ON]
The box matte is added.
[OFF]
The box matte is not added.
Summary of Contents for AV-HS60C3G
Page 5: ...Please read this chapter and check the accessories before use Chapter 1 Overview ...
Page 11: ...This chapter describes installation and connection Chapter 2 Installation and Connection ...
Page 50: ...This chapter describes menu operations Chapter 5 Basic Operations ...
Page 113: ...This chapter describes the configuration of operations Chapter 7 Configuring Operations ...
Page 122: ...This chapter describes how to operate system menus Chapter 8 System Menu ...
Page 136: ...This chapter describes plug in functions Chapter 9 External Interfaces ...
Page 140: ... 140 Chapter 10 Specifications Dimensions Dimensions of the XPT Unit AV LSX10 Unit mm inch ...
Page 141: ... 141 Chapter 10 Specifications Dimensions Dimensions of the ME Unit AV LSM10 Unit mm inch ...
Page 153: ...This chapter describes the setting menu table and terms Chapter 11 Appendix ...
Page 176: ...Web Site https www panasonic com Panasonic Corporation 2020 ...


