7-27
Wh
en
a
m
e
ssa
ge
a
ppe
ar
s
Chapter 7
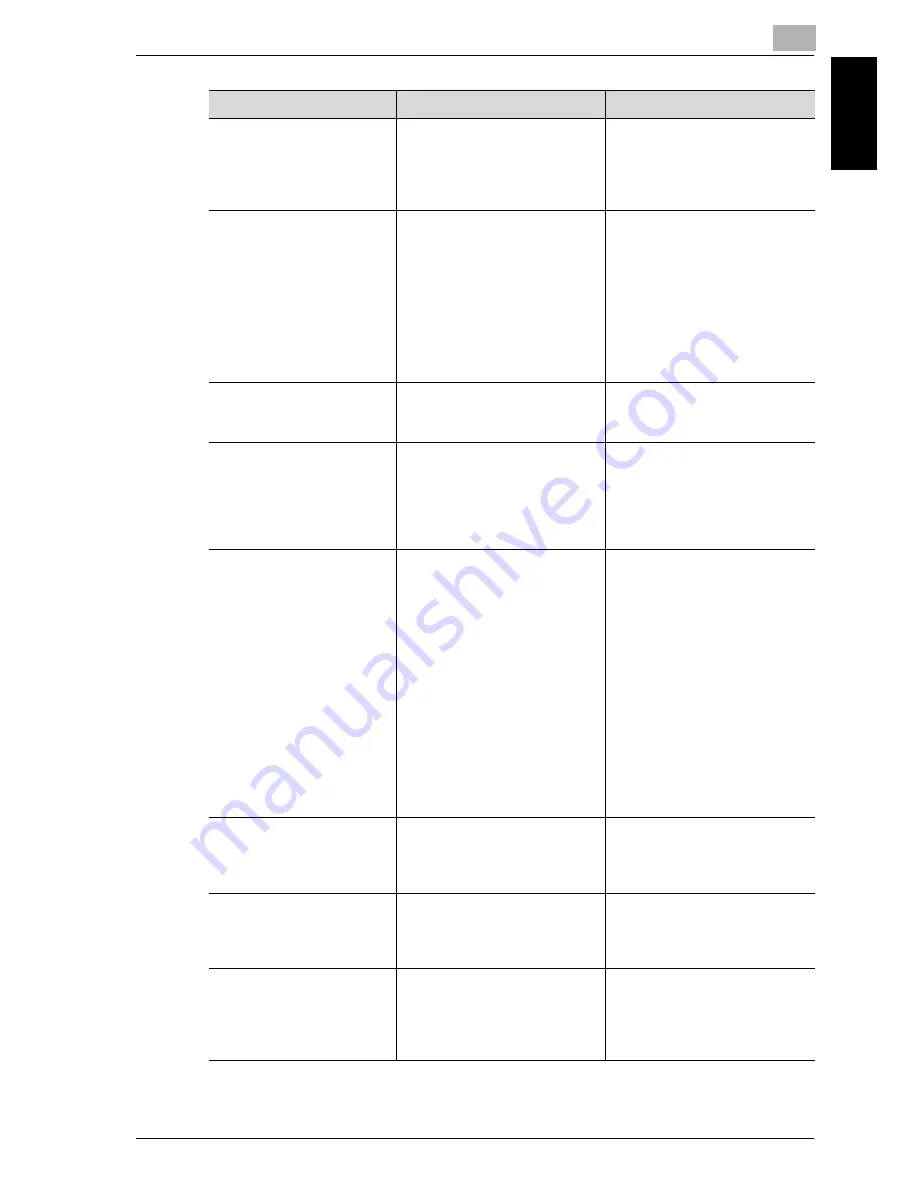
Paper Empty
(when specifying copy settings)
The selected paper drawer contains
no paper.
“#” indicates the paper drawer, and
“XXX” indicates the paper size.
Either load paper of the specified
size into the specified paper draw-
er, or press the [Paper] key and se-
lect a different paper size.
NO SUITABLE PAPER
LOAD PAPER (#XXX)
• The paper size setting for the se-
lected paper drawer was
changed while copying.
• While copying with the “Mixed
Original” setting and the “AU-
TO” Paper setting selected, pa-
per of a suitable size cannot be
found. “#” indicates the paper
drawer, and “XXX” indicates
the paper size.
Either load paper of the specified
size, or press the [Paper] key and
select a different paper size.
APS SIZE ERROR (#XXX)
While copying with the “AUTO”
Paper setting selected, paper of a
suitable size cannot be found.
Either load paper of a suitable size,
or press the [Paper] key and select
a different paper size.
AMS SIZE ERROR
While copying with the “AUTO”
Zoom setting selected, the combi-
nation of the document and paper
sizes caused the zoom ratio to ex-
ceed the range between 25% and
400%.
Either load paper of a suitable size,
or press the [Zoom] key and select
a different zoom ratio.
PAPER SIZE ERROR
RESET PAPER (#XXX)
The paper loaded in the paper
drawer caused a size error. “#” in-
dicates the paper drawer, and
“XXX” indicates the paper size.
For a paper feed unit, remove the
loaded paper, and then reload the
paper according to the procedure
described in “Loading paper” on
page 3-8. For paper of a non-stand-
ard size, refer to “Copying onto la-
bel sheets” on page 4-37. For a
bypass tray, remove the loaded pa-
per, and then reload the paper ac-
cording to the procedure described
in “Loading plain paper into the
bypass tray” on page 4-17. For pa-
per of a non-standard size, refer
to“Copying onto manually fed pa-
per (manual bypass tray)” on
page 4-27.
MEMORY FULL
(PRESS ANY KEY)
The size of the data for the scanned
image has exceeded the capacity of
the memory.
Press any control panel key, or turn
the machine off, then on again.
(The scan data should be cleared
from the memory.)
MEMORY FULL
ADMIN STRATOR
(PRESS ANY KEY)
The image data received from the
computer has exceeded the capaci-
ty of the memory.
Press any control panel key, or turn
the machine off, then on again.
(The received image data should
be cleared from the memory.)
UPPER TRAY FULL
REMOVE PAPER
(PRESS ANY KEY)
If the optional job separator is in-
stalled and the paper in the upper
output tray has reached the maxi-
mum capacity, copying/printing
cannot continue.
Remove all paper from the upper
output tray of the job separator.
Message
Cause
Remedy
Summary of Contents for Omega 1640
Page 1: ...Omega 1640 2140 User Manual ...
Page 2: ......
Page 17: ...x 15 Explanation of manual conventions ...
Page 18: ...x 16 ...
Page 22: ...x 20 ...
Page 23: ...1 Installation and operation precautions Chapter 1 Installation and operation precautions ...
Page 43: ...2 Precaution Chapter 2 Precaution ...
Page 66: ...2 24 Precaution Chapter 2 ...
Page 67: ...3 Before making copies Chapter 3 Before making copies ...
Page 80: ...3 14 Before making copies Chapter 3 5 Close the paper drawer ...
Page 90: ...3 24 Before making copies Chapter 3 3 Carefully close the document feeder ...
Page 95: ...4 Making copies Chapter 4 Making copies ...
Page 160: ...4 66 Making copies Chapter 4 ...
Page 161: ...5 Advanced copy operations Chapter 5 Advanced copy operations ...
Page 196: ...5 36 Advanced copy operations Chapter 5 ...
Page 197: ...6 Utility mode Copy mode parameters Chapter 6 Utility mode Copy mode parameters ...
Page 272: ...6 76 Utility mode Copy mode parameters Chapter 6 ...
Page 273: ...7 When a message appears Chapter 7 When a message appears ...
Page 286: ...7 14 When a message appears Chapter 7 3 Close the right side door 4 Pull out the paper drawer ...
Page 288: ...7 16 When a message appears Chapter 7 7 Close the paper drawer ...
Page 293: ...7 21 When a message appears Chapter 7 3 Close the duplex unit cov er ...
Page 301: ...8 Troubleshooting Chapter 8 Troubleshooting ...
Page 305: ...9 Appendix Chapter 9 Appendix ...
Page 319: ...10 Index Chapter 10 Index ...
Page 323: ...1 1 ...
Page 324: ...1 2 ...
Page 327: ...1 3 ...


