background image

Copying Functions

1-13

Punching

Punch holes in sets of finished copies in preparation for binding.

NOTE: 

Punching requires the optional document finisher and punching unit.

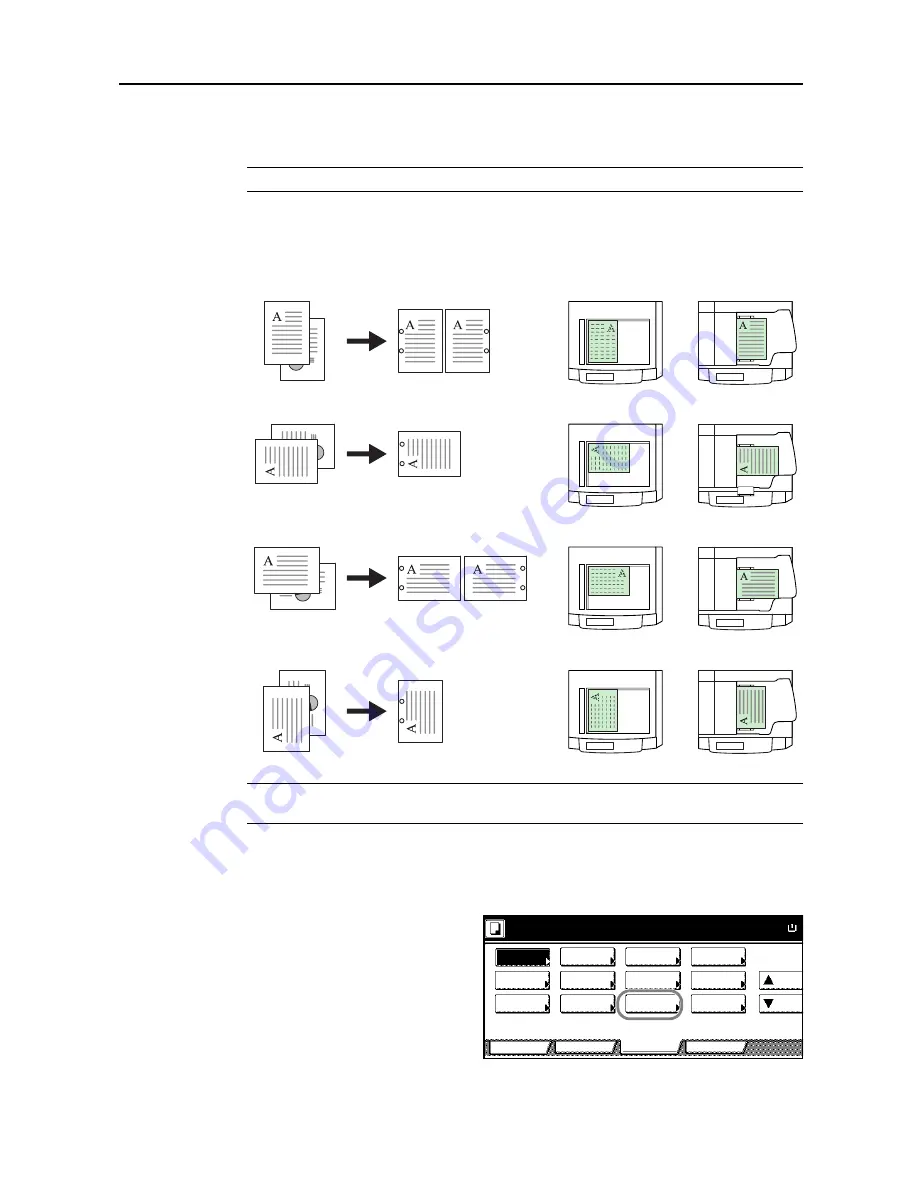
The orientations of the original and corresponding punch positions are as follows.

NOTE: 

The inch model provides two-hole and three-hole punching. The metric model provides 

two-hole and four-hole punching.

Follow the steps as below for punching.

1

Press [Function] and then [

T

 Down].

2

Press [Staple/Punch].

Originals

Copies

Document 

Processor

Platen

Orientation of Original

Two Holes (Left/Right)

Two Holes (Top)

Two Holes (Left/Right)

Two Holes (Top)

Ready to copy.

A

Paper Size

Program

Function

User choice

Basic

Up

Staple

/Punch

Auto Image

Copy

OHP Back

Original

Orient.

Proof Copy

Mirror

Memo

Pages

Down

EcoPrint

Output

Negative

Multi-page

100%

Rotation

Repeat

Tray

Image

Image

Form

Summary of Contents for D-COPIA 6200

Page 1: ...ADVANCED OPERATION GUIDE d Copia 6200 d Copia 8200 548504en GB...

Page 2: ...which could compromise the conformity attested to above as well as the characteristics of the product incorrect electrical power supply incorrect installation incorrect or improper use or use not in...

Page 3: ...ric versions of these copiers The inch versions of these copiers are shown in the screens in this guide If you are using the metric version use the messages provided for the inch version as reference...

Page 4: ...ions Explains the copier s versatile functions for managing original documents and jobs during and after copying 3 System Settings Covers general default settings 4 Job Accounting Provides instruction...

Page 5: ...ault settings Conventions in This Guide The following conventions are used depending on the nature of the description Convention Description Example Bold Indicates operation panel keys Press the Start...

Page 6: ...n 1 48 Output Destination 1 49 EcoPrint Mode 1 50 Inverted Copying 1 51 Mirror Image 1 52 Mixed Size Originals Mode 1 53 Multi Page Forms 1 56 Programmed Copying 1 57 Assigning Register Keys 1 60 Prog...

Page 7: ...and Deactivating Job Accounting 4 18 Job Accounting Default Settings 4 19 Copying with Job Accounting ON 4 28 Appendix Appendix 1 Paper Appendix 2 Specifications Appendix 9 Intercompatible Functions A...

Page 8: ...Page Numbering 1 25 Cover Mode 1 28 Form Overlay 1 30 Booklet from Sheets 1 32 Booklets from Facing Pages 1 35 Memo Mode 1 38 Continuous Scan 1 40 Proof Mode 1 41 Repeat Copy 1 42 Backing Sheets for...

Page 9: ...desired paper size to select that paper source When using the MP tray specify the paper size and type Refer to Configuring MP Tray on page 3 39 3 Press the Start key to start copying Ready to copy A P...

Page 10: ...ch you enter width and length Custom Size Non standard sizes which you enter and register as custom sizes For instructions on registering original sizes refer to Registering Non standard Sizes for Ori...

Page 11: ...m Cover Booklet Up Continuous Scan Mixed Size Originals Border Paper Original Duplex Margin Centering Collate Offset Original Size Page Combine Form Overlay Down 100 Selection Erase numbering Image Re...

Page 12: ...riginal Size A4 stand Size Paper Size A 100 2 2 2 2 Register size Setting Range Inch models 2 to 11 5 8 in 1 8 increments Metric models 50 to 297 mm in 1 mm increments Back Original Size Ready to copy...

Page 13: ...ss the Start key to start copying Ready to copy A Paper Size Program Function User choice Basic Density Zoom Cover Booklet Up Continuous Scan Mixed Size Originals Border Paper Original Duplex Margin C...

Page 14: ...keys on the operation panel to enter the desired copy quantity The copy quantity will be displayed at the top right corner of the touch panel NOTE To clear the copy quantity press the Stop Clear key T...

Page 15: ...ature Punching optional feature When placing originals on the platen When placing originals in the document processor NOTE You can change the default setting for the original orientation Refer to Orie...

Page 16: ...o copy A Paper Size Program Function User choice Basic Up Staple Punch Auto Image Copy OHP Back Original Orient Proof Copy Mirror Memo Pages Down EcoPrint Output Negative Multi page 100 Rotation Repea...

Page 17: ...numeric keys to enter the copy quantity 5 Place the originals in the document processor or on the platen Press the Start key to start copying 3 2 1 3 2 1 3 2 1 3 2 1 Originals Copies Ready to copy A...

Page 18: ...Function and then T Down 2 Press Staple Punch Originals One staple Two staples Left Right Two staples Top One staple Document Processor Platen Orientation of Original Two staples Left Right Two stapl...

Page 19: ...isplayed Place the next original and press the Start key After scanning all originals press Scanning finished to start copying Back Select Origi Off 1 staple Orientation Top Edge Staple Punch Ready to...

Page 20: ...e metric model provides two hole and four hole punching Follow the steps as below for punching 1 Press Function and then T Down 2 Press Staple Punch Originals Copies Document Processor Platen Orientat...

Page 21: ...or on the platen Press the Start key to start copying Back Select Origi Off 1 staple Orientation Top Edge Staple Punch Ready to copy Punch 2 holes 2 staples Off Paper Size A Staple 100 Register Top 3...

Page 22: ...e copy paper sizes of A3 B4 A4 A4R B5 B5R 11 17 11 8 1 2 8 1 2 11 8K and 16K 2 in 1 Mode For copying two originals onto a single sheet This mode can be used with Duplex mode to copy four originals ont...

Page 23: ...nd corresponding output are as follows NOTE When placing the original on the platen copy originals in the order of the page Types of Page Boundary Lines Choose from the following types of the lines fo...

Page 24: ...ing all originals press Scanning finished to start copying Ready to copy A Paper Size Program Function User choice Basic Density Zoom Cover Booklet Up Continuous Scan Mixed Size Originals Border Paper...

Page 25: ...e the originals in the document processor or on the platen with the top edge facing either the rear or the left side of the copier 2 Press Function 3 Press Margin Centering Margin Imag Shift 4 Press M...

Page 26: ...y the orientation of placed originals 9 Press the Start key to start copying Back Select Origi Auto Orientation Top Edge Back page margin Ready to copy Front Back Paper Size A If AUTO is selected for...

Page 27: ...f the placed originals 6 Press the Start key to start copying Ready to copy A Paper Size Program Function User choice Basic Density Zoom Cover Booklet Up Continuous Scan Mixed Size Originals Border Pa...

Page 28: ...e of the original such as a thick books You can specify the widths individually to erase the borders around the edges and in the center of the book Separate Border Erase Use this mode to specify borde...

Page 29: ...unction 3 Press Border Erase Erase Mode Ready to copy A Paper Size Program Function User choice Basic Density Zoom Cover Booklet Up Continuous Scan Mixed Size Originals Border Paper Original Duplex Ma...

Page 30: ...Off Paper Size A Erase edge of original or center and copy Book Erase Bord Erase Sheet Individual BordrErase 100 Register Border Erase Off Back Paper Size A Ready to copy Individual BordrErase Border...

Page 31: ...ing Keys 8 Press Close To specify widths of other borders to erase repeat steps 6 to 8 9 Press the Start key to start copying Ready to copy A Paper Size Back Select Origi Off Orientation Top Edge Bott...

Page 32: ...5 To start page numbering from the page other than the first page press Select 1st page Setting 1st page Originals 1 P 1 1 n Ready to copy A Paper Size Program Function User choice Basic Density Zoom...

Page 33: ...e denominator for 1 n If not go to step 15 12 To specify the total number of pages for the format 1 n press Select denominator Set Denomin 13 Press Manual Back Setting1st page Ready to copy Top Edge S...

Page 34: ...s will be displayed Place the next original and press the Start key After scanning all originals press Scanning finished to start copying Back Select Origi Orientation Top Edge Setting denominator Rea...

Page 35: ...an the normal paper source Front Cover Back Cover You can select not to print the first page and or last page so that the cover is blank for both one side and duplex printing Front Cover Back Cover Or...

Page 36: ...If the original is placed on the platen Scan next original s will be displayed Place the next original and press the Start key After scanning all originals press Scanning finished to start copying Re...

Page 37: ...step 6 To scan new forms move to step 8 6 Press Select Stored Frm Loading Form Originals Copies Forms Ready to copy A Paper Size Program Function User choice Basic Density Zoom Cover Booklet Up Contin...

Page 38: ...original for the forms first 9 Press the Start key When the original is placed on the platen Place originals then press Start key Set original Press Start key will be displayed Place the next origina...

Page 39: ...the optional document finisher you can staple the booklet in the center margin If the copier is also equipped with a folding unit you can combine a center margin with folding at the center The follow...

Page 40: ...he left Follow the steps as below for booklet 1 Press Function 2 Press Booklet Originals Copies Originals No copying Copy on outside Copy on inside Duplexing Originals No copying Copy on outside Copy...

Page 41: ...cover press Stitching Front Cvr Stitching Front cov and move to the next step To skip the cover settings move to step 9 8 Press Cover and specify whether or not to copy on the front and back covers P...

Page 42: ...g at the center The following paper sizes are supported when stapling the center margin or combining a center margin with center folding Copying on covers The original for the cover is scanned first W...

Page 43: ...lose NOTE When you copy onto covers be sure to set the original that you want to have copied onto the cover first Ready to copy A Paper Size Program Function User choice Basic Density Zoom Cover Bookl...

Page 44: ...ons 1 37 9 Press the Start key to start scanning the original Scan next original s is displayed Place the next original and press the Start key After scanning all originals press Scanning finished to...

Page 45: ...ages of each original page for copying onto half of a page leaving the other half blank for notes Layout B Reduces images of two original pages for copying onto half of a single page leaving the other...

Page 46: ...ress Scanning finished to start copying Ready to copy A Paper Size Program Function User choice Basic Up Staple Punch Auto Image Copy OHP Back Original Orient Proof Copy Mirror Memo Pages Down EcoPrin...

Page 47: ...us Scan 3 Press On 4 Place the originals in the document processor or on the platen and press the Start key Place the next original and press the Start key Repeat these steps to scan the remaining ori...

Page 48: ...job is approved or cancelled Check the test copy If it is acceptable press the Start key to deliver the specified quantity To change the copy quantity press Change Preset If there is a problem with t...

Page 49: ...3 16 Preparing a Job for Repeat Copy Follow the steps as below to prepare a job for repeat copies as needed 1 Press Function and then T Down 2 Press Repeat Copy 3 Press On For confidential jobs press...

Page 50: ...Repeat Copy key 2 Select the job to repeat and press Reprint The input screen will be displayed if you have specified a pass code Use the numeric keys to enter the pass code and press Enter 3 Press o...

Page 51: ...ck the job Press Print from 1st Head Print to print the first page for reviewing 4 After reviewing the job press Close To review other jobs repeat steps 2 to 4 5 Press End to display the Basic screen...

Page 52: ...the Repeat Copy key 2 Select the job to delete and press Delete 3 Press Yes to delete the selected job To delete other jobs repeat steps 2 and 3 4 Press End to display the Basic screen Mixed Size orig...

Page 53: ...destination for finished copies For instructions refer to Selecting Output Destination on page 3 29 Copying on Backing Sheets Copies the same image as the transparency onto the backing sheet In the fi...

Page 54: ...r choice Basic Up Staple Punch Auto Image Copy OHP Back Original Orient Proof Copy Mirror Memo Pages Down EcoPrint Output Negative Multi page 100 Rotation Repeat Tray Image Image Form Back OHP Back Re...

Page 55: ...s below for automatic rotation 1 Press Function and then T Down 2 Press Auto Image Rotation 3 Press On to specify automatic rotation Supported Paper Sizes Inch models 11 8 1 2 8 1 2 11 and 5 1 2 8 1 2...

Page 56: ...multiple trays are empty copies are sent to the bottom tray first and higher trays thereafter Tray A Sent to the tray A of the document finisher Tray B Sent to the tray B of the document finisher Thi...

Page 57: ...n and then T Down 2 Press EcoPrint 3 Press On to activate EcoPrint mode Ready to copy A Paper Size Program Function User choice Basic Up Staple Punch Auto Image Copy OHP Back Original Orient Proof Cop...

Page 58: ...mage 3 Press On to specify inverted copying Ready to copy A Paper Size Program Function User choice Basic Up Staple Punch Auto Image Copy OHP Back Original Orient Proof Copy Mirror Memo Pages Down Eco...

Page 59: ...On to specify mirror image copying Ready to copy A Paper Size Program Function User choice Basic Up Staple Punch Auto Image Copy OHP Back Original Orient Proof Copy Mirror Memo Pages Down EcoPrint Out...

Page 60: ...per sizes matching each original NOTE In this mode up to 30 originals of different sizes can be placed in the document processor at the same time Originals of the Same Width Place all originals of the...

Page 61: ...s are as follows A3 B4 A4 and B5 B4 A4R and B5 Folio A4R and B5R NOTE Place originals flush against the document width guide toward the back of the copier IMPORTANT When placing the originals of diffe...

Page 62: ...tart copying NOTE When copying the originals of different widths the reading speed of the document processor becomes slower than as usual to read the originals accurately Mixed Size originals Back Mix...

Page 63: ...document processor 2 Press Function and then T Down 3 Press Multi Page Form Multi Page Forme 4 Press On 5 Press the Start key Place the next original and press the Start key Repeat these steps to sca...

Page 64: ...ram 2 Press Register 3 Press a number 1 to 8 for the program number 4 Enter the program name and press End NOTE For instructions on entering characters refer to Entering Characters on Touch Panel on p...

Page 65: ...umber 1 to 8 of the program to rename 4 Enter the new program name and press End to register the program with the new name NOTE For instructions on entering characters refer to Entering Characters on...

Page 66: ...e program to delete 4 Press Yes to delete the program to copy A4 Paper Size Set Reg Delete Register Delete Change 4 in 1 Sheet Margin Left Program Function User choice 100 Name Bord Erase Delete regis...

Page 67: ...to keys 2 Press Shortcut Register NOTE Functions for which Shortcut Register is displayed may be assigned register keys 3 Press Register 4 Press a number 1 to 3 to register the function 5 Press Yes T...

Page 68: ...s the number 1 to 3 of the function to delete 5 Press Yes to delete the register key Back Select Origi Off 2 in 1 Orientation Top Edge Combine Ready to copy Layout 4 in 1 Paper Size A Border line Soli...

Page 69: ...inserting a blank sheet between sets of copies from each step and specifying a front cover page during a duplexing step Job Build Procedure This procedure describes how to use job build for the follo...

Page 70: ...ob Build Ready to Job build A4 Paper 1 sided Original Basic Quality Zoom Top Edge Top Finishing 1 sided 2 sided Original Orient 1 sided Copy Edit 1 sided Copy Left Finished page Step Auto Selection Ty...

Page 71: ...iginal Basic Quality Zoom Top Edge Top Finishing 1 sided 2 sided Original Orient 2 sided Copy Edit 2 sided Copy Left Finished page Step Auto Selection Type Set original Press Start key Back Paper Sele...

Page 72: ...in A3 Plain A4R Plain Place the originals and press start key Scan next original s Place the originals and press start key Job Build A4 Paper 1 sided Basic Quality Zoom Top Edge Top Original Finishing...

Page 73: ...d 2 sided Next copy page Front Selection Type Press Scanning finished when starting copy Back Paper Selection A4 Recycled A4 Colour A4 Plain A3 Plain A4R Plain Place the originals and press start key...

Page 74: ...ed 1 sided 2 sided 2 sided Book or Multi Page Form Multi Page Forme NOTE When selecting 2 sided 2 sided check the binding direction and be sure that the originals are placed in the correct orientation...

Page 75: ...low the instructions on the right side of the touch panel and confirm the orientation of the originals NOTE Failure to place originals correctly may result in copying errors 3 Press Close Ready to Job...

Page 76: ...pling Document finisher None Center margin stapling is not available Document finisher Installed Folding unit None Center margin stapling is available Document finisher Installed Folding unit Installe...

Page 77: ...ss Zoom 2 Select the desired magnification For instructions on reducing enlarging refer to Reducing Enlarging in Chapter 3 of the Operation Guide for details 3 Press Close Set original Press Start key...

Page 78: ...s Close Ready to Job build Job Build A4 Paper 1 sided Basic Quality Zoom Top Edge Top Original Finishing 2 sided Copy Edit 1 sided Copy Left Finished page Step Auto Original Set original Press Start k...

Page 79: ...ose Ready to Job build Job Build Density4 Density Text Photo Basic Quality Off Edit 1 sided Copy Left Finished page Step Original Set original Press Start key EcoPrint Image Ready to Job build Origina...

Page 80: ...f Border Auto Basic Quality Page Tray A Off Edit 1 sided Copy Left Finished page Step Off Set original Press Start key Original Orig Size Off Margin Centering Output Repeat Erase Copy Tray numbering S...

Page 81: ...2 Press Margin or Centering Image shift For details refer to Margin Mode on page 1 18 or Centering Originals on page 1 20 3 Press Close Ready to Job build Job Build Off Border Auto Basic Quality Page...

Page 82: ...pplies to all other steps Simply complete this setting once as an initial step 2 Specify the output destination Refer to Output Destination on page 1 49 for details 3 Press Close Ready to Job build Jo...

Page 83: ...Copying Functions 1 76...

Page 84: ...and Output Management Functions This chapter explains the functions used for managing original documents as well as jobs during and after copying Document Management Functions 2 2 Output Management F...

Page 85: ...me and enter the form name For instructions on entering characters refer to Entering Characters When Using Document Management Functions on page 3 58 If you prefer not to name the form go to the next...

Page 86: ...Change form name and enter the new form name For instructions on entering characters refer to Entering Characters When Using Document Management Functions on page 3 58 5 After reviewing the form pres...

Page 87: ...t to register frequently used documents Registering Documents Register documents in the Shared Data Box as follows The box can hold up to 100 documents 1 Place the originals to be registered as docume...

Page 88: ...rder of indication and choose from Sort by Date New J Old and Old J New or Sort by Name A J Z and Z J A To verify the content of selected documents press Document Properties Check Rev Details Refer to...

Page 89: ...ame For instructions on entering characters refer to Entering Characters When Using Document Management Functions on page 3 58 5 After reviewing the document press Close The touch panel will return to...

Page 90: ...and Z J A 4 Press Yes To delete other documents repeat steps 3 and 4 5 Press Close The touch panel will return to the Document Management screen Document Management Select function Registr Shared Dat...

Page 91: ...umeric keys followed by pressing Enter 4 Press Change Name and enter the document name For instructions on entering characters refer to Entering Characters When Using Document Management Functions on...

Page 92: ...ged setting NOTE You can change the document collate order Press Order of indication and choose from Sort by Date New J Old and Old J New or Sort by Name A J Z and Z J A Documents registered from scan...

Page 93: ...Printing 3 Select the source box To enter the box number press the key for the box or use the numeric keys followed by pressing Enter If a password has been set up for the box a screen for password e...

Page 94: ...ge 2 14 4 Select the document to be checked and press Document Properties Check Rev Details NOTE You can change the document collate order Press Order of indication and choose from Sort by Date New J...

Page 95: ...ents to be deleted are stored To enter the box number press the key for the box or use the numeric keys followed by pressing Enter If a password has been set up for the box a screen for password entry...

Page 96: ...box or use the numeric keys followed by pressing Enter If a password has been set up for the box a screen for password entry will be displayed Use the numeric keys to enter the password and press Ente...

Page 97: ...meric keys followed by pressing Enter If a password has been set up for the box a screen for password entry will be displayed Use the numeric keys to enter the password and press Enter End Order of De...

Page 98: ...prefer not to specify a password press Clear and without having entered any password press Enter 6 Press End The touch panel will return to the Document Management screen End Order of Delete ent Syner...

Page 99: ...an check the status of these jobs just as you would copy jobs on the Prt Status Prnt Status screen Completed or canceled jobs are listed on the Job History screen In the list copy jobs are indicated b...

Page 100: ...terrupt Print Pauses the job in progress and starts printing the selected job which is then moved to the top of the list 5 Cancel Delete Removes the selected job from the list 6 Document Properties Ch...

Page 101: ...not be displayed 2 Check Details Displays the Check Details screen From this screen you can check the content of the selected job 3 S and T Used to select jobs 4 End Exits from the output management...

Page 102: ...s are as follows Default Settings for Copying 3 2 Common Default Settings 3 20 Weekly Timer 3 36 Configuring MP Tray 3 39 Registering Non standard Sizes for Originals 3 40 Setting Document Management...

Page 103: ...er Selection 3 7 Selecting Copy Paper for Zooming 3 8 Selecting Media Types for Automatic Paper Selection 3 8 Selecting Default Cassette 3 9 Specifying Cassette for Cover Paper 3 9 Automatic Zoom 3 10...

Page 104: ...g sections to customize individual settings Density Mode Density mode changes the default for how the copier adjust how dark or light copying is made Choose Auto or Manual as the default Selecting Aut...

Page 105: ...opy Default screen For instructions refer to Accessing the Copy Default Screen on page 3 3 2 Press S or T to select Density Steps and press Change 3 Select 1 step or 0 5 step 4 Press Close The touch p...

Page 106: ...t EcoPrint on or off 1 Access the Copy Default screen For instructions refer to Accessing the Copy Default Screen on page 3 3 2 Press S or T to select EcoPrint and press Change 3 Select On or Off 4 Pr...

Page 107: ...py Default screen For instructions refer to Accessing the Copy Default Screen on page 3 3 2 Press S or T to select Thin Line adjustment and press Change 3 Press Thinner or Thicker to adjust the line t...

Page 108: ...cifies whether the copy paper is automatically selected according to the size of the original document or the copy paper in the default cassette is forcibly selected 1 Access the Copy Default screen F...

Page 109: ...ock Color Colour Prepunched Letterhead Thick paper Envelope High Quality and Custom 1 8 When Plain is selected in the following example the copier looks for the cassette or MP tray in which the paper...

Page 110: ...hich is automatically selected to feed cover paper during the cover or booklet mode is used NOTE 5th paper is available when the copier is equipped with an optional side feeder 1 Access the Copy Defau...

Page 111: ...3 Select Off not to use automatic zooming or On to use automatic zooming 4 Press Close The touch panel will return to the Copy Default screen System Menu Counter System Menu Copy Default Paper Select...

Page 112: ...application NOTE This setting is available only if the copier is equipped with the optional scanner kit 1 Access the Copy Default screen For instructions refer to Accessing the Copy Default Screen on...

Page 113: ...1 Access the Copy Default screen For instructions refer to Accessing the Copy Default Screen on page 3 3 2 Press S or T to select Adj Manual dens Text and press Change 3 Press Lighter or Darker to adj...

Page 114: ...creen For instructions refer to Accessing the Copy Default Screen on page 3 3 2 Press S or T to select Zoom and press Change 3 Select Auto or 100 4 Press Close The touch panel will return to the Copy...

Page 115: ...ssing the Copy Default Screen on page 3 3 2 Press S or T to select Auto Image Rotation and press Change 3 Select Off to disable or On to enable automatic rotation by default 4 Press Close The touch pa...

Page 116: ...Default Screen on page 3 3 2 Press S or T to select Default erase width and press Change System Menu Copy Default Default menu Adj Manual dens Photo Zoom Collate Offset Change Auto Image Rotation Sys...

Page 117: ...documents which were copied and stored in the copier You can enable or disable repeat copy and set it as the default NOTE This menu is not available when the copier is equipped with the optional secur...

Page 118: ...ocument Refer to Output Management Functions on page 2 16 Select On All job or On reserved On Reserv job to display the Job History screen under Print Document 4 Press Close The touch panel will retur...

Page 119: ...Press S or T to select Customize Basic Screen Customize Main function and press Change 3 Highlight the menu item that you want to change the order of appearance using S or T Press Move Ahead or Move...

Page 120: ...want to change the order of appearance using S or T Press to move the item to the left side pane according to the corresponding number 4 Press Close The touch panel will return to the Copy Default sc...

Page 121: ...ng Low Power Timer Timeout 3 28 Setting Auto Clear Timeout Time 3 28 Selecting Output Destination 3 29 Activating Operation Panel Sound 3 30 Enabling Silent Mode 3 30 Adjusting Date and Time 3 31 Sett...

Page 122: ...can specify not to switch to the cassette if the media type differs 1 Access the Machine Default screen For instructions refer to Accessing the Machine Default Screen on page 3 20 2 Press S or T to s...

Page 123: ...1 to 5 These cassettes support the following media types Plain Recycled Preprinted Bond Color Colour Letterhead Thick paper High Quality and Custom 1 8 NOTE Cassette 5 is available when the copier is...

Page 124: ...Normal1 and Light Thin NOTE Refer to the following media types and weights g m 1 Access the Machine Default screen For instructions refer to Accessing the Machine Default Screen on page 3 20 Media Typ...

Page 125: ...a Type Cassette 2 Media Type Cassette 3 Default menu Setting mode Media Type Cassette 4 Check MP tray sizing Media Type paper weight Recycled Change Plain On Plain System Menu Media Type paper weight...

Page 126: ...ce the original and the letterhead paper as shown below NOTE Load paper in the cassette with the printing side facing down When loading paper in the MP tray load it with the printing side facing up Co...

Page 127: ...ize to set up Press Change When the size of the original document is cardstock or A6R choose Cardstock to copy it onto cardstock size or A6 to copy it on A6R size When the size of the original documen...

Page 128: ...pier enters sleep mode The Sleep timer can be set from 1 to 240 minutes in 1 minute increments NOTE If the copier is used frequently we recommend using a longer timeout If it is used infrequently use...

Page 129: ...ion is made Those settings revert to the default settings after the predetermined period of time You can specify the period after copying before the copier automatically clears the previous settings T...

Page 130: ...e Seconds Minute Adjust print direction 15 15 90 90 Auto Clear Time Setting Back System Menu Set the period of time from the last operation after which the default state is reverted Machine Default Se...

Page 131: ...ccess the Machine Default screen For instructions refer to Accessing the Machine Default Screen on page 3 20 2 Press S or T to select Silent Mode and press Change Select Copy output tray Back Machine...

Page 132: ...ate Time and press Change 3 Use or to specify Year Month Day and Time To specify summertime daylight saving press On 4 Press Close The touch panel will return to the Machine Default screen Silent Mode...

Page 133: ...ing the optional security kit enter the eight digit management code By default the management code is 62006200 for 62 cpm model and 82008200 for 82 cpm model The new management code must be a number c...

Page 134: ...3 Select On to activate or Off to deactivate the Sleep mode 4 Press Close The touch panel will return to the Machine Default screen System Menu Machine Default Default menu Key sound ON OFF Silent Mod...

Page 135: ...ons refer to Accessing the Machine Default Screen on page 3 20 2 Press S or T to select Copy Job Priority and press Change 3 Select On or Off 4 Press Close The touch panel will return to the Machine D...

Page 136: ...Default screen For instructions refer to Accessing the Machine Default Screen on page 3 20 2 Press S or T to select Hard Disk Overwrite and press Change 3 Press Once Overwrite or 3 time Overwrite 4 P...

Page 137: ...the management code is 6200 for the 62 cpm model and 8200 for the 82 cpm model The Weekly timer Week timer screen will be displayed NOTE For security it is recommended to change the management code Re...

Page 138: ...Weekly timer Week timer Screen on page 3 36 2 Select the day to cancel the Weekly Timer For example Monday Press Change 3 Under Cancel press On cancel the timer on that day 4 Press Close The touch pan...

Page 139: ...to Accessing the Weekly timer Week timer Screen on page 3 36 2 Select On to activate or Off to deactivate the Weekly Timer 3 Press Close 4 Press End The touch panel will return to the Basic screen k...

Page 140: ...dstock Color Colour Prepunched Letterhead Thick paper Envelope High Quality and Custom 1 8 For instructions on specifying media type refer to Chapter 2 of the Operation Guide Menu Unit Paper Sizes Sup...

Page 141: ...X as the width System Menu Counter Job System Menu Management Hard Disk Report Print Language MP tray Orig Size Register Management Document Default Machine Default Copy Setting Accounting System Men...

Page 142: ...System Settings 3 41 7 Press Close 8 Press Close The touch panel will return to the System Menu screen...

Page 143: ...umeric keys to enter the four digit management code By default the management code is 6200 for the 62 cpm model and 8200 for the 82 cpm model The Document Management screen will be displayed NOTE For...

Page 144: ...System Settings 3 43 Print Document List You can print a list of documents in the Form Box Shared Data Box and Synergy Print Box Document List Form Box Document List Shared Data Box...

Page 145: ...he Document Management Screen on page 3 42 2 Press Print the list under the specific data box The list for the data box is printed 3 When printing is finished the touch panel will return to the Docume...

Page 146: ...s specified printing or deleting a document in the Synergy Print Box prompts you to enter the password 1 Access the Document Management screen For instructions refer to Accessing the Document Manageme...

Page 147: ...ncel The touch panel will return to the Document Management screen Deleting All Documents in Box You can delete all documents in the Synergy Print Boxes at once 1 Access the Document Management screen...

Page 148: ...ically deleted after the period You can choose the period of storing the documents from 1 to 7 days 1 Access the Document Management screen For instructions refer to Accessing the Document Management...

Page 149: ...cuments from 1 to 7 days To indefinitely store the documents press No time limit 4 Press Close The touch panel will return to the Document Management screen Document data save period Back System Menu...

Page 150: ...stalling the optional security kit enter the eight digit management code By default the management code is 62006200 for the 62 cpm model and 82008200 for the 82 cpm model 4 To check the free space on...

Page 151: ...System Settings 3 50 Printing Reports You can print the following reports using the operation panel Copy status report Machine status report...

Page 152: ...ot coverage reports will not match the guaranteed volume given on toner containers exactly The actual copying volume supported depends on conditions of use such as the content of copies and the freque...

Page 153: ...to Changing Management Code on page 3 32 When installing the optional security kit enter the eight digit management code By default the management code is 62006200 for the 62 cpm model and 82008200 f...

Page 154: ...System Menu Counter key 2 Press Check the counter 3 The touch panel will display the total count for copying and scanning To print the total count information press Print Report Press Close The touch...

Page 155: ...fresh 5 Press On to start refreshing the drum Please wait approx one minute until this process is finished 6 When the drum has been refreshed press Close 7 Press Close The touch panel will return to t...

Page 156: ...his key to enter lowercase letters 4 Num Sym Press this key to enter numbers and symbols 5 Space Press this key to enter a space 6 AllDel Press this key to delete all characters entered 7 Press these...

Page 157: ...key to delete all characters entered 8 Press these keys to move the cursor left and right 9 Del prev Press this key to delete the character to the left of the cursor 10 Stop Press this key to return...

Page 158: ...Symbol 1 Space Char Limit 32 including AllDel Del prev Symbol 2 Name to display End Capital Stop Letter Symbol 1 Space Char Limit 32 including AllDel Del prev Symbol 2 Name to display End Capital Sto...

Page 159: ...s key to delete all characters to the right of the cursor at once 6 Shift key Press this key to toggle between entry of capital letters and lowercase letters 7 Space key Press this key to enter a spac...

Page 160: ...System Settings 3 59 2 Press the a b c d and e keys in this order The character display field will show abcde 3 Press the End key Enter user name Char Limit 16 including Space Shift...

Page 161: ...System Settings 3 60...

Page 162: ...ccounting on copier use shared among various departments Overview of Job Accounting 4 2 Managing Accounts 4 4 Copy Count per Department 4 14 Activating and Deactivating Job Accounting 4 18 Job Account...

Page 163: ...ounting you must switch the Copy Job Accounting from Off to On as the default If the copier is equipped with the optional printer kit or scanner kit also activate Printer Job Accounting and Scanner Jo...

Page 164: ...ng screen will be displayed NOTE For security it is recommended to change the management code Refer to Changing Management Code on page 3 32 When installing the optional security kit enter the eight d...

Page 165: ...r 4 Select Account ID and press Change 5 Use the numeric keys to enter the department ID code from 0 to 99999999 6 Press Close Job Accounting Each Job Job Accountg T Register Sett Total Job Management...

Page 166: ...restrictions on copying as desired For instructions on restricting copier usage refer to Restricting Usage Copier on page 4 6 11 Press Registr to finalize settings To make settings on another departme...

Page 167: ...Refer to steps 1 to 11 of New Account on page 4 4 and display the usage restriction screen 2 Set Copy Printer Output Management to All on page 4 23 3 Select Copy and press Change All Available settin...

Page 168: ...ting or Is not permitted Is not permited to prohibit printing 5 Press Close The touch panel will return to the usage restriction screen Restricting Number of Copies to Copy and Print Restricts the num...

Page 169: ...function 1 Refer to steps 1 to 11 of New Account on page 4 4 and display the usage restriction screen 2 Select Scanner transmission and press Change 3 To prohibit scanning image press Is not permitte...

Page 170: ...h on page 4 23 3 Select Copy and press Change 4 To restrict copying press Is not permitted Is not permited Or to restrict the number of copying press Counter limit and use the numeric keys to enter th...

Page 171: ...ress Close The touch panel will return to the usage restriction screen Deleting Account You can delete the department accounts registered 1 Access the Job Accounting screen For instructions refer to A...

Page 172: ...gistered for the department 1 Access the Job Accounting screen For instructions refer to Accessing the Job Accounting Screen on page 4 3 2 Press Management Edit 3 Select the department ID code to edit...

Page 173: ...b accounting turn Copy Job Accounting from Off to On in the job accounting default settings Refer to Job Accounting Default Settings on page 4 19 for details If the copier is equipped with the optiona...

Page 174: ...ll return to the Job Accounting screen Job Accounting Each Job Job Accountg T Register Sett Total Job Management Job Accntg Def Set System Menu Accounting Accounting Edit Close Order of Job Mgt Inf De...

Page 175: ...is displayed for your reference Press Print Report and choose the report type to print this information as a copy management report Press Report by Function to count a list of reports by function Pre...

Page 176: ...he Copy Printer Output Management of the job accounting default settings 4 To reset the copy volume press Counter clear 5 Press Yes 6 Press Close The touch panel will return to the Job Accounting scre...

Page 177: ...settings You can change the department sort order Press Order of indication and choose either of Sort by Code 1 J 9 and 9 J 1 or Sort by Name A J Z and Z J A 4 The copy count of the selected departmen...

Page 178: ...Job Accounting 4 17 6 Press Yes 7 Press Close 8 Press Close The touch panel will return to the Job Accounting screen Yes No The count value of this ID code will be deleted Are you sure...

Page 179: ...b Accounting Screen on page 4 3 2 Select On or Off 3 Press Close 4 Press End When you select On the screen for the department ID code entry is displayed When you select Off the Basic screen is display...

Page 180: ...Job Accounting Screen on page 4 3 2 Press Job Accntg Def Set 3 Select Copy Job Accounting and press Change 4 Select On or Off 5 Press Close Setting Description On Copy Job Accounting is activated Off...

Page 181: ...6 Press Close The touch panel will return to the Job Accounting screen Setting Description On Printer Job Accounting is activated Off Printer Job Accounting is deactivated Job Accounting Each Job Job...

Page 182: ...s Close 6 Press Close The touch panel will return to the Job Accounting screen Setting Description On Prints an error report Off Does not print an error report Job Accounting Each Job Job Accountg T R...

Page 183: ...Select On or Off 5 Press Close Account ID mismatch Output Tray Job MP tray A4 Plain Count Set 1 sided Collate Left tray Stopping p A4 A4 A3 A4 Plain APS Setting Description On Users can print from com...

Page 184: ...ng screen Scanner Job Accounting Activate or deactivate job accounting when the copier is used for scanning NOTE This setting is displayed only if the copier is equipped with the optional scanner kit...

Page 185: ...l Job Management Job Accntg Def Set System Menu Accounting Accounting Edit System Menu Job Accounting Def set Copy Job Accounting Print Job Accounting Printer error report Others Mgt Reg print Copy Pr...

Page 186: ...print Copy Printer output mgt Change Scanner Job Accounting Apply Limit Setting Item On On Off Off All On Subsequently Value Job Accounting Job Accounting Def set Apply Limit Back Job Accounting Def...

Page 187: ...ob Accounting screen For instructions refer to Accessing the Job Accounting Screen on page 4 3 2 Press Job Accntg Def Set 3 Select Total size 1 5 and press Change 4 Press On 5 Press Select size Job Ac...

Page 188: ...Copy Count on page 4 14 for details Select size Job Accounting Def set Job Accounting B5 A4 A3 A5 B4 Folio 11x17 8 x14 8 x11 5 x8 Back Total size 1 Close Paper Size s of paper size and type Media Type...

Page 189: ...press Enter The touch panel will return to the Basic screen NOTE If you enter the code incorrectly press Clear to reenter the correct code Entering an invalid department ID code will trigger an error...

Page 190: ...Appendix 1 Appendix The appendix covers the following topics Paper Appendix 2 Specifications Appendix 9 Intercompatible Functions Appendix 12 Glossary Appendix 16...

Page 191: ...t of recycled paper as a sample for testing prior to use Choose recycled paper that gives the best copying results and contains low levels of paper dust We are not responsible for problems that occur...

Page 192: ...and may damage the drum Be sure to use standard paper that contains at least 80 pulp i e not more than 20 of the total paper content consists of cotton or other fibers Supported Paper Sizes Paper of t...

Page 193: ...ay also indicate that the paper is too thick The proper thickness is between 0 086 and 0 110 mm Moisture Content Paper moisture content is the ratio of moisture to dryness expressed as a percentage Mo...

Page 194: ...tically charged so that the toner adheres Choose paper that can be discharged quickly so that copies do not cling together Whiteness Paper whiteness affects copy contrast Use whiter paper for sharper...

Page 195: ...per Thus special paper is more likely than regular paper to cause copying problems Before purchasing special paper in volume try testing a sample to ensure the copy quality is satisfactory General pre...

Page 196: ...use envelopes with exposed adhesive In addition do not use the type of envelope in which the adhesive is exposed after the top layer is peeled off Serious damage may be caused if the paper covering th...

Page 197: ...listed on the page 2 of the Appendix The colored ink must be able to withstand the heat of copying It must be resistant to silicone oil as well Do not use paper with a treated surface such as glossy p...

Page 198: ...ed Paper For details on the supported paper refer to the Paper on page 2 of the Appendix Paper Supply Capacity Cassettes 1 and 2 Cassettes 3 and 4 MP Tray 1 500 sheets 80 g m 2 cassettes 500 sheets 80...

Page 199: ...from the platen Resolution Scanning 600 600 dpi Copying Equivalent to 1 800 600 dpi Continuous Copying 1 to 9 999 sheets Zoom Level Any level from 25 to 400 in 1 increments With the document processor...

Page 200: ...Trays A and B 45 to 200 g m When stapling 60 to 200 g m When punching optional feature 45 to 200 g m Maximum Sheets for Stapling 11 17 8 1 2 14 A3 and B4 30 sheets 11 8 1 2 8 1 2 11 A4 A4R and B5 50...

Page 201: ...Y 2 Y Y N N N 3 3 Y Y Y Y N Y Mixed Size Originals mode Same width 12 Y 12 Y 12 Y 12 12 12 Y 12 12 Y Y 3 3 3 3 N 33 Y Y Y N Y Mixed Size Originals mode Different widths 12 Y 12 Y 12 Y 12 12 12 Y 12 1...

Page 202: ...12 12 Y Y 7 7 7 12 12 12 Y 12 Y 12 Y Y Y 12 Y Y 12 12 36 Y Mixed Size Originals mode Different widths Y Y Y Y Y Y Y Y Y Y Y Y Y Y Y Y Y Y Y Y Y Y Y Y Y Continuous scan Y Y Y Y Y Y Y Y Y Y Y Y Y Y Y Y...

Page 203: ...2 sided Duplex mode Book J 2 sided Split mode 2 sided J 1 sided Split mode Book J 1 sided Original size selection Standard sizes Original size selection Size entry Original size selection Auto detect...

Page 204: ...r erase Book erase Border erase Separate border erase Cover mode Booklet from sheets Booklets from facing pages Auto Image Rotation Backing sheets for transparencies Proof mode Memo mode EcoPrint mode...

Page 205: ...cific period In Sleep mode power consumption is kept to a minimum CPM copy per minutes The number of A4 sized copies printouts that can be delivered in one minute dpi dots per inch A unit for resoluti...

Page 206: ...paper Appendix 8 Combine mode 1 15 2 in 1 mode 1 15 4 in 1 mode 1 16 Types of page boundary lines 1 16 Common default settings 3 20 Accessing the Machine Default screen 3 20 Activating auto clear 3 3...

Page 207: ...3 14 Selecting copy paper for zooming 3 8 Selecting default cassette 3 9 Selecting default zoom 3 13 Selecting maximum number of copies 3 16 Selecting media types for automatic Paper Selection 3 8 Sel...

Page 208: ...Basic paper specifications Appendix 2 Choosing the appropriate paper Appendix 3 Special paper Appendix 6 Paper Selection 3 7 Paper selection Index 1 Paper selection size 3 22 Paper source 1 2 Postcar...

Page 209: ...Setting time zone 3 32 Shared Data Box 2 4 Deleting documents 2 7 Printing documents 2 5 Registering documents 2 4 Renaming documents 2 6 Reviewing documents 2 6 Sheet border erase 1 21 1 22 Side feed...

Page 210: ...you need and the instructions for handling the waste correctly for example location and times of the waste collection centres etc b When you purchase a new device of ours give a used device similar t...

Page 211: ......

Reviews: