VarioLink 6022/7522
7-11
Application functions
7
8
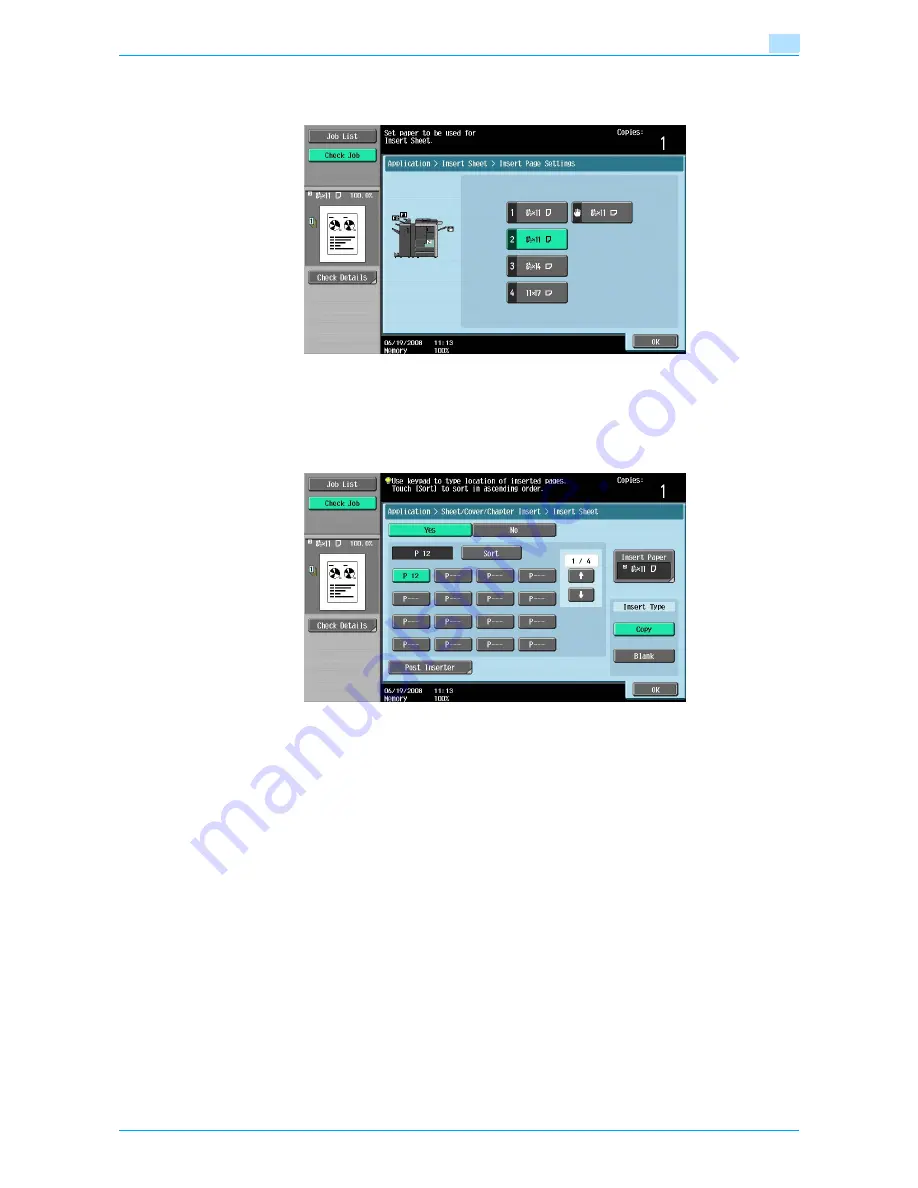
Select the paper tray loaded with the paper for the insertion sheets, and then touch [OK].
–
If [Blank] is selected in step 6, the Post Inserter can be selected for paper tray.
9
Touch [OK], and then touch [OK] in the next screen that appears.
10
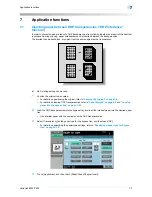
Touch [Post Inserter].
–
Touch a button for a page number, and then use the keypad to type in the number of the page where
the paper is to be inserted.
–
There are two Post Inserter screens. Touch [
↑
] or [
↓
] to display a different screen.
–
To arrange the page numbers in order, starting with the lowest number, touch [Sort].
–
To remove a page number that has been specified, touch the button for the page to be removed,
and then press the [C] (clear) key.
–
If the same page number is entered multiple times, copying is not possible. Delete repeated page
numbers.
–
If the entered page number is greater than the number of pages in the original, paper is not inserted.
11
Select the paper tray loaded with the paper for the insertion sheets, and then touch [OK].
12
Touch [OK], and then touch [OK] in the next screen that appears.
13
Specify any other desired copy settings.
14
Using the keypad, type in the desired number of copies.
15
Press the [Start] key.
Summary of Contents for VarioLink 6022
Page 1: ...Océ VarioLink 6022 VarioLink 7522 Copy Operations User s Guide Printing for Professionals ...
Page 18: ...VarioLink 6022 7522 x 15 Explanation of manual conventions ...
Page 19: ...VarioLink 6022 7522 x 16 ...
Page 22: ...1 Before Making Copies ...
Page 80: ...2 Basic copy operations ...
Page 151: ...VarioLink 6022 7522 2 72 Basic copy operations 2 4 Touch OK and then touch OK again ...
Page 159: ...3 Additional copy operations ...
Page 189: ...4 Troubleshooting ...
Page 237: ...5 Specifications ...
Page 248: ...6 Copy paper originals ...
Page 278: ...7 Application functions ...
Page 300: ...VarioLink 6022 7522 7 23 Application functions 7 6 Press the Start key ...
Page 318: ...VarioLink 6022 7522 7 41 Application functions 7 7 Press the Start key ...
Page 357: ...8 Replacing toner cartridges and staple cartridges and emptying hole punch scrap box ...
Page 378: ...9 Care of the machine ...
Page 385: ...10 Managing jobs ...
Page 399: ...11 Utility mode ...
Page 478: ...12 Authentication Unit Biometric Type AU 101 ...
Page 503: ...13 Authentication Unit IC Card Type AU 201 ...
Page 529: ...14 Appendix ...
Page 536: ...15 Index ...
Page 540: ...Printing for Professionals Beyond the Ordinary ...


