


179
Continued on next page
Ma
il
1
i
“OWN DATA” “Mail member”
The “Mail member list
screen” appears.
2
Select a mail member
The “Mail member detail
screen” appears.
3
Highlight “<Not
stored>”
o
(Edit)
Enter the mail address
To store more e-mail
addresses, repeat step 3.
Mail member list screen (P.179)
Compose message
……
Composes an i-mode mail
message with the members of the mail member pasted
into the recipients field.
Edit member name
……
Edits the name of the mail
member. You can enter up to 10 double-byte or 20 single-
byte characters.
Reset member name
……
Resets the mail member name
to the default name.
Mail member detail screen (P.179)
Edit address
……
Edits the e-mail address.
Look-up address
……
Enters the e-mail address by
browsing the phonebook, sent address list or received
address list.
Delete this
・
Delete all
……
Deletes one or all mail
member(s).
When You Receive i-mode
Mail
When the FOMA terminal is in a service area, i-mode
mail or MessageR/F is automatically sent to the
FOMA terminal from the i-mode Center.
z
You can store up to 1,000 received mails (i-mode
mail and SMS) (the number of mails you can
actually store may be reduced depending on the
file size).
z
You can have the FOMA terminal read out the
received mail message.
→
P.185
Displaying new messages
automatically
<Auto receive mail/Message>
[
1
]
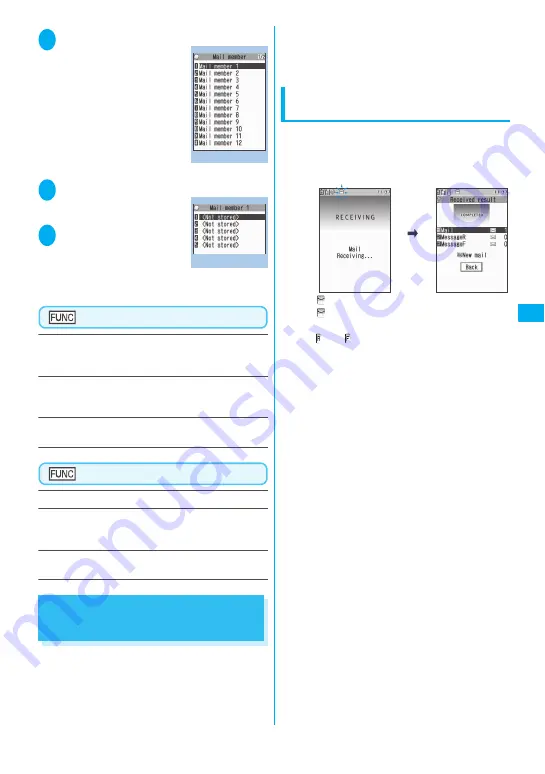
The “Receiving screen” appears when the
reception of i-mode mail or Message starts and
the “Received result screen” appears when the
reception is finished.
z
“
” flashes while receiving a i-mode mail and
“
” stops flashing and lights up when the
reception is finished.
z
“
” or “
” flashes while receiving a Message.
[
2
]
The number of received mail or MessageR/F
appears on the received result screen.
z
The number of mails includes the number of
SMS.
z
When you select mail or Message on the
received result screen, the Received mail list
screen (P.187, 188) or Message list screen
(P.198) appears.
z
If no operation is performed for about 15
seconds while the received result screen is
displayed, the previous screen appears for
mails and Detail screen appears for Message.
The display duration may vary depending on
the “Mail/Msg. ring time” setting.
z
Press
o
(Read) on the received result screen
to have the FOMA terminal read out the mail
message.
→
P.185
z
The detail screen of MessageR/F is displayed
automatically when the message is received on
the standby screen.
z
If no operation is performed for about 15
seconds while the Message detail screen is
displayed, the standby screen reappears.
However, if you use operations such as
scrolling, the detail screen continues to be
displayed.
z
You can set the FOMA terminal to display the
detail screen of MessageR/F automatically
with “Auto-display setting”.
Mail member list
Function menu P.179
Mail member detail
Function menu P.179
Summary of Contents for FOMA N705i
Page 90: ......
Page 172: ......
Page 226: ......
Page 234: ......
Page 244: ......
Page 292: ......
Page 308: ......
Page 356: ......
Page 389: ...387 Continued on next page Appendix External Devices Troubleshooting Reading Reading Reading...
Page 425: ...423 Appendix External Devices Troubleshooting Memo...
Page 426: ...424 Appendix External Devices Troubleshooting Memo...
Page 427: ...425 Index Quick Manual Index 426 Quick Manual 440...
Page 441: ...439 Index Quick Manual...
Page 514: ...Kuten Code List...


