


128
Camera
Before Using the Camera
You can use the FOMA terminal’s built-in camera to
shoot photos (still images) and movies.
z
You cannot activate the camera function or shoot
images when the FOMA terminal is folded.
Using the camera
●
To set to camera mode
There are 2 ways as follows:
①
Select the desktop icon (
) on the standby
screen
②
Select “Camera” from “LIFEKIT” of the main menu
or Simple Menu
z
When there is no key operation for more than about
3 minutes, the camera mode ends automatically.
●
To switch between the rear camera and
front camera
Press
u
(FUNC) in the shooting screen, then select
“Front camera” or “Rear camera” from the function
menu.
■
Rear camera
This camera is useful for taking pictures of other
people, animals or scenery. What you see is what you
get on the screen (Normal display: photographed as it
is displayed on the screen). Suitable for close-up
shooting with the functions of the lens selector switch
or the close-up in the rear camera.
■
Front camera
Use this camera to take a picture of yourself. The
image is displayed as if you are looking in the mirror
(Mirror display). The shot image is reversed from the
displayed image. It is unavailable in Continuous
mode.
●
Lens selector switch
z
To take a close-up image, set to the close-up mode
by moving the lens selector switch to
(macro
lens). When set to the close-up mode, the camera
is focused on an object approx. 6 to 8 cm away
from the rear camera.
z
To use Bar code reader or Text reader, set to the
close-up mode by moving the lens selector switch
to
(macro lens).
z
When you move the lens selector switch, move the
switch to the
●
(standard lens) position or the
(macro lens) position. Do not leave the switch in the
middle of these positions.
When using the camera
■
Notes on shooting
z
The camera of the FOMA terminal is made with the
extremely high-precision technology. However, it
may include lines or spots that look dark or bright.
Noises such as white lines may also appear on the
photographed images particularly when shooting in
very poorly lit locations.
z
Before shooting, wipe the lens clean with a soft
cloth. Fingerprints or grease spots on the lens
could prevent the camera from focusing properly
and cause blurred images.
z
Take care not to press the lens with excessive force
when folding the FOMA terminal. This may cause
malfunction.
z
Image quality may be adversely affected if the
FOMA terminal is left in a hot location for a long
period of time.
z
The color tones and brightness levels in still images
and movies shot may differ from those of the actual
object.
z
Do not leave the camera under the direct sunlight
for a long period of time or shoot the sun or a
powerful lamp directly. This could lead to the
discoloration of the photographed images or cause
the camera to malfunction.
z
Take care that your fingers, hair, or the strap do not
cover the lens when you shoot images.
z
The shooting uses a large amount of the battery. It
is recommended to turn off the camera
immediately after you finish shooting. The screen
may look dark or blurred if you shoot images when
the battery is low.
N
z
To paste the desktop icon again after deleting it, select
“Camera” in step
②
(procedure from main menu)
above and press
u
(FUNC) to select “Add desktop
icon”.
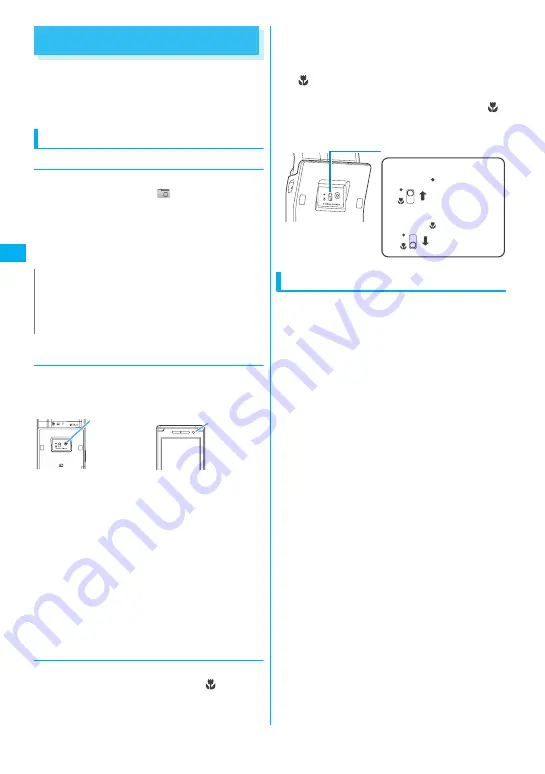
Rear camera
Front camera
Lens selector switch
Using the standard lens
Slide to the position
Using the macro lens
Slide to the position
Summary of Contents for FOMA N705i
Page 90: ......
Page 172: ......
Page 226: ......
Page 234: ......
Page 244: ......
Page 292: ......
Page 308: ......
Page 356: ......
Page 389: ...387 Continued on next page Appendix External Devices Troubleshooting Reading Reading Reading...
Page 425: ...423 Appendix External Devices Troubleshooting Memo...
Page 426: ...424 Appendix External Devices Troubleshooting Memo...
Page 427: ...425 Index Quick Manual Index 426 Quick Manual 440...
Page 441: ...439 Index Quick Manual...
Page 514: ...Kuten Code List...


