


8. If the displays asks if you want to send the email to your account, press the left/right arrow to
highlight
Yes
or No and press
OK
.
9. Enter an email subject and press
OK
.
10. Press the up/down arrow until the file type you want highlights and press
OK
.
The machine begins scanning and then sends the email.
11. If the display asks if you want to log off your account, press the left/right arrow to highlight
Yes
or
No and press
OK
.
12. Press the
Stop/Clear
to return to ready mode.
Storing email addresses
You can set up
Address Book
with the email addresses you use frequently via SyncThru™ Web
Service and then easily and quickly enter email addresses by entering the location numbers
assigned to them in
Address Book
.
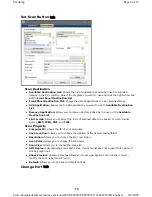
Storing on your local machine
This method means that you store email addresses on your machine’s memory. You can add
addresses, as well as group them in particular catagories.
Individual
1. Turn your networked computer on and open the web browser.
2. Enter your machine's IP address as the URL in a browser.
3. Click
Go
to access the SyncThru™ Web Service.
4. Click
Machine Settings
>
E-mail Setup
>
Individual Address Book
. The screen shows
Individual Address Book
on the right side of the screen.
5. Click
Add
.
6. When the
Add E-Mail
screen appears, select the
Index
number, enter
User Name
and
E-
mail Address
.
7. Click
Apply
.
Group
1. Access to the SyncThru™ Web Service from your computer.
2. Make sure you have configured
Individual Address Book
.
3. Click
Machine Settings
>
E-mail Setup
>
Group Address Book
. Then the screen shows
Group Address Book
on the right side.
4. Click
Add
.
5. Select the
Group
number and enter
Group Name
.
6. Select email addresses by clicking the check boxes.
7. Click
Apply
.
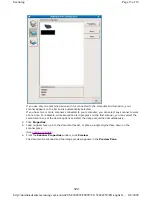
Searching
Address Book
for an entry
There are two ways to search for an address in memory. You can either scan from 0 to 199
sequentially or search by entering the first letters of the name associated with the address.
Searching sequentially through memory
1. Press
Scan/Email
and
Address Book
on the control panel.
2. Press the up/down arrow to highlight
Search & Send
and press
OK
.
3. Press the up/down arrow until the option you want highlights and press
OK
.
4. Press the up/down arrow to highlight
All
and press
OK
.
This prompt does not appear if you have activated the
Auto Send To Self
option in the
SMTP
Client Setup
on
SyncThru Web Service
.
While the machine is sending an email, you cannot use the machine to copy or to send a fax.
Page 3 of 16
Scanning
8/4/2009
http://downloadcenter.samsung.com/content/UM/200907/20090721152022250/EN/english/...
113