background image

6 Mounting

Maschinenfabrik Reinhausen GmbH 2021

60

6796573/02 EN

MSENSE

®

 VAM

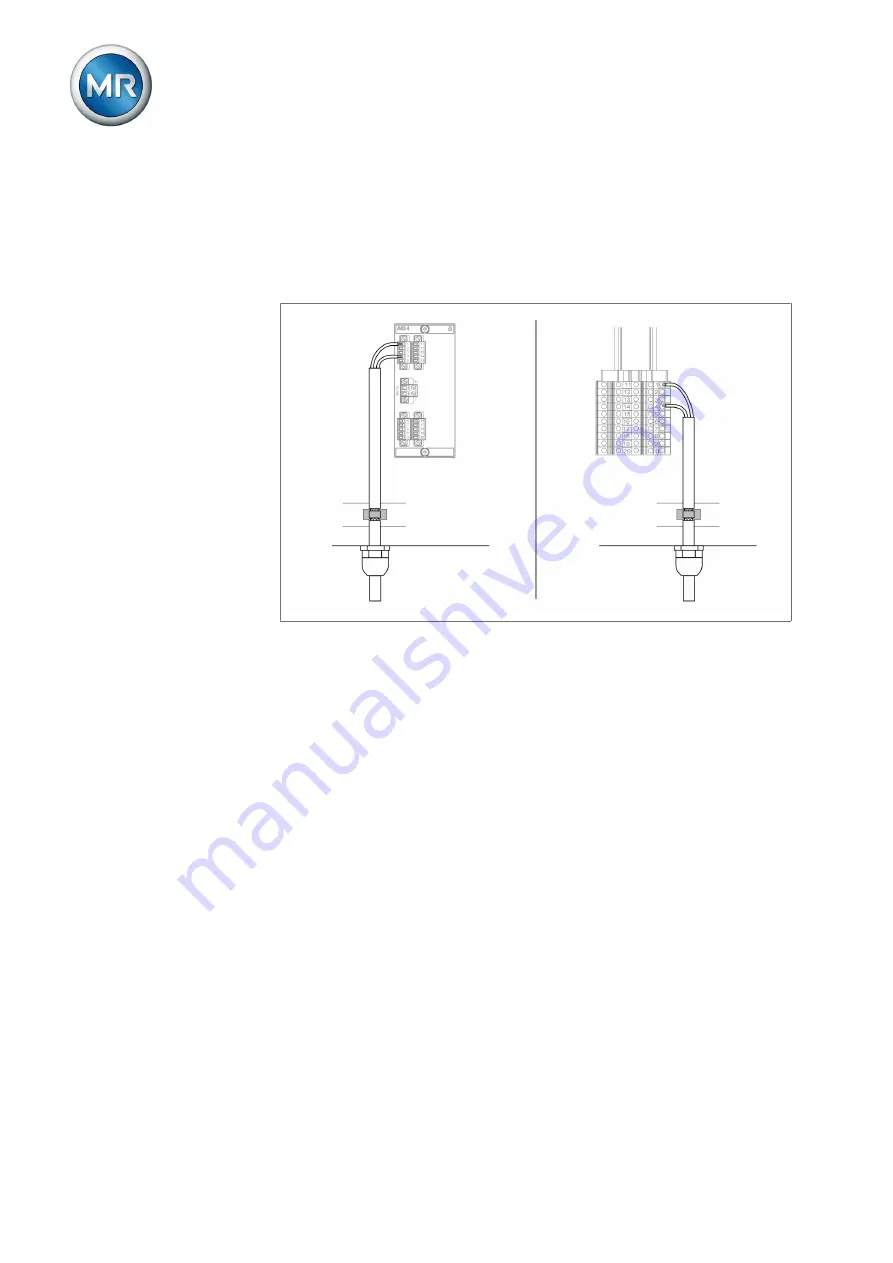
6.3.4.4 Information about screening the cables for analog signals

In order to correctly record the analog signals, you must place the cable
screening in the motor-drive unit on the grounding bar. The cable shielding
should be removed as late as possible before connecting to keep the section
with unshielded cables as short as possible. The shielding must be con-
nected with shielding clips.

Figure 40: Examples of supporting screening on ground bar (on left: Direct connection to AIO
assembly, on right: Connection using line-up terminal)

6.3.5 Information about laying fiber-optic cable

To ensure the smooth transfer of data via the fiber-optic cable, you must en-
sure that mechanical loads are avoided when laying the fiber-optic cable and
later on during operation. Also observe the information from the manufac-
turer of the fiber-optic cable and the following instructions:

▪ Radii must not fall below the minimum permissible bend radii (do not bend

fiber-optic cable).

▪ The fiber-optic cables must not be over-stretched or crushed. Observe the

permissible load values.

▪ The fiber-optic cables must not be twisted.

▪ Be aware of sharp edges because they can damage the fiber-optic cable's

coating during laying or can place mechanical loads on the coating later
on.

▪ Provide a sufficient cable reserve near distributor cabinets. Lay the re-

serve such that the fiber-optic cable is neither bent nor twisted when tight-
ened.

Summary of Contents for MSENSE VAM

Page 1: ...Monitoring system MSENSE VAM Operating Instructions 6796573 02 EN ...

Page 2: ... for compensation All rights reserved in the event of the granting of patents utility models or designs The product may have been altered since this document was published We reserve the right to change the technical data design and scope of supply Generally the information provided and agreements made when processing the individual quotations and orders are binding The original operating instruct...

Page 3: ...use 12 2 3 Fundamental safety instructions 12 2 4 Personnel qualification 13 2 5 Personal protective equipment 14 3 IT security 16 4 Product description 20 4 1 MSENSE VAM monitoring system versions 20 4 2 Scope of delivery 20 4 3 Function description 21 4 4 Performance features 22 4 5 Design 23 4 5 1 VS 1 sensor assembly 24 4 5 2 Control cabinet 24 4 6 Main screen 32 4 6 1 MSENSE VAM as an integra...

Page 4: ...rs 55 6 3 4 Electromagnetic compatibility 57 6 3 5 Information about laying fiber optic cable 60 6 3 6 Connecting the vibration sensor to the control cabinet 61 6 3 7 Connecting the motor drive unit controller to the monitoring system 64 6 3 8 Connecting the temperature sensor 64 6 3 9 Connecting additional leads optional 65 6 3 10 Connecting the power supply 65 6 4 Checking functional reliability...

Page 5: ...uring the network 97 8 7 3 Time synchronization 97 8 7 4 Configuring syslog 100 8 7 5 Setting the screensaver 101 8 7 6 Linking digital outputs and control system messages 101 8 7 7 Linking functions 103 8 7 8 Temperature monitoring 104 8 7 9 On load tap changer OLTC data 105 8 7 10 Power grid Tap position monitoring 105 8 7 11 SCADA 106 8 8 Menu Settings Events 127 8 9 Menu Settings DIO configura...

Page 6: ...ts 157 10 2 Event messages 157 10 3 Human machine interface 158 10 4 Other faults 158 11 Disassembly 159 12 Disposal 160 13 Technical data 161 13 1 Control cabinet standalone version 161 13 1 1 Connection terminals 162 13 2 Voltage supply 162 13 3 CPU central processing unit II 162 13 4 DIO 28 15 digital inputs and outputs 164 13 5 AIO 2 analog inputs and outputs 166 13 6 VI 4 vibration sensor inp...

Page 7: ...instraße 8 93059 Regensburg Tel 49 9 41 40 90 0 E mail sales reinhausen com Further information on the product and copies of this technical file are avail able from this address if required 1 2 Completeness This technical file is incomplete without the supporting documents The following documents are considered supporting documents Operating instructions Connection diagrams 1 3 Safekeeping Keep th...

Page 8: ...ngs apply to smaller units of information than the warnings relating to sec tions Embedded warnings use the following format DANGER Instruction for avoiding a dangerous situation 1 4 1 3 Signal words and pictograms The following signal words are used Signal word Definition DANGER Indicates a hazardous situation which if not avoided will result in death or serious injury WARNING Indicates a hazardo...

Page 9: ...Warning of danger of crushing Table 2 Pictograms used in warning notices 1 4 2 Information system Information is designed to simplify and improve understanding of particular procedures In this technical file it is laid out as follows Important information 1 4 3 Instruction system This technical file contains single step and multi step instructions Single step instructions Instructions which consis...

Page 10: ... Step 2 ð Result of step optional ð Result of action optional 1 4 4 Typographic conventions Typographic convention Purpose Example UPPERCASE Operating controls switches ON OFF Brackets PC keyboard Ctrl Alt Bold Software operating controls Press Continue button Menu paths Parameter Control parameter Italics System messages error messages signals Function monitoring alarm triggered Number of pages C...

Page 11: ...d facili ties It may only be used in compliance with the requirements and conditions listed in this technical file as well as the warnings in this technical file and the warnings posted on the product This applies throughout the service life of the product from delivery installation and operation to removal and dis posal The following is considered appropriate use Only use the product with the on ...

Page 12: ... for transport installa tion operation maintenance and disposal of the product or parts of the prod uct must ensure the following Personal protective equipment Loosely worn or unsuitable clothing increases the danger of becoming trapped or caught up in rotating parts and the danger of getting caught on protruding parts This poses a danger to life and limb Wear appropriate personal protective equip...

Page 13: ...sing Ambient conditions To ensure reliable and safe operation the product must only be operated under the ambient conditions specified in the technical data Observe the specified operating conditions and requirements for the in stallation location Modifications and conversions Unauthorized or inappropriate changes to the product may lead to personal injury material damage and operational faults On...

Page 14: ...sively under the guidance and supervision of an electrically skilled person Operator The operator uses and operates the product in line with this technical file The operating company provides the operator with instruction and training on the specific tasks and the associated potential dangers arising from im proper handling Technical Service We strongly recommend having maintenance repairs and ret...

Page 15: ...shoes To protect against falling heavy objects and slipping on slippery surfaces Safety glasses To protect the eyes from flying parts and splashing liq uids Visor To protect the face from flying parts and splashing liq uids or other dangerous substances Hard hat To protect against falling and flying parts and materials Hearing protection To protect against hearing damage Protective gloves To prote...

Page 16: ...h the Operator role for example should only perform operations and should not be able to change any device settings Delete or disable the default admin user ID This requires first creating a new user account with the Administrator role You can then use it to delete or disable the default admin account Deactivate service user access Enable SSL TLS encryption access to the device is then only possib...

Page 17: ...H1 1 TCP 80 Web visualization 1 ETH1 1 TCP 443 SSL protected web visualization ETH1 1 TCP 990 SSL protected FTP service access ETH1 1 TCP 8080 Web visualization alternative port 1 ETH1 1 TCP 8081 SSL protected web visualization alternative port Table 5 Interfaces and open ports of the OT1205 assembly 1 Port is closed if you activate the device s SSL encryption Figure 2 Interfaces of the CPU assemb...

Page 18: ...DNP33 ETH 2 x TCP 21 FTP1 only for MR service ETH 2 x TCP 80 HTTP for web based visualization1 ETH 2 x TCP 443 HTTPS for web based visualization1 ETH 2 x TCP 990 FTPS only for MR service ETH 2 x TCP 8080 HTTP for web based visualization1 ETH 2 x TCP 8081 HTTPS for web based visualization1 Table 6 Interfaces and open ports of the CPU assembly 1 Port is closed if you activate the device s SSL encryp...

Page 19: ...TLS secured connection Key exchange Authentication Encryption Key length Operating mode Hash func tion TLS ECDHE RSA WITH AES 128 CBC SHA1 DHE SHA265 ECDHE ECDSA GCM SHA256 ECDH 256 CBC SHA1 RSA1 SHA256 GCM SHA384 Table 7 Cipher suite 1 Not available with TLS version 1 2 The device uses the SHA256 hash function to save passwords ...

Page 20: ...oduct version the following MSENSE VAM monitoring system assemblies are included in the scope of supply Depending on the order additional ETOS modules that are not listed in these instructions may also be used Also observe the corresponding operating instructions MSENSE VAM Standalone version in the control cabinet VI 4 vibration sensor input module VAM sensor assembly including VS 1 vibration sen...

Page 21: ...al DIO 28 15 or DIO 42 20 inputs outputs CPU II central processing unit Optional MC 2 2 media converter Optional SW 3 3 media converter with managed switch Optional Display Optional PT100 for OLTC oil temperature temperature pocket must be available in the on load tap changer head cover 1 1 Oil temperature recording is a prerequisite for the self learning of the yel low limit value curve As an alt...

Page 22: ...In addition it can also be sent to a digital output 4 4 Performance features The MSENSE VAM monitoring system monitors the vibro acoustic signals from on load tap changers and has the following Monitoring on load tap changers reactors in accordance with the technical specification in the order confirmation Suitable for on load tap changers with oil switch and vacuum switch tech nology Recording of...

Page 23: ...IEC 60870 5 104 IEC 61850 edition 1 and edition 2 Modbus RTU TCP ASCII DNP3 4 5 Design This chapter contains an overview of the design of the monitoring system Figure 3 Design example of single column application 1 On load tap changer head cover 2 Vibration sensor with kick guard 3 Control cabinet 4 Sensor cable 5 Transformer ...

Page 24: ...or assembly 1 Sensor cable 2 Kick guard 3 Vibration sensor 4 Adapter 4 5 2 Control cabinet Depending on the order the electronic assemblies are either already in stalled in a control cabinet or are supplied as individual components for mounting on a cap rail The following two figures show a design example for the standalone version ...

Page 25: ... 5 2 1 Display elements and operating controls The control cabinet contains the following display elements and operating controls Figure 5 Display elements and operating controls example 1 Indicator lamp H1 yellow Anomaly detected 2 Indicator lamp H2 green No anomalies 3 Service interface ...

Page 26: ...ol cabinet layout example A10 CPU II central processing unit A22 VI 4 vibration sensor input module A18 Analog AIO 2 or AIO 4 inputs out puts G1 Voltage supply X19 Plug socket F13 Miniature circuit breaker for heat ing F14 Miniature circuit breaker for control system F25 Residual current circuit breaker plug A19 Digital inputs outputs DIO 28 15 The functions of the device s individual assemblies a...

Page 27: ...r to the de vice Figure 7 G1 PULS DIMENSION QS3 241 assembly 4 5 2 2 2 CPU central processing unit II The CPU II assembly is the central computing unit for the device It contains the following interfaces Internal system interface RS232 COM1 Serial interface RS232 485 COM2 3x Ethernet ETH 1 ETH 2 1 ETH 2 2 USB USB 2 0 2x CAN bus CAN 1 CAN 2 Figure 8 CPU assembly ...

Page 28: ... oper ating instructions Warning of dangerous electrical voltage Table 8 Safety relevant symbols on the assembly 4 5 2 2 4 Analog inputs and outputs AIO 2 The AIO 2 assembly provides 2 channels for analog inputs and outputs In accordance with the device configuration the AIO assembly supports one of the following signal types Input Output Voltage Current Voltage Current 0 to 10 V 0 20 mA 4 20 mA 0...

Page 29: ...VI 4 vibration sensor input module The VI 4 assembly records the vibration sensor signals via an IEPE inter face The abbreviation IEPE refers to an industry standard for piezo electri cal sensors IEPE Integrated Electronics Piezo Electric Figure 11 Assembly VI 4 The measured signals are processed with evaluation algorithms ...

Page 30: ...and does not have its own IP address Figure 12 MC 2 2 assembly 4 5 2 2 7 Media converter with managed switch The assembly SW 3 3 is a media converter with managed switch It com bines two independent functions and provides you with the following inter faces A media converter converts an electric connection RJ45 into a fiber optic cable connection RJ45 ETH12 Duplex LC SFP module ETH11 Managed switch...

Page 31: ...4 Product description Maschinenfabrik Reinhausen GmbH 2021 31 6796573 02 EN MSENSE VAM Figure 13 SW 3 3 assembly ...

Page 32: ...fference between the following product versions MSENSE VAM as an integration solution MSENSE VAM as a standalone product 4 6 1 MSENSE VAM as an integration solution Figure 14 Main screen 1 Display area 2 Secondary navigation 3 Primary navigation 4 Status bar Click on the on load tap changer in the graphic to enter the overview screen for the vibro acoustically measured tap change operations of the...

Page 33: ...ace visualization on a PC The scope of function and structure of both options is virtually identical User rights and user roles The device is equipped with a rights system and a roles system The display and access rights to device settings or events can therefore be controlled at the user level You can configure the rights system and roles system to meet your require ments You will find more infor...

Page 34: ...ing the controls on the front panel you can use the rotary knob to navigate through the entire menu The menu currently selected has a blue border To open the highlighted menu you have to press the key Pressing the key returns you to the previous menu level If you are operating the device using the web based visualization you can navigate by clicking on the appropriate buttons Example 1 Go to Setti...

Page 35: ...om a list 2 Use the rotary knob to highlight the list entry and press the key 3 Press the Accept button to save the modified parameter Entering a value To enter a value proceed as follows 1 Use the rotary knob to select the value field and press the key ð If operating via the front panel the numerical keypad appears Figure 17 Entering a value 2 Enter the desired value and confirm with 3 Press the ...

Page 36: ...If operating via the front panel the keyboard appears Figure 18 Entering text 2 Enter the desired text and confirm with 3 Press the Accept button to save the modified parameter Parameter search You can use the quick search function in the parameter menu to search for a parameter Enter the name of the desired parameter in the Search entry field Figure 19 Quick search ...

Page 37: ...eters You can enter the parameters directly on the overview screen of the respective menu in this mode Figure 20 Expert mode 1 Go to Settings Parameters 2 Select the Expert mode checkbox ð Expert mode is active Hiding showing parameters Depending on how you set the parameters the device will hide or show ad ditional parameters related to this function ...

Page 38: ...marking on the packaging states if for example the on load tap changer or selector has been packed upright Never stack these crates General rule Do not stack crates above a height of 1 5 m For other crates Only stack up to 2 equally sized crates on top of one an other The packaging is suitable to ensure undamaged and fully functional means of transportation in compliance with local transportation ...

Page 39: ...let secure it sufficiently Only trained and authorized persons may select the sling gear and se cure the load Do not walk under the suspended load Use means of transport and lifting gear with a sufficient carrying capacity in accordance with the weight stated on the delivery slip In addition to oscillation stress jolts must also be expected during trans portation In order to prevent possible damag...

Page 40: ...aging is damaged do not under any circumstances install or commission the packaged goods Either re dry the dried packaged goods as per the operating instructions or contact the manufacturer to agree on how to proceed Identify the damaged parts Hidden damage When damages are not determined until unpacking after receipt of the ship ment hidden damage proceed as follows Make the party responsible for...

Page 41: ...e the sealed packaging Unpack the packed goods and store in a suitable storage space well ven tilated as dust free as possible humidity 50 where possible 5 4 Unpacking shipments and checking for transportation damages NOTICE Transport the packaged crate to the place where the packaged goods are to be installed Do not open the sealed packaging until just be fore installation Otherwise damage to the...

Page 42: ... 45 in relation to the vertical Figure 21 Maximum permissible cable angle for the lifting gear limit stop of the control cabinet WARNING Serious injuries due to the control cabinet tipping and damage to the cable gland if the control cabinet is set down transported or stored upright Only set down transport and store the control cabinet on its back Only remove the control cabinet from the crane onc...

Page 43: ...e following sections 1 Depending on the product version selected install the cap rail modules in the customer control cabinet or in the control cabinet on the transformer You will find the appropriate description in the Cap rail module assembly control cabinet Section 6 1 Page 43 section 2 Mounting the vibration sensor Section 6 2 Page 50 3 Connecting the assemblies Section 6 3 Page 51 Connecting ...

Page 44: ...distances to the control cabinet and to neighboring components Minimum distance To the floor of the control cabinet 88 9 mm 3 5 in Corresponds to 2 RU To the roof of the control cabinet Between assemblies on the bus bar and assem blies on the remote cap rail Table 11 Minimum distances in the control cabinet Figure 22 Example depiction of the minimum distances in a control cabinet For other install...

Page 45: ...ion Fasten the cap rail to the rear panel of the switch cabinet using screws and contact washers or lock washers The distance between the screws may be no more than 10 cm 3 94 in Figure 23 Fastening the cap rail 6 1 1 3 Installing the bus rail on the cap rail The bus rail connects assemblies such as the CPU DIO and AIO to each other mechanically and electrically The bus bar can contain different a...

Page 46: ...re mounted on the bus rail The following optional assemblies must be mounted with an off set on a cap rail DIO 28 15 or DIO 42 20 MC 2 2 SW 3 3 G1 PULS ü Cap rail fastened to the rear panel of the cabinet Section 6 1 1 2 Page 44 WARNING A faulty connection to the protective ground can lead to an electric shock in the event of faults Hook the assembly onto the cap rail at the specified location ens...

Page 47: ...ty information and warnings they con tain when mounting the control cabinet on the transformer Once mounted continue in accordance with the section Mounting the vibration sen sor Section 6 2 Page 50 in these instructions 6 1 3 Fitting the control cabinet to the transformer This section describes how to mount the control cabinet of the stand alone version to the transformer The special design with ...

Page 48: ...cure it To mount the control cabinet on the transformer proceed as follows 1 Attach four stud bolts not supplied by MR to the transformer tank Figure 26 Fastening the stud bolts 2 Use the fixing attachments to attach the control cabinet to the stud bolts and align it vertically on the transformer tank Figure 27 Attaching the control cabinet ...

Page 49: ...ubjecting it to mechanical tension Otherwise the control cabinet may be damaged Figure 28 Fastening the control cabinet 4 Connect the grounding cable to the control cabinet and transformer tank holding it against the control cabinet using a wrench of size 36 Figure 29 Connecting the grounding cable to the control cabinet ...

Page 50: ...acoustic recording to a minimum To mount the VAM sensor proceed as follows 1 Remove one bolt from the on load tap changer cover Reuse the washer that is present Figure 30 Removing bolt 2 NOTICE Incorrect mounting can destroy the vibration sensor Only apply a tool with wrench size 17 to the lower hexagon of the adapter to attach the sensor assembly Place the washer over the open tapped hole and scr...

Page 51: ...e following Maschinenfabrik Reinhausen recommendation when wiring the device Excessive line capacitance can prevent the relay contacts from interrupting the contact current In control circuits operated with alternating current take into account the effect of the line capacitance of long control cables on the function of the relay contacts If you want to route Ethernet connections from a control ca...

Page 52: ...2 Signal inputs AIO 2 AIO 4 AIO 8 Shielded 1 mm2 400 m 25 Ω km Signal outputs AIO 2 AIO 4 AIO 8 Shielded 1 mm2 RS232 SUB D CPU I CPU II Shielded 0 25 mm2 25 m RS485 SUB D CPU I CPU II Shielded 0 25 mm2 140 m Ethernet RJ45 CPU I Min CAT5 shielded S FTP 100 m Ethernet FO MC 2 2 SW 3 3 Duplex LC Multimode OM3 1310 nm 2000 m Table 12 Recommendation for connection cables Observe line capacitance see no...

Page 53: ...aschinenfabrik Reinhausen GmbH 2021 53 6796573 02 EN MSENSE VAM RS232 D SUB 9 pole To connect the device via the RS232 interface COM2 use a data cable with the following structure Figure 32 RS232 data cable 9 pole ...

Page 54: ...le with the following structure Figure 33 RS485 data cable D SUB 9 pole plug connection Only use 9 pole D SUB plugs with the following characteristics Plug housing is metallic or metal plated Cable shielding is connected with the plug using one of the two following variants Shielding is screwed down with traction relief Shielding is soldered with plug housing ...

Page 55: ...connected and configured analog inputs outputs may result in damage to the device and sensor Follow information about connecting analog sensors Section 6 3 3 Page 55 Configure analog inputs and outputs according to the connected sensors The AIO assembly has a separate plug connector for each channel input or output The plugs are assigned as follows Figure 35 Plug assignment of the AIO module illus...

Page 56: ... Table 13 Analog inputs and outputs You can connect the following types of analog sensors 4 20 mA PT100 PT1000 2 wire 3 wire 4 wire 4 20 mA sensor You must connect a 4 20 mA sensor to the pins and You must also connect the supplied bridge to the pins and I OUT I U IN U OUT I U IN I U OUT 1 2 3 4 5 4 20 mA signal source Figure 36 Connection example for a 4 20 mA sensor PT100 PT1000 sensor Depending...

Page 57: ...en selecting the installation site The system s overvoltage protection must be effective The system s ground connection must comply with all technical regula tions Separate system parts must be joined by a potential equalization The device and its wiring must be at least 10 m away from circuit break ers load disconnectors and busbars 6 3 4 2 Wiring requirement of operating site Note the following ...

Page 58: ...tible to interference e g signal line Short circuit and ground reserve lines Never connect the device with a multi wire collective pipe For signal transmission use shielded lines with individual conductors out going conductor return conductor twisted in pairs Connect full surface of shielding 360º to device or to a nearby grounding bar Using single conductors may limit the effectiveness of the shi...

Page 59: ...inet physical separation Constant potential equalization all metal parts are joined Line routing in accordance with EMC requirements separation of lines which cause interference and those susceptible to interference Optimum shielding metal housing Overvoltage protection lightning protection Collective grounding main grounding rail Cable bushings in accordance with EMC requirements Any contactor co...

Page 60: ... fiber optic cable To ensure the smooth transfer of data via the fiber optic cable you must en sure that mechanical loads are avoided when laying the fiber optic cable and later on during operation Also observe the information from the manufac turer of the fiber optic cable and the following instructions Radii must not fall below the minimum permissible bend radii do not bend fiber optic cable The...

Page 61: ...er e g in the tube or cable duct and along a conductive grounded surface that runs without interruption Route sensor cables separately from supply lines and do not create any unnecessary loops The vibration sensor cable can also be routed together with the tempera ture sensor cable in a protective tube On the control cabinet it is advantageous to have routing parallel to the earthing cable that co...

Page 62: ...62 6796573 02 EN MSENSE VAM 3 Plug in the sensor cable plug and screw it in by hand Figure 42 Plugging in the sensor cable 4 Route the sensor cable on the transformer to the control cabinet with shielding to prevent mechanical damage and interference ...

Page 63: ...igure 43 Sensor cable routing 1 Temperature sensor cable 2 Control cabinet 3 Vibration sensor cable 4 Transformer 5 On load tap changer head cover If the control cabinet is farther away extend the sensor cable with a shielded cable in the motor drive cabinet or in a metal intermediate terminal box Follow the information in the Cable recommendation Section 6 3 1 Page 51 section and implement contin...

Page 64: ... the vibro acoustic signals with the tap position change it is necessary to measure the diverter switch operation in the motor drive con troller With the integration solution in the motor drive unit this connection is already made at the factory With the standalone and integration solution in the customer control cabi net versions you must make this connection yourself To do so connect the positio...

Page 65: ...ice to a control system or to your network for ac cessing the visualization observe the following recommendation on the ca ble routing in the control cabinet Figure 45 Recommendation on the cable routing in the control cabinet for the connection of the control system or visualization 6 3 10 Connecting the power supply You may only connect the control cabinet to circuits with an external over curre...

Page 66: ...tion of at least 2 5 mm2 AWG 13 and protect it with a C6A or B6A type miniature circuit breaker To connect the voltage supply proceed as follows Connect the power supply of the control cabinet to terminal X1 in accor dance with the connection diagram provided 6 4 Checking functional reliability To ensure that the device is wired correctly check its functionality NOTICE Damage to device and system ...

Page 67: ... ETOS TD motor drive unit Yes No Optional Integration solution in the ETOS ED motor drive unit without display No Yes Optional Integration solution in the ETOS ED motor drive unit with display Yes No Optional Integration solution in the customer control cabinet ETOS IM pluggable modules No Yes Optional Establishing a connection for visualization via the ETH 1 1 front interface 1 Connect the PC and...

Page 68: ... ETH 2 2 interface You can use the ETH 2 1 interface or the optional ETH 2 2 interface of the CPU assembly to establish the connection to the visualization The inter faces do not use a DHCP server Therefore you must assign a static IP ad dress to your PC To do this observe the following configuration example Interface Configuration Standard ETH 2 1 IP address 192 168 165 1 not adjustable PC IP add...

Page 69: ...ryption is active enter https 192 168 165 1 in the browser on the PC ð The visualization is accessed 7 2 Commissioning wizard If you want the device to help when setting the relevant parameters you can use the commissioning wizard The commissioning wizard provides a selec tion of parameters that you can configure in order A detailed description of each of the parameters can be found in the Opera t...

Page 70: ...tered all of the parameters relevant to commissioning continue with the function test 7 3 Setting the language You can use this parameter to set the display language for the device The device comes with a maximum of four languages The following languages are available English Italian German Portuguese French Russian Spanish Chinese Korean Polish Language is available as an option upon request To s...

Page 71: ...stem If you would like to use an SNTP time server you must set the required parameters For more information refer to the information in the section Setting the de vice time Section 8 7 3 Page 97 7 5 Name plate You can enter the data of the nameplates from the transformer on load tap changer and motor drive unit and display it later When operating ETOS with the MSENSE VAM option you must enter the ...

Page 72: ...r drive unit Figure 52 Transformer nameplate Go to Information System Nameplate Transformer On load tap changer Motor drive unit 7 6 Setting the control system protocol optional If you need a control system protocol you must set the parameters required for this More information on this e g data points is to be found in the pro vided supplement for the control system protocol You do not need to set...

Page 73: ...ns and check the plausibility of the signal progression including the envelope curve in the monitoring system 3 Check that the signals are being recorded and saved correctly 4 Optional Check the control system ð The monitoring system is ready to function 7 7 3 Electrical high voltage tests on the transformer It is essential that you ensure only trained instructed expert personnel who are familiar ...

Page 74: ...n accordance with IEC 61010 1 Note the following in formation Test current 2 times the measurement current of the overcurrent protec tion device of the supply line Test duration 1 minute for each measurement point The measured voltage between the measurement point and the protective conductor must be smaller than 10 V Proceed as follows to carry out the ground test 1 Feed the test current at the f...

Page 75: ...in less than 10 V over a duration of 1 minute Figure 54 Perform a ground test on the G1 PULS DIMENSION QS3 241 assembly 7 7 5 Dielectric tests on transformer wiring Note the following points for dielectric testson the transformer wiring The monitoring system has been put through dielectric tests before delivery Before the dielectric test for the transformer wiring disconnect the moni toring system...

Page 76: ...f the integration solution 1 Display area 2 Secondary navigation 3 Primary navigation 4 Status bar Primary navigation The primary navigation on the right edge of the screen is always structured the same way regardless of the product version The buttons of the primary navigation have the following functions Button Function Home Switch to the start screen Events Switch to the display of events detec...

Page 77: ...operation is shown in blue Clicking on the Home button always returns you to this screen Once the recording of a tap change operation is complete the calculation and evaluation is performed With complex switching sequences and a high switching frequency it may take a few minutes before the latest tap change operation is displayed Figure 56 Standalone version start screen The upper curve in yellow ...

Page 78: ...ns and settings are controlled using a hi erarchical system of roles The system has 5 different roles with different ac cess rights Some of these access rights are fixed but you can configure the access rights to particular parameters and events Note the Setting access rights to parameters and events Section 8 2 4 Page 82 section If you are not logged in on the device you will assume the Data disp...

Page 79: ... the following areas of the device is linked to the roles Function Data display Diagnostics Operator Parameter configurator Administrator Administration Restart device Import Export Set date and time Calling up the commissioning wizard Calibrate resistor contact se ries Actuation of the RAISE LOWER REMOTE AVR AUTO and AVR MANUAL keys Setting topology Configuring analog inputs and outputs Configuri...

Page 80: ...bers Special characters To change the password proceed as follows 1 Select the user name in the status line Figure 57 Changing the password 2 Enter the new password twice 3 Press the Accept button to save the changed password 8 2 3 Creating editing and deleting users You can set the following options for all users Username and password Role You can assign a role to every user The access rights to ...

Page 81: ...users if you are assigned an adminis trator role When in delivery status you can log in as the administrator as follows User name admin Password admin Creating users To create a new user proceed as follows 1 Go to Settings Administration User 2 Press the Create user button 3 Enter the user name once and the password twice 4 Select the role you want 5 If necessary activate the Group account Active ...

Page 82: ...s and events for the available roles The following options are available for this purpose Read Parameter event may be displayed Write Parameter event may be modified Acknowledge Event may be acknowledged Figure 59 Setting access rights for an event You can only change access rights if you are assigned an administrator role When in delivery status you can log in as the administrator as follows User...

Page 83: ...ssages Section 10 2 Page 157 section To display the events currently active proceed as follows Go to Events ð A list of currently pending events appears Figure 60 Events menu The events are numbered consecutively A short description and a time stamp for each one follows Acknowledging events Acknowledgeable events must be acknowledged in the event overview so that they are no longer displayed All o...

Page 84: ...played Column Description Consecutive number of events No Event number for clear identification Event category Warning yellow Info gray Event Event text Time Date and time of event DD MM YYYY HH MM SS ms Event coming going Event coming Event going Table 17 Event memory To call up the event memory proceed as follows 1 Go to Events 2 Press the Log button Figure 61 Event history ...

Page 85: ...n the properties of the events and a description of how you can configure this in the chapter Menu settings Events Sec tion 8 8 Page 127 Filtering events To adjust the display you can define a filter To do so proceed as follows 1 Press the Filter button 2 Enter the desired time period 3 Select the checkbox and enter the desired event number ð The event text is displayed 4 Select the desired event ...

Page 86: ...urrently displayed as a csv file If you first create a filter only the filtered entries are exported To export the events proceed as follows ü First connect using Connect PC or connect a storage medium to the USB port on the CPU I module 1 Press the Export button 2 Select the desired option for data transmission PC or USB ð The data is exported Figure 64 Export events list ...

Page 87: ...re used OLTC Information on the on load tap changer Tap change operation statistics Information on the frequency of the on load tap changer operations Temperatures Temperature of the transformer VAM analysis Analyzed vibro acoustic measurements of the on load tap changer Menu Information VAM analysis For every tap change operation listed you will receive the following informa tion Tap change opera...

Page 88: ...e tap change Tap selector operation in which the distance be tween the attached selector contacts used for this tap change operation is moderate Large tap change Tap selector operation in which the distance between the attached selector contacts used for this tap change operation is large Reverse tap change operation Tap change operation in which the tap changes in the opposite direction to the mo...

Page 89: ... tap change operations with the associated VAM signal and the stored limit value as a curve proceed as follows 1 Place a check mark in the first column in front of the tap change op eration that is to be displayed as a curve Up to 100 tap change opera tions can be shown in the visualization via web browser A maximum of 10 tap change operations can be shown on the device display 2 Confirm via the D...

Page 90: ...ations are shown at the same time Figure 68 Display of multiple tap change operations If multiple tap change operations are selected for the visualization it is pos sible to hide or show individual tap change operations by clicking on them in the key Using the web based ISM Intuitive Control visualization allows you to zoom into an area of the signal To do this hold down the left mouse button and ...

Page 91: ...lution you can use this function to display the temporal pro gression of additional measured values and signals If you call up the measured value recorder directly on the device display you can select a maximum of 3 measured values If you access it via the web visualization you can select a maximum of 10 measured values To display the measured value recorder on the device display proceed as follow...

Page 92: ...d below is only possible if you access the visualiza tion using a computer 6 Move the mouse indicator to a measurement point for more information 7 Use the mouse to produce a selection window or turn the mouse wheel to zoom into or out of the diagram If necessary you can move an enlarged diagram with the right mouse button 8 Select the button to save the displayed measured values as a csv file ...

Page 93: ...time period Figure 71 Setting trend curves 1 Call up the measurement recorder and the desired measured value se ries 2 Press the Trend button 3 Select the desired measured values 4 Select the desired trend function 5 Entire the desired time period for the calculation of the trend curve 6 Press the Accept button to display the trend curves ð The trend curve is displayed Measured values that are dis...

Page 94: ... PC Export Export data via a USB or a PC Administration You can use this menu to change user administration settings As an administrator you can view and adjust the rights of se lected users 8 7 Menu Settings Parameters The parameters are divided into four groups You will find more information directly via the link 1 System General Section 8 7 1 Page 95 Configuring the network Section 8 7 2 Page 9...

Page 95: ...r Hardware and SCADA USB interface Off Service user access activation Activated SNMP Agent Off Home Events Information Recorder Settings EN CHANGE REBOOT admin 14 04 2020 14 22 Figure 73 General General settings Language With this setting you can specify the device display language The display language can also be set via the status bar Section 7 3 Page 70 Commissioning wizard Information on how t...

Page 96: ...y The device accepts commands via digital inputs SCADA only The device accepts commands via SCADA Hardware and SCADA The device accepts commands via digital inputs and SCADA Table 18 Selecting remote behavior To set the remote behavior proceed as follows 1 Go to Settings Parameters General Remote behavior 2 Select the desired option 3 Press the Accept button to save the modified parameter 8 7 1 2 ...

Page 97: ...rs for ETH 2 2 if the device is equipped with the optional interface for visualization Figure 74 Network settings 1 Go to Settings Parameters System Network settings 2 Select the desired parameter 3 Set the parameter 4 Press the Accept button to save the modified parameter 8 7 3 Time synchronization You can set the the device time manually or automatically via an SNTP time server The device must b...

Page 98: ...ton to save the modified parameter Second time server optional As an option you can use a second time server e g should the first one fail When you activate the second time server the device synchronizes the time with the second time server if a connection cannot be established with the first time server If the device is able to re establish the connection to the first time server it automatically...

Page 99: ... time server optional You can use this parameter to enter the IP address of the second time server as an option To enter the time server address of the second SNTP server proceed as fol lows 1 Go to Settings Parameters Time synchronization SNTP time server 2 2 Enter time server address 3 Press the Accept button to save the modified parameter 8 7 3 3 Setting the time zone If the time information is...

Page 100: ...al 3 Press the Accept button to save the modified parameter 8 7 3 5 Setting the date and time manually You can use the Time parameter to set the date and time To do so proceed as follows 1 Go to Settings Parameters Time synchronization Time 2 Enter the date and time 3 Press the Accept button to save the modified parameter 8 7 4 Configuring syslog The device supports the transmission of log message...

Page 101: ...Settings Parameters System Screensaver 2 Select the desired parameter 3 Set the desired parameter 4 Press the Accept button to save the modified parameter 8 7 6 Linking digital outputs and control system messages You can link each event with a digital output or a control system message Depending on your device configuration the device provides a maximum of 20 digital outputs and 10 SCADA messages ...

Page 102: ...able for each available digital output Figure 78 Linking digital outputs In order to establish the link you have to enter the corresponding event number in the desired parameter If you enter event number 500 the link is disabled To link the digital output proceed as follows ü The desired event number is known 1 Go to Settings Parameters Link outputs 2 Select the desired parameter 3 Enter the desir...

Page 103: ...ing event number in the desired parameter If you enter event number 500 the link is disabled To link the SCADA message proceed as follows ü The desired event number is known 1 Go to Settings Parameters Link messages 2 Select the desired parameter 3 Enter the desired event number 4 Press the Accept button to save the modified parameter 8 7 7 Linking functions You can link the Generic digital input ...

Page 104: ...Generic SCADA command events If you enter event number 500 the link is disabled To link the function proceed as follows ü The desired event number is known 1 Go to Settings Parameters Link functions 2 Select the desired parameter 3 Enter the desired event number 4 Press the Accept button to save the modified parameter 8 7 8 Temperature monitoring You can set four limit values for monitoring the te...

Page 105: ...sage optional Here you can set whether the message on the tap position uses the raw value or uses the interpretation based on the tap position table 8 7 10 Power grid Tap position monitoring You can define two limit values and two delay times to monitor the tap posi tions Pos Lower limit Pos Upper limit Pos Delay time Pos Delay time The Number of tap change operations parameter has no function and...

Page 106: ...s for example for comparison with the operations counter of the motor drive unit To set tap position monitoring or the number of tap position changes pro ceed as follows 1 Go to Settings Parameters Tap position monitoring 2 Select the desired parameter 3 Set the parameter 4 Press the Accept button to save the modified parameter 8 7 11 SCADA The following section describes how you can configure the...

Page 107: ...ccess point in the IEC 61850 network Edition You can use this parameter to switch between edition 1 and edition 2 of the IEC 61850 control system protocol 8 7 11 1 1 Downloading an ICD file You can download the ICD file from the device via the Import Export Man ager To do this you have to establish an Ethernet connection between the device and your PC For a smooth download with Windows Vista 7 8 o...

Page 108: ...5 IEDs It may take several min utes to import a complete SCD file The SCD file should only contain the IEDs needed You can import the CID SCD file via the Import Export Manager To do so proceed as follows 1 Go to Settings Import 2 Select and import the desired CID SCD file 8 7 11 2 Configuring IEC 60870 5 101 optional If you want to use the IEC 60870 5 101 control system protocol you must set the ...

Page 109: ...is parameter to set the transmission procedure You can se lect the following options Unbalanced transmission Balanced transmission Number of link address octets You can use this parameter to set how many octets are provided for the link address Link address You can use this parameter to set the link address Number of ASDU address octets You can use this parameter to set how many octets are provide...

Page 110: ...r confir mation is only possible for requesting data of class 2 Class 2 Request RES bit test You can use this parameter to set whether the device is to check the RES bit Reserved Bit in the control field You can select the following options Option Description On Messages from the master with RES bit 1 are declined by the device Off Messages from the master with RES bit 1 are accepted by the device...

Page 111: ...hich time is to be transmitted by the con trol system The device uses this information for time synchronization Section 8 7 3 Page 97 You can select the following options Option Description Local The control system transmits the local time Note If you use this option you must deactivate the au tomatic changeover between daylight saving time and standard time Otherwise the device will use an incorr...

Page 112: ...an select the following options RS232 RS485 Baud rate You can use this parameter to set the serial interface s baud rate You can select the following options 9600 baud 19200 baud 38400 baud 57600 baud 115200 baud ASDU address You can use this parameter to set the address of the ASDU Number of data bits You can use this parameter to set the number of databits Parity You can use this parameter to se...

Page 113: ...s the DFC bit in a response if a second command is received without the master having previ ously sent a request for data of class 1 Table 24 DFC compatibility Reference time You can use this parameter to set which time is to be transmitted by the con trol system The device uses this information for time synchronization Section 8 7 3 Page 97 You can select the following options Option Description ...

Page 114: ... parameter 4 Press the Accept button to save the modified parameter TCP port You can use this parameter to set the TCP port ASDU address You can use this parameter to set the address of the ASDU ASDU sequence optimization With this parameter you can set which method is to be used for optimizing the ASDU types The standard enables optimization in order to be able to transfer multiple value changes ...

Page 115: ...Table 26 ASDU sequence optimization Reference time You can use this parameter to set which time is to be transmitted by the con trol system The device uses this information for time synchronization Section 8 7 3 Page 97 You can select the following options Option Description Local The control system transmits the local time Note If you use this option you must deactivate the au tomatic changeover ...

Page 116: ...ou want to use Modbus TCP Figure 85 Modbus 1 Go to Settings Parameters System Modbus 2 Select the desired parameter 3 Set the parameter 4 Press the Accept button to save the modified parameter Modbus type You can use this parameter to set the Modbus type You can select the fol lowing options RTU TCP ASCII Modbus address You can use this parameter to set the Modbus address TCP port You can use this...

Page 117: ... can select the following options RS232 RS485 Baud rate You can use this parameter to set the serial interface s baud rate You can select the following options 9600 baud 19200 baud 38400 baud 57600 baud 115200 baud Number of data bits You can use this parameter to set the number of databits Parity You can use this parameter to set the parity You can select the following options None Even Odd Numbe...

Page 118: ... via TCP Figure 86 DNP3 1 Go to Settings Parameters System DNP3 2 Select the desired parameter 3 Set the parameter 4 Press the Accept button to save the modified parameter 8 7 11 6 1 DNP3 transmission type You can use this parameter to set the transmission type You can select the following options TCP Serial TCP port You can use this parameter to set the TCP port Serial interface You can use this ...

Page 119: ... messages the device sends a message via the control system every time a value is changed 8 7 11 6 5 Repetition of unsolicited messages You can use this parameter to set how often the device is to send an unso licited message until it receives a response from the DNP3 master 8 7 11 6 6 Repeat unsolicited messages indefinitely You can use this parameter to set the device to send an indefinite numbe...

Page 120: ...system data points of the device You can only configure the data points on a PC using the web based visualization 8 7 11 7 1 Configuring IEC 60870 5 101 data points You can adjust the following data point properties for the IEC 60870 5 101 control system protocol Column Description Modifiable Setting range Active You can use the checkbox to set whether the data point is to be transferred via the c...

Page 121: ...s active either Notice You can only enter a threshold value for data points of type 9 10 11 12 13 14 21 34 35 or 36 Yes 0 32 768 CT Interval in ms for periodic transmission of the data point If you set 0 the data point is not transmitted periodically Notice You can only enter an interval for data points of type 9 11 or 13 Yes 0 10 000 Table 29 Configuring IEC 60870 5 101 data points Figure 87 Conf...

Page 122: ...pe 254 Yes 0 255 GIN Data point generic identification number Notice You can only use generic identification number 0 for data points with a function type other than 254 Yes 0 65 535 Data Type Data point data type No Name Data point designation No Interrogation The value indicates whether the data point is to be in cluded in a general query 1 or not 0 Yes 0 1 Threshold Threshold value for measured...

Page 123: ...ership as a binary code 5 bits A maximum of 5 groups is possible Example 00000 belongs to no groups 00001 group 1 01000 group 4 01001 group 1 and group 4 Yes 00000 11111 INTG The value indicates whether the data point is to be in cluded in a general query 1 or not 0 Yes 0 1 TH Threshold value for measured values The data point is only transferred again if the change of value is greater than the th...

Page 124: ...s You can adjust the following data point properties for the Modbus control system protocol Column Description Modifiable Setting range Active You can use the checkbox to set whether the data point is to be transferred via the control system protocol or not Yes Active inactive Type Data point type No Index1 Data point address Yes 0 65 535 Index2 Optional second data point address This is used auto...

Page 125: ...ints You can adjust the following data point properties for the DNP3 control sys tem protocol Column Description Modifiable Setting range Active You can use the checkbox to set whether the data point is to be transferred via the control system protocol or not Yes Active inactive OBJGROUP The OBJGROUP column indicates the data point object group AI Analog Input AO Analog Output BI Binary Input BO B...

Page 126: ...lue CT 1 2 5 6 Yes 0 6 NAME Data point designation No Deadband Threshold value for analog inputs The data point is only transferred again if the change of value is greater than the threshold value If you enter the value 0 no threshold value is active If you do not enter any value the device adopts the threshold value defined by the device parameter If no device parameter is available for the thres...

Page 127: ...ack it up or import it into another device You will find more information in the Import Export Man ager section 8 8 Menu Settings Events The events have the following properties Property Description Event status Active The event is pending Inactive The event is not pending High active not configurable High active The device generates a signal if the event is pending Low active The device generates...

Page 128: ...and if configured accordingly issued via an output and the control system protocol Storage If you enable this option the event is stored in the event memory Table 34 Properties of events Figure 92 Configuring events To configure an event proceed as follows 1 Go to Settings Events 2 Select the event to be changed in the list 3 Select the desired options 4 Press the Accept button to save the change ...

Page 129: ...or low active DO N O contact NO N C contact NC Note If the device is dis connected or in the event of an error the digital outputs are always open no bi stable relay Assembly channel Channel of the DIO assembly to which the function is linked Func tions that are not linked with a channel are identified with Note the connection diagram supplied Table 35 Configuration of the digital inputs and outpu...

Page 130: ...es in a column alphabetically 3 Configure the properties as desired 4 Press the Accept button 5 Confirm the security prompt with Yes to save the changes 8 10 Menu Settings AIO configuration optional You can flexibly configure the device s analog inputs and outputs and assign device functions The device supports analog sensors with linear characteristic curves and only outputs analog signals with l...

Page 131: ...asured value for 4 mA and the corresponding value for 20 mA Table 36 Configuration of the analog inputs and outputs Figure 95 Configuring analog inputs outputs The operation described below is only possible if you access the visualiza tion using a computer You can only change the configuration of the analog inputs and outputs if you have a Parameter Configurator or Administrator role When in deliv...

Page 132: ...erations increases The sta tistics stored for this can be reset in this display window Resetting the counter The first and the second anomalies in an evaluation cluster are indicated via a yellow status message in the VAM analysis Information menu A third anomaly arising in an evaluation cluster triggers an additional event mes sage This event message is transmitted to a connected SCADA system By ...

Page 133: ...on and statistics update Standard setting The tap change operation is recorded checked for plausibility and eval uated The statistics update ensures the self learning of the yellow limit value curve envelope curve 2 No statistics update The tap change operation is only recorded and checked for plausibility The evaluation and statistics update are not performed If a limit value curve has already be...

Page 134: ... 2 Variables The following types of variables for information processing are available for TPLE Event inputs You can use all the device s events as inputs for a function Event outputs 100 generic events are available as outputs for functions Binary inputs You can use all the device s configured digital inputs and up to 42 generic inputs of the device as inputs for a function Binary outputs You can...

Page 135: ...n module 8 15 1 3 2 NAND Description NAND logical NOT AND link Inputs Input 1 4 BOOL Outputs Output BOOL Parameter None Function If all configured inputs are TRUE the output is FALSE otherwise it is TRUE Initial state All inputs and outputs are FALSE Non configured inputs are assumed to be TRUE so that they have no impact on the output If no input is configured the output therefore remains in the ...

Page 136: ...IVE OR link Inputs Input 1 2 BOOL Outputs Output BOOL Parameter None Function If an odd number of inputs is TRUE the output is TRUE otherwise it is FALSE Initial state All inputs and outputs are FALSE Non configured inputs are assumed to be FALSE so that they have no impact on the output If no input is configured the output therefore remains in the initial state of FALSE Table 41 XOR function modu...

Page 137: ...E If the Reset and Set inputs are FALSE the status of Output changes when there is a rising edge at the Trig ger input If there is no edge at the Trigger input Out put remains unchanged Initial state All inputs and outputs are FALSE Non configured inputs are assumed to be FALSE so that they have no impact on the output Table 43 Current impulse relay function module Figure 97 Example of RS 1 Trigge...

Page 138: ...utput BOOL Parameter Time ms UINT32 1 1 000 000 default 1 000 Function If Input becomes TRUE Output also instantly becomes TRUE this condition takes priority If Input has a falling input the internal timer is set to zero and starts to run When the internal timer has reached or exceeded the parameter value Output becomes FALSE and the counter stops running If Input is FALSE and the Reset input beco...

Page 139: ... Output BOOL Parameter Time ms UINT32 1 1 000 000 default 1 000 Function The internal timer runs for a long as Enable is TRUE When the internal timer has reached or exceeded the configured time value the status of the output changes and the timer is restarted The configured time there fore corresponds to half the period duration of the re sulting signal If the Enable input becomes FALSE the output...

Page 140: ... is in cremented by one with every rising edge at the Trigger input When Direction input TRUE the output value is decremented by one with every rising edge at the Trig ger input Initial state All inputs and outputs are zero or FALSE Table 48 Counter forwards backwards function module Figure 98 Example of COUNT 1 Trigger 2 Direction 3 Reset 4 Lock 5 Output 8 15 1 3 13 Analog threshold value switch ...

Page 141: ...lue of Input is greater than On Limit and at the same time less than Off Limit Output becomes TRUE Otherwise the Output is FALSE Initial state All inputs and outputs are zero or FALSE Table 49 Analog threshold value switch with hysteresis function module On Off Input Output FALSE TRUE FALSE Figure 99 Analog threshold value switch with the On Limit Off Limit setting Off On Input Output FALSE TRUE F...

Page 142: ...15 1 3 15 Analog division Description DIV analog division Inputs Divident REAL32 Divisor REAL32 Outputs Result REAL32 DivByZero BOOL Overflow BOOL Parameter Constant divisor REAL32 1 000 000 1 000 000 default 1 Function Result Dividend Divisor Constant Divisor If dividing by zero the DivByZero output becomes TRUE and Result is set to zero If the REAL32 range of numbers is exceeded the Overflow out...

Page 143: ... becomes TRUE Initial state All inputs and outputs are zero or FALSE Table 53 Analog subtraction function module 8 15 1 3 18 Rising edge Description RTRG rising edge trigger Inputs Input BOOL Outputs Output BOOL Parameter Function When the input changes from FALSE to TRUE the output becomes TRUE for one cycle of the function group and then changes back to FALSE Initial state All inputs and outputs...

Page 144: ...E during the rising Reset edge a new averaging process is started Done becomes TRUE and Started becomes FALSE once averaging is complete Done remains TRUE until a Reset is detected or new averaging is triggered by a rising edge of Enable If AutoRepeat and Enable are TRUE a new averaging process is automatically started each time averaging is completed Done is set for one cycle each time averag ing...

Page 145: ... Started 8 SampleCount 8 15 1 3 21 Scaling Description SCAL scaling Inputs Input REAL32 Outputs Output REAL32 Error BOOL Parameter Min In REAL32 10 000 000 10 000 000 default 10 000 000 Max In REAL32 10 000 000 10 000 000 default 10 000 000 Min Out REAL32 10 000 000 10 000 000 default 10 000 000 Max Out REAL32 10 000 000 10 000 000 default 10 000 000 ...

Page 146: ...ridge Inputs Analog Input REAL32 Digital Input BOOL Outputs Analog Output REAL32 Digital Output BOOL Parameter Function Copies the value of Analog Input to Analog Output and Digital Input to Digital Output Initial state All inputs and outputs are zero or FALSE Table 58 Bridge function module 8 15 1 3 23 RTOI Description RTOI Real to Integer conversion Inputs Analog Input REAL32 Outputs Analog Outp...

Page 147: ... display To configure TPLE you have to hold the role of Administrator or Parameterizer When in delivery status you can log in as the administrator as follows User name admin Password admin 8 15 2 1 Editing variables You can adapt the name and description of the following variables Binary inputs Binary outputs Analog inputs Binary flags Analog flags Discrete inputs The names and descriptions of the...

Page 148: ...ter the name and description 4 Press the Accept button to save the modified variable 8 15 2 2 Creating functions Within one function group you can create up to 12 function modules to de pict one function To create edit or delete a function you have to call up the function group you want To do so proceed as follows 1 Go to Settings TPLE Function group 2 Select the function group you want Figure 103...

Page 149: ...llows Drag the desired function module to the desired position using drag drop Editing function module To edit a function module proceed as follows 1 Select the desired function module 2 Press the Edit button Figure 104 Editing function module 3 Select the inputs and outputs you want and set the parameters 4 Press the Accept button to save the change to the function module 8 15 2 3 Renaming functi...

Page 150: ...unction modules are processed To activate deactivate a function group proceed as follows 1 Go to Settings TPLE Function group 2 Select the function group you want 3 Press the Inactive button ð Red X Function group is inactive gray X Function group is active 8 16 Menu Settings Import The device is equipped with an import export manager which can be used to export and import various data To transfer...

Page 151: ... Client CA crt For the import you will have to compress the certificate crt and key pem in a zip file You can import certificates with the following key authenti cation RSA with 1024 bits ECDSA with 256 bits secp256r1 or prime256v1 curve Data point configura tion Data point configuration import SCD import Control system configuration import TPLE Customer program import TPLE Table 62 Importing data...

Page 152: ...plete The regulation functions and monitoring functions of the device how ever remain available You can export the following data from the device depending on your device configuration Option Description System image Complete image of the system software and configuration If you are using the option with history all of the event memory entries are also exported System config uration System configu...

Page 153: ... a full export you can export selected filtered data Exporting via FTP access is also possible as long as you have set up an FTP client Table 64 Exporting data Only remove the USB stick once the data transfer is complete Otherwise data may be lost To export data proceed as follows 1 Go to Settings Export 2 Select the desired option for the export 8 17 1 VAM export You can export the vibro acoustic...

Page 154: ...take longer There are 3 options available Figure 108 Complete VAM export By selecting 100 points and TDMS format the data necessary for the stan dard online report will be exported The WAVE format is necessary in addi tion for the extended online report Contact Maschinenfabrik Reinhausen GmbH for the online report The latest information about your product and the description of the data ex change ...

Page 155: ...nals is limited to 100 All three formats will be exported 100 points TDMS format and WAVE format Figure 109 User defined VAM export 8 18 Menu Settings Administration With this menu you can change user administration settings As an adminis trator you can view and adjust the rights of selected users You will find additional details in the User administration Section 8 2 Page 78 chapter ...

Page 156: ... inside of the control cabinet with a dry cloth 9 2 Inspection Inspect the functionality of the signal lamp in the control cabinet once per year 9 3 Maintenance Maintenance of the monitoring system is not required However check the state and functionality of the monitoring system as part of maintenance work on the transformer Technical Service Maschinenfabrik Reinhausen GmbH Technical Service Post...

Page 157: ...cord is stored Wait until the recording is complete VAM Recording not possible Yellow Recording is not possible if the tap change operation is invalid or there is a sensor error Check the function and wiring of the sen sor the tap position capture the K1 K2 response contacts and the device config uration VAM Recording be ing analyzed Gray Recordings are being analyzed Record ings are being analyze...

Page 158: ...onnection to the visualization The browser does not accept an SSL connection with a signed certificate that is non public this is the default status of the de vice Import signed SSL certificate or adjust browser settings The device SSL certificate has expired Import SSL certificate The device date time is set incor rectly Set the date and time When using time synchronization via SNTP check SNTP se...

Page 159: ... after the supply voltage has been shut off which could lead to seri ous injuries Wait at least five minutes and ensure that the control cabinet is de energized 3 Disconnect all connection lines sensor cable control cable to the motor drive unit customer cables grounds etc in the control cabinet 4 Close the control cabinet door 5 WARNING Attach the lifting gear to the control cabinet lifting eyes ...

Page 160: ...12 Disposal Maschinenfabrik Reinhausen GmbH 2021 160 6796573 02 EN MSENSE VAM 12 Disposal Observe the national requirements applicable in the country of use ...

Page 161: ...13 Technical data Maschinenfabrik Reinhausen GmbH 2021 161 6796573 02 EN MSENSE VAM 13 Technical data 13 1 Control cabinet standalone version Figure 111 Dimensions of the control cabinet MSENSE VAM ...

Page 162: ...t 13 1 1 Connection terminals Terminal block Maximum permitted operating voltage X1 Max 250 VAC X10 Max 150 VAC Table 69 Maximum permitted operating voltage of the connection terminals for external circuits 13 2 Voltage supply G1 PULS QS3 241 Permissible voltage range 85 to 276 V AC 88 to 375 V DC VN 100 to 240 V AC UN 110 to 300 V DC Permissible frequency range 50 60 Hz Nominal power consumption ...

Page 163: ... VDC Power consumption Max 22 W Table 71 Technical data for the CPU II assembly Interfaces Interface Pin Description 2 RXD RS232 3 TXD RS232 5 GND RS232 RS485 6 RXD TXD RS485 9 RXD TXD RS485 Table 72 COM2 RS232 RS485 Interface Pin Description 1 VCC 2 D 3 D 4 GND Table 73 USB 2 0 Interface Pin Description 1 TxD 2 TxD 3 RxD 4 NC 5 NC 6 RxD 7 NC 8 NC Table 74 ETH1 ETH 2 1 ETH 2 2 RJ45 ...

Page 164: ...ter from D SUB 9 pole to fiber optic cable ACF660 ST F ST 660 nm range max 60 m at 40 kBd ACF660 SMA F SMA 660 nm range max 60 m at 40 kBd ACF850 ST F ST 850 nm range max 1 000 m at 40 kBd ACF850 SMA F SMA 850 nm range max 1 000 m at 40 kBd Table 76 Optional accessories 13 4 DIO 28 15 digital inputs and outputs DIO 28 15 Inputs plug based electrical isolation Quantity 28 Logical 0 0 10 V AC RMS 0 ...

Page 165: ... output is loaded with 5 A Up to 60 C 100 60 C 5 K Table 77 Technical data for the DIO 28 15 assembly 10 20 30 40 50 100 V 300 0 1 0 2 0 5 1 2 5 10 20 A U I Figure 112 Contact rating DIO CAUTION Electric shock The inputs of the DIO assembly have plug based electrical isolation A mix ture of voltage ranges e g extra low voltage and low voltage or various phases within a plug can lower the protectio...

Page 166: ...n 1 A 6 A 11 A Break contact 1C 6C 11C Source contact 1B 6B 11B Make contact 2 A 7 A 12 A Break contact 2C 7C 12C Source contact 2B 7B 12B Make contact 3 A 8 A 13 A Break contact 3C 8C 13C Source contact 3B 8B 13B Make contact 4C 9C 14C Source contact 4B 9B 14B Make contact 5C 10C 15C Source contact 5B 10B 15B Make contact Table 79 Digital outputs 13 5 AIO 2 analog inputs and outputs Channels inpu...

Page 167: ...rrent output 5 10 Not used Table 81 Analog inputs and outputs 13 6 VI 4 vibration sensor input module VI 4 Analog inputs For vibration sensors based on the IEPE standard Input voltage 24 V DC Power consumption Max 200 mA Operating temperature 25 C 70 C Relative humidity operation 5 95 non condensing Storage temperature 40 C 85 C Relative humidity storage 5 95 condensing Table 82 VI 4 vibration sen...

Page 168: ... VS 1 sensor Degree of protection When screwed on IP68 in accordance with IEC 60529 Permissible operating temperature range fixed routing 40 C 105 C Permissible operating temperature range flexible routing 20 C 105 C Properties Halogen free silicon free oil resistant UV resistant Flame resistance In accordance with UL 758 1581 FT2 Shielding Drain wire and shielding connected to union nut Table 84 ...

Page 169: ... Redundancy protocol in accordance with IEEE 802 1D 2004 Rapid Spanning Tree Protocol SCADA Technical processes are monitored and con trolled using a computer system Supervisory Control and Data Acquisition SNTP NTP Network Time Protocol is a standard for synchronizing clocks in computer systems using packet based communication networks SNTP Simple Network Time Protocol is the simplified version o...

Page 170: ...ission type 118 E Edition 107 Electrical high voltage test 73 Electromagnetic compatibility 57 Event memory 84 Events 83 Acknowledge 83 Configure 127 Display 83 Exporting 86 Filtering 85 Expert mode 37 Export 150 152 F Fiber optic cable Information about laying 60 Function check 73 G G1 27 General 95 Remote behavior 96 ground test 74 I ICD file 107 IEC 60870 5 101 108 IEC 60870 5 103 111 IEC 60870...

Page 171: ...ver 101 Second time server 98 Serial interface 109 112 117 118 SNTP 97 98 SNTP time server 99 SNTP time server 2 99 Stop bits 110 112 117 SW 3 3 30 Synchronization interval 100 Syslog 100 T Tap position monitoring 105 TCP connections 116 TCP Keepalive 117 TCP port 114 116 118 Temperature Monitoring 104 Time 71 100 Time server address 99 Time shift 99 Time synchronization 97 Activate 98 Reference t...

Page 172: ......

Page 173: ......

Page 174: ...enfabrik Reinhausen GmbH Falkensteinstrasse 8 93059 Regensburg 49 0 941 4090 0 sales reinhausen com www reinhausen com 6796573 02 EN MSENSE VAM 04 21 Maschinenfabrik Reinhausen GmbH 2021 THE POWER BEHIND POWER ...

Reviews: