background image


41-621.1 HART

®

 to Modbus

®

 Adaptor Operating Manual


35 

11.4.11 

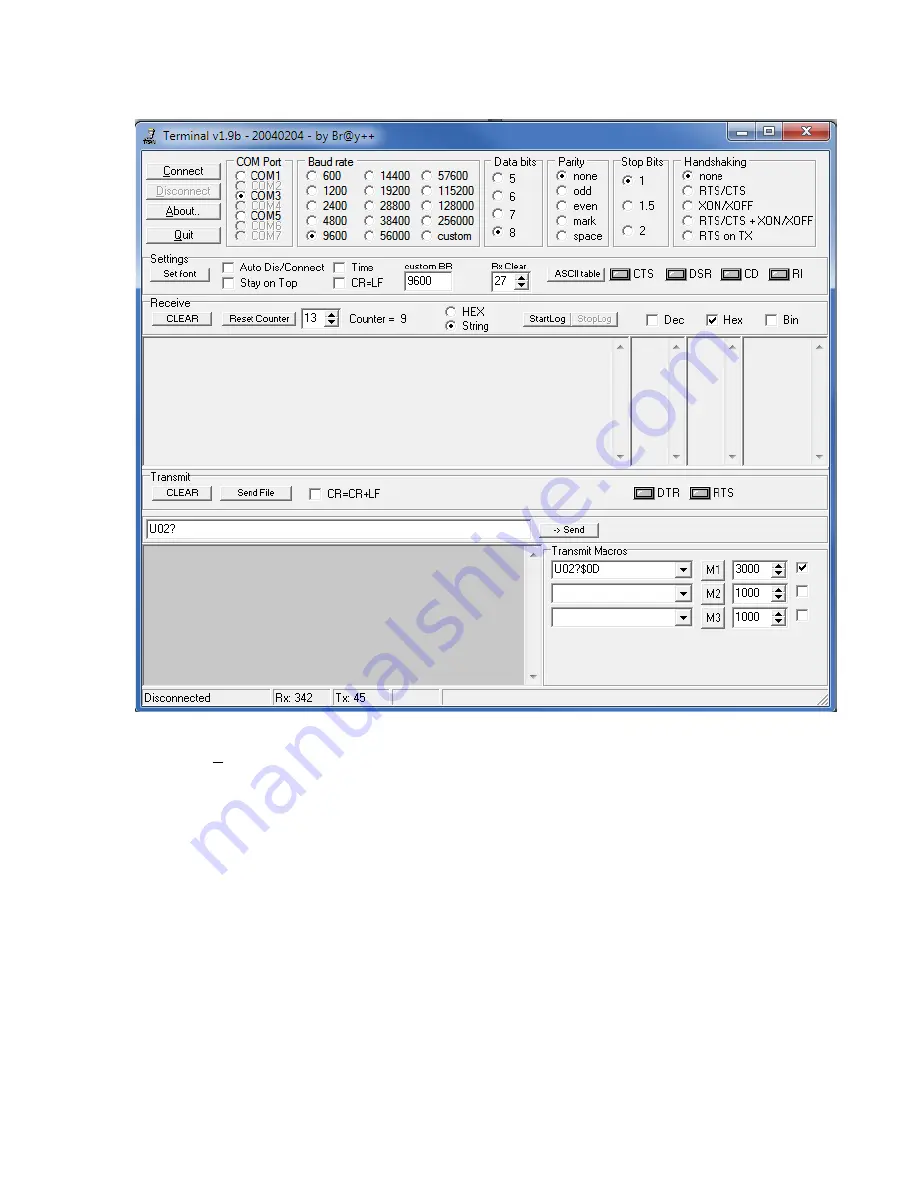
The Terminal application settings should be as below. 


11.4.12 

Click Connect. 

11.4.13 

Create a Transmit Macro that will send U02?$0D and check the checkbox to the right of 
the  macro definition.   Note that the  02  in  the macro  represents the  Poll  Address  of the 
Model 706 device. 

11.4.14 

Verify that the Terminal application is receiving responses from the HMA and that there 
are no communication errors being reported.  The Receive buffer section should have the 
same number of responses as the Transmit buffer section. 


Summary of Contents for Jupiter JM4

Page 1: ...daptor Operating Manual Firmware Version 1 7 2014 68 EU Eclipse Model 706 Guided Wave Radar Level Transmitter Jupiter Model JM4 Magnetostrictive Level Transmitter Pulsar Model R96 Pulse Burst Radar Le...

Page 2: ......

Page 3: ...31 12 ADDITIONAL LEVELMASTER COMMANDS 37 13 AUTO SWITCHING BETWEEN MODBUS RTU ASCII AND HART OVER RS 485 COMMUNICATION 42 14 AUTO SWITCHING BETWEEN LEVELMASTER AND HART OVER RS 485 COMMUNICATION 46 15...

Page 4: ...EL R82 R2 MODBUS REGISTERS 114 O MODEL RX5 MODBUS REGISTERS 115 P MODEL 355 MODBUS REGISTERS 116 Q ENHANCED JUPITER MODBUS REGISTERS 117 R E3 MODULEVEL MODBUS REGISTERS 118 S MODEL R96 MODBUS REGISTER...

Page 5: ...mitters to be utilized in a Modbus 1 system The following Modbus protocols are supported Modbus RTU Function codes 3 4 6 and 16 Modbus ASCII Function codes 3 4 6 and 16 Levelmaster Commands Uxx UxxF U...

Page 6: ...evices will appear to be native Modbus devices to the Modbus host The registers for each attached device type are the same regardless of the poll address The registers in the HMA for each attached dev...

Page 7: ...be connected directly to the HART terminal block on the HMA The HMA will always act as a primary master on the HART loop Therefore if connecting another HART host to the terminal HART block that addi...

Page 8: ...e location of the DIP switch and Appendix B for a legend of the four switch positions 3 Connect the device containing the HMA to a power supply via the power terminal block 4 Apply power to the HMA 5...

Page 9: ...position 1 of the DIP switch should be set to ON and then input power cycled Changing back to the fixed default settings also requires a power cycle 1 2 Equipment Item Manufacturer Model HART to Modb...

Page 10: ...onnection settings are as follows and then click OK Note that the USB Serial Port setting needs to match the port number for the communication cable that is being used 1 4 4 Open or click on an Mbpoll...

Page 11: ...ick on a value that needs to be changed in order to open the Write Single Register dialog enter the new value and then click on Send 1 4 6 Change DIP switch 1 to ON This sets the device to run in the...

Page 12: ...odbustools com Modbus Poll Power Supply 20 24V 0 5A 2 3 Setup Connect the HMA to a power supply via the power terminal block Connect an RS 485 communications cable to the RS 485 terminal block of the...

Page 13: ...anual 13 2 4 3 Select Connection Connect from the menu bar ensure that the connection settings are as follows and then click OK Note that the USB Serial Port setting needs to match the port number for...

Page 14: ...Quantity and Display type in the pop up dialog as required Then click OK The register value should appear in the Mbpoll window In general the Address should be set to the number of the first register...

Page 15: ...ess of the HMA Set the Function to 03 Read Holding Registers 4x Using Appendices L through S set the Address Quantity and Display type in the pop up dialog as required Then click OK The register value...

Page 16: ...in the Project tree and add a DTM to the Project for the listed device 3 4 4 Right click on the Comm DTM item and select Parameter Select the correct COM port for the HART modem set the Start address...

Page 17: ...al block on the HMA Note that the HMA provides 24 VDC on the terminal block and contains an internal 250 ohm resistor so the field communicator can be directly connected to the terminal block 4 4 Proc...

Page 18: ...lead orange on the positive terminal and the Receive Transmit Data B lead yellow on the negative terminal Connect a 120 resistor between the two RS 485 terminal block positions Connect the other end...

Page 19: ...or between the two RS 485 terminal block positions Connect the other end of the cable to a PC which has a Modbus host application 6 4 Procedure 6 4 1 Using Procedure 1 ensure that registers 3000 throu...

Page 20: ...nal and the Receive Transmit Data B lead yellow on the negative terminal Connect a 120 resistor between the two RS 485 terminal block positions Connect the other end of the cable to a PC which has a M...

Page 21: ...ection settings are as follows and then click OK Note that the USB Serial Port setting needs to match the port number for the communication cable that is being used 7 4 6 Verify that the Modbus Poll a...

Page 22: ...anufacturer Model HART to Modbus Adaptor MII 031 2859 001 RS485 Communications cable FDTIchip USB RS485 WE Termination resistor 120 Modbus host application www modbustools com Modbus Poll Power Supply...

Page 23: ...value and then click on Send 8 4 3 Using Procedure 2 change register 3001 to a value of 15 This changes the address of the HMA to 15 to be unique from other HMAs and from the attached devices Note tha...

Page 24: ...x K for the register numbers For example with two devices attached 8 4 12 Note that Poll Address and Device Type registers corresponding to Slave IDs with no attached device will show 0xFFFF and 0x00F...

Page 25: ...olumn labeled with the Slave ID number of the device Read the registers for each parameter Note that the Slave ID number for the Mbpoll window must match the Slave ID of the HMA not the attached HART...

Page 26: ...unit The HMA should have a different Modbus address from the various attached HART devices and from other HMAs on the RS 485 line so that it can also be queried by the Modbus master 9 2 Equipment Item...

Page 27: ...address for the HMA is not critical as long as it is different from other HMAs to be used in the same system 9 4 4 Using Procedure 2 change register 3007 to a value of 1 This sets the HMA to run in th...

Page 28: ...k on Send 9 4 12 Repeat steps 9 4 9 through 9 4 11 for the other devices attached to the HMA For each device the Slave ID entered in step 9 4 9 must match the Poll Address for that device The supporte...

Page 29: ...a power supply via the power terminal block Connect an RS 485 communications cable to the RS 485 terminal block of the HMA with the Receive Transmit Data A lead orange on the positive terminal and th...

Page 30: ...30 41 621 1 HART to Modbus Adaptor Operating Manual 10 4 6 The HMA HART device can be communicated with using the Modbus address and the registers for Slave 1 as shown in Appendices L through S...

Page 31: ...S485 Communications cable FDTIchip USB RS485 WE Termination resistor 120 Modbus host application www modbustools com Modbus Poll Terminal v1 9b application hw server com Version 1 9b 20040204 Power Su...

Page 32: ...dix H for the HMA Communication settings If the settings do not match double click on a value that needs to be changed in order to open the Write Single Register dialog enter the new value and then cl...

Page 33: ...41 621 1 HART to Modbus Adaptor Operating Manual 33 11 4 3 Change DIP switch 1 to ON and then back to OFF 11 4 4 Set up a window to read 11 registers starting at address 1250...

Page 34: ...he menu bar 11 4 8 Start the Terminal v1 9b application Note that any similar application that supports transmission reception of ASCII characters over the RS 485 connection may be used 11 4 9 Set the...

Page 35: ...2 0D and check the checkbox to the right of the macro definition Note that the 02 in the macro represents the Poll Address of the Model 706 device 11 4 14 Verify that the Terminal application is recei...

Page 36: ...after the second D in the response matches the SV value shown on the local display of the Model 706 device 11 4 18 Verify that the value after the F in the response matches the Echo Strength value sh...

Page 37: ...b application hw server com Version 1 9b 20040204 Power Supply 20 24V 0 5A Level transmitter MII Model 706 Probe MII Model 706 compatible 12 3 Setup Connect the HMA to a power supply via the power ter...

Page 38: ...Change DIP switch 1 to ON 12 4 4 Select Connection Disconnect from the Modbus Poll menu bar 12 4 5 Start the Terminal v1 9b application 12 4 6 Set the COM Port to match the COM port used for the commu...

Page 39: ...s returned so 2 should always be returned by the UxxF Command Note that the 03 in the macro represents the Poll Address of the Model 706 device 12 4 10 Verify that the Terminal application receives a...

Page 40: ...ion errors being reported The Receive buffer section should have the same number of responses as the Transmit buffer section 12 4 14 Verify that the value after the OL in the response matches the Leve...

Page 41: ...d and that there are no communication errors being reported The Receive buffer section should have the same number of responses as the Transmit buffer section 12 4 17 Verify that the value after the O...

Page 42: ...r that protocol in step 13 4 2 13 2 Equipment Item Manufacturer Model HART to Modbus Adaptor MII 031 2859 001 RS485 Communications cable FDTIchip USB RS485 WE Termination resistor 120 Modbus host appl...

Page 43: ...End address to cover the range of addresses for the attached devices Set the Comm DTM to be a secondary master then click OK 13 4 13 Right click on the Comm DTM Project item and select Additional func...

Page 44: ...nding a HART Command 0 with an address of 63 Receipt of that command by the HMA will cause it to reboot into the Normal operating mode 13 4 25 Shut down PACTware 13 4 26 Open the Modbus Poll applicati...

Page 45: ...window is increasing the Err count is not increasing and there are no reported communication errors 13 4 30 Verify that register 3008 is set to 0 13 4 31 If unable to establish communication in the H...

Page 46: ...Transmit Data A lead orange on the positive terminal and the Receive Transmit Data B lead yellow on the negative terminal Connect a 120 resistor between the two RS 485 terminal block positions Connect...

Page 47: ...Transmit Macro that will send U02 0D and check the checkbox to the right of the macro definition Note that the 02 in the macro represents the Poll Address of the Model 706 device so the number used s...

Page 48: ...t of the U02 0D macro definition 14 4 15 Ensure that there is no response from the HMA 14 4 16 Click on the Disconnect button 14 4 17 Start PACTware 14 4 18 Add a HART Comm DTM to the Project 14 4 19...

Page 49: ...municates with the device and features such are changing parameters and viewing Echo Curves Echo History as appropriate and Trend Data are operational 14 4 28 Close the Online parameterization window...

Page 50: ...mber of responses as the Transmit buffer section 14 4 38 If unable to establish communication in the HART over RS 485 mode the HMA can be reset to the default Modbus RTU operating mode by switching DI...

Page 51: ...lead orange on the positive terminal and the Receive Transmit Data B lead yellow on the negative terminal Connect a 120 resistor between the two RS 485 terminal block positions Connect the other end...

Page 52: ...p Read Write Definition from the menu bar ensure that the settings are as follows and then click OK 15 4 5 Remove one of the attached HART devices 15 4 6 Verify that the corresponding slave malfunctio...

Page 53: ...m the menu bar ensure that the settings are as follows and then click OK 15 4 10 Verify that register 1250 indicates the correct number of attached devices 15 4 11 Verify that registers 1251 through 1...

Page 54: ...select Setup Read Write Definition from the menu bar ensure that the settings are as follows and then click OK 15 4 14 Verify that registers 1000 through 1017 show the correct information for the att...

Page 55: ...cable 16 2 2 Connect an appropriate power supply to the power supply module of the ROC 800 16 2 3 Connect the HMA to a 9 30 VDC power supply via terminal block TB1 16 2 4 Connect an RS 485 communicat...

Page 56: ...56 41 621 1 HART to Modbus Adaptor Operating Manual 16 3 4 Click on ROC Comm Ports in the ROCLINK 800 Menu bar 16 3 5 Ensure that the communication settings for 1 Local Port are as follows...

Page 57: ...in step 16 1 1 then click OK Ensure that the Port Owner is set to Modbus Master For example 16 4 Reading registers from the HMA 16 4 1 Select Configure MODBUS from the ROCLINK 800 Menu bar 16 4 2 Chan...

Page 58: ...te Order and Comm Mode match the selections made in step 16 1 1 16 4 6 Check Start Polling Set the Starting Request to 1 and the Number of Requests to match the total number of separate rows defined i...

Page 59: ...6 4 10 Enter into the table the sets of registers to be read from the device Set the RTU Address to that of the HMA when it is in the HMA mode Set the RTU Address to that of the individual attached HA...

Page 60: ...to be read 16 4 14 Enter the Start and End Register numbers Refer to Appendices F through S for register numbers of the HMA and attached HART devices 16 4 15 Create a Soft Point and Data number in th...

Page 61: ...lose the Select TLP dialog 2 16 4 17 Set a Convert Code see ROCLINK 800 Help in the Conversion column to properly interpret the data bytes into the correct numerical format 16 4 18 Assign the correct...

Page 62: ...the values 16 4 22 Open the Soft Point dialog by selecting I O Soft Point in the Configuration Tree window then double clicking on 1 Soft Pt 01 16 4 23 Click on Update to read a single set of values...

Page 63: ...the Soft Point dialog by selecting I O Soft Point in the Configuration Tree window then double clicking on 1 Soft Pt 01 16 5 5 Highlight the value to be changed and enter the new value 16 5 6 Click on...

Page 64: ...2 1 Connect the XRC to a computer using a USB A to USB B cable 17 2 2 Connect an appropriate power supply to the battery terminal J16 of the XRC 17 2 3 Connect the HMA to a 9 30 VDC power supply via...

Page 65: ...aptor Operating Manual 65 17 3 3 Select the COM port number corresponding to the XRC The proper COM port number can be identified by navigating to the Device Manager in Windows and expanding the Ports...

Page 66: ...Modbus Adaptor Operating Manual 17 3 5 Select on Operate Connect to Totalflow in the PCCU32 Menu bar 17 3 6 Select Entry Setup from the Local Connect initial dialog 17 3 7 Select View Advanced from t...

Page 67: ...s in the tree view window 17 3 9 Click on the Port name associated with Modbus RTU 17 3 10 Ensure that the communications settings match the settings of the HMA performed in step 17 1 1 For example 17...

Page 68: ...ctions on the XRC can be verified by clicking on the View wiring radio button Note that the RS485 terminal of the HMA should be connected to the CTS BUS position of the TotalFlow terminal block The te...

Page 69: ...HMA When making any changes to the settings click on Send at the bottom of the window to write them to the XRC 17 4 2 Select Holding Registers from the tree view window of the PCCU32 17 4 3 Select the...

Page 70: ...17 4 6 Select the Dynamic Variables tab 17 4 7 Change the description of the four registers to PV through QV 17 4 8 Note the Register numbers displayed in the first column of the table They will be u...

Page 71: ...o Modbus Adaptor Operating Manual 71 17 4 9 Select Communications Modbus RTU in the tree view window 17 4 10 For the Setup tab 17 4 11 Ensure that the Protocol and Baud Rate match the selections made...

Page 72: ...ch the selections made in step 17 1 1 17 4 14 Ensure that the Unkey Delay is less than 7 milliseconds as the HMA typically responds within about 8 milliseconds If the Unkey Delay time is too long the...

Page 73: ...Appendices F through S for register numbers of the HMA and attached HART devices 17 4 19 Set the Registers to equal the total number of Dynamic Variables to be read Note that in this case 4 Dynamic Va...

Page 74: ...commands being sent out and the responses from the HMA 17 4 26 Right click in the clear area between the Monitor checkbox and the Log Size drop down Select a shorter interval screen refresh interval...

Page 75: ...ter is used as the example When making any changes to the settings click on Send at the bottom of the window to write them to the XRC 17 5 2 Select Holding Registers from the tree view window of the P...

Page 76: ...ual 17 5 6 Select the Blocking Distance tab 17 5 7 Change the description of the register to Blocking Distance 17 5 8 Note the Register number displayed in the first column of the table It will be use...

Page 77: ...o Modbus Adaptor Operating Manual 77 17 5 9 Select Communications Modbus RTU in the tree view window 17 5 10 For the Setup tab 17 5 11 Ensure that the Protocol and Baud Rate match the selections made...

Page 78: ...ch the selections made in step 17 1 1 17 5 14 Ensure that the Unkey Delay is less than 7 milliseconds as the HMA typically responds within about 8 milliseconds If the Unkey Delay time is too long the...

Page 79: ...ster numbers of the HMA and attached HART devices 17 5 19 Set the Registers to 1 Note that in this case 1 float value is to be written so that a value of 1 is entered even though the total number of 1...

Page 80: ...the Blocking Distance tab 17 5 26 Change the Value to the desired distance 17 5 27 Click on Send at the bottom of the window 17 5 28 To check if the value has been accepted follow the steps in sectio...

Page 81: ...ensure that registers 3000 through 3007 of the HMA match the values shown for LevelMaster communication with the XRC Refer to Appendix F for the HMA Communication settings If the settings do not match...

Page 82: ...Setup System Setup in the PCCU32 Menu bar A dialog will appear allowing for communication settings between the PCCU32 application and the XRC 18 3 3 Select the COM port number corresponding to the XR...

Page 83: ...41 621 1 HART to Modbus Adaptor Operating Manual 83 18 3 5 Select on Operate Connect to Totalflow in the PCCU32 Menu bar 18 3 6 Select Entry Setup from the Local Connect initial dialog...

Page 84: ...view window 18 3 9 Click on the Port name associated with Modbus RTU 18 3 10 Select Tank Gauge for the Protocol 18 3 11 Set the Unkey delay to 3 ms 18 3 12 Ensure that the communications settings mat...

Page 85: ...ctions on the XRC can be verified by clicking on the View Wiring radio button Note that the RS485 terminal of the HMA should be connected to the CTS BUS position of the TotalFlow terminal block The te...

Page 86: ...and Warnings from a HART device attached to the HMA When making any changes to the settings click on Send at the bottom of the window to write them to the XRC 18 4 2 Select Communications LevelMaster...

Page 87: ...41 621 1 HART to Modbus Adaptor Operating Manual 87 18 4 6 For the Communications tab 18 4 7 Ensure that the communication settings match the selections made in steps 18 1 1 and 18 3 12...

Page 88: ...e and the Sensor to Dual Level The HMA always returns a Dual Level response to Command Uxx to provide data for the SV output of the attached HART device 18 4 10 In the Registers group menu set the ID...

Page 89: ...og tab when selecting Communications Modbus RTU from the tree view window 18 4 13 Set the Log Size to 25 and check the Monitor checkbox The log should start updating with the XRC commands being sent o...

Page 90: ...er of Tank Sections in row 51 108 x 18 4 18 For each tank section set the height of that section in rows 51 109 x 18 4 19 For each tank section enter the Factor in rows 51 110 x The Factor value is th...

Page 91: ...PV is sent as Float 1 of Command Uxx is displayed as Level 1 The Interface Level reading from the device is displayed as Level 2 The Echo Strength from the device is displayed as the Temperature The...

Page 92: ...erating Manual 18 5 Writing registers to the HMA The ABB Totalflow XRC has no provisions for sending commands to LevelMaster devices other than the Uxx command Therefore it is not possible to write re...

Page 93: ...the new value and then click on Send 19 2 Physical Connections 19 2 1 Connect the AutoPILOT PRO to a computer using a CHIT computer connection cable ThermoScientific p n 3 0446 090 19 2 2 Connect an a...

Page 94: ...O This example uses Local Connection as the connection profile name 19 3 3 Select the COM port number corresponding to the CHIT cable 19 3 4 Ensure that the other communication settings are set as des...

Page 95: ...utoPILOT PRO 19 4 2 In the Navigation Bar click on Communication s expand the 96 Communication Port s item and then double click on Host Comm Port 19 4 3 Set Calculation to Enabled 19 4 4 Set the Repe...

Page 96: ...r to 1302 the start of the PV register for Slave 1 in the HMA 19 4 13 Set the Num Entries to 4 four 32 bit floating point numbers 19 4 14 The Host IP Address Host Port Number AutoMitter Mode Extended...

Page 97: ...g Point Value item 19 4 20 Double click on the Table 1 Item 1 entry change Descriptor 1 to PV and Engineering Unit to correspond to the level units in use by the HART transmitter to be read 19 4 21 Cl...

Page 98: ...egister number 1302 cell and select Paste 19 4 25 To set up the SV TV and QV readings repeat steps 19 4 19 through 19 4 24 using Table 1 items 2 to 4 Paste the SV into address 1304 TV into address 130...

Page 99: ...toPILOT PRO 19 5 2 In the Navigation Bar click on Communication s expand the 96 Communication Port s item and then double click on Host Comm Port 19 5 3 Set Calculation to Enabled 19 5 4 Set the Repea...

Page 100: ...the Blocking Distance register for Slave 1 in the HMA 19 5 12 Set the Num Entries to 1 one 32 bit floating point number 19 5 13 The Host IP Address Host Port Number AutoMitter Mode Extended Addressing...

Page 101: ...Table 1 Item 5 entry and change Descriptor 1 to Blk Dist and Engineering Unit to correspond to the level units in use by the HART transmitter to be read 19 5 20 Enter the value to be sent to the devi...

Page 102: ...ck on the Register number 3100 cell and select Paste 19 5 25 Click on Apply to send the settings to the AutoPILOT PRO 19 5 26 Click on Refresh to command the AutoPILOT PRO to send the value to the dev...

Page 103: ...as the RS 232 terminal block when the positions 3 and 4 DIP switches are set to the RS 232 mode See Appendix B Connect the RS 232 TX line to the position of the RS 485 terminal block and the RX line t...

Page 104: ...tion 2 ON Program mode OFF Run mode Position 3 OFF RS485 mode Position 4 ON Position 3 ON RS232 mode Position 4 OFF C HMA LED Indicators LED D5 Green Indicates Power ON LED D4 Red Indicates Error indi...

Page 105: ...tor Operating Manual 105 D HMA System Connection Diagram E Nomenclature Table HMA Nomenclature Modbus Poll Nomenclature Data Type Display Number of Registers Quantity Modbus Register Type Function Mod...

Page 106: ...3003 7 7 bits 8 8 bits 8 Stop bits UINT8 1 Holding 3004 1 1 bit 2 2 bits 1 Parity UINT8 1 Holding 3005 0 None 1 Odd 2 Even 0 Baud rate UINT8 1 Holding 3006 0 1200 1 2400 2 4800 3 9600 4 19200 3 HMA M...

Page 107: ...3003 7 7 bits 8 8 bits 7 Stop bits UINT8 1 Holding 3004 1 1 bit 2 2 bits 1 Parity UINT8 1 Holding 3005 0 None 1 Odd 2 Even 0 Baud rate UINT8 1 Holding 3006 0 1200 1 2400 2 4800 3 9600 4 19200 3 HMA M...

Page 108: ...g 3003 7 7 bits 8 8 bits 8 Stop bits UINT8 1 Holding 3004 1 1 bit 2 2 bits 1 Parity UINT8 1 Holding 3005 0 None 1 Odd 2 Even 0 Baud rate UINT8 1 Holding 3006 0 1200 1 2400 2 4800 3 9600 4 19200 3 HMA...

Page 109: ...3003 7 7 bits 8 8 bits 8 Stop bits UINT8 1 Holding 3004 1 1 bit 2 2 bits 1 Parity UINT8 1 Holding 3005 0 None 1 Odd 2 Even 1 Baud rate UINT8 1 Holding 3006 0 1200 1 2400 2 4800 3 9600 4 19200 0 HMA M...

Page 110: ...rror 11 Slave 3 malfunction Comm error 12 Slave 4 malfunction Comm error 13 Slave 5 malfunction Comm error 14 Configuration data area checksum error 15 Byte 3 bits Reserved UINT8 1 Input 1201 Byte 4 b...

Page 111: ...024 1044 1064 1084 Device rev UINT8 1 Input 1005 1005 1025 1045 1065 1085 S w rev UINT8 1 Input 1006 1006 1026 1046 1066 1086 H W rev physical sign code UINT8 1 Input 1007 1007 1027 1047 1067 1087 Fla...

Page 112: ...300 2400 2500 Software version UINT8 8 Input 2112 2112 2212 2312 2412 2512 Reserved Unused Blocking Distance Float 2 Holding 3100 3100 3200 3300 3400 3500 Level Unit code UINT8 1 Input 2140 2140 2240...

Page 113: ...24 1131 1134 1141 1144 Serial Number UINT8 6 Input 2100 2100 2200 2300 2400 2500 Software version UINT8 4 Input 2112 2112 2212 2312 2412 2512 Reserved Unused Blocking Distance Float 2 Holding 3100 310...

Page 114: ...Input 2100 2100 2200 2300 2400 2500 Software version UINT8 6 Input 2112 2112 2212 2312 2412 2512 Reserved Unused Blocking Distance Float 2 Holding 3100 3100 3200 3300 3400 3500 Level Unit code UINT8 1...

Page 115: ...rved Unused Blocking Distance Float 2 Holding 3100 3100 3200 3300 3400 3500 Level Unit code UINT8 1 Input 2140 2140 2240 2340 2440 2540 Level Offset Float 2 Holding 3102 3102 3202 3302 3402 3502 Level...

Page 116: ...0 2300 2400 2500 Software version UINT8 6 Input 2112 2112 2212 2312 2412 2512 Reserved Unused Blocking Distance Float 2 Holding 3100 3100 3200 3300 3400 3500 Level Unit code UINT8 1 Input 2140 2140 22...

Page 117: ...68 188 Command 48 status bytes UINT8 1 Input 1101 1101 1111 1121 1131 1141 Serial Number UINT8 6 Input 2100 2100 2200 2300 2400 2500 Software version UINT8 4 Input 2112 2112 2212 2312 2412 2512 Reserv...

Page 118: ...121 1124 1131 1134 1141 1144 Serial Number UINT8 6 Input 2100 2100 2200 2300 2400 2500 Software version UINT8 4 Input 2112 2112 2212 2312 2412 2512 Reserved Unused Trim Level Float 2 Holding 3100 3100...

Page 119: ...nused Top Blocking Distance Float 2 Holding 3100 3100 3200 3300 3400 3500 Level Unit code UINT8 1 Input 2140 2140 2240 2340 2440 2540 Bottom Blocking Distance Float 2 Holding 3102 3102 3202 3302 3402...

Page 120: ...rature Failure Blocking Distance Hi Volume Alrm High Flow Alrm Safe Zone Alarm Echo Lost Warning 1 Low VDC at 20 mA Noise High Elec Temp Low Elec Temp Echo Rej Crpt Echo Rej Invl Initializing System C...

Page 121: ...1 Spare 3 Spare 4 Spare Indicator 5 22 Initializing Config Conflict Ramp Slope Error 23 Analog Output Fixed Hi Volume Alarm High Electronics Temp 24 Config Changed Spare 5 Low Electronics Temp 25 Spar...

Page 122: ...2 Ifc Thickness Ifc Thickness Ifc Level Distance Volume Density 3 Volume Volume Ifc Volume Echo Strength Head 4 Flow Fill Rate Flow Distance 5 Distance Distance Head Totalizer R 6 Echo Strength Echo S...

Page 123: ...el R82 R2 Model RX5 Model R96 0 None None None 1 Light Light Light 2 Medium Medium Medium 3 Heavy Heavy Heavy Rate of Change Code Model R82 R2 Model RX5 Model R96 0 5 in min 5 in min 5 in min 1 5 20 i...

Page 124: ...embers to participate in the technical and educational activities of our organization Suppliers large and small system integrators end users open source developers educators and other interested parti...

Reviews: