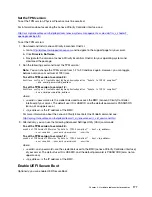
• M.2 backplane
• Serial port module
• CMOS battery
• TCM (for China only)
• Intrusion switch
• PHM
Important:
Do not disassemble the PHM.
To remove the system board, complete the following steps:
Watch the procedure
. A video of the removal process is available:
• Youtube:
https://www.youtube.com/playlist?list=PLYV5R7hVcs-Acsjj4tU79GzKnWG316BYn
• Youku:
http://list.youku.com/albumlist/show/id_50483452
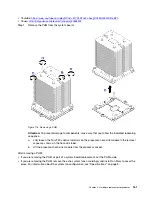
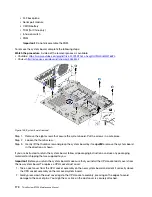
Figure 125. System board removal
Step 1. Remove the eight screws that secure the system board. Put the screws in a safe place.
Step 2. Loosen the thumb screw.
Step 3. Gently lift the thumb screw and grasp the system board by its edge
1
to remove the system board
in the direction as shown.
If you are instructed to return the system board, follow all packaging instructions, and use any packaging
materials for shipping that are supplied to you.
Important:
Before you return the system board, make sure that you install the CPU socket dust covers from
the new system board. To replace a CPU socket dust cover:
1. Take a dust cover from the CPU socket assembly on the new system board and orient it correctly above
the CPU socket assembly on the removed system board.
2. Gently press down the dust cover legs to the CPU socket assembly, pressing on the edges to avoid
damage to the socket pins. You might hear a click on the dust cover is securely attached.
170
ThinkSystem ST550 Maintenance Manual
Summary of Contents for ThinkSystem ST550 7X09
Page 1: ...ThinkSystem ST550 Maintenance Manual Machine Types 7X09 and 7X10 ...
Page 8: ...vi ThinkSystem ST550 Maintenance Manual ...
Page 36: ...28 ThinkSystem ST550 Maintenance Manual ...
Page 188: ...180 ThinkSystem ST550 Maintenance Manual ...
Page 206: ...198 ThinkSystem ST550 Maintenance Manual ...
Page 210: ...202 ThinkSystem ST550 Maintenance Manual ...
Page 219: ......
Page 220: ......


