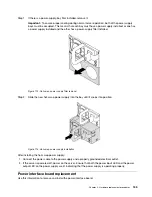
Step 1. If there is a power-supply-bay filler installed, remove it.
Important:
To ensure proper cooling during normal server operation, both of the power supply
bays must be occupied. This means that each bay must have a power supply installed; or one has
a power supply installed and the other has a power-supply filler installed.
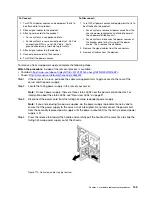
Figure 112. Hot-swap power supply filler removal
Step 2. Slide the new hot-swap power supply into the bay until it snaps into position.
Figure 113. Hot-swap power supply installation
After installing the hot-swap power supply:
1. Connect the power cable to the power supply and a properly grounded electrical outlet.
2. If the server is powered off, power on the server. Ensure that both the power input LED and the power
output LED on the power supply are lit, indicating that the power supply is operating properly.
Power interface board replacement
Use this information to remove and install the power interface board.
.
Hardware replacement procedures
155
Summary of Contents for ThinkSystem ST550 7X09
Page 1: ...ThinkSystem ST550 Maintenance Manual Machine Types 7X09 and 7X10 ...
Page 8: ...vi ThinkSystem ST550 Maintenance Manual ...
Page 36: ...28 ThinkSystem ST550 Maintenance Manual ...
Page 188: ...180 ThinkSystem ST550 Maintenance Manual ...
Page 206: ...198 ThinkSystem ST550 Maintenance Manual ...
Page 210: ...202 ThinkSystem ST550 Maintenance Manual ...
Page 219: ......
Page 220: ......

