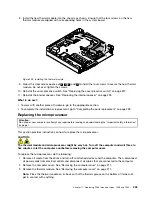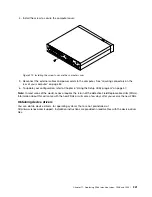
4. Install the screw to secure the computer cover.
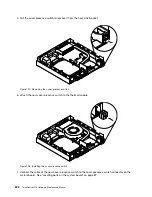
Figure 212. Installing the screw to secure the computer cover
5. Reconnect the external cables and power cords to the computer. See “Locating connectors on the
rear of your computer” on page 84.
6. To update your configuration, refer to Chapter 6 “Using the Setup Utility program” on page 57.
Note:
In most areas of the world, Lenovo requires the return of the defective Field Replaceable Units (FRUs).
Information about this will come with the new FRUs or will come a few days after you receive the new FRUs.
Obtaining device drivers
You can obtain device drivers for operating systems that are not preinstalled at
http://www.lenovo.com/support. Installation instructions are provided in readme files with the device-driver
files.
Chapter 11
.
Replacing FRUs (machine types: 10AX and 10AY)
241
Summary of Contents for 10AX
Page 6: ...iv ThinkCentre M73 Hardware Maintenance Manual ...
Page 8: ...2 ThinkCentre M73 Hardware Maintenance Manual ...
Page 15: ...Chapter 2 Safety information 9 ...
Page 19: ...Chapter 2 Safety information 13 ...
Page 20: ...1 2 14 ThinkCentre M73 Hardware Maintenance Manual ...
Page 21: ...1 2 Chapter 2 Safety information 15 ...
Page 26: ...1 2 20 ThinkCentre M73 Hardware Maintenance Manual ...
Page 27: ...1 2 Chapter 2 Safety information 21 ...
Page 30: ...24 ThinkCentre M73 Hardware Maintenance Manual ...
Page 34: ...28 ThinkCentre M73 Hardware Maintenance Manual ...
Page 40: ...34 ThinkCentre M73 Hardware Maintenance Manual ...
Page 74: ...68 ThinkCentre M73 Hardware Maintenance Manual ...
Page 92: ...86 ThinkCentre M73 Hardware Maintenance Manual ...
Page 140: ...134 ThinkCentre M73 Hardware Maintenance Manual ...
Page 194: ...188 ThinkCentre M73 Hardware Maintenance Manual ...
Page 248: ...242 ThinkCentre M73 Hardware Maintenance Manual ...
Page 258: ...252 ThinkCentre M73 Hardware Maintenance Manual ...
Page 259: ......
Page 260: ......


