


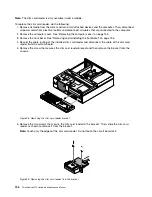

6. Locate the memory slots. See “Locating parts on the system board” on page 80.
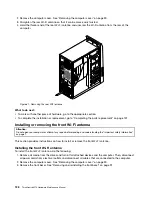
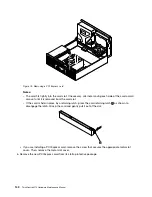
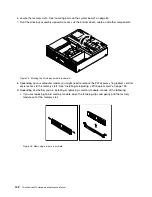
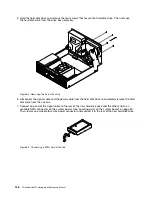
7. Pivot the drive bay assembly upward to access all the internal drives, cables, and other components.
Figure 75. Pivoting the drive bay assembly upward
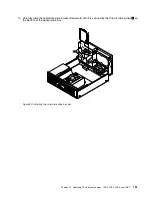
8. Depending on your computer model, you might need to remove the PCI Express x16 graphics card for
easier access to the memory slots. See “Installing or replacing a PCI Express card” on page 139.
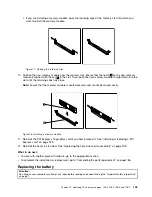
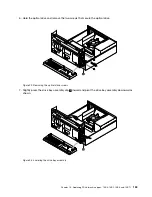
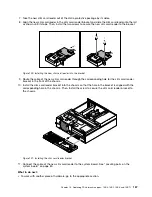
9. Depending on whether you are installing or replacing a memory module, do one of the following:
• If you are replacing an old memory module, open the retaining clips and gently pull the memory
module out of the memory slot.
Figure 76. Removing a memory module
142
ThinkCentre M73 Hardware Maintenance Manual
Summary of Contents for 10AX
Page 6: ...iv ThinkCentre M73 Hardware Maintenance Manual ...
Page 8: ...2 ThinkCentre M73 Hardware Maintenance Manual ...
Page 15: ...Chapter 2 Safety information 9 ...
Page 19: ...Chapter 2 Safety information 13 ...
Page 20: ...1 2 14 ThinkCentre M73 Hardware Maintenance Manual ...
Page 21: ...1 2 Chapter 2 Safety information 15 ...
Page 26: ...1 2 20 ThinkCentre M73 Hardware Maintenance Manual ...
Page 27: ...1 2 Chapter 2 Safety information 21 ...
Page 30: ...24 ThinkCentre M73 Hardware Maintenance Manual ...
Page 34: ...28 ThinkCentre M73 Hardware Maintenance Manual ...
Page 40: ...34 ThinkCentre M73 Hardware Maintenance Manual ...
Page 74: ...68 ThinkCentre M73 Hardware Maintenance Manual ...
Page 92: ...86 ThinkCentre M73 Hardware Maintenance Manual ...
Page 140: ...134 ThinkCentre M73 Hardware Maintenance Manual ...
Page 194: ...188 ThinkCentre M73 Hardware Maintenance Manual ...
Page 248: ...242 ThinkCentre M73 Hardware Maintenance Manual ...
Page 258: ...252 ThinkCentre M73 Hardware Maintenance Manual ...
Page 259: ......
Page 260: ......