Kortho qic i series User Manual Download Page 23

PRINT PROCESS DESCRIPTION 

H325 IAE 

Rev.: 004


kortho

 QiC i-series 


3-3 

3.4.1  Menu structure 

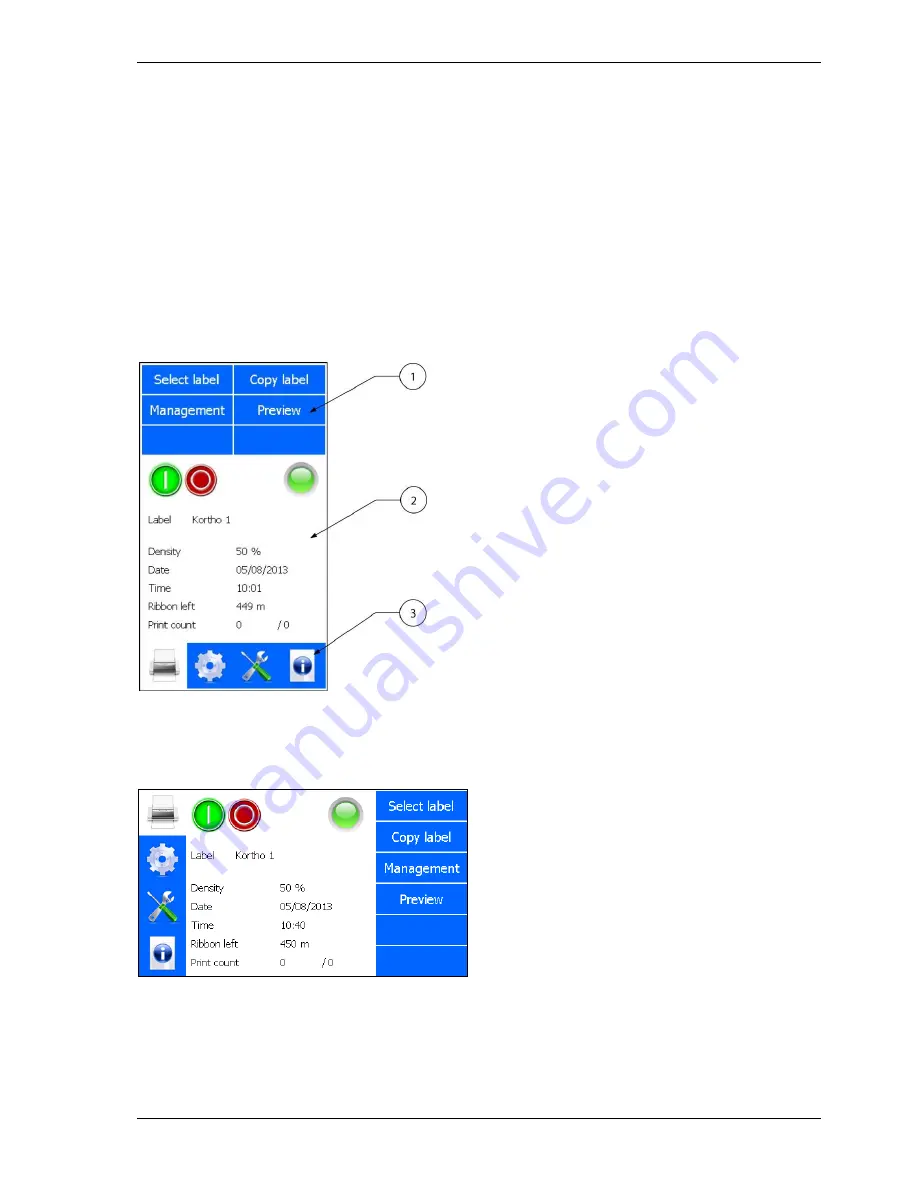
The screen is divided in three parts, see Fig. 3.1. Section 1 shows the submenus available when the printer 
icon is selected. When the other icons in section 3 are selected, different submenus will be shown. Section 2 is 
showing the status of the printer and the Start (I) \ Pause (0) button. Depending on the button selected in 
section 1 and 3 the content of this section will change.  

The content can be settings, status information or general information. Section 3 is showing the 4 main menu 
options: 

1. 

Label selection/Label management. 

2. 

Printer settings. 

3. 

Diagnostics. 

4. 

Information. 


Fig. 3.1 

Screen layout, main menu portrait 

The standard factory setting for the menu is portrait mode. Alternatively the screen can be displayed in 
landscape mode. The screen can be rotated by steps of 90 degrees, see section 8.6.1. 


Fig. 3.2 

Screen layout, main menu landscape 


1.


Section 1, sub menu items 

2.


Section 2, status, options and 
preview area 

3.


Section 3, main menu items 

Summary of Contents for qic i series

Page 1: ...MANUAL QiC i series Thermal Transfer Printer Edition H325 IAE Rev 004 English kortho...

Page 2: ...ved QiC QiC Draw the kortho logo and the bv Korthofah logo are trademarks of Korthofah BV All other brand and product names in this manual are the trademarks or registered trademarks of their respecti...

Page 3: ...ual on a sensible and safe place for future use Contact Korthofah BV or your local distributor if you have any questions Conventions in this manual The printers of the QiC i series will be referred to...

Page 4: ...mallest portion of a bitmap For a printer one pixel represents one dot one sequence of heating up of a single heating element of the print head Print The result of printing a label on a substrate Prin...

Page 5: ...oding unit 2 2 2 3 Control unit 2 4 2 4 Air supply 2 4 2 5 Label design 2 5 2 5 1 QiC Draw label design software 2 5 2 5 2 NiceLabel 2 6 3 PRINT PROCESS DESCRIPTION 3 1 Print cycle 3 1 3 2 Printhead 3...

Page 6: ...g support 6 3 6 3 2 Substrate adjustment 6 3 6 3 3 Air supply 6 4 6 4 Mounting the control unit 6 4 7 COMMISSIONING 7 1 Initial setup 7 1 7 1 1 Load the ribbon on the magazine 7 1 7 1 2 Aligning the p...

Page 7: ...8 9 4 Fault finding 9 19 9 4 1 Control unit 9 19 9 4 2 Coding unit 9 20 9 4 3 Print request signal sensor 9 22 9 5 Error warning messages 9 22 9 6 Poor print quality 9 23 10 MAINTENANCE 10 1 Daily mai...

Page 8: ...ices Appendix A Specifications A 1 Appendix B Dimensions B 1 Appendix C Part lists illustrations C 1 Appendix D Connections D 1 Appendix E NiceLabel driver tutorials E 1 Appendix F Quick reference F 1...

Page 9: ...ndustrial printers and are designed to print directly on substrates e g packaging foils The printer can print labels with fixed and or dynamic items Dynamic items are items like operator input text nu...

Page 10: ...1 1 The dimensions H x W x D of the coding units are bracket excluded see section 6 3 1 and 6 3 2 Part nr Printer Height Width Depth Print area 816629 Coding unit QiC 30i 196 166 192 53x30 816311 Codi...

Page 11: ...Power rating 200VAmax Fuse rating 2x T3 15A 250Vac slow acting All external equipment that is connected to the control unit interface must be double insulated to qualify the whole installation as a se...

Page 12: ...graphic These items are placed in a label with the label design software Data Fixed and variable Size Maximal 96kB Max items 7 number items per label 1000 external or 400 internal characters per text...

Page 13: ...ication by unqualified personnel or repair with non original parts No claims for guarantee or compensation for damages will be accepted in such instances 1 4 6 Electrostatic charge Make sure that the...

Page 14: ...INTRODUCTION kortho QiC i series H325 IAE Rev 004 1 6...

Page 15: ...from the buffer memory and prints it on the substrate The resolution is always 12 dots mm 300 DPI in width and when the substrate is not moving while printing 12 dots mm 300 DPI in length While the p...

Page 16: ...gazine parts 1 Printer body 2 Magazine 1 Ribbon movement sensor 2 Finger guard 3 Connection to control unit 4 Connection to air supply 5 Front button S 6 Status LED 7 Magazine handle 8 Magazine ribbon...

Page 17: ...place any your fingers in the opening in the main plate of the coding unit once the magazine has been removed This as there is a small change one cuts oneself on sharp edges on parts inside the codin...

Page 18: ...n cable can cause EMC interference Fig 2 7 Control unit connections 2 4 Air supply The printer requires an air supply that is clean and dry ISO 8573 1 2010 4 4 3 The air pressure should be set to 0 4...

Page 19: ...r for further information 2 5 1 QiC Draw label design software The label design software is called QiC Draw With this software package one can create labels for the QiC printer series Besides the labe...

Page 20: ...When using this driver in combination with the NiceLabel software one can use the full options this software program offers including variable text and data fields One should note that using the Nice...

Page 21: ...ved by the control unit the following sequence will be started 1 Printhead down 2 Printhead carriage forward 3 Firing of the heating elements in the sequence determined by the label bitmap When the pr...

Page 22: ...atic discharge may occur due to improper handling charging of non conductive substrate and ribbon moving through dry air o Moisture If your printer is operating in a humid or damp environment this moi...

Page 23: ...1 and 3 the content of this section will change The content can be settings status information or general information Section 3 is showing the 4 main menu options 1 Label selection Label management 2...

Page 24: ...as several functions 1 Following a ribbon break printer malfunction or head being lifted pressing the front button S will attempt to reset the condition However if the condition remains e g the ribbon...

Page 25: ...the relevant buttons or by swiping over the round indicators at the bottom of the screen Fig 3 4 First keyboard screen To use the keyboard superscript alphanumerics 1 Touch and hold the desired key 2...

Page 26: ...swipe over the round indicators at the bottom of the screen or touch the special functions button in the first screen to enter the fourth screen and touch FX Fig 3 7 Third keyboard screen commonly use...

Page 27: ...xt The button is now labelled with the text entered see Fig 3 9 Touching this button enters the text where required Fig 3 9 Programming third keyboard screen buttons entering text The text in a button...

Page 28: ...Fourth keyboard screen edit text and use cursor controls To return to the first screen touch the aBc button To return to the second screen touch the 12 button To return to the third screen touch the F...

Page 29: ...firmware versions installed on the control unit can be displayed on screen by pressing System Info in the Information menu A B Fig 3 12 Entering the System information screen 3 4 6 Menu structure Fig...

Page 30: ...PRINT PROCESS DESCRIPTION kortho QiC i series H325 IAE Rev 004 3 10...

Page 31: ...drive to the control unit but place the USB thumbdrive directly in the control unit Using an extension cable can cause EMC interference Always follow the Safety guidelines presented in the SDS of the...

Page 32: ...label will remain selected until a new label is selected or the system is switched off and on again Make sure another label is selected when starting up the production otherwise the Test label will b...

Page 33: ...on screen showing Error 44 the printer is paused Start the print process to continue The directories that are stored on the USB thumbdrive are shown in pink while the directories that are stored in t...

Page 34: ...ig 4 1 Control unit identification label The part number and serial number of the control unit can be found on the identification label which is also located at the back of the control unit see Fig 4...

Page 35: ...SAFETY H325 IAE Rev 004 kortho QiC i series 4 5 Verify that no significant potential difference exists between the single phase protective earth of the printer and the frame ground of the host machine...

Page 36: ...n the control unit and the coding unit 2 The mains power plug X1 3 The air connection on the coding unit 4 The interface cable X3 Info host interface 5 The LAN cable X2 Option 4 2 4 Precautions when o...

Page 37: ...be protected from electrostatic discharges The printhead can be compared with a normal CMOS circuit and must be ESD protected accordingly to avoid later problems caused by discharges 4 3 2 Printed cir...

Page 38: ......

Page 39: ...0i 4 4 kg L350xW310xH240 818242 Control unit TsC12 QiC 53i 4 4 kg L350xW310xH240 818255 Control unit TsC12 QiC 107i 4 7 kg L350xW310xH240 Store the package in a dry location refer to label 2 of Fig 5...

Page 40: ...a dust cover or bag over the control unit For storage prior to distribution 1 Keep the coding unit upright with the printhead in his upper position to avoid the printhead gets damaged during the hand...

Page 41: ...ntify products 5 2 2 Transport information Refer to the latest Material Safety Datasheet for more detailed and accurate information The product is not subject to transport regulations ADR RID IATA and...

Page 42: ...TRANSPORT STORAGE kortho QiC i series H325 IAE Rev 004 5 4...

Page 43: ...r QiC 107i Input to the air regulator should be 0 7 MPa to 0 8 MPa Distance between regulator and printer should be as short as possible and no longer then 3m The air connection on the coding unit has...

Page 44: ...Fig 6 2 Control unit TsC12 6 2 3 Printhead cleaning set The cleaning set 167131 consists of a box with 25 cleaning swab sticks for cleaning the thermal printhead each swab contains cleaning liquid Bre...

Page 45: ...maintenance and that this location is accessible for operating the printer and for maintenance 3 Mount the substrate adjustment module on the mounting support substrate runs first under the coding uni...

Page 46: ...4 Mounting the control unit 1 Find a secure location which is easily accessible for operators to mount the control unit Refer to Appendix B Dimensions Control unit for the dimensions of the mounting h...

Page 47: ...e coding unit 1 Check and clean the ribbon sensor roller 2 Place an empty core on the rewind spool 4 check whether the pin slides in the notches of the empty core 3 Slide the new ribbon roll on the fe...

Page 48: ...nit once the magazine has been removed This as there is a small change one cuts oneself on sharp edges on parts inside the coding unit and there is a very small change one becomes trapped due to movin...

Page 49: ...6 Set the time and date refer to section 8 6 1 7 Set the interface settings refer to section 8 6 3 8 Set the IP address refer to section 8 6 4 9 Set the printhead resistance refer to section 8 6 2 10...

Page 50: ...o section 9 1 1 8 Set the print density at 10 9 Make some prints when the preheat reached its set temperature by pressing the test button 10 When using QiC Draw download some scope traces from de prin...

Page 51: ...10 tightening of the adjustment screw at the top right corner will result in a good print Fig 7 6 Grid test label printed with correct alignment of printhead and platen density 10 Fig 7 7 Grid test l...

Page 52: ...nt input High Push Home 0 ms Busy output High Printer ID 0 Alarm output High IP address 10 0 1 2xx Low Foil output High Subnet 255 255 255 0 Print missed Error Gateway 0 0 0 0 Encoder time out Error S...

Page 53: ...ngine is powered up and a print request is received The print engine is active before the Main menu is shown Refer to subsection 8 6 1 Note During the boot process the Screen calibration screen will b...

Page 54: ...print 4 To pause the printer touch the Pause print button Note If a print request is received during the pause mode a popup will appear on screen showing Error 44 The printer is paused Start the prin...

Page 55: ...edited and touch the required character s that need s to replace the old character s Alternatively a cursor is indicating the location at which a new character will be inserted Use the keys of the key...

Page 56: ...w value 1 Enter the desired new offset 2 Touch Enter to confirm the Operator input To change only a few numbers 1 Touch the Input text to select the digit s that need s to be changed 2 Enter the desir...

Page 57: ...perator only accepts valid numbers as defined by the label design program To enter a complete new value 1 Enter the desired new digit s 2 Touch Enter to confirm the Operator input To change only a few...

Page 58: ...appear if the label selected requires the input of data see section 8 3 6 Enter the required data and touch Enter the system will return to the Main screen 7 Touching the Preview button will show a pr...

Page 59: ...lower window 3 Touch the sub folder or file in the lower window that needs to be copied 4 Touch the green Copy button 5 The screen will switch to the explorer screen of the label memory Fig 8 8 Copy...

Page 60: ...ng of a label fails the Copy label failed message will appear on screen Touch Ok to return to the Main menu Fig 8 10 Copy label s failed message 12 When there is not enough memory available for the la...

Page 61: ...finished 8 4 3 Moving a label There is a Move function available to make it possible to rearrange the label files and directories 1 Select Management in the Main menu Fig 8 12 Move label menu 2 Touch...

Page 62: ...5 Touch the Paste button 6 The Move procedure is now finished 8 4 4 Deleting a label There is a Delete function available to make it possible to remove label files and or folders 1 Select Management...

Page 63: ...cancel the operation 8 4 5 Showing a preview There is a Preview function available that will show the currently printed label on screen 1 Select Preview in the Main menu the first preview screen will...

Page 64: ...sharp edges on parts inside the coding unit and there is a very small change one becomes trapped due to moving parts inside the coding unit 8 5 2 Placing the magazine 1 Align the magazine guide posts...

Page 65: ...t the ribbon along the path shown in the diagram see Fig 8 19 8 Tape the ribbon on the empty take up core a new roll of ribbon has an adhesive part at the beginning of the ribbon Fig 8 19 Ribbon path...

Page 66: ...ATION kortho QiC i series H325 IAE Rev 004 8 14 Fig 8 20 Settings menu 8 6 1 System settings 1 To change the system settings touch the System button at the top of the screen Fig 8 21 System settings m...

Page 67: ...or seconds 3 Touch the arrow up or arrow down to adjust the time 4 Touch the arrow left or arrow right to change the month and year 5 Touch the day of the month to change the selected date 6 Touch Ok...

Page 68: ...The graphical interface will reboot but this does not affect the printing process 5 Touch No if a The wrong language has been selected Select the correct language immediately after aborting the system...

Page 69: ...age selection menu 2 Touch the language button to select another language Screen orientation 1 Touch the blue button that shows Screen orientation Fig 8 26 Screen orientation selection menu 2 Touch th...

Page 70: ...setting from No to Yes or from Yes to No When Yes is selected the printer will boot in pause mode While in pause mode the printer will ignore print request signals applied In order to start the print...

Page 71: ...ill continue to function normal while the screen save mode is active After touching the screen it will be powered on again Rollover hour 1 Touch the blue button that shows Rollover hour to change the...

Page 72: ...to correctly show the length of unused ribbon that is left on the printer magazine so that the system can warn the operator when the ribbon is almost used up See section 9 1 6 Warning length This valu...

Page 73: ...g downwards Due to vibrations there is a chance that the printhead will slowly move downwards out of its home position at that time When this function is activated the print head carriage is pushed ba...

Page 74: ...etting depends on which type of sensor is used and how it is set Usually the sensor is set in a way that the print will be made on the rising edge Default setting is High rising edge Busy output This...

Page 75: ...t will abort the printing process and the general alarm will be set When set to Warning printing will continue and a warning will be displayed on screen and depending on the Multi function choice sett...

Page 76: ...blue button and the following screen will appear Fig 8 34 Network settings IP address 2 Enter the desired value do not forget to enter the decimal points 3 Confirm with Enter 4 Reboot the system to a...

Page 77: ...on Changing the settings will move the label printed on the product in the corresponding direction The offsets are entered in mm CAUTION If the label is offset too much one could lose parts of the pri...

Page 78: ...nter 1 Touch the Orientation button Fig 8 36 Orientation setting selection 2 Select the required orientation Mirror flips the printed label along the width of the print head 180 rotates the label 180...

Page 79: ...e print request signal is applied at the end of the machine cycle so just at the moment the substrate movement stops Because of the machine dynamics the substrate quite often moves a bit backwards and...

Page 80: ...during a printcycle will set the Print missed error warning Print queue means that a print request is put in the queue when the system is busy making a print The print queue can store 1 print request...

Page 81: ...ostics icon located at the bottom of the screen The following status screen is shown Fig 9 1 Diagnostics menu Beware Many of the features in this section only work when the printer is paused Pause the...

Page 82: ...Test label loaded message will be displayed on screen Fig 9 3 Test label loaded 4 Press the front button S on the coding unit briefly to make a print A sample print can also be made by using the Diag...

Page 83: ...iagnostics screen Printhead temperature the ideal printing temperature is around 30 C Board temperature the temperature of the main board that s located in the control unit It is measured by a sensor...

Page 84: ...r connected to the control unit Date system date of the control unit Printer ID the printer ID as defined by the user Ribbon left the length of remaining ribbon on the magazine measured in metres IP A...

Page 85: ...ersion running on the user interface hardware WinOS Version the build version of the image that is used to flash the user interface hardware Error Touch the Error button to show the 10 most recent err...

Page 86: ...fonts shown in the picture above are the pre installed fonts These fonts can be replaced by other fonts using QiC Draw The fonts shown on screen are those that should be used when using auto code var...

Page 87: ...rough its colours green red and orange This can be used to test whether the tri colour LED is intact IO Feedback This button is used to test the most important internal Carriage encoder Ribbon encoder...

Page 88: ...ves properly Clutch The clutch valve is activated for 2 seconds This can be used to test whether the clutch solenoid is operational and whether the actual clutch does indeed open and close releases en...

Page 89: ...n Beware The system will print as fast as possible with the current settings and label This is very fast and should not be used often To observe whether the printer is capable of reaching the maximum...

Page 90: ...ottom of the screen Fig 9 14 Information menu 9 2 1 General Touch the General button to display the information screen containing the general information Fig 9 15 General information screen Model mode...

Page 91: ...containing the system information Fig 9 16 System information screen Firmware the firmware that controls the main board QiC Control the software that creates the user interface FPGA the software that...

Page 92: ...C Draw program Reset service P h mileage a visual representation of how much distance the printhead has printed compared to the expected life of the printhead Density a visual representation showing t...

Page 93: ...humbdrive Otherwise there is a chance that the wrong version will be installed 2 Touch the Upgrade button the following screen will be displayed Fig 9 18 Upgrade files detected screen 3 Touch the Yes...

Page 94: ...rive and wait for 4 seconds so it can be detected and mounted CAUTION Do not use an extension cable for connecting the USB thumbdrive to the control unit but place the USB thumbdrive directly in the c...

Page 95: ...played Touch Yes and the backup file will be overwritten Touch No and the backup operation will be cancelled Fig 9 22 Backup overwrite 6 While creating the backup folder and backing up the labels a ti...

Page 96: ...taining the printer settings and a scope trace file This service report can either be opened as a text file or loaded into the service part of QiC Draw The scope trace file can be opened in the oscill...

Page 97: ...h the Enter button to save the report 5 If the name already exists a file overwrite message will be displayed Touch Yes and the report files will be overwritten Touch No and the report operation will...

Page 98: ...rt and Scope_KorthoReport_ xxx for the scope trace file xxx being the name one has entered at step 3 9 3 Screen calibration If the screen calibration is not correct the screen can be re calibrated dur...

Page 99: ...se actions should only be performed by qualified personnel Disconnect power cable X1 from mains power supply first The user interface remains dark Check whether the power cable of the user interface p...

Page 100: ...sensing the product mark System is in error mode the orange LED on the coding unit is on and general alarm output is active A half roll of ribbon is left but the QiC TsC12 advises it has run out of ri...

Page 101: ...t to 0 4 MPa 4 bar 0 5 MPa for QiC 107i Carriage encoder problem Check whether the air is applied to the printer Remove the magazine and lower the printhead Manually move the printhead and check for a...

Page 102: ...ensor does not detect passing product In case of a photocell Check whether the lens front side of the photocell is clean Check whether the sensitivity of the photocell is properly set Check whether th...

Page 103: ...her the air pressure is set to 0 4MPa 4 bar 0 5 MPa for QiC 107i Parts of the label are missing and white lines appear within the printed label Fig 9 30 Check whether the printhead has been cleaned re...

Page 104: ...nt request signal issue affects the setup e g is the substrate stopped when the system printer starts printing Check whether the delay setting is either too low or too high Check whether the substrate...

Page 105: ...is important to clean the printhead regularly CAUTION Under NO circumstances should a sharp tool be used while maintaining the printhead Any damage caused by sharp object will void the warranty To cl...

Page 106: ...replaced the magazine needs to be cleaned Clean the ribbon movement sensor roller and the pressure roller with a cleaning swab or lint free cloth soaked in isopropanol 2 propanol or isopropyl alcohol...

Page 107: ...permanently damage the encoder strip To guarantee a optimal clutch action and so an optimal ribbon transport it is adviced to lubricate the clutch every 6 months with a thin layer of Kl bersynth UH1 1...

Page 108: ...o avoid extensive wear Adjust the coding unit to have an even pressure across the width of the printhead Use ribbon which is free from Na K and CI ions Use ribbon which is designed to reduce the frict...

Page 109: ...pins Ensure the lock clip s of the connector s is are in place CAUTION Make sure the connector is secured by the connector clamp 2 6 Switch on the system and adjust the printhead resistance value see...

Page 110: ...MAINTENANCE kortho QiC i series H325 IAE Rev 004 10 6...

Page 111: ...2 Remove the printed circuit board 3 Remove the LED s wire loom carriage encoder module and the ribbon encoder 4 Remove the printhead 5 Treat the printed circuit board and the printhead as electronic...

Page 112: ...aration Deliver the packaging materials to a certifiet waste recycling company Printed circuit boards power supplies touch panel net entr e encoders and wire looms are considered electronic waste beca...

Page 113: ...ton 3 2 3 3 3 4 3 5 3 6 3 7 3 8 4 4 7 4 7 5 8 1 8 2 8 6 8 7 8 10 8 12 8 14 8 15 8 16 8 17 8 18 8 19 8 20 8 21 8 22 8 23 8 24 8 25 8 26 8 27 9 1 9 2 9 3 9 4 9 5 9 7 9 9 9 10 9 11 9 12 9 13 9 14 9 16 9...

Page 114: ...0 5 11 1 product 4 1 5 2 5 3 8 22 8 23 8 25 8 27 9 20 9 22 protection 1 1 1 3 1 4 Q qualified 1 1 4 2 9 9 9 19 10 1 10 3 10 5 R ribbon 1 2 1 3 1 4 2 3 3 1 3 2 3 4 4 1 4 2 5 3 7 1 8 6 8 13 8 20 8 23 8...

Page 115: ...2 Power supply information 4 4 Fig 4 3 Attention label for opening control unit 4 6 Fig 5 1 Shipping and handling labels 5 1 Fig 6 1 Coding unit 6 2 Fig 6 2 Control unit TsC12 6 2 Fig 6 3 Positioning...

Page 116: ...d firmware version screen 9 4 Fig 9 8 Error Warning list 9 5 Fig 9 9 Font list screen 9 6 Fig 9 10 Diagnostics menu 9 7 Fig 9 11 IO feedback screen 9 8 Fig 9 12 Test menu 9 8 Fig 9 13 Reset Ribbon men...

Page 117: ...Prints per minute QiC 30i QiC53i QiC107i 10mm print 350 250 250 30mm print 180 50mm print NA 120 120 100mm print NA 70 70 Print head 12 dots mm 300 dpi Substrate Synthetic foils PP PET PE and coated...

Page 118: ...hics These items are placed in a label using the label design program Data Fixed and variable Size Maximal 96kB Font Internal 6 fonts are preinstalled Liberation Sans Liberation Serif Tahoma Century G...

Page 119: ...PostNet 6 ZIP 5 digits Check digit PostNet 9 ZIP 4 QR Code Royal Mail 4 State RM4SCC RSS Expanded RSS Limited RSS 14 Expanded Stacked RSS 14 Stacked Omnidirectional RSS 14 Stacked RSS 14 Truncated RS...

Page 120: ...APPENDIX A SPECIFICATIONS kortho QiC i series H325 IAE Rev 004 A 4...

Page 121: ...H325 IAE Rev 004 kortho QiC i series B 1 Appendix B Dimensions Coding unit 30i B 2 Coding unit 53i B 3 Coding unit 107i B 4 Control unit B 5 Standard bracket B 6...

Page 122: ...APPENDIX B DIMENSIONS kortho QiC i series H325 IAE Rev 004 B 2 Coding unit 30i Dimensions are metric mm...

Page 123: ...APPENDIX B DIMENSIONS H325 IAE Rev 004 kortho QiC i series B 3 Coding unit 53i Dimensions are metric mm...

Page 124: ...APPENDIX B DIMENSIONS kortho QiC i series H325 IAE Rev 004 B 4 Coding unit 107i Dimensions are metric mm...

Page 125: ...APPENDIX B DIMENSIONS H325 IAE Rev 004 kortho QiC i series B 5 Control unit Dimensions are metric mm...

Page 126: ...APPENDIX B DIMENSIONS kortho QiC i series H325 IAE Rev 004 B 6 Standard bracket Dimensions are metric mm...

Page 127: ...wing A C 10 Coding unit QiC 53i drawing B C 12 Magazine QiC 53i C 14 Printhead cylinder QiC 53i C 16 Coding unit QiC 107i C 18 Coding unit QiC 107i drawing A C 18 Coding unit QiC 107i drawing B C 20 M...

Page 128: ...scription 1 165394 Draw spring d 0 45 Dm 7 5 L 14 0 6 815261 Cable internal coding unit QiC 2 165728 Close tolerance screw 7 815299 PCB coding unit QiC 3 165871 Printhead QiC 30 53 8 815414 Magazine Q...

Page 129: ...APPENDIX C PART LISTS ILLUSTRATIONS H325 IAE Rev 004 kortho QiC i series C 3 Coding unit QiC 30i drawing A...

Page 130: ...a g a z in e Q iC 3 0 7 1 6 5 3 4 9 W a g e n lin e a ir ra il Q iC 2 3 8 1 5 3 0 1 C lu tc h Q iC 8 1 6 5 4 4 8 P u s h b u tto n Q iC 2 4 8 1 5 5 5 4 C a b le c lu tc h Q iC 3 0 9 1 6 5 5 8 8 In n e...

Page 131: ...APPENDIX C PART LISTS ILLUSTRATIONS H325 IAE Rev 004 kortho QiC i series C 5 Coding unit QiC 30i drawing B...

Page 132: ...ock nut M5 13 323005 L piece magazine QiC 4 165897 O ring 11 0x1 5 Viton 14 323285 Disc winding roll QiC 5 166078 Beraing 15 5x2 15 323957 Shaft spool feed off QiC 30 53 6 166081 Disc bearing 15 5x2 1...

Page 133: ...APPENDIX C PART LISTS ILLUSTRATIONS H325 IAE Rev 004 kortho QiC i series C 7 Magazine QiC 30i...

Page 134: ...rtho QiC i series H325 IAE Rev 004 C 8 Printhead cylinder QiC 30i Line Part no Description Line Part no Description 1 165772 O ring 8 0x1 5 Viton 3 165982 Solenoid valve QiC 2 165897 O ring 11 0x1 5 V...

Page 135: ...APPENDIX C PART LISTS ILLUSTRATIONS H325 IAE Rev 004 kortho QiC i series C 9 Printhead cylinder QiC 30i...

Page 136: ...l c o d in g u n it Q iC 2 1 6 5 7 2 8 C lo s e to le ra n c e s c re w 8 8 1 5 2 9 9 P C B c o d in g u n it Q iC 3 1 6 5 8 7 1 P rin th e a d Q iC 3 0 5 3 9 8 1 5 4 2 7 M a g a z in e Q iC 5 3 i 4...

Page 137: ...APPENDIX C PART LISTS ILLUSTRATIONS H325 IAE Rev 004 kortho QiC i series C 11 Coding unit QiC 53i drawing A...

Page 138: ...iC 2 1 8 1 5 3 0 2 C lu tc h Q iC 7 1 6 5 4 1 9 T im in g b e lt B 6 L 6 3 Q iC 5 3 1 0 7 2 2 8 1 5 5 7 9 C a b le c lu tc h Q iC 5 3 1 0 7 8 1 6 5 4 4 8 P u s h b u tto n Q iC 2 3 8 1 5 5 8 2 C a b...

Page 139: ...APPENDIX C PART LISTS ILLUSTRATIONS H325 IAE Rev 004 kortho QiC i series C 13 Coding unit QiC 53i drawing B...

Page 140: ...3 166078 Bearing 15 5x2 12 323285 Disc winding roll QiC 4 166081 Disc bearing 15 5x2 13 323957 Shaft spool feed off QiC 30 53 5 166218 Spring encoder magazine 14 324138 L piece magazine QiC 53 107 6...

Page 141: ...APPENDIX C PART LISTS ILLUSTRATIONS H325 IAE Rev 004 kortho QiC i series C 15 Magazine QiC 53iMagazine QiC 30i...

Page 142: ...tho QiC i series H325 IAE Rev 004 C 16 Printhead cylinder QiC 53i Line Part no Description Line Part no Description 1 165772 O ring 8 0x1 5 Viton 3 165982 Solenoid valve QiC 2 165897 O ring 11 0x1 5 V...

Page 143: ...APPENDIX C PART LISTS ILLUSTRATIONS H325 IAE Rev 004 kortho QiC i series C 17 Printhead cylinder QiC 53i...

Page 144: ...394 Draw spring d 0 45 Dm 7 5 L 14 0 7 815261 Cable internal coding unit QiC 2 165422 Printhead QiC 107 8 815299 PCB coding unit QiC 3 165728 Close tolerance screw 9 815439 Magazine QiC 107 4 322347 C...

Page 145: ...APPENDIX C PART LISTS ILLUSTRATIONS H325 IAE Rev 004 kortho QiC i series C 19 Coding unit QiC 107i drawing A...

Page 146: ...ard magazine QiC 107 6 165349 Wagen lineair rail QiC 21 815302 Clutch QiC 7 165419 Timing belt B 6 L 63 QiC 53 107 22 815579 Cable clutch QiC 53 107 8 165448 Push button QiC 23 815582 Cable tension Qi...

Page 147: ...APPENDIX C PART LISTS ILLUSTRATIONS H325 IAE Rev 004 kortho QiC i series C 21 Coding unit QiC 107i drawing B...

Page 148: ...L 19 5 11 322849 Disc felt QiC 3 166078 Beraing 15 5x2 12 323314 Rol encoder QiC 107 4 166081 Disc bearing 15 5x2 13 323005 L piece magazine QiC 5 166218 Spring encoder magazine 14 815369 Roller foil...

Page 149: ...APPENDIX C PART LISTS ILLUSTRATIONS H325 IAE Rev 004 kortho QiC i series C 23 Magazine QiC 107i...

Page 150: ...ho QiC i series H325 IAE Rev 004 C 24 Printhead cylinder QiC 107i Line Part no Description Line Part no Description 1 165772 O ring 8 0x1 5 Viton 3 165982 Solenoid valve QiC 2 165897 O ring 11 0x1 5 V...

Page 151: ...APPENDIX C PART LISTS ILLUSTRATIONS H325 IAE Rev 004 kortho QiC i series C 25 Printhead cylinder QiC 107i...

Page 152: ...16015 Support controlbox TsC8 5 166682 Transistor clip TsC26 17 816925 Main cable TsC12 L 2 5 6 166695 Isolation strip TsC26 18 816769 Cable intern encoder QiC 7 167172 LED green 24VDC QiC 19 817049 P...

Page 153: ...APPENDIX C PART LISTS ILLUSTRATIONS H325 IAE Rev 004 kortho QiC i series C 27 Control unit TsC12 QiC 30i...

Page 154: ...t controlbox TsC8 5 166682 Transistor clip TsC26 17 816925 Main cable TsC12 L 2 5 6 166695 Isolation strip TsC26 18 816769 Cable intern encoder QiC 7 167172 LED green 24VDC QiC 19 817049 Power supply...

Page 155: ...APPENDIX C PART LISTS ILLUSTRATIONS H325 IAE Rev 004 kortho QiC i series C 29 Control unit TsC12 QiC 53i...

Page 156: ...t controlbox TsC8 5 166682 Transistor clip TsC26 17 817822 CCU PX2 incl software TsC12 6 166695 Isolation strip TsC26 18 816769 Cable intern encoder QiC 7 167172 LED green 24VDC QiC 19 817049 Power su...

Page 157: ...APPENDIX C PART LISTS ILLUSTRATIONS H325 IAE Rev 004 kortho QiC i series C 31 Control unit TsC12 QiC 107i...

Page 158: ...ment part 4 817119 Set counter pressure plate 175x135 8 817081 Counter pressure plate 175x135 QiC i 5 817122 Set adjustment block support QiC Bracket L 520 Standard bracket L 620 Line Part no Descript...

Page 159: ...APPENDIX C PART LISTS ILLUSTRATIONS H325 IAE Rev 004 kortho QiC i series C 33...

Page 160: ...APPENDIX C PART LISTS ILLUSTRATIONS kortho QiC i series H325 IAE Rev 004 C 34...

Page 161: ...dix D Connections Control unit Connector Plate D 2 X3 Schematic diagram input D 3 X3 Schematic diagram output D 4 X3 Circuit diagram input D 5 X3 Circuit diagram output D 6 X3 Schematics diagram User...

Page 162: ...d 2 fuses 3 15A T X2 LAN connection RJ45 socket X3 Interface connection input output HD 26 ways socket X4 Encoder not present at 30i printer F1 Preheat fuse 500mA F LABEL Partnumber serialnumber and m...

Page 163: ...APPENDIX D CONNECTIONS H325 IAE Rev 004 kortho QiC i series D 3 X3 Schematic diagram input...

Page 164: ...APPENDIX D CONNECTIONS kortho QiC i series H325 IAE Rev 004 D 4 X3 Schematic diagram output...

Page 165: ...APPENDIX D CONNECTIONS H325 IAE Rev 004 kortho QiC i series D 5 X3 Circuit diagram input...

Page 166: ...APPENDIX D CONNECTIONS kortho QiC i series H325 IAE Rev 004 D 6 X3 Circuit diagram output...

Page 167: ...APPENDIX D CONNECTIONS H325 IAE Rev 004 kortho QiC i series D 7 X3 Schematics diagram User This diagram can be used to note the specific user settings...

Page 168: ...APPENDIX D CONNECTIONS kortho QiC i series H325 IAE Rev 004 D 8 Pneumatic circuit diagram 30i 53i 107i...

Page 169: ...iver E 2 Versions of the driver E 2 Installation of the driver E 3 Configuration of the driver E 6 Summary E 8 Downloading a label through USB E 9 Introduction E 9 Installation of the driver E 9 Downl...

Page 170: ...d with that the Kortho printers can be controlled by all common Windows systems Most ERP systems are also capable of printing to a Windows driver This means that one could control all Kortho printers...

Page 171: ...r s port setting Installation of the driver As soon as the compatible driver has been downloaded it can be installed on the PC Laptop which is going to control the printer s Beware If the label needs...

Page 172: ...92 168 1 10 b Optionally enter a Name for the port So that the port is easily recognized for example X18_line c Enter the Port number With a Kortho printer this is always 14322 this is the control uni...

Page 173: ...inish to close the screen A progress screen will appear installing the driver 11 Open the printer configuration screen in Windows This is found in Windows Start or in Start Configuration screen The pr...

Page 174: ...r will print het Windows logo Configuration of the driver In order to more easily work with the printer and set up labels a standard label type can be set 1 Open the printer configuration screen in Wi...

Page 175: ...printer 10 Click New Nieuw again to add another label definition or click OK to close the screen When designing a label in a designing program one can select the printer Kortho X18_Line 1 and after t...

Page 176: ...can be defined By doing this the driver can communicate the information back to a label design program like NiceLabel Bartender etc When defining the lay out of a label the program will take the print...

Page 177: ...it needs to be printed to a Printfile prn It is not possible to download the original label file to the printer Installation of the driver As soon as the compatible driver has been downloaded it can...

Page 178: ...step 4 Beware To guarantee a good print result it is important that the label is designed for the printer to which one would like to download the label 2 Select the right printer driver configured to...

Page 179: ...designed with a PC based design tool or they can de designed on the control unit The labels designed with a PC based design tool can be downloaded to the control unit by Ethernet or by USB thumbdrive...

Page 180: ...APPENDIX E NICELABEL DRIVER TUTORIALS Kortho QiC i series H325 IAE Rev 004 E 12 6 Select Print and the printer will start printing the selected label...

Page 181: ...H325 IAE Rev 004 kortho QiC i series F 1 Appendix F Quick reference...

Page 182: ...APPENDIX F QUICK REFERENCE Kortho QiC i series H325 IAE Rev 004 F 2...

Page 183: ...ue Error 17 Maximum digits for Error 18 Maximum characters for Error 19 Date invalid Error 20 Time invalid Error 21 Wrong name or missing variable Error 23 Maximum users Error 24 Access Denied Error 2...

Page 184: ...not calibrated Calibrate the PX2 board Error 60 Preview too large Error 61 The speed of the line is too low The speed must be at least 40 mm s 2 4 m min Error 62 The speed of the line is too high The...

Page 185: ...t QiC 53i 816311 Coding unit QiC 107i 815722 to which this declaration relates is in conformity with the following standards or other normative documents NEN EN ISO 12100 2010 FSO TR 14121 2 2007 EN 6...

Page 186: ...bv korthofah P O box 3040 2220 CA Katwijk The Netherlands...

Reviews: