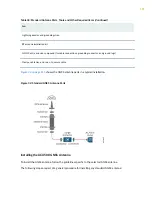
•
"Mounting the ACX500 Outdoor Router on a Pole" on page 137
— You can mount the ACX500
outdoor router on a suitable telephone or an electrical pole with help of the pole-mounting kit. The
pole-mounting kit is sold separately. It is not shipped with the ACX500 outdoor router.
•
"Mounting the ACX500 Outdoor Router on a Wall" on page 132
— You can mount the ACX500
outdoor router on a suitable wall with the help of a wall-mounting kit. The wall-mounting kit is sold
separately. It is not shipped with the ACX500 outdoor router.
NOTE: The information provided in this topic is applicable for both the ACX500 outdoor router
variants—ACX500 outdoor router and ACX500 outdoor router with PoE.
To install and connect an ACX500 outdoor router:
1. Unpack the router and verify the parts received. See
"Unpacking the ACX500" on page 125
2. Install the router.
• On a pole—See
"Mounting the ACX500 Outdoor Router on a Pole" on page 137
• On a wall—See
"Mounting the ACX500 Outdoor Router on a Wall" on page 132
.
3. Ground the router. See
"Connecting the ACX500 Router to Earth Ground" on page 156
.
4. Connect power to the router.
• AC-powered models—See
"Connecting an AC Power Cord to the ACX500 Indoor Router" on page
• DC-powered models—See
"Connecting DC Power Cables to the ACX500 Indoor Router" on page
5. Connect and secure the interface cables to the router. See
"Weatherproofing the ACX500 Outdoor
6. Connect the router to external devices. See:
•
"Connecting ACX500 Routers to Management Devices" on page 175
•
"Connecting the ACX500 Router to an External Alarm-Reporting Device" on page 178
•
"Connecting the ACX500 Router to External Clocking Devices" on page 179
7. Perform initial configuration of the router. See
"Configuring Junos OS on the ACX500 Router" on
RELATED DOCUMENTATION
Site Preparation Checklist for ACX500 Routers | 76
124


