background image

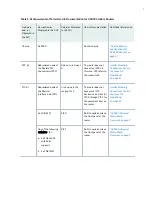
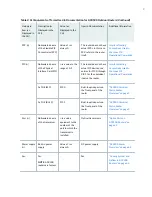
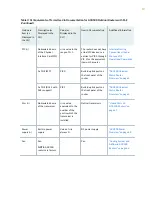
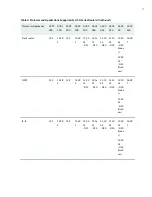
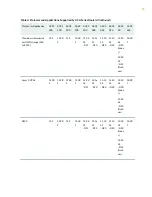
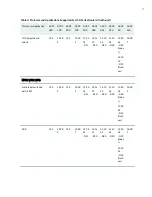
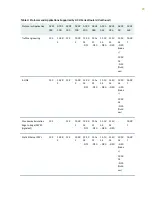
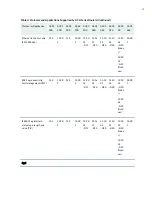
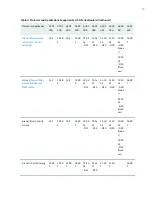
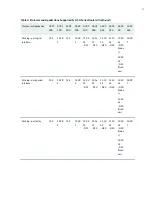
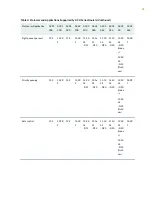
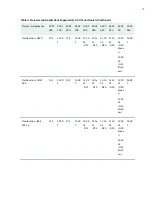
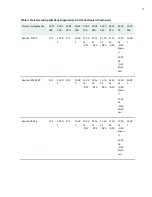
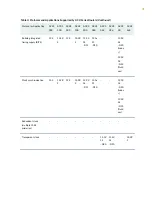
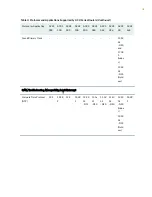
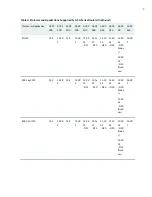
Table 4: Protocols and Applications Supported by ACX Series Routers 

(Continued)

Protocol or Application

ACX1
000

ACX1
100

ACX2
000

ACX2
100

ACX2
200

ACX4
000

ACX5
048

ACX5
096

ACX5
00

ACX5
448

LDP (targeted and
direct)

12.2

12.2R
2

12.2

12.2R
2

12.3X
54
–D15

12.3x
51
-D10

15.1X
54
–D20

15.1X
54
–D20

12.3X
54
–D20
(Indoo
r)

12.3X
54
–D25
(Outd
oor)

18.2R
1

MPLS, VPLS, VPNs

Static label-switched
path (LSP)

12.2

12.2R
2

12.2

12.2R
2

12.3X
54
–D15

12.3x
51
-D10

15.1X
54
–D20

15.1X
54
–D20

12.3X
54
–D20
(Indoo
r)

12.3X
54
–D25
(Outd
oor)

18.2R
1

FRR

12.2

12.2R
2

12.2

12.2R
2

12.3X
54
–D15

12.3x
51
-D10

15.1X
54
–D20

15.1X
54
–D20

12.3X
54
–D20
(Indoo
r)

12.3X
54
–D25
(Outd
oor)

18.2R
1

19

Summary of Contents for ACX500

Page 1: ...ACX500 Universal Metro Router Hardware Guide Published 2022 05 03...

Page 2: ...dware Guide Copyright 2022 Juniper Networks Inc All rights reserved The information in this document is current as of the date on the title page YEAR 2000 NOTICE Juniper Networks hardware and software...

Page 3: ...X500 Outdoor Router Description 49 ACX500 Outdoor Router with PoE Description 51 Front Panel of an ACX500 Indoor Router 53 Front Panel of an ACX500 Outdoor Router with PoE 55 Alarm Contact Port on ACX...

Page 4: ...e Requirements for ACX500 Outdoor Routers 98 Rack Requirements for ACX500 Indoor Routers 99 ACX500 Alarm and Management Cable Specifications and Pinouts 101 Alarm Contact Port Pinouts for ACX500 Route...

Page 5: ...ement Ports 155 Connecting the ACX500 Router to Earth Ground 156 Connecting the ACX500 to Power 161 Connecting an AC Power Cord to the ACX500 Indoor Router 161 Connecting DC Power Cables to the ACX500...

Page 6: ...Cable 190 Replacing a Fiber Optic Cable 191 Disconnecting a Fiber Optic Cable 191 Connecting a Fiber Optic Cable 192 Replacing an SFP Transceiver 193 Removing an SFP Transceiver 193 Installing an SFP...

Page 7: ...n Instructions Warning 216 Chassis and Component Lifting Guidelines 217 Restricted Access Warning 217 Ramp Warning 219 Rack Mounting and Cabinet Mounting Warnings 219 Grounded Equipment Warning 223 Ra...

Page 8: ...ard Warning 246 Multiple Power Supplies Disconnection Warning 246 TN Power Warning 247 Agency Approvals and Compliance Statements 248 Agency Approvals for ACX500 Routers 248 Compliance Statements for...

Page 9: ...CX500 Universal Metro Router After completing the installation and basic configuration procedures covered in this guide refer to the Junos OS documentation for information about further software confi...

Page 10: ...1 CHAPTER Overview ACX500 System Overview 2 ACX500 Chassis 47 Cooling System and Airflow in ACX500 Routers 66 ACX500 Power System 68...

Page 11: ...address legacy and emerging requirements to provide the foundation for a converged network that utilizes the same mobile backhaul infrastructure for business or residential services The routers have...

Page 12: ...ent such as on walls and poles The chassis of the ACX500 indoor router measures 1 75 in 4 45 cm high 9 4 in 24 cm deep and 17 5 in 44 5 cm wide The chassis of the ACX500 outdoor router with the Power...

Page 13: ...s and support files needed to bring the hardware online Unified in service software upgrade unified ISSU provides software upgrades between two different Junos OS releases major or minor without disru...

Page 14: ...e router itself Interface Naming Conventions Used in the Junos OS Operational Commands PIC n Abbreviated name of the Physical Interface Card PIC n is a value in the range of 0 1 The router does not ha...

Page 15: ...on page 62 Power supply n Built in power supply Value of n is always 0 DC power supply ACX500 Power Overview on page 68 Fan Fan NOTE ACX500 routers are fanless models ACX500 Universal Metro Router Ov...

Page 16: ...hardware terms used in ACX500 outdoor router documentation and the corresponding terms used in the Junos OS CLI Figure 2 on page 9 shows the port locations of the interfaces Table 2 CLI Equivalents o...

Page 17: ...devices see entries for PIC 0 through PIC 1 for the equivalent item on the router Interface Naming Conventions Used in the Junos OS Operational Commands 3x 1GE SFP PIC 0 Built in uplink ports on the...

Page 18: ...ocations of the interfaces Table 3 CLI Equivalents of Terms Used in Documentation for ACX500 Outdoor Routers with PoE Hardware Item as Displayed in the CLI Description as Displayed in the CLI Value as...

Page 19: ...e Junos OS Operational Commands 3x 1GE SFP PIC 0 Built in uplink ports on the front panel of the router ACX500 Universal Metro Router Overview on page 2 3x 1GE RJ 45 with PoE support PIC 1 Built in up...

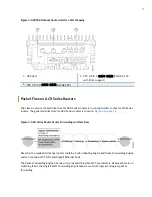
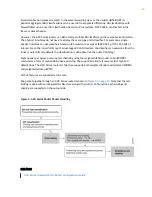
Page 20: ...he general architecture for ACX Series routers is shown in Figure 4 on page 11 Figure 4 ACX Series Router Packet Forwarding and Data Flow Based on the model ACX Series routers contain a built in Routi...

Page 21: ...g of a dual tagged VLAN interface the classifier can examine either the inner or outer bits By default the classification is done based on the outer VLAN tag Eight queues per egress port support sched...

Page 22: ...in show interface extensive output The only way to use higher MTU for a family is to manipulate the MTU apply at interface or family inet levels and let it calculate for each family automatically MTU...

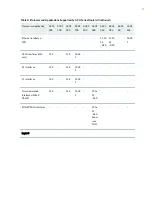
Page 23: ...00 ACX4 000 ACX5 048 ACX5 096 ACX5 00 ACX5 448 Ethernet interfaces 40G 15 1X 54 D20 15 1X 54 D20 18 2R 1 ATM interfaces IMA only 12 2 12 2 12 2R 2 E1 interfaces 12 2 12 2 12 2R 2 T1 interfaces 12 2 12...

Page 24: ...s 12 2 12 2R 2 12 2 12 2R 2 12 3X 54 D15 12 3x 51 D10 15 1X 54 D20 15 1X 54 D20 12 3X 54 D20 Indoo r 12 3X 54 D25 Outd oor 18 2R 1 OSPF 12 2 12 2R 2 12 2 12 2R 2 12 3X 54 D15 12 3x 51 D10 15 1X 54 D20...

Page 25: ...4 D15 12 3x 51 D10 15 1X 54 D20 15 1X 54 D20 12 3X 54 D20 Indoo r 12 3X 54 D25 Outd oor 18 2R 1 Internet Control Message Protocol ICMP 12 2 12 2R 2 12 2 12 2R 2 12 3X 54 D15 12 3x 51 D10 15 1X 54 D20...

Page 26: ...12 2 12 2R 2 12 3X 54 D15 12 3x 51 D10 15 1X 54 D20 15 1X 54 D20 12 3X 54 D20 Indoo r 12 3X 54 D25 Outd oor 18 2R 1 Dynamic Host Configuration Protocol DHCP 12 2 12 2R 2 12 2 12 2R 2 12 3X 54 D15 12...

Page 27: ...256 to 9192 12 2 12 2R 2 12 2 12 2R 2 12 3X 54 D15 12 3x 51 D10 15 1X 54 D20 15 1X 54 D20 12 3X 54 D20 Indoo r 12 3X 54 D25 Outd oor 18 2R 1 Layer 3 VPNs 12 3R 1 12 3R 1 12 3R 1 12 3R 1 12 3X 54 D15 1...

Page 28: ...12 2 12 2R 2 12 3X 54 D15 12 3x 51 D10 15 1X 54 D20 15 1X 54 D20 12 3X 54 D20 Indoo r 12 3X 54 D25 Outd oor 18 2R 1 MPLS VPLS VPNs Static label switched path LSP 12 2 12 2R 2 12 2 12 2R 2 12 3X 54 D15...

Page 29: ...5 1X 54 D20 12 3X 54 D20 Indoo r 12 3X 54 D25 Outd oor 18 2R 1 E LINE 12 2 12 2R 2 12 2 12 2R 2 12 3X 54 D15 12 3x 51 D10 15 1X 54 D20 15 1X 54 D20 12 3X 54 D20 Indoo r 12 3X 54 D25 Outd oor 18 2R 1 P...

Page 30: ...ayer 2 circuits 12 2 12 2R 2 12 2 12 2R 2 12 3X 54 D15 12 3x 51 D10 15 1X 54 D20 15 1X 54 D20 12 3X 54 D20 Indoo r 12 3X 54 D25 Outd oor 18 2R 1 IEE802 1ag CC monitoring on active and standby pseudowi...

Page 31: ...X 54 D15 12 3x 51 D10 15 1X 54 D20 15 1X 54 D20 12 3X 54 D20 Indoo r 12 3X 54 D25 Outd oor 18 2R 1 802 1ag connectivity fault management CFM 12 2 12 2R 2 12 2 12 2R 2 12 3X 54 D15 12 3x 51 D10 15 1X 5...

Page 32: ...54 D20 12 3X 54 D20 Indoo r 12 3X 54 D25 Outd oor 18 2R 1 Standard firewall filter match conditions for MPLS traffic 12 2 12 2R 2 12 2 12 2R 2 12 3X 54 D15 12 3x 51 D10 15 1X 54 D20 15 1X 54 D20 12 3X...

Page 33: ...2 12 2 12 2R 2 12 3X 54 D15 12 3x 51 D10 15 1X 54 D20 15 1X 54 D20 12 3X 54 D20 Indoo r 12 3X 54 D25 Outd oor 18 2R 1 Policing per physical interface 12 2 12 2R 2 12 2 12 2R 2 12 3X 54 D15 12 3x 51 D...

Page 34: ...2 2 12 2R 2 12 3X 54 D15 12 3x 51 12 3X 54 D15 D10 15 1X 54 D20 15 1X 54 D20 12 3X 54 D20 Indoo r 12 3X 54 D25 Outd oor 18 2R 1 SrTCM color aware color blind 12 2 12 2R 2 12 2 12 2R 2 12 3X 54 D15 12...

Page 35: ...12 2R 2 12 2 12 2R 2 12 3X 54 D15 12 3x 51 D10 15 1X 54 D20 15 1X 54 D20 12 3X 54 D20 Indoo r 12 3X 54 D25 Outd oor 18 2R 1 Priority queuing 12 2 12 2R 2 12 2 12 2R 2 12 3X 54 D15 12 3x 51 D10 15 1X...

Page 36: ...12 2R 2 12 3X 54 D15 12 3x 51 D10 15 1X 54 D20 15 1X 54 D20 12 3X 54 D20 Indoo r 12 3X 54 D25 Outd oor 18 2R 1 Low latency queue LLQ 12 2 12 2R 2 12 2 12 2R 2 12 3X 54 D15 12 3x 51 D10 15 1X 54 D20 1...

Page 37: ...2 12 2R 2 12 3X 54 D15 12 3x 51 D10 15 1X 54 D20 15 1X 54 D20 12 3X 54 D20 Indoo r 12 3X 54 D25 Outd oor 18 2R 1 Classification MPLS EXP 12 2 12 2R 2 12 2 12 2R 2 12 3X 54 D15 12 3x 51 D10 15 1X 54 D...

Page 38: ...R 2 12 2 12 2R 2 12 3X 54 D15 12 3x 51 D10 15 1X 54 D20 15 1X 54 D20 12 3X 54 D20 Indoo r 12 3X 54 D25 Outd oor 18 2R 1 Rewrite MPLS EXP 12 2 12 2R 2 12 2 12 2R 2 12 3X 54 D15 12 3x 51 D10 15 1X 54 D2...

Page 39: ...ferent values 12 2 12 2R 2 12 2 12 2R 2 12 3X 54 D15 12 3x 51 D10 15 1X 54 D20 15 1X 54 D20 12 3X 54 D20 Indoo r 12 3X 54 D25 Outd oor 18 2R 1 Timing Timing 1588 v2 1588 2008 backup clock 12 2 12 2R 2...

Page 40: ...096 ACX5 00 ACX5 448 Building integrated timing supply BITS 12 2 12 2R 2 12 2 12 2R 2 12 3X 54 D15 12 3x 51 D10 12 3X 54 D20 Indoo r 12 3X 54 D25 Outd oor Clock synchronization 12 2 12 2R 2 12 2 12 2...

Page 41: ...ACX2 200 ACX4 000 ACX5 048 ACX5 096 ACX5 00 ACX5 448 Grand Primary Clock 12 3X 54 D20 and 17 3R 1 Indoo r 12 3X 54 D25 Outd oor OAM Troubleshooting Manageability Lawful Intercept Network Time Protocol...

Page 42: ...R 2 12 2 12 2R 2 12 3X 54 D15 12 3x 51 D10 15 1X 54 D20 15 1X 54 D20 12 3X 54 D20 Indoo r 12 3X 54 D25 Outd oor 18 2R 1 802 1ag CFM 12 2 12 2R 2 12 2 12 2R 2 12 3X 54 D15 12 3x 51 D10 15 1X 54 D20 15...

Page 43: ...e Management 12 2 12 2R 2 12 2 12 2R 2 12 3X 54 D15 12 3x 51 D10 15 1X 54 D20 15 1X 54 D20 12 3X 54 D20 Indoo r 12 3X 54 D25 Outd oor 18 2R 1 MPLS OAM 12 2 12 2R 2 12 2 12 2R 2 12 3X 54 D15 12 3x 51 D...

Page 44: ...2 2R 2 12 2 12 2R 2 12 3X 54 D15 12 3x 51 D10 15 1X 54 D20 15 1X 54 D20 12 3X 54 D20 Indoo r 12 3X 54 D25 Outd oor 18 2R 1 DNS 12 2 12 2R 2 12 2 12 2R 2 12 3X 54 D15 12 3x 51 D10 15 1X 54 D20 15 1X 54...

Page 45: ...irroring local port mirroring 12 2 12 2R 2 12 2 12 2R 2 12 3X 54 D15 12 3x 51 D10 12 3X 54 D20 Indoo r 12 3X 54 D25 Outd oor 18 2R 1 Interface loopback 12 2 12 2R 2 12 2 12 2R 2 12 3X 54 D15 12 3x 51...

Page 46: ...12 2R 2 12 2 12 2R 2 12 3X 54 D15 12 3x 51 D10 15 1X 54 D20 15 1X 54 D20 12 3X 54 D20 Indoo r 12 3X 54 D25 Outd oor 18 2R 1 Interface queue stats 12 2 12 2R 2 12 2 12 2R 2 12 3X 54 D15 12 3x 51 D10 1...

Page 47: ...h each 802 1ag connection by VLAN ID 12 2 12 2R 2 12 2 12 2R 2 12 3X 54 D15 12 3x 51 D10 15 1X 54 D20 15 1X 54 D20 12 3X 54 D20 Indoo r 12 3X 54 D25 Outd oor 18 2R 1 Interface passive monitor mode 12...

Page 48: ...3X 54 D15 12 3x 51 D10 15 1X 54 D20 15 1X 54 D20 12 3X 54 D20 Indoo r 12 3X 54 D25 Outd oor 18 2R 1 RADIUS authentication 12 2 12 2R 2 12 2 12 2R 2 12 3X 54 D15 12 3x 51 D10 15 1X 54 D20 15 1X 54 D20...

Page 49: ...096 ACX5 00 ACX5 448 MPLS FRR 12 2 12 2R 2 12 2 12 2R 2 12 3X 54 D15 12 3x 51 D10 15 1X 54 D20 15 1X 54 D20 12 3X 54 D20 Indoo r 12 3X 54 D25 Outd oor 18 2R 1 BFD 12 2 12 2R 2 12 2 12 2R 2 12 3X 54 D...

Page 50: ...n S6 1 ATM N to one cell mode required as per standard 12 2 12 2R 2 12 2 12 2R 2 12 3X 54 D15 12 3x 51 D10 12 3X 54 D20 Indoo r 12 3X 54 D25 Outd oor RFC4717 S6 3 ATM AAL5 SDU encapsulation optional 1...

Page 51: ...448 ATM PWE3 by means of dynamic labels 12 2 12 2R 2 12 2 12 2R 2 12 3X 54 D15 12 3x 51 D10 12 3X 54 D20 Indoo r 12 3X 54 D25 Outd oor ATM VPI VCI swapping 12 2 12 2R 2 12 2 12 2R 2 12 3X 54 D15 12 3x...

Page 52: ...promiscuous mode 1 PW per port and 1 PW per VPI 12 2 12 2R 2 12 2 12 2R 2 12 3X 54 D15 12 3x 51 D10 12 3X 54 D20 Indoo r 12 3X 54 D25 Outd oor Cell concatenation 1 to 30 cells per packet 12 2 12 2R 2...

Page 53: ...g over ATM IMA 12 2 12 2R 2 12 2 12 2R 2 12 3X 54 D15 12 3x 51 D10 12 3X 54 D20 Indoo r 12 3X 54 D25 Outd oor ATM Encapsulation AAL5 SDU n to 1 cell relay 12 2 12 2R 2 12 2 12 2R 2 12 3X 54 D15 12 3x...

Page 54: ...ACX5 448 MAP ATM service categories to PW EXP bits 12 2 12 2R 2 12 2 12 2R 2 12 3X 54 D15 12 3x 51 D10 12 3X 54 D20 Indoo r 12 3X 54 D25 Outd oor Input policing per VC 12 2 12 2R 2 12 2 12 2R 2 12 3X...

Page 55: ...12 2R 2 12 2 12 2R 2 12 3X 54 D15 12 3x 51 D10 12 3X 54 D20 Indoo r 12 3X 54 D25 Outd oor MIBs Standard SNMP MIBs 12 2 12 2R 2 12 2 12 2R 2 12 3X 54 D15 12 3x 51 D10 15 1X 54 D20 15 1X 54 D20 12 3X 54...

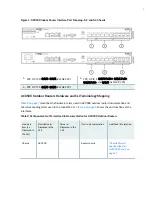
Page 56: ...routers contain a total of 10 ports that support 1 Gbps speed eight of which are labeled COMBO At any point of time you can use a maximum of six ports The ports labeled COMBO combination ports consis...

Page 57: ...h the 0 1 1 PoE RJ 45 port but not the 0 1 0 PoE RJ 45 port as the port numbers of the SFP and the RJ 45 ports are same 0 1 0 Figure 6 on page 48 and Figure 7 on page 48 shows the front views of the A...

Page 58: ...e only component that appears different is the power inlet for the two routers ACX500 Outdoor Router Description The ACX500 outdoor routers contain three Gigabit Ethernet ports that support SFP transc...

Page 59: ...Figure 10 on page 51 show the ACX500 outdoor router from bottom and top Figure 9 Bottom View of the ACX500 Outdoor Router 1 Interface port chamber with weather seal cover 3 Management port chamber wit...

Page 60: ...X500 Outdoor Router with PoE Description The ACX500 outdoor routers with Power over Ethernet PoE contain three Gigabit Ethernet RJ 45 ports that support PoE and three Gigabit Ethernet SFP ports Out of...

Page 61: ...ttom View of the ACX500 Outdoor Router with PoE 1 Interface port chamber with weather seal cover 3 Management port chamber with weather seal cover 2 Cable connector ports with weather seal cap 4 Power...

Page 62: ...a DE 15 alarm cable GPS antenna port labeled GPS ANTENNA External clocking 1 PPS input and output ports labeled IN and OUT GPS clocking LED labeled GPS 1PPS Network ports and corresponding status LEDs...

Page 63: ...rts COMBO 4 Console port CONSOLE 12 Gigabit Ethernet SFP ports 5 USB port 13 GPS LED GPS 1PPS 6 Recovery switch 14 External clocking ports 7 Alarm contact port 15 System status LED SYS 8 GPS antenna p...

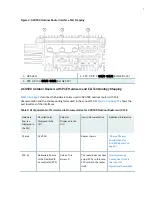
Page 64: ...wing components see Figure 15 on page 56 Figure 16 on page 56 and Figure 17 on page 57 Chassis status LED labeled SYS USB port for upgrading Junos OS Management Ethernet port labeled MGMT Time of day...

Page 65: ...gement ports Figure 16 on page 56 shows the ports that are available under the management port cover Figure 16 Front Panel of the ACX500 Outdoor Router with PoE Management Ports 1 Alarm contact port 6...

Page 66: ...rm cable is required to connect the ACX500 router to external alarm devices Use the gauge wire appropriate for the external device that you are connecting Whenever a system condition triggers an alarm...

Page 67: ...operating normally When the current stops flowing the open alarm is generated Contact 2 Reference REF Provides the current path for the external alarm reporting device and functions as a reference or...

Page 68: ...that triggers an input alarm when a door open condition occurs Figure 19 Sample Input Alarm Reporting Device SEE ALSO Alarm Contact Port on ACX500 Routers 57 LEDs on ACX500 Routers IN THIS SECTION Sys...

Page 69: ...ormally Red Blinking The router has reported a yellow alarm On steadily The router has reported a red alarm Gigabit Ethernet SFP and RJ 45 Port LEDs Each Gigabit Ethernet SFP and RJ 45 port on the fro...

Page 70: ...ght Yellow On The link is online Off No link GPS 1 PPS LED on the Front Panel One green LED labeled GPS 1PPS indicates the status of the pulse per second PPS signal received from the GPS receiver Tabl...

Page 71: ...where applicable are documented for each transceiver The Hardware Compatibility Tool allows you to search by product displaying all the transceivers supported on that device or category displaying all...

Page 72: ...ibed inTable 11 on page 63 are located on the front of the chassis and enable you to install the small form factor pluggable SFP transceivers Table 11 Gigabit Ethernet SFP Port Features Feature Descri...

Page 73: ...s and security cameras that require both network connectivity and electric power Table 12 on page 64 describes the Gigabit Ethernet PoE ports in more detail NOTE PoE is supported only on the ACX500 in...

Page 74: ...s are 1 pulse per second PPS The one SubMiniature B SMB 1 PPS output connectors on the front panel of the router connect to external clock signal sources The clocking ports provide the synchronized ou...

Page 75: ...page 66 Temperature sensors in the chassis monitor the temperature within the chassis If the temperature inside the chassis rises above the threshold the router shuts down automatically Figure 20 Coo...

Page 76: ...ters do not have air vents Figure 21 Cooling System in the ACX500 Outdoor Routers 1 Cooling fins RELATED DOCUMENTATION Site Preparation Checklist for ACX500 Routers 76 Clearance Requirements for Airfl...

Page 77: ...d and AC powered models The power supply in the router is built along the front panel of the chassis with the DC power terminals or AC inlets on the front to connect power to the router Table 13 on pa...

Page 78: ...fications Table 15 AC Power Electrical Specifications Item Specification ACX500 Indoor ACX500 AC ACX500 Outdoor ACX500 O AC ACX500 Outdoor with PoE ACX500 O POE AC AC input voltage Operating range 100...

Page 79: ...power cord connects each power supply to the power distribution panel You can order detachable AC power cords each approximately 8 ft 2 5 m long that supply AC power to the router The C15 appliance co...

Page 80: ...HITEMP CH 250 VAC 10 A 50 Hz PRC 3 GB2099 GB1002 Europe except Italy Switzerland and United Kingdom CBL PWR C15M HITEMP EU 250 VAC 10 A 50 Hz VIIG CEE 7 VII India CBL PWR C15M HITEMP IN 250 VAC 10 A...

Page 81: ...e router is intended for use with the router only and not for any other use WARNING The attached power cable is only for this product Do not use the cable for another product Translation in Japanese f...

Page 82: ...her than that is provided by Juniper Networks with the router can damage the power terminal The nominal rating of the DC power source are 24 VDC 48 VDC and 60 VDC These power cords are specifically de...

Page 83: ...5 A 60 VDC Power supply output 145 W 80 W PoE 55 W 135 W 80 W PoE NOTE The router with DC power has more than one power source Ensure proper care while connecting the DC power supply to the router To...

Page 84: ...ecifications Site Preparation Checklist for ACX500 Routers 76 ACX500 Site Guidelines and Requirements 78 ACX500 Mounting Requirements 95 ACX500 Alarm and Management Cable Specifications and Pinouts 10...

Page 85: ...d humidity do not exceed router tolerances ACX500 Router Environmental Specifications on page 89 Power Measure the distance between external power sources and router installation site Locate sites for...

Page 86: ...Pole Requirements for ACX500 Outdoor Routers on page 98 Plan rack or cabinet location including required space clearances Clearance Requirements for Airflow and Hardware Maintenance on ACX500 Routers...

Page 87: ...er site planning and maintenance and proper layout of the equipment rack or cabinet and wiring closet To plan and create an acceptable operating environment for your device and prevent environmentally...

Page 88: ...rs when wires exceed recommended distances or pass between buildings Electromagnetic pulses EMPs caused by lightning damage unshielded conductors and electronic devices Radio frequency interference To...

Page 89: ...repare your site for installation by observing the following guidelines When planning the installation site allow sufficient clearance around the rack See Figure 22 on page 81 For service personnel to...

Page 90: ...on with the cables pointing downward and the eye bolt for hoisting the router pointing upward Figure 23 on page 83 and Figure 24 on page 84 show the orientation of the ACX500 outdoor router after inst...

Page 91: ...ed chassis Insert the screws into wall studs wherever possible to provide added support for the chassis The width of the pole must be within the range of 2 in through 16 in for the pole mounting brack...

Page 92: ...sonnel to remove and install hardware components allow at least 24 in 60 9 cm on top of the router See Figure 24 on page 84 Figure 23 ACX500 Outdoor Router Chassis Dimensions and Clearance Requirement...

Page 93: ...n a pole or on a wall the chassis must be installed in a vertical orientation with the cables pointing downward and the eye bolt for hoisting the router pointing upward Figure 25 on page 86 and Figure...

Page 94: ...all studs use hollow wall anchors capable of supporting the combined weight of two fully loaded chassis Insert the screws into wall studs wherever possible to provide added support for the chassis The...

Page 95: ...el to remove and install hardware components allow at least 24 in 60 9 cm on top of the router See Figure 26 on page 87 Figure 25 ACX500 Outdoor Router with PoE Chassis Dimensions and Clearance Requir...

Page 96: ...ts 95 Cabinet Requirements for ACX500 Indoor Routers 95 General Site Guidelines 78 ACX500 Installation Overview 123 Chassis Physical Specifications for ACX500 Routers The ACX500 router is a rigid shee...

Page 97: ...4 in 24 cm Weight 8 6 lb 3 9 kg Table 21 Physical Specifications of the ACX500 Outdoor Router Chassis Description Value Height 12 3 in 31 24 cm Width 10 in 25 4 cm Depth 4 3 in 10 92 cm Weight AC powe...

Page 98: ...Specifications The ACX500 indoor router must be installed in a rack or cabinet housed in a dry clean well ventilated and temperature controlled environment Ensure that the following environmental gui...

Page 99: ...mental Specifications Description Value Altitude No performance degradation up to 3 000 ft 914 4 m Relative humidity Normal operation ensured in relative humidity range of 5 through 95 noncondensing T...

Page 100: ...s of the ACX500 routers is 80W 1GB ports Full traffic SFP RJ 45 ports Full traffic SFP Industrial grade Central office environment 1GB ports Full traffic SFP RJ 45 ports Full traffic SFP Industrial gr...

Page 101: ...oints fit 0 5 inch long SAE 10 32 screws American The grounding points are spaced at 0 625 in 15 86 mm centers You must install the ACX500 router in a restricted access location and ensure that the ch...

Page 102: ...AC powered and DC powered models Figure 28 Grounding Points on the ACX500 Outdoor Router NOTE The location of the grounding points on the ACX500 is the same for both AC powered and DC powered models...

Page 103: ...CX Series router chassis The grounding cable lug attaches to the grounding cable see Figure 29 on page 94 and is secured to the router by two SAE 10 32 screws of length between 0 25 in and 0 5 in The...

Page 104: ...Outdoor Routers 98 Pole Requirements for ACX500 Outdoor Routers 98 Rack Requirements for ACX500 Indoor Routers 99 Cabinet Requirements for ACX500 Indoor Routers You can mount the indoor router in a c...

Page 105: ...d by the Electronics Industry Association http www eia org NOTE The cabinet must meet the strength requirements to support the weight of the router The minimum cabinet size must be able to accommodate...

Page 106: ...he router An open cabinet without a top or doors that employs hot air exhaust extraction from the top allows the best airflow through the chassis If the cabinet contains a top or doors perforations in...

Page 107: ...Networks to mount the router on a wall The wall mounting kit is not part of the standard package and needs to be ordered separately SEE ALSO ACX500 Router Models Pole Requirements for ACX500 Outdoor R...

Page 108: ...r a four post rack You can mount the router on any two post or four post rack that provides bracket holes or hole patterns spaced at 1 U 1 75 in or 4 45 cm increments and that meets the size and stren...

Page 109: ...n 48 7 cm The rack must be strong enough to support the weight of the router Ensure that the spacing of rails and adjacent racks allows for the proper clearance around the router and rack Rack connect...

Page 110: ...nd to trigger a red alarm condition or a yellow alarm condition or to ignore alarm conditions You can independently configure alarm output ports 0 and 1 to relay alarm information when the system cond...

Page 111: ...rence to Pin 8 alarm input 3 is in closed condition 5 ALARM_OUT3_REF Output Reserved for Minor alarm External alarm output 3 this pin is connected to Pin 10 in closed condition 6 ALARM_IN0_REF Input I...

Page 112: ...larm Port 1 External alarm output 1 this pin is connected to Pin 14 in closed condition 14 ALARM_OUT1_REF Output Output Alarm Port 1 External alarm output 1 this pin is connected to Pin 13 in closed c...

Page 113: ...ting Engine In Management Port Connector Pinout Information for ACX500 Routers The management port labeled MGMT on an ACX Series router uses an RJ 45 connector to connect to a management device for ou...

Page 114: ...etworks USB flash drives have been tested and are officially supported for the USB port on all ACX Series routers RE USB 1G S RE USB 2G S RE USB 4G S CAUTION Any USB memory product that is not listed...

Page 115: ...ter contains four SMB connectors that support 1 pulse per second PPS signal These signals are internally isolated and have surge protection Use a Molex 50 ohm SMB connector or equivalent not provided...

Page 116: ...ND RS 422 level GND 5 GND RS 422 level GND 6 1PPS_OUT Tx 1PPS positive Out 7 TX Tx TOD Time message negative Out 8 TX Tx TOD time message positive OUT RELATED DOCUMENTATION ACX500 Universal Metro Rout...

Page 117: ...stall the GNSS Antenna 114 Installing the ACX500 GNSS Antenna 115 ACX500 GNSS Antenna Power Specification 116 ACX500 GNSS Antenna Surge Protection 117 Antenna Installation Verification 117 This sectio...

Page 118: ...n to secure cable ACX500 Router GNSS Antenna Signal Gain Requirements The ACX500 router requires an active GNSS antenna with built in low noise amplifier LNA for optimal performance The LNA amplifies...

Page 119: ...electrical poles and so on At least 3 feet 1 m below the highest point of a lightning rod Convenient path for running the outdoor coaxial cable from the GNSS antenna to the network Install the router...

Page 120: ...ge to the GNSS antenna and the router do not install the antenna in the proximity of any transmitting RF or high voltage power sources This is both a hardware precaution as well as a personnel safety...

Page 121: ...to a surge or lightning arrestor The surge arrester must be near the antenna location or at the building entrance and must be grounded to the building ground This ensures that the antenna has a direc...

Page 122: ...recommend where applicable to run smaller size cabling through a dedicated outdoor rated electrical conduit Figure 30 Antenna Clearance Requirement Peripheral 113...

Page 123: ...and other items required to install the GNSS antenna Table 32 Standard Antenna Parts Tools and Other Required Items Item GNSS L1 G1 antenna with a frequency band of 1575 to 1610 MHz 10 MHz 3 dB bandwi...

Page 124: ...connector and ground lugs Clamps cable ties and so on to secure cable Figure 32 on page 115 shows the GNSS antenna parts in a typical installation Figure 32 Standard GNSS Antenna Parts Installing the...

Page 125: ...other electric light or power circuits or where it can come into contact with such circuits When you install the antenna take extreme care not to come into contact with such circuits because they migh...

Page 126: ...tions and standards for lightning protection in the country where the ACX500 router is installed NOTE We recommend that you use an external first level fast lightning protector that has clamping volta...

Page 127: ...opriate GPS antenna for the ACX500 router The ACX500 router requires an active GPS antenna with built in low noise amplifier LNA for optimal performance The ACX500 router supports only 3 V DC voltage...

Page 128: ...ntenna boosts the signal from the antenna with a gain of 38 dB The antenna receives power rated at 3 3 VDC from the ACX500 router through the antenna s coaxial cable connections Table 34 on page 119 l...

Page 129: ...40 dB typical Azimuth coverage 360 omnidirectional Elevation coverage 0 through 90 elevation hemispherical Environmental Specifications Operating temperature 40 C through 90 C Storage temperature 40...

Page 130: ...a Table 35 Antenna Cable Specification for Trimble Bullet 38dB GPS L1 Antenna Antenna Coaxial Cable Type Maximum Length Loss Budget Trimble Bullet 38dB GPS L1 Antenna 3V 38dB gain LMR 240 RG 213 150 f...

Page 131: ...stallation Overview 123 Unpacking the ACX500 125 Installing the ACX500 Router 129 Connecting the ACX500 Router to Earth Ground 156 Connecting the ACX500 to Power 161 Connecting the ACX500 to External...

Page 132: ...er AC powered models See Connecting an AC Power Cord to the ACX500 Indoor Router on page 161 DC powered models See Connecting DC Power Cables to the ACX500 Indoor Router on page 163 5 Connect the rout...

Page 133: ...the router On a pole See Mounting the ACX500 Outdoor Router on a Pole on page 137 On a wall See Mounting the ACX500 Outdoor Router on a Wall on page 132 3 Ground the router See Connecting the ACX500 R...

Page 134: ...ent To unpack the router 1 Move the shipping carton to a staging area as close to the installation site as possible but where you have enough room to remove the system components 2 Position the carton...

Page 135: ...t your customer service representative or contact Juniper Customer Care from within the U S or Canada by telephone at 1 888 314 5822 For international dial or direct dial options in countries without...

Page 136: ...er Networks Product Warranty 1 End User License Agreement 1 NOTE The AC power cord or the DC power cord for the ACX500 outdoor routers is not shipped with the router You need to purchase it separately...

Page 137: ...tely Table 38 Parts List for the Wall Mounting Kit Component Quantity Wall mounting bracket 1 Chassis mounting bracket 1 Nuts 4 Screws 10 Washers 14 Table 39 Parts List for the Pole Mounting Kit Compo...

Page 138: ...available Phillips screwdriver number 2 Two mounting brackets for front or rear mounting are shipped with the router see Figure 33 on page 130 and Figure 34 on page 130 NOTE The router must be instal...

Page 139: ...nting holes b Insert the four screws at the top and bottom of the bracket and tighten each partially c Tighten the four screws completely d Repeat the procedure for the other bracket Figure 33 Install...

Page 140: ...oting is solid Figure 35 Installing the ACX500 Indoor Router in the Rack 5 Align the mounting brackets with the holes in the rack rails 6 Install a mounting screw into each of the open mounting holes...

Page 141: ...ssis and mounting kit The AC powered ACX500 outdoor router weighs 18 2 lb 8 3 kg and the DC powered router weighs 17 5 lb 7 9 kg The AC powered ACX500 outdoor router with PoE weighs 18 7 lb 8 5 kg and...

Page 142: ...mation provided in this topic is applicable for both the ACX500 outdoor router variants ACX500 outdoor router and ACX500 outdoor router with PoE To mount the ACX500 outdoor router on a wall 1 Attach a...

Page 143: ...ter with the wall mounting bracket facing the wall and mark the four wall mounting screw hole points on the wall NOTE The router must be mounted keeping in mind the basic clearance requirement for the...

Page 144: ...stalling the Wall Mounting Kit 1 Wall mounting bracket keyhole 3 Chassis mounting bracket 2 Chassis mounting bracket keyhole 4 Wall mounting bracket 7 Pull the wall mounting kit gently down so that it...

Page 145: ...ttached to the router in step 10 into the chassis mounting bracket keyholes See Figure 38 on page 136 NOTE Ensure that the chassis mounting screws sit properly in the chassis mounting bracket keyholes...

Page 146: ...er pointing upward The strength and thickness of the pole must safely support the total weight of the router chassis including the mounting brackets and cables and must comply with local standards and...

Page 147: ...the chassis 2 Align and attach the chassis mounting bracket and the pole mounting bracket provided with the pole mounting kit and secure the two brackets with the set of four bracket screws washers an...

Page 148: ...strap 3 Top chassis mounting screw 9 Pole mounting bracket 4 Chassis mounting bracket keyhole 10 Bottom chassis mounting screw 5 Chassis mounting bracket 11 Middle chassis mounting screw 6 Pole 4 Pla...

Page 149: ...is two on top two on center and two on bottom The center and bottom screw holes are for normal screws while the top screw holes are for keyhole screws NOTE Ensure that the top two chassis mounting scr...

Page 150: ...le mounting strap screw 8 Top chassis mounting screw 8 Align and insert the top two chassis mounting screws attached to the router in step 6 into the chassis mounting bracket keyholes NOTE Ensure that...

Page 151: ...jetting environment To protect the router s inner components from external environmental factors the router is environmentally hardened and the chassis is ruggedized The router is fanless and ventless...

Page 152: ...led weather seal caps The figure also shows the weatherproofing port covers also called weather seal covers protecting the interface and management port components from external environment Figure 42...

Page 153: ...nal environmental factors See Figure 10 Weatherproofing the Interface Ports Gigabit Ethernet SFP To access and weatherproof the Gigabit Ethernet SFP interface ports and cables 1 Unscrew and remove the...

Page 154: ...12 The cable connector unit consists of three components the outer connector enclosure the connector screw and the cable seal The front end of the outer cable connector enclosure is from where the int...

Page 155: ...Removing the ACX500 Outdoor Router Cable Connector Unit 4 Carefully align the transceiver with the cable inlet hole of the SFP port where you want to insert the interface cable and slide the transcei...

Page 156: ...by loosening the connector screw and pushing the cable seal out See Figure 15 Keep the cable seal and the cable connector unit for later use 6 Pass the interface cable through the front end of the out...

Page 157: ...r Figure 46 Installing the ACX500 Outdoor Router Cable Seal on the Interface Cable 1 Interface cable 3 Rubber cable seal with groove 2 Outer cover of cable seal 4 Hole plugs 8 Push back the cable seal...

Page 158: ...tight and dustproof Figure 47 ACX500 Outdoor Router Cable Connector Unit 1 Connector enclosure 3 Cable seal 2 Interface SFP cable 4 Connector screw 9 Push the connector screw back on top of the cable...

Page 159: ...LEDs on the front panel indicate that the transceiver is functioning correctly For more information about the component LEDs see LEDs on ACX500 Routers on page 59 14 Replace the metal cover of the in...

Page 160: ...ure 17 Keep the weather seal cap in a safe place for future use Weather seal caps prevent dust and water from entering the router when the router or the interface port is not in use Figure 49 Removing...

Page 161: ...r structure with grooves or holes for the cables to pass through The cable seal sits tightly in the connector screw and prevents water and dust particles from entering the router NOTE The cable seal w...

Page 162: ...er diameter of 6 5 mm for the RJ 45 ports for the ACX500 outdoor routers Figure 51 Cable Connector Unit 1 Connector enclosure 3 Cable seal 2 Interface RJ 45 cable 4 Connector screw 6 Slide the interfa...

Page 163: ...ace the hole plugs for the unused cable seal groove holes Figure 52 Installing the ACX500 Outdoor Router Cable Seal on the Interface Cable 1 Interface cable 3 Rubber cable seal with grooves 2 Outer co...

Page 164: ...terface port chamber back to its original place and secure it with the six screws that were removed in step 1 NOTE Ensure that the metal cover sits tightly on top of the router Failing to do so might...

Page 165: ...metal cover of the management port chamber back to its original place and secure it with the seven screws that were removed in step 1 NOTE Ensure that the metal cover sits tightly on top of the router...

Page 166: ...ecifications for the ACX500 router Warnung Warnung Der Outdoor Router ACX500 bietet die M glichkeit eine Erdungsklemme mit zwei ffnungen anzuschlie en Panduit LCCF6 14A L Stellen Sie sicher dass der R...

Page 167: ...Place the grounding cable lug over the grounding points on the front of the chassis see Figure 54 on page 158 and Figure 55 on page 159 Figure 54 Grounding Point Location on the ACX500 Indoor Router 1...

Page 168: ...he ACX500 indoor routers the grounding points are located on the front left of the router In the ACX500 outdoor routers the grounding points are located just below the power inlet port The location of...

Page 169: ...b in 0 49 Nm of torque to each screw Do not overtighten the screw use a number 2 Phillips screwdriver See Figure 56 on page 160 and Figure 55 on page 159 Figure 56 Grounding Points on the ACX500 Indoo...

Page 170: ...ing an ACX500 Indoor Router Overview 123 Installing and Connecting an ACX500 Outdoor Router Overview 123 Site Preparation Checklist for ACX500 Routers 76 Prevention of Electrostatic Discharge Damage 2...

Page 171: ...4 Insert the power cord plug into an external AC power source receptacle NOTE We recommend that you use a dedicated customer site circuit breaker rated for 20 A 100 VAC or 16 A 240 VAC or as required...

Page 172: ...tic cover WARNING You must ground the router before connecting the DC power cables To connect the power cables 1 Switch off the dedicated customer site circuit breakers Ensure that the voltage across...

Page 173: ...against the surface of the terminal block as you are tightening the screws Ensure that each screw is properly threaded into the terminal Applying installation torque to the screw when improperly thre...

Page 174: ...ally repeat the installation and cabling procedures Figure 58 Connecting DC Power to the Router SEE ALSO ACX500 DC Power Specifications 73 ACX500 DC Power Electrical Safety Guidelines 239 Connecting a...

Page 175: ...nsures that the power cord is safe to handle NOTE The information provided in this topic is applicable for both the ACX500 outdoor router variants ACX500 outdoor router and ACX500 outdoor router with...

Page 176: ...rt chamber with weather seal cover 2 Cable connector ports with weather seal cap 4 Power port with weather seal cap 4 Power off the AC power source NOTE Ensure that the power source for the ACX500 out...

Page 177: ...0 AC Power Cord Wires That Connect to the Power Source 1 Power lug 3 Cord wire 2 Label G N and L 4 AC power cord WARNING Ensure that the line L neutral N and ground G AC power cord wires are correctly...

Page 178: ...Verify that the power cabling is correct that the power cables or cords do not touch or block access to router components and that they do not drape where people could trip on them 9 Power on the AC...

Page 179: ...zus tzlicher Schutz f r den Router verwendet wird damit vor bergehende Spannungsst e berspannung Kategorie IV bis II am AC Anschluss des Routers auftreten Die zu diesem Schutz eingesetzten berspannung...

Page 180: ...L 60950 1 This SELV power source must be electrically isolated from AC power source NOTE The information provided in this topic is applicable for both the ACX500 outdoor router variants ACX500 outdoor...

Page 181: ...t cover 3 Management port cover 2 Cable connector ports with dust cover 4 Power port with dust cover 4 Insert the appliance coupler terminal end of the power cord into the appliance inlet on the power...

Page 182: ...t the DC power cord plug to the power terminal on the router Ensure that the power plug sits tight See Figure 64 on page 173 Figure 64 Connecting DC Power to the Router NOTE A DC powered router needs...

Page 183: ...components and that they do not drape where people could trip on them 8 Observe the system LED on the router If an DC power supply is functioning normally the system LED lights green steadily If the...

Page 184: ...45 ports For the ACX500 outdoor router see Weatherproofing the ACX500 Outdoor Router on page 142 topic to know how to access secure and weatherproof the router ports See Front Panel of an ACX500 Outdo...

Page 185: ...accepts a serial cable with an RJ 45 connector which is provided with the router To connect a management console 1 Turn off the power to the console 2 Plug the RJ 45 end of the serial cable into the M...

Page 186: ...ELATED DOCUMENTATION Installing and Connecting an ACX500 Indoor Router Overview 123 General Site Guidelines 78 Management Port Connector Pinout Information for ACX500 Routers 104 Configuring Junos OS...

Page 187: ...and 2 08 mm2 2 Attach an electrostatic discharge ESD grounding strap to your bare wrist and connect the strap to one of the ESD points on the chassis 3 While the terminal block is not plugged into the...

Page 188: ...ACX500 Routers 106 Troubleshooting Resources for ACX500 Routers 197 Configuring Junos OS on the ACX500 Router The ACX500 routers are shipped with Junos OS preinstalled and ready to be configured when...

Page 189: ...rnet interface IP address of a default router IP address of a DNS server Password for the root user This procedure connects the router to the network but does not enable it to forward traffic For comp...

Page 190: ...ss and prefix length for the router s Ethernet interface edit root set interfaces fxp0 unit 0 family inet address address prefix length 10 Configure the IP address of a backup router which is used onl...

Page 191: ...ess to the management port is limited to the local subnet To access the management port from a remote subnet you need to add a static route to that subnet within the routing table edit root set routin...

Page 192: ...it 17 Optional Configure additional properties by adding the necessary configuration statements Then commit the changes to activate them on the router edit root host commit 18 When you have finished c...

Page 193: ...4 CHAPTER Removing Installing and Maintaining Components Maintaining ACX500 Components 185 Replacing ACX500 Components 188...

Page 194: ...Maintenance Procedures for the ACX500 Router IN THIS SECTION Purpose 185 Action 185 Purpose For optimum router performance perform preventive maintenance procedures Action Inspect the installation sit...

Page 195: ...specifically to fiber optic cables When you unplug a fiber optic cable always place a rubber safety plug over the transceiver on the faceplate and on the end of the cable Anchor fiber optic cables to...

Page 196: ...iber optic cable cleaning kit such as the Opptex Cletop S Fiber Cleaner Follow the directions for the cleaning kit you use SEE ALSO Routine Maintenance Procedures for the ACX500 Router 185 Maintaining...

Page 197: ...N RJ45 SFP SEE ALSO ACX500 Routers Hardware and CLI Terminology Mapping 4 Replacing ACX500 Components IN THIS SECTION Replacing a Console Cable 188 Replacing a Management Ethernet Cable 189 Replacing...

Page 198: ...Console Cable The CONSOLE port on the front panel of the router accepts an RS 232 EIA 232 serial cable with RJ 45 connectors To connect a cable between the router and the console device 1 Attach an ES...

Page 199: ...re 2 shows the connector 3 Disconnect the cable from the network device Figure 70 Ethernet Cable Connectors Installing a Management Ethernet Cable To install a serial cable connected to a management d...

Page 200: ...evices Ensure that you have the following parts and tools available A rubber safety cap to cover the transceiver A rubber safety cap to cover the fiber optic cable connector To disconnect a fiber opti...

Page 201: ...ld replaceable unit FRU optical transceivers to which you can connect fiber optic cables To connect a fiber optic cable to an optical transceiver installed in an ACX Series router LASER WARNING Do not...

Page 202: ...ACX1100 Network Ports Fiber Optic Cable Signal Loss Attenuation and Dispersion Calculating Power Budget and Power Margin for Fiber Optic Cables Replacing an SFP Transceiver IN THIS SECTION Removing a...

Page 203: ...transceiver Use needle nose pliers to pull the ejector handle out from the transceiver 6 Grasp the transceiver ejector handle and pull the transceiver approximately 0 5 in 1 3 cm out of the router 7 U...

Page 204: ...t If you are unable to fully insert the transceiver make sure the connector is facing the right way 6 Close the ejector handle of the transceiver 7 Remove the rubber safety cap from the transceiver an...

Page 205: ...5 CHAPTER Troubleshooting Hardware Troubleshooting ACX500 Components 197...

Page 206: ...controlling and troubleshooting router hardware the Junos OS routing protocols and network connectivity CLI commands display information from routing tables information specific to routing protocols...

Page 207: ...indicates the status of the PPS signal received from the GPS receiver For more information about the front panel LEDs see LEDs on ACX500 Routers on page 59 SEE ALSO Alarm Types and Severity Classes o...

Page 208: ...ion Failure event that triggers an alarm Alarm severity Seriousness of the alarm The level of severity can be either major steady red or minor steady amber Chassis alarm Predefined alarm that is trigg...

Page 209: ...r more hardware components have exceeded temperature thresholds An alarm condition that is configured on an interface has triggered a critical warning Minor steady amber Indicates a noncritical condit...

Page 210: ...s alarms 1 alarms currently active Alarm time Class Description 2012 04 08 14 13 37 PDT Minor Host 0 Boot from alternate media When the router is functioning normally with no active alarms the CLI dis...

Page 211: ...6 CHAPTER Contacting Customer Support and Returning the Chassis or Components Contacting Customer Support and Returning the Chassis or Components 203...

Page 212: ...ance Center JTAC 24 hours a day 7 days a week in one of the following ways On the Web using the Service Request Manager link at https support juniper net support By telephone From the US and Canada 1...

Page 213: ...their serial numbers enter the following command line interface CLI command user host show chassis hardware Hardware inventory Item Version Part number Serial number Description Chassis VH0214340016 A...

Page 214: ...o Return a Hardware Component to Juniper Networks Inc 206 ACX500 Chassis Serial Number Label The chassis serial number is located on the rear of the ACX500 indoor chassis see Figure 74 on page 205 Fig...

Page 215: ...mber labels for the ACX500 routers are same for both the AC and the DC variant How to Return a Hardware Component to Juniper Networks Inc If a hardware component fails please contact Juniper Networks...

Page 216: ...2 Obtain an RMA number from the Juniper Networks Technical Assistance Center JTAC You can send e mail or telephone as described above 3 Provide the following information in your e mail message or duri...

Page 217: ...m the rack One lifter can then move the router to the shipping container 9 Place the router in the shipping container 10 Cover the router with an ESD bag and place the packing foam on top of and aroun...

Page 218: ...217 Ramp Warning 219 Rack Mounting and Cabinet Mounting Warnings 219 Grounded Equipment Warning 223 Radiation from Open Port Apertures Warning 224 Laser and LED Safety Guidelines and Warnings 225 Main...

Page 219: ...Power Grounding Requirements and Warning 242 DC Power Wiring Sequence Warning 243 DC Power Wiring Terminations Warning 245 Midplane Energy Hazard Warning 246 Multiple Power Supplies Disconnection War...

Page 220: ...rd to people or make the equipment unsafe Never attempt to lift an object that is too heavy for one person to handle Never install or manipulate wiring during electrical storms Never install electrica...

Page 221: ...te CAUTION You need to observe the specified guidelines to prevent minor injury or discomfort to you or severe damage to the device Attention Veillez respecter les consignes indiqu es pour viter toute...

Page 222: ...tuazione potrebbe causare infortuni alle persone Prima di lavorare su qualsiasi apparecchiatura occorre conoscere i pericoli relativi ai circuiti elettrici ed essere al corrente delle pratiche standar...

Page 223: ...to e qualificato deve essere autorizzato ad installare o sostituire questo apparecchio Advarsel Kun kvalifisert personell med riktig oppl ring b r montere eller bytte ut dette utstyret Aviso Este equi...

Page 224: ...and operate your equipment Fire Suppression In the event of an electrical hazard or an electrical fire you should first turn power off to the equipment at the source Then use a Type C fire extinguish...

Page 225: ...WARNING Read the installation instructions before you connect the device to a power source Waarschuwing Raadpleeg de installatie aanwijzingen voordat u het systeem met de voeding verbindt Varoitus Lue...

Page 226: ...be used When this is not practical specially trained persons or systems must be used riggers or movers Restricted Access Warning WARNING This unit is intended for installation in restricted access are...

Page 227: ...dall autorit responsabile della zona Advarsel Denne enheten er laget for installasjon i omr der med begrenset adgang Et omr de med begrenset adgang gir kun adgang til servicepersonale som bruker et sp...

Page 228: ...mpa inclinada m s de 10 grados Varning Anv nd inte ramp med en lutning p mer n 10 grader Rack Mounting and Cabinet Mounting Warnings Ensure that the rack or cabinet in which the device is installed is...

Page 229: ...het toestel in het rek monteert of het daar een servicebeurt geeft Varoitus Kun laite asetetaan telineeseen tai huolletaan sen ollessa telineess on noudatettava erityisi varotoimia j rjestelm n vakavu...

Page 230: ...l ist das Gestell von unten nach oben zu laden wobei das schwerste Bauteil unten im Gestell anzubringen ist Wird das Gestell mit Stabilisierungszubeh r geliefert sind zuerst die Stabilisatoren zu inst...

Page 231: ...eciais para se certificar de que o sistema possui um suporte est vel As seguintes directrizes ajud lo o a efectuar o seu trabalho com seguran a O Juniper Networks switch dever ser instalado numa prate...

Page 232: ...st llningen Om denna enhet installeras p en delvis fylld st llning skall st llningen fyllas nedifr n och upp med de tyngsta enheterna l ngst ned p st llningen Om st llningen r f rsedd med stabiliseri...

Page 233: ...g LASER WARNING Because invisible radiation might be emitted from the aperture of the port when no fiber cable is connected avoid exposure to radiation and do not stare into open apertures Waarschuwin...

Page 234: ...Atenci n Debido a que la apertura del puerto puede emitir radiaci n invisible cuando no existe un cable de fibra conectado evite mirar directamente a las aperturas para no exponerse a la radiaci n Va...

Page 235: ...er laser could permanently damage the eye Avertissement Les connecteurs fibre optique sans terminaison peuvent mettre un rayonnement laser invisible Le cristallin de l il humain faisant converger tout...

Page 236: ...RNING Do not stare into the laser beam or view it directly with optical instruments Waarschuwing Niet in de straal staren of hem rechtstreeks bekijken met optische instrumenten Varoitus l katso s tees...

Page 237: ...ng Activity Warning 231 Operating Temperature Warning 232 Product Disposal Warning 233 While performing the maintenance activities for devices observe the following guidelines and warnings Battery Han...

Page 238: ...Avvertenza Pericolo di esplosione se la batteria non installata correttamente Sostituire solo con una di tipo uguale o equivalente consigliata dal produttore Eliminare le batterie usate secondo le is...

Page 239: ...angeschlossen werden und k nnen schwere Verbrennungen verursachen oder an die Anschlu klemmen angeschwei t werden Avvertenza Prima di intervenire su apparecchiature collegate alle linee di alimentazi...

Page 240: ...ssa l k yhdist tai irrota kaapeleita ukkosilmalla Avertissement Ne pas travailler sur le syst me ni brancher ou d brancher les c bles pendant un orage Warnung Arbeiten Sie nicht am System und schlie e...

Page 241: ...flot d air constant d gagez un espace d au moins 15 2 cm autour des ouvertures de ventilations Warnung Um einen Router der switch vor berhitzung zu sch tzen darf dieser nicht in einer Gegend betrieben...

Page 242: ...ent volgens alle landelijke wetten en voorschriften te worden afgedankt Varoitus T m n tuotteen lopullisesta h vitt misest tulee huolehtia kaikkia valtakunnallisia lakeja ja s nn ksi noudattaen Averti...

Page 243: ...rts pour int rieur ne doivent pas tre raccord s physiquement aux interfaces pr vues pour la connexion l installation ext rieure ou son c blage Les ports pour int rieur de l appareil sont r serv s au r...

Page 244: ...ossible hazards in your work area such as moist floors ungrounded power extension cords and missing safety grounds Operate the device within marked electrical ratings and product usage instructions To...

Page 245: ...ts antistatic bag see Figure 76 on page 237 in one hand and touch the exposed bare metal of the device with the other hand immediately before inserting the component into the device WARNING For safety...

Page 246: ...ays ground the cables to a suitable and safe earth ground before connecting them to the system Attention Les c bles ANSI TIA EIA 568 par exemple Cat 5e et Cat 6 peuvent emmagasiner des charges lectros...

Page 247: ...and be easily accessible The cores in the main lead are colored in accordance with the following code Green or yellow Earth label G White or blue Neutral label N Brown or black Live label L When a ro...

Page 248: ...sulle unit CA Advarsel F r det utf res arbeid p kabinettet eller det arbeides i n rheten av str mforsyningsenheter skal str mledningen trekkes ut p vekselstr msenheter Aviso Antes de trabalhar num ch...

Page 249: ...ure that the polarity of the DC input wiring is correct Under certain conditions connections with reversed polarity might trip the primary circuit breaker or damage the equipment For personal safety c...

Page 250: ...room circuit uitgeschakeld is Om u ervan te verzekeren dat alle stroom UIT is geschakeld kiest u op het schakelbord de stroomverbreker die het gelijkstroom circuit bedient draait de stroomverbreker na...

Page 251: ...ua Para se assegurar que toda a corrente foi DESLIGADA localize o disjuntor no painel que serve o circuito de corrente cont nua e coloque o na posi o OFF Desligado segurando nessa posi o a manivela do...

Page 252: ...r enheten installeres m jordledningen alltid tilkobles f rst og frakobles sist Aviso Ao instalar a unidade a liga o terra dever ser sempre a primeira a ser ligada e a ltima a ser desligada Atenci n A...

Page 253: ...ti all estremit del cablaggio come illustrato La corretta sequenza di cablaggio da massa a massa da positivo a positivo da linea ad L e da negativo a negativo da neutro a N Tenere presente che il filo...

Page 254: ...tulee puristaa yhteen sek eristeen ett johdinosan Avertissement Quand des fils torsad s sont n cessaires utiliser des douilles terminales homologu es telles que celles circuit ferm ou du type plage o...

Page 255: ...ndas t ex kabelsko av sluten eller ppen typ med upp tv nd tapp Storleken p dessa kontakter m ste vara avpassad till ledningarna och m ste kunna h lla b de isoleringen och ledaren fastkl mda Midplane E...

Page 256: ...e energia dever o ser desconectadas todas as conex es existentes Atenci n Esta unidad tiene m s de una conexi n de suministros de alimentaci n para eliminar la alimentaci n por completo deben desconec...

Page 257: ...Routers 248 Compliance Statements for NEBS for ACX500 Routers 253 Compliance Statements for EMC Requirements for ACX500 Routers 253 Compliance Statements for Environmental Requirements 256 Compliance...

Page 258: ...fety All country deviations CB Scheme report EN 60825 1 2007 Safety of Laser Products Part 1 Equipment Classification Requirements and User s Guide EMC EN 300 386 V1 6 1 Telecom Network Equipment EMC...

Page 259: ...VCCI Class A Class B KN 22 Class A Class B IEEE 1613 IEC 61850 3 EN50121 4 NOTE Class B requirement is only for the ACX500 Outdoor routers Immunity EN 55024 A1 A2 1998 Information Technology Equipment...

Page 260: ...torage Class T1 2 ETSI EN 300 019 2 2 1999 Transportation Class T2 3 ETSI EN 300 019 2 3 2003 T 3 2 Stationary Use at Weather protected Locations ACX Indoor Routers ETSI EN 300 019 2 4 T 4 1 Stationar...

Page 261: ...y of telecommunication equipment installed in customer premises to over voltages and over currents ITU T K 20 2011 Resistibility of telecommunication equipment installed in telecom centers to over vol...

Page 262: ...The equipment is suitable for installation as part of the Common Bonding Network CBN The equipment is suitable for installation in locations where the National Electrical Code NEC applies The battery...

Page 263: ...receiver in a domestic environment it might cause radio interference Install and use the equipment according to the instruction manual VCCI A United States The hardware equipment has been tested and...

Page 264: ...found to comply with the limits for a Class B digital device pursuant to Part 15 of the FCC Rules These limits are designed to provide reasonable protection against harmful interference in a resident...

Page 265: ...lead or cadmium substances The batteries used in this product are in compliance with EU Directives 91 157 EEC 93 86 EEC and 98 101 EEC The product documentation includes instructional information abou...

Reviews: