The ACX500 outdoor router is secured onto the wall-mounting kit with the help of six screws. The
top two screws are inserted first into the keyholes on the wall-mounting kit. These screws help to
first hang the router on the wall-mounting kit by taking the weight out, and when the router
comfortably hangs on the unit, secure it by using the other four screws.
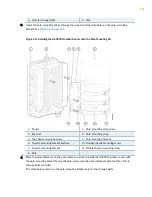
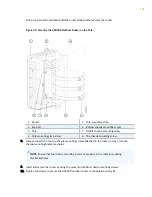
11. Align the router carefully and then insert the top two chassis-mounting screws attached to the
router in step
into the chassis-mounting bracket keyholes. See
NOTE: Ensure that the chassis-mounting screws sit properly in the chassis-mounting
bracket keyholes.
Figure 38: Installing the ACX500 Outdoor Router onto the Wall-Mounting Kit
1
—
Eye bolt
5
—
Chassis-mounting bracket
2
—
Router
6
—
Wall
3
—
Top chassis-mounting screw
7
—
Middle chassis-mounting screw
4
—
Wall-mounting bracket
8
—
Bottom chassis-mounting screw
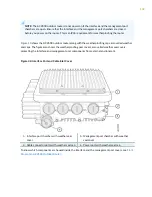
12. After the router comfortably hangs on the wall-mounting kit, secure it by using the other four
chassis-mounting screws (two screws on the middle and two on the bottom of the outdoor router).
136


