Maintenance Instructions
WARNING
•
Do not mix stud piloted wheels or fasteners with hub
piloted wheels or fasteners. Premature wheel failure
can result in property damage, personal injury, or death.
•
Do not mix foreign (not made in North America) wheel
mounting parts with domestic (made in North America)
parts.
Many foreign wheel components look similar
to, but are not exactly the same as domestic made
components.
Mixing components can cause wheel
or fastener failures and result in property damage,
personal injury, or death.
•
Do not change from aluminum wheels to steel wheels, or
vice-versa, without changing the mounting hardware.
In some cases with flange nut mounting systems,
changing the hub and stud assembly may be required.
Mixing components could cause wheel or fastener
failures and result in property damage, personal injury,
or death.
WARNING
When installing the tire and rim assembly on disc
- brake equipped axles, make sure the tire valve
stem clears the brake caliper. The use of either
an International® truck valve stem retainer or a
tire manufacturer’s stem forming tool is the only
acceptable method of obtaining clearance when
necessary.
Failure to obtain proper clearance
may result in rapid tire deflation and cause
property damage, personal injury, or death.
Wheel Nut Torque Maintenance
Tighten and maintain wheel and rim mounting nuts to the proper
torque. Loose nuts or overtightened nuts can lead to premature
wear and possible failure of the wheel, rim, and/or mounting
hardware.
Hub-Piloted Wheel Installation Procedures
WARNING
Use only the same type and style wheels and
mounting hardware to replace original parts.
Failure to do so may result in an assembly, which
looks fine, but does not fit together properly. This
could cause wheel or fastener failures and result
in property damage, personal injury, or death.
Out-of-round tires and wheel assemblies can sometimes be
corrected by reclocking the tire relative to the wheel.
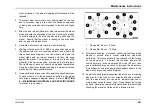
Tightening
procedure
for
disc
wheels
with
flange
nuts
(hub-piloted).
1.
Clean the mating surfaces of the hub, drum, and wheel(s)
as well as the wheel studs and wheel nuts with a wire brush
prior to assembly.
2.
Lubricate, the two-piece wheel nuts by putting two drops
of oil in the slot between the nut and washer and spin the
washer to spread the oil around the nut-to-washer contact
surface.
3.
Carefully lubricate the wheel stud threads by wiping them
with a freshly oiled cloth.
Do not get the oil on any
206
3878859R2
Summary of Contents for ProStar+ Eagle Series.
Page 4: ...Operator s Manual ProStar Series Printed in the United States of America 3878859R2 ...
Page 12: ...Table of Contents Section 10 Index Index 235 viii 3878859R2 ...
Page 26: ...Model Description Exterior Components 14 3878859R2 ...
Page 28: ...Model Description 16 3878859R2 ...
Page 59: ...Controls Features 3878859R2 47 ...
Page 70: ...Controls Features Declination Zone Map 58 3878859R2 ...
Page 93: ...Controls Features Center Dash Panel Wing Panel 3878859R2 81 ...
Page 128: ...Sleeper Features 116 3878859R2 ...
Page 182: ...Operation 170 3878859R2 ...
Page 241: ...Maintenance Intervals and Specifications Typical Interior Fuse Panel Layout 3878859R2 229 ...
Page 262: ...Index 250 3878859R2 ...

