background image

4 E-mail Function

28-56

WindO/I-NV4 User’s Manual

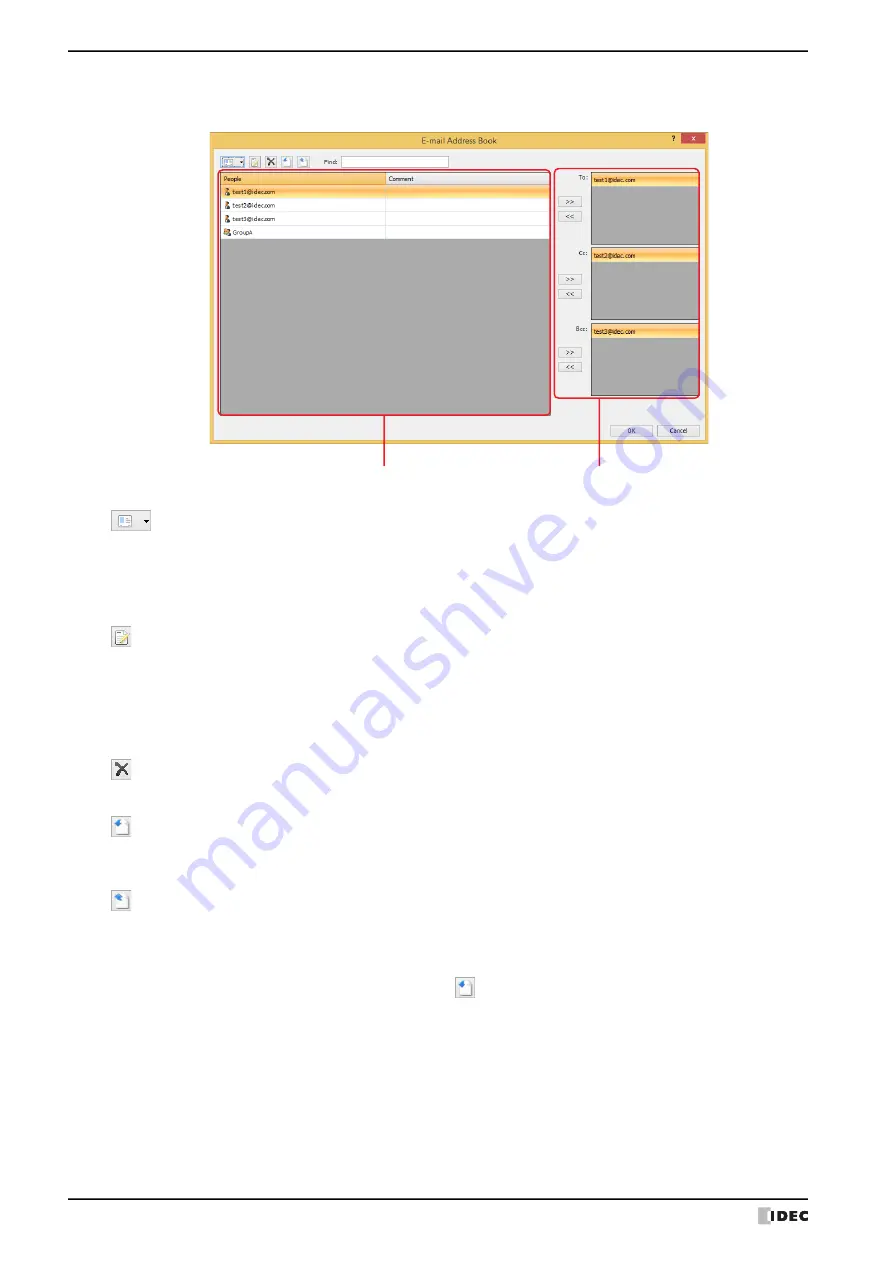
E-mail Address Book Dialog Box

The e-mail addresses used by the E-mail function are collectively managed in the E-mail Address Book dialog box.

(New E-mail Address)

Adds an e-mail address or an E-mail Group.
Click this button to display the E-mail Address dialog box. For details, refer to “E-mail Address Dialog Box” on page 

28-58.
To create an E-mail Group, click the arrow to the right of this button and then click 

New E-mail Group

.

(Edit)

Changes the selected e-mail address or E-mail Group.
Select an e-mail address in People, and then click this button to display the E-mail Address dialog box. For details, 

refer to “E-mail Address Dialog Box” on page 28-58. 
Select an E-mail Group in People, and then click this button to display the E-mail Group dialog box. For details, refer 

to “E-mail Group Dialog Box” on page 28-59.

(Delete)

Deletes the selected e-mail address and E-mail Group in People.

(Import)

Imports the file in the E-mail Address Book saved by the Unicode text format (*.txt). Click this button to display the 

Open dialog box. For details, refer to “Importing the E-mail Address Book settings” on page 28-50.

(Export)

Export and saves the E-mail Address Book settings as an Unicode Text (*.txt) file.
Click this button to display the Save As dialog box. For details, refer to “Save the E-mail Address Book settings as a 

file” on page 28-49.
The saved E-mail Address Book file can be imported with 

(Import).

Find

The entered text is searched for in the 

People

 in the (

People List

).

(People List)

(Destination Address)

Summary of Contents for WindO/I-NV4

Page 1: ...B 1701 16 User s Manual...

Page 2: ...switches for an emergency circuit or an interlocking circuit If the MICRO I fails equipment connected to the MICRO I will no longer be protected and serious injury to operators and equipment damage m...

Page 3: ...environment and may become unremovable Do not push hard or scratch the touch panel and protection sheet with a hard object like hand tool Touch panel and protection sheet can be easily damaged Do not...

Page 4: ...cting this product to the Internet be sure to connect via a device such as a router Trademarks WindO I and MICRO I are registered trademarks of IDEC CORPORATION in JAPAN Microsoft and Windows are eith...

Page 5: ...tware Read the following materials as necessary for your particular application References Content WindO I NV4 User s Manual This document Describes the hardware specifications of the HG2J 7U HG5G 4G...

Page 6: ...tion provided can lead to serious injury or damage Information relating to requests or material to reference in the use of a function Useful information relating to a function Indicates the chapter an...

Page 7: ...external device Device Link Communication A communication method that performs communication with the external device according to the setting of the screen and without a program DM Link Communicatio...

Page 8: ...n dedicated for performing initial setting of the MICRO I self diagnosis and clearing the log data etc External Memory Device The generic term for an SD memory card and a USB flash drive NV Metafile A...

Page 9: ...asic Operations 1 WindO I NV4 Specifications 2 1 1 1 Available Data 2 1 1 2 Available Text 2 6 1 3 Available Number of Colors 2 20 1 4 Available Image Files 2 20 1 5 Available Sound Files 2 37 1 6 Ava...

Page 10: ...t Communication 3 87 6 1 Overview 3 87 6 2 Supported Protocols and Communication Driver 3 87 6 3 HMI Link Register LLR Assignment 3 88 6 4 Sub Host Communication Configuration Procedure 3 89 6 5 Error...

Page 11: ...Restrictions 4 83 4 1 Download Restrictions 4 83 4 2 Maximum Number of External Device Addresses 4 83 Chapter 5 Screen 1 Screen Overview 5 1 1 1 Screen Types 5 1 1 2 Screen Size 5 1 2 Creating and Man...

Page 12: ...ng Overlapping Drawings and Parts 6 6 4 3 Restrictions 6 10 5 Part Library Function 6 11 5 1 What Can Be Done with the Part Library Function 6 11 5 2 How to use the Library Part in a project 6 12 5 3...

Page 13: ...2 Key Button Configuration Procedure 8 74 5 3 Properties of Key Button Dialog Box 8 75 5 4 Key Buttons 8 94 5 5 Key Browser 8 99 5 6 Key Button Usage Examples 8 103 6 Multi Button 8 110 6 1 How the Mu...

Page 14: ...ure 10 59 3 3 Properties of Picture Display Dialog Box 10 60 3 4 Picture Display Usage Examples 10 76 4 Video Display 10 81 4 1 How the Video Display is Used 10 81 4 2 Video Display Configuration Proc...

Page 15: ...Line Chart is Used 11 21 2 2 Line Chart Configuration Procedure 11 22 2 3 Properties of Line Chart Dialog Box 11 23 3 Pie Chart 11 53 3 1 How the Pie Chart is Used 11 53 3 2 Pie Chart Configuration P...

Page 16: ...Sampling Data 13 4 1 4 Data Configuration 13 5 1 5 Saving and Deleting Data 13 7 1 6 Using Data and Detected Alarms 13 9 2 Alarm Log Function Configuration Procedure 13 10 2 1 Configuring the Device A...

Page 17: ...Operation Log Settings Dialog Box 15 10 4 Using the Data 15 21 4 1 Saving the Data as a CSV File 15 21 Chapter 16 Data Storage Area 1 Overview 16 1 1 1 What is the Data Storage Area 16 1 1 2 Data Sto...

Page 18: ...Text Groups and Text Registrations 19 1 1 2 Functions that Support Text Groups 19 2 2 Text Groups and Text Configuration Procedure 19 3 2 1 How to Create the Text Groups and Text Registrations 19 3 2...

Page 19: ...the Sound Function is Used 21 1 1 2 Supported Sound Files 21 1 2 Sound Function Configuration Procedure 21 2 2 1 Configuring Sound Files Trigger Conditions 21 2 3 Sound Settings Dialog Box 21 6 3 1 S...

Page 20: ...4 14 2 3 Downloading Files to an External Memory Device Inserted in the MICRO I 24 18 2 4 Downloading the System Software of Expansion Modules 24 20 3 Uploading 24 21 3 1 Upload Project Data from the...

Page 21: ...Pass Through Function is Used 27 1 1 2 Supported External Devices 27 2 1 3 How to Connect when Using the Pass Through Function 27 3 1 4 Use the Pass Through Function 27 3 2 Pass Through Function Setti...

Page 22: ...tion 28 64 5 2 System Composition 28 64 5 3 Social media message Sending Operation 28 65 5 4 Operating Social media function and checking sending status 28 66 5 5 Restrictions of each Tweet 28 66 5 6...

Page 23: ...res for Cyclic Script 30 29 5 Module Configuration Dialog Box 30 30 5 1 Overview 30 30 5 2 Basic Operations for Module Configuration Dialog Box 30 31 Chapter 31 External Memory Devices 1 External Memo...

Page 24: ...33 6 2 Word Devices 33 7 2 1 HMI Device Addresses 33 7 2 2 Control Device Addresses 33 16 Chapter 34 MICRO I Setup 1 Maintenance Screen 34 1 1 1 Maintenance Screen Overview 34 1 1 2 Displaying the Ma...

Page 25: ...mensions 35 21 2 7 Installation 35 26 2 8 Wiring 35 29 2 9 USB Cable Lock Pin Attachment 35 30 2 10 Maintenance and Inspection 35 31 3 HG4G 3G HG2G 5F 35 35 3 1 Packing content 35 35 3 2 Type No 35 35...

Page 26: ...arranty Period 35 96 7 2 Extent of warranty 35 96 7 3 Start 35 96 7 4 Indemnification 35 96 7 5 Extent of service 35 96 Chapter 36 Troubleshooting 1 Error Messages 36 1 1 1 Errors Displayed on the Scr...

Page 27: ...write from to external device s and does not burden the operator with issues relating to communications software 1 1 System Composition for the RUN operation The MICRO I can be operated in the follow...

Page 28: ...ct you have created can be downloaded to the MICRO I by directly connecting it to the computer or the project data can be downloaded to external memory device and then it can be copied from external m...

Page 29: ...settings and creating screens The set of data made up of settings and created screens is called a project Using WindO I NV4 you create a project and then download it to the MICRO I to build the interf...

Page 30: ...nitor Mode flashes at the bottom left of the MICRO I screen On the WindO I NV4 Online tab in the Monitor group click Start Monitor Offline Mode MICRO I stops communicating with the external devices It...

Page 31: ...e 4 Downloading the project 3 Saving the project 5 Debug 7 RUN refer to Chapter 2 2 1 Starting WindO I NV4 on page 2 38 Creating a new project refer to Chapter 4 1 1 Creating New Project Data on page...

Page 32: ...project data while confirming actual actions 6 Troubleshooting If there is a module or communication related problem with the MICRO I or a problem with the screen an appropriate message is displayed a...

Page 33: ...38 to 1 18x10 38 0 1 18x10 38 to 3 4x1038 Bit 0 1 String S String data It handles from the beginning to the NULL 00h character as a character string Data type Data handling UBIN16 W Data is handled as...

Page 34: ...er word Upper word Sign 1st 2nd 3rd 4th 5th 6th 7th s e exponent bit 30 to 23 bit 31 bit 23 f significand bit 22 to 0 Represents after the decimal of 1 xxx 127 Sign bit 0 positive 1 negative bit 22 bi...

Page 35: ...n LDR1 Storing 4321 Hex in LDR0 F765 Hex in LDR1 BCD8 EB The sign is 1 Hex so the binary coded decimal value of the positive number 2345678 Hex handled as 2345678 Dec The sign is F Hex so the binary c...

Page 36: ...ommunicate data in device addresses in one word units so when the upper word and lower word are sent in separate packets the value may have already changed when the data for both words is received whi...

Page 37: ...LDR103 Parts you can indirectly read and indirectly write Device address set as read source Device address with actually read value Device address for Indirect value 200 LDR11 300 LDR12 100 LDR10 500...

Page 38: ...ion that switches between two or more text groups dynamically With this function the registration text of buttons can be switched to different languages according to the conditions For details refer t...

Page 39: ...lovak Slovene Baltic ANSI1257 Estonian Latvian Lithuanian Greenlandic Lappish Cyrillic ANSI1251 Bulgarian Belarusian Ukrainian Serbian 2 Macedonian Russian 7 seg ASCII Displays number 0 to 9 alphabet...

Page 40: ...nt ISO 8859 1 Latin1 Icelandic Irish Italian English Dutch Swedish Spanish Danish German Norwegian Portuguese Finnish Faeroese French Text can be displayed sharper when European fonts are enlarged Ref...

Page 41: ...for the variable strings Objects Installed Fonts in the MICRO I 1 Optional Fonts 2 Windows Font Drawings Text YES YES YES Buttons Bit Button YES YES YES Word Button YES YES YES Goto Screen Button YES...

Page 42: ...large font on the System tab in the Project Setting dialog box the MICRO I can replace some of the optional fonts with the high quality fonts Scaled text with a background color is replaced and displa...

Page 43: ...I NV4 User s Manual 2 11 1 WindO I NV4 Specifications 2 WindO I NV4 Features Basic Operations High quality Japanese Font Display Size 8x16 W H 0 5 1 1 2 3 4 5 6 0 5 2 3 4 5 6 7 8 W H 1 7 8 0 5 2 3 4 5...

Page 44: ...2 3 4 5 6 7 8 W H 1 7 8 0 5 2 3 4 5 6 7 8 When the high quality fonts have not been downloaded into the operator interface the installed fonts in the MICRO I are used even if Use large font is select...

Page 45: ...the Text Manager 2 Set each item and click the OK button Font Select the font to use Font style Select italic bold or other style Size Select the size of the text Sample Shows a preview using the spe...

Page 46: ...fonts set is selected lines containing characters outside the part outline are not displayed Applicable draw object Text Applicable parts Buttons Bit Button Word Button Goto Screen Button Print Butto...

Page 47: ...This table shows where to find this property Applicable draw object Text Applicable parts Buttons Bit Button Word Button Goto Screen Button Print Button Key Button Keypad Lamps Pilot Lamp Multi State...

Page 48: ...de are hexadecimal 1 Therefore the character code for a is as follows HG3G HG2G 5F HG5G V HG4G V HG3G V HG2G V HG2G 5T HG4G HG1G HG1P HG2J 7U Upper 4 bits of the code hexadecimal Lower 4 bits of the c...

Page 49: ...WindO I NV4 User s Manual 2 17 1 WindO I NV4 Specifications 2 WindO I NV4 Features Basic Operations High quality Western Font ISO 8859 1 Central European ANSI 1250...

Page 50: ...1 WindO I NV4 Specifications 2 18 WindO I NV4 User s Manual Baltic ANSI 1257 Cyrillic ANSI 1251...

Page 51: ...NV4 User s Manual 2 19 1 WindO I NV4 Specifications 2 WindO I NV4 Features Basic Operations Japanese Font JIS X0201 Control Codes Refer to the following table when using control codes in User Communi...

Page 52: ...HG2J 7U HG5G 4G 3G 2G V HG4G 3G HG2G 5F 5T 1 HG1G 1P Picture Manager 65536 colors Drawing objects and Properties sheet 256 colors HG2G 5T 2 Picture Manager Monochrome 16 shades Drawing objects and Pro...

Page 53: ...awings Saving image files 1 Click Import in Picture Manager The Open dialog box is displayed 2 Specify the image file and then click Open When managing pictures by category create a new category and s...

Page 54: ...played Click Yes to overwrite the image After overwriting the image is saved in the list of the selected category and the previous image is deleted from the list Example The picture Picture00 is saved...

Page 55: ...pictures in the category selected from Symbols is displayed When managing pictures by category create a new category and select it To create a category click Configure and then click New Category on t...

Page 56: ...in Preview can be changed 1 Right click the picture displayed in Preview then click Set Preview Size The Set Preview Size dialog box is displayed 2 Specify the width and the height and click OK Previ...

Page 57: ...screen are saved as pictures in NMF NV Metafile format in Picture Manager 1 Select and right click the drawing object then click Copy to Picture Manager The Picture Name Setting dialog box is displaye...

Page 58: ...anager You cannot use the following characters in the picture name HG2J 7U HG5G 4G 3G 2G V HG4G 3G HG2G 5F 5T HG1G 1P Options Configures the image processing in Options For details refer to Picture Na...

Page 59: ...e to export and then click Export The Browse For Folder dialog box is displayed 2 Select the folder to save and then click OK HG3G HG2G 5F HG5G V HG4G V HG3G V HG2G V HG2G 5T HG4G HG1G HG1P HG2J 7U To...

Page 60: ...registered to the picture list Save Picture Files in External Memory Device Saves the image files for the pictures selected with the check boxes to external memory device Click this button to display...

Page 61: ...details refer to Symbol Factory on page 2 32 Select Closes Picture Manager and sets the picture selected in the picture list Close Closes Picture Manager 1 HG5G 4G 3G 2G V HG4G 3G HG2G 5F 5T HG1G 1P o...

Page 62: ...Exchange Selects this check box to convert the color of the picture From Specifies color before conversion Click this button to display the Color Settings dialog box Specify the color and then click O...

Page 63: ...ates a new category in the Category List The default category name is NewBookn n Number Delete Category Deletes a category from the Category List Rename Category Changes the name of the category selec...

Page 64: ...ed in Picture Manager Categories tab Opens a tab for a category name selected from Categories and shows a list of pictures Selects a picture saved in Picture Manager Preview Display a picture selected...

Page 65: ...The image is filled uniformly in the color selected in Fill Color Hollow All color is deleted Fill Color Selects the color used for Shaded or Solid modes Click this button to display the Color Settin...

Page 66: ...r or exporting an image using Export from the right click menu Click this button to display the Color Settings dialog box Select a color from the Color Palette Defaults Returns the background color co...

Page 67: ...pictures If this check box is not selected applies to the picture selected in Categories tab Defaults Returns the size configured to the picture to default Help Displays the Symbol Factory Help Width...

Page 68: ...e saved Color Exchange Select this check box to convert the color of the picture Image You cannot use the following characters in the picture name HG2J 7U HG5G 4G 3G 2G V HG4G 3G HG2G 5F 5T HG1G 1P Fr...

Page 69: ...are equipped with a video interface 1 HG2J 7U only Item Description File format Wave files wav Data format PCM Sampling rate 8000 11025 12000 16000 24000 22050 32000 44100 48000 1 Hz Quantization bit...

Page 70: ...IDEC Automation Organizer and then click WindOI NV4 Windows 8 On the Start screen tiles click WindOI NV4 Windows 7 Click Start click Programs click IDEC Automation Organizer and then click WindOI NV4...

Page 71: ...software Preference The Update Preference dialog box is displayed when this button is clicked To update information when WindO I NV4 starts check this check box The Automation Organizer Updater dialo...

Page 72: ...tton to open the project data The recovery data is deleted when the project data is saved Delete Deletes the selected recovery data Delete All Deletes all recovery data Close Closes the Project Recove...

Page 73: ...2 46 Workspace The workspace is the area where the Project window the Object List window the Part Library window the Toolbox window etc are located You can change the position and method for displayi...

Page 74: ...Open Opens project data that has already been created Save Saves the project data being edited Save As Saves the project data being edited with a new name Print Outputs the project data being edited...

Page 75: ...f you click the Customize Quick Access Toolbar button the Customize Quick Access Toolbar menu is displayed You can change the quick access toolbar to any desired settings Changing the buttons displaye...

Page 76: ...ve button The command is deleted Show below the Ribbon You can change the position of the quick access toolbar to be located below the ribbon Click the button on the quick access toolbar and then clic...

Page 77: ...tion to be below the ribbon with the following methods Right click the quick access toolbar or the ribbon and then click Show below the Ribbon Select the Show Quick Access Toolbar below the Ribbon che...

Page 78: ...already been created Open Base Screen Opens a Base Screen that has already been created Popup Screen Opens a Popup Screen that has already been created Password Input Screens Opens a Password Input Sc...

Page 79: ...ts a Numerical Input Character Input Inserts a Character Input Picture Display Inserts a Picture Display Video Display 2 Inserts a Video Display Message Display Inserts a Message Display Message Switc...

Page 80: ...the right Rotate Left 90 Rotates selected drawing objects 90 to the left Flip Vertical Flips selected drawing objects vertically Flip Horizontal Flips selected drawing objects horizontally Replace 3...

Page 81: ...he data log Operation Log Configures the operation log Data Storage Area Changes the allocation of the data storage area Recipe Configures recipes Preventive Maintenance Configures the preventative ma...

Page 82: ...oftware to the expansion modules attached to the MICRO I Upload Uploads project data from the MICRO I Project Data This is the same as clicking the Upload icon Stored Data in External Memory Device Up...

Page 83: ...mediately before the screen was changed with the Back command Go to Screen First Screen Switches to the Base Screen with the smallest screen number in the project data Previous Screen Switches to the...

Page 84: ...on Result window This window displays the results of that comparison of projects Screen Diagram Shows the Screen Diagram This window displays the Overlapping Screen information and the screen numbers...

Page 85: ...Text Group Changes the displayed text to the text of the specified text group Command Description Zoom Changes the magnification of the editing window Command Description Close All Closes all editing...

Page 86: ...lected objects Flip Horizontal Horizontally flips selected objects Align Left Aligns selected objects to the left Align Center Aligns selected objects to the center Align Right Aligns selected objects...

Page 87: ...w or its tab to disable docking Windows that are not docked are called floating windows If you drag the title bar of the workspace window you can move all the docked windows together If you drag the t...

Page 88: ...f the workspace window is dropped on the icon it is docked to WindO I NV4 s left right top or bottom frame If a floating window is dropped on the Docking icon it is docked to WindO I NV4 s left right...

Page 89: ...ing window to that window Change the displayed window with the tabs Changing the display method of windows Auto Hide If the workspace window is docked you can change the widow to automatically hide an...

Page 90: ...with the latest information Position This section of the status bar shows the X and Y coordinates of the mouse cursor in the editing window Text Group This section of the status bar shows the current...

Page 91: ...ay the Grid Settings dialog box Configure the items and click the OK button Type Selects the type of grid Touch Panel Aligns the grid to the touch panels Other Aligns the grid to the specified spacing...

Page 92: ...alog box is displayed 2 Specifying the zoom magnification 50 to 400 and click OK Customizing the status bar You can change the commands displayed on the status bar Right click the status bar and check...

Page 93: ...ptions when editing screens the path when selecting files and the path for automatic backups The settings configured here are saved even when you exit WindO I NV4 The procedure for configuring the wor...

Page 94: ...fore pasting it to the screen Enable Text Auto Resizing Select this box to automatically change the text size according to a change in part size Enable Input Method Editor IME when entering Device Add...

Page 95: ...der E mail Address in the E mail tab on the Project Settings dialog box E mail Address on the E mail Address dialog box Import was executed on the E mail Address Book dialog box The settings on this t...

Page 96: ...e Foreground Color Background Color and Pattern Switch Foreground Color Background Color and Pattern Size W H Registration Text tab Font Potentiometer View tab The shape used for the appearance design...

Page 97: ...Pattern Size W H Format tab Font Charts Bar Chart View tab Plate Color Flange Foreground Color Background Color and Pattern Space between Bars Size W H Scale tab Show Tick Numbers for X Axis and Y Ax...

Page 98: ...g box is displayed when WindO I NV4 starts For details refer to Project Recovery Dialog Box on page 2 40 Backup A backup copy of a project being edited is created as often as you want The file name of...

Page 99: ...toolbar to be located below the ribbon select this check box Add Add a command to the Customizing the quick access toolbar list Remove Delete a command from the Customizing the quick access toolbar li...

Page 100: ...r is released the Automation Organizer Updater dialog box is displayed For details refer to Automation Organizer Updater Dialog Box on page 2 39 Go online Shows the IDEC web page for free updates manu...

Page 101: ...150 175 200 250 300 350 400 Object List tab This tab changes the items displayed in the Object List window List Items Shows the list of items that can be displayed in the Object List window Add Adds a...

Page 102: ...fying a device address with the Tag Editor To display the Tag Editor click to the right of the text box for setting the device address Use this Tag Editor to set the device address The Tag Editor is d...

Page 103: ...ss number list with the tag names and comments in the selected file Export Displays the Export dialog box Select the location to save the file enter a file name and then click Save to save the tag nam...

Page 104: ...lays the comment of the address number Double clicking the cell allows you to edit the comment The maximum number is 255 characters You can enter multi line messages by inserting a newline To enter a...

Page 105: ...f five items of data can be used To flip the bits in data select the Not check box Operator priority is the same as scripts For details refer to Chapter 20 6 5 About the Priority of the Operator on pa...

Page 106: ...greater than NO YES Less than Compares if is less than NO YES Bitwise operators Bitwise AND Calculates the logical product AND of each bit in and YES YES Bitwise OR Calculates the logical sum OR of e...

Page 107: ...adding the values of D11 D12 multiplied by two and D13 is equal to the value of D10 100 D 0 D 1 D 2 D 3 D 4 D 5 D 6 D 7 This expression cannot be configured in the Trigger Condition Settings dialog b...

Page 108: ...5 WindO I NV4 Common Operations and Settings 2 76 WindO I NV4 User s Manual...

Page 109: ...mmunicationn 0 1 Read Write D0 M0 1234 Numerical Display Reference Device Address D0 Bit Button Destination Device Address M0 When the read source is the value from the device address of the external...

Page 110: ...s and configuring settings the Select Communication Driver dialog box is displayed For details refer to Chapter 4 Create new project data by using the interactive quick start on page 4 1 Click Communi...

Page 111: ...Link Tab on page 4 55 2 O I Link Communication HG3G HG2G 5F HG5G V HG4G V HG3G V HG2G V HG2G 5T HG4G HG1G HG1P HG2J 7U Read Write 5678 MICRO I O I Link Slave Slave 1 MICRO I O I Link Slave Slave 2 MI...

Page 112: ...Event Transmission function from the MICRO I can be used with DM Link 1 1 Communication The Event Transmission function is a function that works as follows When value in the dedicated DM Link memory o...

Page 113: ...Write Read Write Read Write DM Link 1 N Communication The Event Transmission function cannot be used with DM Link 1 N Communication HG3G HG2G 5F HG5G V HG4G V HG3G V HG2G V HG2G 5T HG4G HG1G HG1P HG2...

Page 114: ...tings the Select Communication Driver dialog box is displayed For details refer to Chapter 4 Create new project data by using the interactive quick start on page 4 1 Click Communication Driver on the...

Page 115: ...ialog box By clicking and then clicking New following displayed dialog boxes and configuring settings the Select Communication Driver dialog box is displayed For details refer to Chapter 4 Create new...

Page 116: ...HG4G HG1G HG1P HG2J 7U External device MICRO I Data reception Data transmission User communication External device Device Link Communicaton When the serial interface connecting external devices is RS...

Page 117: ...mand 1 On the Configuration tab in the System Setup group click Project The Project Settings dialog box is displayed 2 Click the Communication Interface tab on the Project Settings dialog box 3 Select...

Page 118: ...1 For details refer to Chapter 4 When SERIAL1 RS232C SERIAL1 RS422 485 COM RS232C or COM RS422 485 is selected under Interface Configuration on page 4 40 Ethernet Interface For details refer to Chapte...

Page 119: ...be set in Protocol Name The maximum number for protocol name is 40 characters 7 Set the time out 0 to 255 in Receiving Character Time Out x100 msec For details on the Receiving Character Time Out x10...

Page 120: ...ual 8 Set Transmission TXD command Click Add under Command List The Command Settings dialog box is displayed 9 Select TXD in Type Specify the transmitted data to the external device connected to the M...

Page 121: ...Trigger Condition Settings dialog box For the conditional expressions configuration procedure refer to Chapter 2 5 2 Setting Conditional Expressions on page 2 73 For details on data types refer to Cha...

Page 122: ...a List The Data Settings dialog box is displayed 16 Select data type in Type Data setting items are displayed For details on transmission command refer to Transmission TXD Command on page 3 49 17 Set...

Page 123: ...smission command configured in Command List and Data List on Project Settings dialog box is displayed The data is displayed in Data List in the order they were set To change the order of data select d...

Page 124: ...WindO I NV4 User s Manual 20 Specify Receive RXD command Click Add under Command List The Command Settings dialog box is displayed 21 Select RXD in Type Define the data configuration for received data...

Page 125: ...he type of data handled by the conditional expression in Data Type Click to display the Trigger Condition Settings dialog box For the conditional expressions configuration procedure refer to Chapter 2...

Page 126: ...ta List The Data Settings dialog box is displayed 27 Select data type in Type Data setting items are displayed For details on receive command refer to Receive RXD Command on page 3 62 28 Specify the d...

Page 127: ...on Project Settings dialog box is displayed To add a transmission command repeat steps 8 through 19 To add a receive command repeat steps 20 through 29 The data are displayed in Data List in the orde...

Page 128: ...communication to use Transmission TXD and Receive RXD commands To set the created user communication protocol to another user communication or to use it in another project click Copy to Protocol Mana...

Page 129: ...box is displayed 2 Click the Communication Interface Tab in the Project Settings dialog box 3 Select the interface for user communication under Interface Configuration and then select the User Communi...

Page 130: ...ernet Interface 2 For details refer to Chapter 4 When Protocol1 to Protocol7 is selected for Ethernet under Interface Configuration on page 4 43 5 Click the User Communication tab 6 Enter the name of...

Page 131: ...hing check box 10 Configure the transmission command for the Inching Function Click Add under Command List The Command Settings dialog box is displayed The items displayed in Command List can be chang...

Page 132: ...e conditional expression in Condition and select the data type handled by the conditional expression in Data Type Click to display the Trigger Condition Settings dialog box For the conditional express...

Page 133: ...on in Comment under Detail The maximum number is 40 characters 17 Set the command data for the inching function Click Add under Data List The Data Settings dialog box is displayed 18 Select data type...

Page 134: ...ialog box is displayed To add a command for inching function repeat steps 10 through 20 To add a transmission command repeat steps 8 through 19 of Using Transmission Command and Receive Command To add...

Page 135: ...K This concludes configuring user communication To set the created user communication protocol to another user communication or to use it in another project click Copy to Protocol Manager to register...

Page 136: ...her user communication 1 On the Configuration tab in the System Setup group click Project The Project Settings dialog box is displayed 2 In the User Communication tab on the Project Settings dialog bo...

Page 137: ...NV4 User s Manual 3 29 5 User Communication 3 Communication The user communication protocol selected in Protocol Manager is configured to the user communication specified on the Project Settings dial...

Page 138: ...d then import it to a project Saving registered user communication protocol as a file 1 On the Configuration tab in the Manager group click Protocol Manager Protocol Manager is displayed 2 Select the...

Page 139: ...r group click Protocol Manager Protocol Manager is displayed 2 On Protocol Manager click Import The Open dialog box is displayed 3 Specify the user communication protocol file and then click Open The...

Page 140: ...monitored These setting items are used only with receive command Example The received data 1 frame is 2 bytes While ON is selected as Trigger Type in Trigger Condition and LM100 is set to Device Addre...

Page 141: ...ut duration First byte of receive data Second byte of receive data Value of Receiving Character Time Out address number 0 bit 15 of Status Device Address LDR110 Value of Completed Device Address LM101...

Page 142: ...l displays the Command Settings dialog box Type Shows the type of command Double clicking the cell displays the Command Settings dialog box Key Shows the function keys F1 to F12 assigned to the comman...

Page 143: ...selected command downward in the list Delete Deletes the selected command from the Command List Adding copying and shifting up and down happen within the range of the same type of command There are t...

Page 144: ...5 User Communication 3 36 WindO I NV4 User s Manual Command Settings Dialog Box Specify the command details for user communication protocol...

Page 145: ...ndition device address LM100 changes to 1 data can be received ready to receive by user communication so when data is transmitted from the external device the MICRO I starts to receive the data When d...

Page 146: ...nction Key F7 is pressed data is transmitted by user communication from the MICRO I to the external device When data transmission is successfully completed the value of the Completed Device Address LM...

Page 147: ...ing edge is selected as Trigger Type Click to display the Tag Editor For the device address configuration procedure refer to Chapter 2 5 1 Device Address Settings on page 2 70 Condition Sets the condi...

Page 148: ...rocedure refer to Chapter 2 5 2 Setting Conditional Expressions on page 2 73 Function Key Select the function key F1 to F12 assigned to the command Trigger Type A condition for data transmission is se...

Page 149: ...hen Trigger Type in Trigger Condition is While ON Device Address is LM100 and Completed Device Address is LM101 When the Not Clear Completed Device Address automatically check box is not selected When...

Page 150: ...ion and Calculation End Position settings and the transmission data 1 2 Reserved 3 Registering Constant Data Error When data type is Registering Constant Character or Registering Constant Hexadecimal...

Page 151: ...f the Registering Constant data Check the transmission data from the external device 4 Device Data Conversion Error When data type is Device Address and Conversion Type is ASCII to Hexadecimal a code...

Page 152: ...e When Trigger Type in Trigger Condition is Rising edge and Device Address is LM100 Receiving Time Out x100 msec Set the time out 0 to 255 from when the trigger condition is satisfied to when 1 frame...

Page 153: ...isfied the value of the Receiving Time Out of the Status Device Address LDR110 address number 0 bit 14 changes to 1 Comment Enter a comment for a command The maximum number is 40 characters Receive co...

Page 154: ...Settings dialog box TXD HEX A DEC A N Hexadecimal to ASCII is selected Decimal to ASCII is selected No conversion is selected RXD A DEC A HEX N ASCII to Decimal is selected ASCII to Hexadecimal is se...

Page 155: ...s RTU CRC is selected Conversion Type Display the conversion methods for values of device addresses as follows HEX A N Hexadecimal to ASCII is selected No conversion is selected Number of bytes Displa...

Page 156: ...cimal Device Address Registering Constant Character Registering Constant Hexadecimal BCC Skip Skip can only be configured when RXD is selected as Type on the Command Settings dialog box Setting item v...

Page 157: ...acter is selected under Type on the Data Settings dialog box Data Enter character data to be transmitted 1 to 1 500 bytes The size of a single byte character is one byte and that of a double byte char...

Page 158: ...is selected as Type on the Command Settings dialog box and Constant Hexadecimal is selected under Type on the Data Settings dialog box Data Enter hexadecimal data to be transmitted 1 to 1 500 bytes Ex...

Page 159: ...n internal device For details refer to Chapter 2 Indirect Read and Indirect Write Settings on page 2 5 Click to display the Tag Editor For the device address configuration procedure refer to Chapter 2...

Page 160: ...word device to which a number of bytes is applied for transmitted data Click to display the Tag Editor For the device address configuration procedure refer to Chapter 2 5 1 Device Address Settings on...

Page 161: ...nversion Type Decimal to ASCII Device Address LDR100 Use Reference Device Address OFF Number of bytes 2 Words 2 Variable OFF Item Setting Conversion Type No conversion Device Address LDR100 Use Refere...

Page 162: ...age Method of data from Lower byte Number of bytes 2 Words 2 Variable ON Device Address LDR200 Item Setting Conversion Type No conversion Device Address LDR100 Use Reference Device Address ON Device A...

Page 163: ...r is two bytes The character data of different size or the same data with a different number cannot be registered Set Register the Index and Data settings to the list When a number that is already reg...

Page 164: ...No according to the value of device address is transmitted When the LDR100 value is 2 Item Setting Number of Registering Constants 3 Registering Constants Index No 1 123 Index No 2 456 Index No 3 789...

Page 165: ...e or the same data with a different number cannot be registered Set Register the Index and Data settings to the list When a number that is already registered is selected it is overwritten with the new...

Page 166: ...x No according to the value of device address is transmitted When the LDR100 value is 3 Item Setting Number of Registering Constants 3 Registering Constants Index No 1 1234 Index No 2 5678 Index No 3...

Page 167: ...e method to calculate the data between the Calculation Start Position and Calculation End Position 1 31h 4 34h 5 35h 2 32h STX 02h 3 33h BCC CR 0Dh 1 2 3 4 5 6 Calculation Start Position Transmission...

Page 168: ...n exclusive OR XOR of 1 byte data at Calculation Start Position and FFFFh 2 If the least significant bit of the result of step 1 is 0 shift to the right by one bit If the bit is 1 shift to the right b...

Page 169: ...to the transmission data When Calculation Type is Modbus RTU CRC When the BCC calculation result is BA30h with no conversion the two bytes of data is appended to the transmission data 0 30h 4 34h 1 by...

Page 170: ...ngle byte character is one byte and that of a double byte character is two bytes Example Constant Character for receive command data When the trigger condition is satisfied the received data is compar...

Page 171: ...box Data Enter hexadecimal data designated to be received 1 to 1 500 bytes Example Constant Hexadecimal for receive command data When the trigger condition is satisfied the received data is compared w...

Page 172: ...s You can only specify an internal device Click to display the Tag Editor For the device address configuration procedure refer to Chapter 2 5 1 Device Address Settings on page 2 70 Storage Method of d...

Page 173: ...data Insufficient by 1 word 0 is stored When the Variable check box is selected observe the following points When data is set expect for the end of a command set Constant Character data or Constant H...

Page 174: ...R100 Use Reference Device Address OFF Number of bytes 2 Words 2 Variable OFF Item Setting Conversion Type No conversion Device Address LDR100 Use Reference Device Address OFF Storage Method of data fr...

Page 175: ...FF Storage Method of data from Lower byte Number of bytes 2 Words 3 Variable ON Item Setting Conversion Type ASCII to Hexadecimal Device Address LDR100 Use Reference Device Address OFF Number of bytes...

Page 176: ...er of bytes 2 Words 3 Variable ON Item Setting Conversion Type No conversion Device Address LDR100 Use Reference Device Address ON Device Address LDR200 Storage Method of data from Upper byte Words 2...

Page 177: ...t size or the same data with a different number cannot be registered Set Register the Index and Data settings to the list When a number that is already registered is selected it is overwritten with th...

Page 178: ...2 of the matching data is stored in Index Device Address LDR100 Item Setting Number of Registering Constants 3 Registering Constants Index No 1 123 Index No 2 456 Index No 3 789 Index Device Address L...

Page 179: ...same data with a different number cannot be registered Set Register the Index and Data settings to the list When a number that is already registered is selected it is overwritten with the new setting...

Page 180: ...istered data and the value of the Index No 2 Dec of the matching data is stored in Index Device Address LDR100 Item Setting Number of Registering Constants 3 Registering Constants Index No 1 1234 Inde...

Page 181: ...ss LDR100 of Device Address of the receive command data is 2 Dec the data is stored in the device address LDR202 which is offset by 2 The last 1 byte is taken as the terminal code Constant Hexadecimal...

Page 182: ...the data between the Calculation Start Position and Calculation End Position 1 31h 4 34h 5 35h 2 32h STX 02h 3 33h BCC CR 0Dh 1 2 3 4 5 6 Calculation Start Position Receive data 1 31h 4 34h 5 35h 2 32...

Page 183: ...es 2 1 Obtain an exclusive OR XOR of 1 byte data at Calculation Start Position and FFFFh 2 If the least significant bit of the result of step 1 is 0 shift to the right by one bit If the bit is 1 shift...

Page 184: ...exadecimal to ASCII conversion the resulting two bytes of data is used for comparison with the BCC part of the receive data When the calculation type is Modbus RTU CRC When the BCC calculation result...

Page 185: ...s selected under Type on the Data Settings dialog box Number of bytes Specify the number of bytes 1 to 249 of receive data to be ignored Example Skip for receive command data In the received four byte...

Page 186: ...nal code When the terminal code is followed by BCC the data including the number of bytes of BCC is received Set Not set Set Reception is started with the start code and the data is received according...

Page 187: ...Registering Constant Hexadecimal Device Address Without Variable Command length Receive BCC 1 0 XOR N 1 BCC Command settings Start code None Terminal code None When trigger conditions are satisfied f...

Page 188: ...smission command 1 Write a value of 100 Dec to LDR100 of transmission command data Device Address 2 Change the trigger condition LM100 from 0 to 1 to start command transmission After the transmission...

Page 189: ...sfully completed the Completed Device Address LM102 changes to 1 When the value of each bit of address 0 of Status Device Address LDR130 is 0 reception is completed without an error Item Setting Type...

Page 190: ...ata 3 Change the value of the trigger condition LM200 from 0 to 1 to send the command The transmission data is as follows When data transmission is successfully completed the Completed Device Address...

Page 191: ...M202 Completed Device Address LM203 Not Clear Completed Device Address automatically No Status Device Address LDR260 Receiving Time Out 0 No Receive Time Out Comment RXD command Command Data Settings...

Page 192: ...3032h there is a match since the BCC part data is 3032h When there is no match the BCC Error address number 0 bit 0 of Status Device Address changes to 1 When data reception is successfully completed...

Page 193: ...ansmission is successfully completed the Completed Device Address LM301 changes to 1 When the value of each bit of address number 0 for Status Device Address LDR330 is 0 transmission is completed with...

Page 194: ...32C 1 SD Pin No Name 2 RD 3 RS 4 CS 5 SG FG Pin No Name RD SD SG Shield Wire HG2J 7U HG5G 4G 3G 2G V HG4G 3G HG2G 5F 5T HG1G Terminal External Device RS232C Cover FG Pin No Name 1 RDB RD 6 SDA SD 4 SD...

Page 195: ...ers 6 Sub Host Communication HG3G HG2G 5F HG5G V HG4G V HG3G V HG2G V HG2G 5T HG4G HG1G HG1P HG2J 7U Read Write 5678 External device 0 1 D1 M1 5678 MICRO I Sub Host Communication Numerical Display Dis...

Page 196: ...cation 1 COM2 Sub Host Communication Item Settings Protocol MICROSmart Allocate Device Address HMI Link Register LLR LLR0 0 D0100 LLR1 0 M0002 LLR2 1 D100 1 LLR3 2 D101 Display Device Address for Nume...

Page 197: ...p click Project The Project Settings dialog box appears 2 Click the Communication Interface tab 3 Select the interface for Sub Host Communication under Interface Configuration and then select the Sub...

Page 198: ...lected under Interface Configuration on page 4 39 HG2G 5T HG1G 1P 1 For details refer to Chapter 4 When SERIAL1 RS232C SERIAL1 RS422 485 COM RS232C or COM RS422 485 is selected under Interface Configu...

Page 199: ...7 Allocate the external device addresses to the HMI Link Registers LLR used with Address Number in Settings For details refer to Chapter 4 3 7 Sub Host Communication Tab on page 4 60 8 Click OK This c...

Page 200: ...umber of the device addresses configured with the Monitor the error information of each Slave Number check box is also cleared 2 Finish 1st reading This bit changes to 1 after all device addresses all...

Page 201: ...When this bit is 1 MICRO I connects with each external device When this bit is 0 MICRO I does not connect the external device Default value is 1 when the device addresses of the relevant slave number...

Page 202: ...g security and fire protection systems were connected using methods unique to the building equipment and systems manufacturers However conforming to BACnet allows equipment and systems to be connected...

Page 203: ...g Output Object Analog Value Object Binary Input Object Binary Output Object Binary Value Object Number of Objects 256 maximum 1 BIBBs DS RP B DS WP B DS RPM B DS WPM B DS COV B DS COVU B DM DDB B DM...

Page 204: ...ices Services are interfaces used to exchange information between BACnet devices Services are classified into the client side that initiates services and the server side that executes services The Ser...

Page 205: ...perty B ReadProperty DS WP B Data Sharing Write Property B ReadPropertyMultiple DS RPM B Data Sharing Read Property Multiple B WriteProperty DS WPM B Data Sharing Write Property Multiple B WriteProper...

Page 206: ...ith WindO I NV4 MICRO I starts running Device addresses Physical I Os BACnet device Analog Input object Present_Value 10 0 Analog Output object Present_Value 20 0 XXXX object YYYY object D0000 1000 Co...

Page 207: ...st from a BACnet device This function is implemented using DS WP B Data Sharing Write Property B and DS WPM B Data Sharing Read Property Multiple B The below diagram shows a BACnet device changing the...

Page 208: ...ation may not be provided for changes in values that are faster than the synchronization cycle of objects and device addresses AI 10 Properties Value Present_Value 10 0 COV_Increment 3 0 BACnet device...

Page 209: ...tion ConfirmedCOVNotification Without confirmation UnconfirmedCOVNotification Lifetime The time to enable the COV function in 1 sec increments If 0 or omitted the COV function is enabled with no time...

Page 210: ...ags have changed Binary Input Binary Output Binary Value Present_Value Status_Flags Notification of change is provided when 1 or 2 as follows 1 When Present_Value has changed 2 When any of the bits in...

Page 211: ...Foreign Device function is used for performing broadcast communications with BACnet devices on different IP subnets even when there is no BBMD on the IP subnet of the MICRO I Broadcast communications...

Page 212: ...properties are changed they operate with the values after the change BACnet IP Properties with Allocated Device Addresses and the Values of Those Device Addresses Enabled Bound Disabled Not bound Whe...

Page 213: ...BACnet IP 1 On the Configuration tab in the System Setup group click Project The Project Settings dialog box is displayed 2 Click the BACnet IP Settings tab select the Use BACnet IP check box and cli...

Page 214: ...ndO I NV4 User s Manual 4 Adds a new object Click New The New Object dialog box is displayed 5 Select the object type of the object to register and assign it an instance number 6 Click OK The new obje...

Page 215: ...d object ID in the object list The properties are displayed 8 Configure the properties For details refer to Object List on page 3 110 9 Repeat steps 4 through 8 to set all the objects 10 click OK This...

Page 216: ...starting from the specified data register Port Number Configures the port number for performing BACnet Communication Configures the port number in the range from 0 to 65 535 Fixed Value Specifies the...

Page 217: ...s itself as a Foreign Device on the configure BBMD BBMD IP Address To join a BACnet IP network when there is no BBMD on the IP subnet of the MICRO I configures the IP address of the BBMD on the other...

Page 218: ...current settings as default Saves the settings of the properties as the default values of the object Property settings Enable When the value of the HMI Special Internal Relay LSM70 BACnet Communicati...

Page 219: ...o not have the same instance number Delete Deletes the object under the node selected in the object list Export Exports the settings of the following objects as a CSV file Analog Input Analog Output A...

Page 220: ...ixed values and device addresses for Present_Value of the Analog Input object Device Control Selects whether to set a fixed value for Present_Value or to allocate device addresses Configures a fixed v...

Page 221: ...36 Coefficient Configures Present_Value as the product of the value stored in the device address multiplied by the coefficient Present_Value Value stored in the device address Coefficient Example The...

Page 222: ...ual Analog Output Object Use these settings to configure devices for Present_Value of the Analog Output object Device Control Device Control of Present_Value is Enable A constant value cannot be confi...

Page 223: ...lied by 1 coefficient multiplied is stored in the device addresses Value of device addresses Present_Value 1 coefficient Example The coefficient is multiplied as a Float32 F value The conversion order...

Page 224: ...Analog Value Object Use these settings to configure device addresses for Present_Value of the Analog Value object Device Control Device Control of Present_Value is Enable A constant value cannot be c...

Page 225: ...out of range nothing is executed even when the value of Device for write trigger changes from 0 to 1 Device for Present_Value Conversion type Storage Destination Present_Value for reading UBIN16 W BI...

Page 226: ...e addresses allocated as Present_Value for writing by the coefficient is set as Present_Value Present_Value Present_Value for writing Coefficient The coefficient is multiplied as a float type value Th...

Page 227: ...Binary Input object Device Control Selects whether to set a fixed value for Present_Value or to allocate device addresses Configures a fixed value to Present_Value Select Disable in the Device Control...

Page 228: ...lue Select Enable in the Device Control of Present_Value and then click a button displayed in Device to display the Present_Value Settings dialog box Configure the parameters in the Present_Value Sett...

Page 229: ...e of the Binary Output object Device Control Device Control of Present_Value is Enable A constant value cannot be configured for Present_Value of the Binary Output object Allocate device addresses to...

Page 230: ...Binary Value Object Use these settings to configure device addresses for Present_Value of the Binary Value object Device Control Device Control of Present_Value is Enable A constant value cannot be c...

Page 231: ...dress 2 continuous words of address number are used 1 Specify the priority between 1 and 16 If the priority is out of range If the value of Device for write trigger changes from 0 to 1 then nothing is...

Page 232: ...The BACnet device reads the analog input value of the Analog Input object 2 The BACnet device writes the analog output value of the Analog Output object BACnet objects BACnet client Initial values of...

Page 233: ...r R Set a fixed value with WindO I NV4 Object_Name Character string 1 R Set a fixed value with WindO I NV4 Object_Type BACnetObjectType R Set a fixed value with WindO I NV4 Present_Value Real number R...

Page 234: ...er string 1 R Set a fixed value with WindO I NV4 Object_Type BACnetObjectType R Set a fixed value with WindO I NV4 Present_Value Real number R R Refer to Present_Value on page 3 132 Description Charac...

Page 235: ...tObjectType R Set a fixed value with WindO I NV4 Present_Value Real number R R Refer to Present_Value on page 3 132 Description Character string 1 R Set a fixed value with WindO I NV4 Status_Flags BAC...

Page 236: ...ixed value with WindO I NV4 Object_Name Character string 1 R Set a fixed value with WindO I NV4 Object_Type BACnetObjectType R Set a fixed value with WindO I NV4 Present_Value BACnetBinaryPV R W Refer...

Page 237: ...value with WindO I NV4 Object_Type BACnetObjectType R Set a fixed value with WindO I NV4 Present_Value BACnetBinaryPV R R Refer to Present_Value on page 3 132 Description Character string 1 R Set a fi...

Page 238: ...ect_Name Character string 1 R Set a fixed value with WindO I NV4 Object_Type BACnetObjectType R Set a fixed value with WindO I NV4 Present_Value BACnetBinaryPV R R Refer to Present_Value on page 3 132...

Page 239: ...ring 1 R Set a fixed value with WindO I NV4 Location Character string 1 R W Set the initial value with WindO I NV4 Description Character string 1 R W Set the initial value with WindO I NV4 Protocol_Ve...

Page 240: ...which write instructions are ranked and the value of Present_Value is determined In this case values cannot be directly written to Present_Value To write a value to Present_Value the value is first s...

Page 241: ...alue Write value Present_Value to be written from the BACnet device 1 When bit 15 of Device for priority is 0 and the value of Device for write trigger changes from 0 to 1 writes the value of Present_...

Page 242: ...of Priority_Array at the index number is used as Present_Value until it is reset to NULL 00h If all values stored in Priority_Array are NULL 00h Relinquish_Default on page 3 145 is used as Present_Val...

Page 243: ...for write trigger 1 The BACnet device writes the write value 20 0 to Priority_Array at the index number indicated by the specified priority 3 2 Priority_Array with the smallest index number out of all...

Page 244: ...ect and the BACnet device reads out the analog input value When writing the value of device addresses as Present_Value Present_Value changes in the following manner Data Type Value of Device Addresses...

Page 245: ...resent_Value The data type of Present_Value is set in Conversion type on page 3 115 of the Analog Output Object BACnet objects BACnet device Device addresses Physical output Analog Output object Prese...

Page 246: ...the Present_Value for reading D0002 is the Present_Value for writing D0010 is the Device for priority and D0011 is the Device for write trigger Writing the Value of a Device Address to Present_Value 1...

Page 247: ...alue for reading D0000 BACnet objects Device addresses BACnet device Analog Value object Present_Value 26 5 D0000 26 5 D0002 XXXX D0010 XXXX D0011 XXXX Reflected Write value 26 5 Priority 1 MICRO I Pr...

Page 248: ...ange of 0 to 65 535 Present_Value Value outside range of 0 to 65 535 0 BIN16 I Value within range of 32 768 to 32 767 Present_Value Value outside range of 32768 to 32 767 0 UBIN32 D Value within range...

Page 249: ...object and the BACnet device reads out the state of the external input The following table shows Present_Value Polarity and the physical state of the input Present_Value Polarity Physical State of Inp...

Page 250: ...tate of the external output The following table shows Present_Value Polarity and the physical state of the output Present_Value Polarity Physical State of Output INACTIVE NORMAL OFF or INACTIVE ACTIVE...

Page 251: ...iting D0010 is the Device for priority and D0011 is the Device for write trigger Writing the Value of a Device Address to Present_Value 1 When the value of the Device for write trigger D0011 is 1 writ...

Page 252: ...e for reading M0000 BACnet objects Device addresses BACnet device Binary Value object Present_Value 1 M0000 1 M0001 XXXX D0010 XXXX D0011 XXXX Reflected Write value 1 Priority 1 MICRO I Priority_Array...

Page 253: ...lt Relinquish_Default is the default value used as Present_Value when all values stored in Priority_Array are NULL 00h Polarity This property represents the relationship between the physical state of...

Page 254: ...the physical input output are bound 1 TRUE Out of service Present_Value and the physical input output are unbound Out_Of_Service TRUE is used for simulations Definition Value Analog Input Analog Outpu...

Page 255: ...bout the application such as the modification date of the created project data as a fixed string with WindO I NV4 Protocol_Services_Supported This property represents the types of services that are su...

Page 256: ...7 BACnet Communication 3 148 WindO I NV4 User s Manual...

Page 257: ...apter describes the various settings required to create a project 1 1 Creating New Project Data Create new project data by using the interactive quick start You can create project data by following di...

Page 258: ...umber A list of model numbers associated with the selected MICRO I is displayed Select the model number to use Installation Select the MICRO I installation direction from the following options The sup...

Page 259: ...n of Device Address Format Select the format for the device address This option can only be configured when Allen Bradley is selected for Manufacturer This concludes creating project data Next you wil...

Page 260: ...assword for projects created with WindO I NV4 Ver 1 11 4 or earlier using only 4 to 15 uppercase letters and numbers The password to enter varies based on the check box setting of the Use Password to...

Page 261: ...Data 4 Project Settings 1 3 Saving Project Data Saving project data You can save the project data being edited Click and then click Save When new project data is created and you have never save it th...

Page 262: ...the project data being edited with a different name 1 Click then click Save As The Save As dialog box is displayed 2 Enter the project name and click Save You cannot use the following characters in t...

Page 263: ...ected the settings are displayed in Detailed Settings to the right 3 Select Output to and click Print Printer The data is printed on the printer connected to the computer The Windows Print dialog is d...

Page 264: ...details refer to Data Log Settings on page 4 12 Operation Log Settings Target Events to record in the operation log settings will be printed Recipe Settings Settings in the recipe settings will be pr...

Page 265: ...t to the Save As dialog box is displayed Specify the save location and file name and then click Save Global Script Settings in Global Script will be printed Script Manager Select the print target for...

Page 266: ...lect the delivery date of the project data Control No Enter the control number of the project data The maximum length is 60 characters Version No Enter the version number The maximum length is 60 char...

Page 267: ...Name is set to N A will not be printed Autorun The Enable USB Autorun and Open Popup Screen when USB Flash Drive is inserted settings will be printed Web Server All settings on the Web Server tab wil...

Page 268: ...e the alarm function will not be printed Advanced Prints the Basic print content the Storage Method and the Monitoring Period on the General tab and the contents of the External Memory Device tab the...

Page 269: ...lt content will be printed for the Basic print content and E mail Function Trigger Condition and E mail content for each number Numbers for which E mail Function is Disable will not be printed HG3G HG...

Page 270: ...t Basic Prints the Script List Advanced Prints the Basic print content and the Script ID the Script Name the Data Type the contents of the registered script Please select the group numbers to print Se...

Page 271: ...he items of data that will be output when printing the object list Select the check boxes of the items to output Name Type Text ID Text Device Address Trigger Type Trigger Condition Trigger Type visib...

Page 272: ...is dialog box to set up the page layout such as the page size orientation and headers and footers Turn Headers and Footers On or Off Sets whether or not to print headers and footers when printing Each...

Page 273: ...of the content that will be printed Current Page Indicates the current page number in Current Page Total Pages format You can also enter a page number to display it First Page Displays the first page...

Page 274: ...The Open dialog box is displayed 2 Select a file to compare with then click Open The Comparison Result window is displayed Comparison results are displayed using colored text Blue Complete match Red...

Page 275: ...ject data cannot be converted to HG2J 7U s HG5G 4G 3G 2G V project data cannot be converted to HG4G 3G and HG2G 5F s Color settings color data are not converted If the Popup Screen size is larger than...

Page 276: ...Creating and Manipulating WindO I NV4 Project Data 4 20 WindO I NV4 User s Manual 3 Specify the save location and file name and then click Save 4 When the data is finished being converted click Close...

Page 277: ...roject data being edited 1 With Communication Driver on the status bar click one of External Device Communication 1 to External Device Communication 4 The Communication Driver tab on the Project Setti...

Page 278: ...O I NV4 User s Manual 4 Check the message and click Yes If there are no device addresses that correspond to the external device addresses used in the current project data after changing the communicat...

Page 279: ...ject data being edited Click and then click Close If the project data being edited has not been saved a confirmation message for saving the project data is displayed Click Yes to save the project data...

Page 280: ...he project overall This section describes the configuration procedure for project settings 1 On the Configuration tab in the System Setup group click Project The Project Settings dialog box is display...

Page 281: ...HG1G HG1P HG2J 7U Image file name Displays the file name of the imported image Import Shows the Open dialog box Select a bitmap format bmp image file and click Open to import it as an image to be dis...

Page 282: ...n extended period of time To return to the backlight to its original brightness touch the screen or write 1 to System Area 1 Backlight bit address number 1 bit 0 Time min Specifies the time 1 to 9999...

Page 283: ...panel 1 this function operates both switches even when two non overlapping touch switches are pressed at the same time 1 HG2J 7U only 5 HG5G 4G 3G 2G V HG4G 3G HG2G 5F 5T HG1G 1P only Press and hold...

Page 284: ...s 1 They are disabled when the device value is 0 6 HG5G 4G 3G 2G V HG4G 3G HG2G 5F 5T HG1G only Script error information is saved to the HMI Special Data Registers LSD52 and LSD53 For details refer to...

Page 285: ...ct was created When the bit devices in control devices are handled as words this setting is always the from Lower word from Upper byte Values of device addresses are read from and written to the upper...

Page 286: ...2 3 4 5 6 7 8 9 10 11 System Area 2 System Area 3 System Area 4 Address number Bit Function Description 0 0 to 15 Display screen number This bit stores the number of the screen being displayed Write...

Page 287: ...eriod of time The backlight turns on if the value changes to 1 when the backlight is off 6 Beep This bit stores the beep state Write a value to this bit to change the state This bit is 0 immediately a...

Page 288: ...s bit write 1 to the Clear error bit System Area 1 address number 1 bit 9 7 Clock IC error 1 This bit changes to 1 when the MICRO I internal clock stops To clear this bit write 1 to the Clear error bi...

Page 289: ...g output 4 Transferring recipe This bit changes to 1 when transferring recipe data This bit automatically changes to 0 when the transfer is finished 5 Character input setting complete This bit changes...

Page 290: ...igit BCD 9 0 to 7 Clock data Hour These bits store the current Hour 00 to 23 value as a 2 digit BCD 8 to 15 Clock data Day These bits store the current Day 01 to 31 value as a 2 digit BCD 10 0 to 7 Re...

Page 291: ...model The supported functions for each communication interface are as follows HG2J 7U HG3G HG2G 5F HG5G V HG4G V HG3G V HG2G V HG2G 5T HG4G HG1G HG1P HG2J 7U Name Interface Function ExternalDevice Co...

Page 292: ...ice Communication 1 to 4 O I Link Master O I Link Slave User Communication 1 to 3 Sub Host Communication Printer Maintenance Communication COM1 Serial Interface RS232C or RS422 485 YES YES 1 YES 1 YES...

Page 293: ...pter 25 Monitor Function on page 25 1 Web Server Refer to Chapter 28 1 Web Server Function on page 28 1 BACnet Communication 3 Refer to Chapter 3 7 BACnet Communication on page 3 94 2 Only special pro...

Page 294: ...connection Refer to Chapter 32 Printer on page 32 1 Barcode reader connection Refer to Chapter 3 5 User Communication on page 3 8 Wireless LAN adapter connection Refer to When USB1 USB A or USB2 USB A...

Page 295: ...nal Device Communication 3 External Device Communication 4 User Communication 1 User Communication 2 User Communication 3 or Sub Host Communication is selected for Function Stop Bits Selects the stop...

Page 296: ...b Host Communication is selected for Function Stop Bits Selects the stop bits as 1 or 2 This option can only be configured when External Device Communication 1 External Device Communication 2 External...

Page 297: ...For details refer to Chapter 24 1 3 Change Communication Settings on page 24 5 According to the DHCP server specifications the IP address may change by removing and reinserting the Ethernet cable Afte...

Page 298: ...rnal Device Setup Manual DNS Settings In order to access a DNS server from the MICRO I the IP address of the DNS server must be specified The setting method of the IP address of the DNS server is dete...

Page 299: ...ternal device also sends data to the MICRO I s listening port and that data is received by the MICRO I Target Configures the IP address and port number for the external device These options can only b...

Page 300: ...Manual YASKAWA Electric as Manufacture and MP2000 Ethernet as Communication Driver are selected on the Communication Driver tab refer to the WindO I NV4 External Device Setup Manual Duplicate UDP por...

Page 301: ...ress Default 192 168 0 150 The format is xxx xxx xxx xxx xxx stands for a numeric value from 0 to 255 When connecting multiple devices to the same network make sure to assign each device a unique IP a...

Page 302: ...led with the value of the HMI Special Data Registers LSD and HMI Special Internal Relays LSM LSD292 to 341 SSID and password of the access point LSD344 to 351 IP address and subnet mask of the wireles...

Page 303: ...unication driver is displayed External Device These options configure the communication driver to use For details refer to the WindO I NV4 External Device Setup Manual HG3G HG2G 5F HG5G V HG4G V HG3G...

Page 304: ...gister Word When using a communication driver other than those listed above and for MICROSmart SmartAXIS is selected the values of all device addresses are handled as from Upper word Enable Pass Throu...

Page 305: ...for all station numbers Only an internal device can be configured for this option Click to display the Tag Editor For the device address configuration procedure refer to Chapter 2 5 1 Device Address S...

Page 306: ...ication 2 External Device Communication 3 and External Device Communication 4 cannot be set to Modbus RTU Master S7 200 PPI S7 MPI or MP920 RTU According to the communication drivers that cannot be si...

Page 307: ...munication Driver Extension Settings Dialog Box The Communication Driver Extension Settings dialog box is used to configure the communication driver extension settings These settings vary based on the...

Page 308: ...to edit the name The maximum number is 20 characters Only alphanumeric characters and symbols can be used You cannot use the following characters and name in the External Device Name The following ch...

Page 309: ...Configuration on Communication Interface tab For details refer to Interface Configuration on page 4 35 Leaving it blank or the same number as the other External Device IDs cannot be used for Slave Num...

Page 310: ...l Device Communication 1 to External Device Communication 4 is a total of 32 external devices The number of external devices that can be set varies based on the communication interface Communication I...

Page 311: ...Station Selects the slave station Slave1 to Slave15 This option can only be configured when O I Link Slave is selected for Function under Interface Settings on the Communication Interface tab Slave S...

Page 312: ...a starts to be received A frame refers to a data string from the beginning to the end of a command If the Receiving Character Time Out is set to 0 it is not monitored These setting items are used only...

Page 313: ...Out duration First byte of receive data Second byte of receive data Value of Receiving Character Time Out address number 0 bit 15 of Status Device Address LDR110 Value of Completed Device Address LM1...

Page 314: ...mand Double clicking the cell displays the Command Settings dialog box This option is displayed only when the Inching check box is selected Trigger Type Shows the trigger type for data transmission or...

Page 315: ...on and receive commands Up Shifts the selected command upward in the list Down Shifts the selected command downward in the list Delete Deletes the selected command from the Command List Adding copying...

Page 316: ...ists the device addresses allocated to HMI Link Registers Address Number Shows the LLR address numbers LLR 0 to LLR 63 Device Address Shows the device addresses allocated to LLR address numbers B W Sh...

Page 317: ...mber and click Set to allocate the settings configured by Device Type Address Number Bit Number and Slave Number to the HMI Link Register LLR Set with Auto Increment Allocates sequential device addres...

Page 318: ...elect this check box to reverse only black or white when printing HG3G HG2G 5F HG5G V HG4G V HG3G V HG2G V HG2G 5T HG4G HG1G HG1P HG2J 7U The color cannot be configured To print in monochrome configur...

Page 319: ...and HG2G 5F USB flash drive for HG2G 5T and HG1G 1P HG3G HG2G 5F HG5G V HG4G V HG3G V HG2G V HG2G 5T HG4G HG1G HG1P HG2J 7U You cannot use the following characters in the folder name HG2J 7U HG5G 4G...

Page 320: ...creen when USB Flash Drive is inserted Select this check box to display a popup screen when a USB flash drive is inserted in the MICRO I HG3G HG2G 5F HG5G V HG4G V HG3G V HG2G V HG2G 5T HG4G HG1G HG1P...

Page 321: ...sing time for parts on the screen Select this check box to use a Cyclic Script Only one Cyclic Script can be configured for the project Script ID Specify the script ID to use 1 to 32000 as the Cyclic...

Page 322: ...to System Information if operation is not performed for the following period Select this check box to automatically return to the homepage when no action is performed in the Remote Control page or Rem...

Page 323: ...Remote Control In Custom Web Page the Custom Web page file name is displayed in Web Page Editor of the Project window This option can only be set when Use System Web Page or Use Custom Web Page is se...

Page 324: ...note the following points The numbers that cannot be used 2539 Maintenance communication Data Transfer 2538 For pass through 2101 For FC4A Series MicroSmart direct connection pass through Duplicate nu...

Page 325: ...iguration procedure refer to Chapter 2 5 1 Device Address Settings on page 2 70 The timeout period to login the MICRO I is 1 minute If Device Address is selected for Data Type note the following point...

Page 326: ...ess of the outgoing mail server SMTP The format is xxx xxx xxx xxx xxx stands for a numeric value from 0 to 255 If Host Name is selected the IP address of the outgoing mail server SMTP is looked up an...

Page 327: ...ting and Authentication setting by Value of Device Address Select this check box to set the General Setting and the Authentication Setting using the value of the specified device address Top Device Ad...

Page 328: ...ue of device address 3 Add a NULL terminating character 0x00 as the end of the string data when the string length is less than twenty words Settings Address Number Words Data Format Outgoing mail serv...

Page 329: ...s Device Address LKR 122 LKR 123 LKR 124 LKR 125 LKR 126 LKR 127 LKR 128 LKR 129 LKR 130 LKR 131 to LKR 142 String ASCII t e s t e x a m p l e c o m 0 0 0 0 Value Hexadecimal 7465h 7374h 4065h 7861h 6...

Page 330: ...ess LKR 186 LKR 187 LKR 188 LKR 189 LKR 190 LKR 191 LKR 192 LKR 193 to LKR 206 String ASCII t e s t _ p a s s w o r d 0 0 0 Value Hexadecimal 7465h 7374h 5F70h 6173h 7377h 6F72h 6400h 0000h Use secure...

Page 331: ...t data was last saved Accessed Shows the date and time the current project data was opened User Enter the name of the creator The maximum number is 40 characters Comment Enter a comment for the projec...

Page 332: ...fonts are selected for download to the MICRO I shows the size of the standard fonts Use Kanji Dictionary Data 1 Select this check box to download the Kanji dictionary data to the MICRO I 1 HG5G 4G 3G...

Page 333: ...ab under Compatibility HG3G HG2G 5F HG5G V HG4G V HG3G V HG2G V HG2G 5T HG4G HG1G HG1P HG2J 7U Script Trigger Condition Calculate 16 bit data with 16 bit Select this check box to calculate arithmetic...

Page 334: ...ndows font is European Select this check box to use Windows 1252 as encoding when the character set of the Windows Font is European Display texts as Center Left for Center with the Align Text and as L...

Page 335: ...ay Divide Floating data and Integer data Select this check box to read and display the decimal portion of data and the integer portion of data from different device addresses when BCD4 B or BCD8 EB is...

Page 336: ...t communication For details on the BACnet communication refer to Chapter 3 7 BACnet Communication on page 3 94 Use BACnet IP Select this check box to use the functions of the BACnet communication Clic...

Page 337: ...0 to 255 If Host Name is selected the IP address of the SNTP server is looked up and obtained from the host name using the DNS server In order to access a DNS server from the MICRO I the IP address of...

Page 338: ...ox to correct the time to daylight saving time when it exists in the selected time zone Start Displays the start date and time of daylight saving time End Displays the end date and time of daylight sa...

Page 339: ...ick Target Info The Target Information dialog box is displayed The project data size can be checked with Memory Space byte under Target Runtime Information The project data size varies based on the fo...

Page 340: ...Settings and the Social Media Settings is 255 File Transfer Settings FTP client function A maximum of 240 external device addresses can be used in the File Transfer settings If the same device addres...

Page 341: ...n numbers 3001 to 3015 Password Input Screen 3026 to 3033 The Password Input Screen is used to enter the user name and password required for switching user accounts when the MICRO I is in Run Mode Thi...

Page 342: ...HG2G 5T HG4G HG1G HG1P HG2J 7U The Password Input Screen is created only when the Use Security functions check box and the Customize Password Input Screens check boxes in the Security dialog box are s...

Page 343: ...box is displayed 3 Click the screens to open in Screen List and then click the OK button Screen Type Select the type of screen to open from the following items The selected screen type is displayed in...

Page 344: ...he screen with the previous screen number or the next screen number of the screen displayed in the active editing window To open the screen with the previous screen number click the Open Previous Scre...

Page 345: ...iting window Click in the upper right of the editing window Closing all screens You can close all the editing windows On the View tab in the Window group click Close All Closing a specific screen You...

Page 346: ...t the type of screen to close from the following items The selected screen type is displayed in Screen List All Base Screen Popup Screen Password Input Screen Screen List This list shows the screens b...

Page 347: ...plicate and then click the OK button Screen Type Select the type of screen to duplicate from the following items The selected screen type is displayed in Screen List Base Screen Popup Screen Password...

Page 348: ...the screens duplicated from screen number 5 If a screen number already exists after copying and you click the OK button on the Duplicate Screens dialog box an overwrite confirmation message is display...

Page 349: ...confirmation message is displayed 2 Click the Yes button The screen is deleted Click the No button to return to the editing window without deleting the screen Deleting specific screens You can delete...

Page 350: ...on or the Yes To All button Click the Yes button to delete the screen with the number displayed in the confirmation message When deleting multiple screens the next message to confirm deleting a screen...

Page 351: ...a screen folder or screen in the Project window and click Reuse Screens the Open dialog box is displayed If a password has been configured for the project data the Password Screen will be displayed E...

Page 352: ...picture included in the screen a text ID or a script ID already exists in the project data being edited an overwrite message is displayed Click the Yes button to overwrite the item displayed in the c...

Page 353: ...or Password Input Screens collectively 1 Selects multiple screens of the same type on the Project window or in the Screen List window right click to open a popup menu and then click Properties The Scr...

Page 354: ...Base Screen as the screen type You can only select the screen type when creating a new screen Number Enter the Base Screen s screen number 1 to 3000 Title Enter the Base Screen s title Maximum number...

Page 355: ...with Base Screen is configured the background color for the Base Screen specified as the background is displayed 1 to 5 Select these to display the Base Screen by overlaying screens No Enter the over...

Page 356: ...g edited Overlay screen 5 screens max Base screen being edited Overlay screen 3 None Displays the screen Flash 1 sec cycle The screen display is flashed in one second intervals Flash 0 5 sec cycle The...

Page 357: ...the Security Settings dialog box you can select that created group For details refer to Chapter 23 2 2 Adding and Editing Security Groups on page 23 19 No Displays the security group numbers 1 to 15...

Page 358: ...y being edited as the bottom most layer Example Displaying a Base Screen currently being edited on the layered screen 3 For details about how to configure these settings refer to 3 1 Properties of Bas...

Page 359: ...0 0 Displayed as the base Layered Screen Layered Screen Layered Screen Base Screen 101 is displayed Layered Screen Base Screen 101 is not displayed Outside of the display area Layered Screen Displayed...

Page 360: ...llowing items Western Japanese Simplified Chinese Traditional Chinese Hangul Central European Baltic Cyrillic This option can only be selected when Use Text Manager is cleared Use Text Manager Select...

Page 361: ...ansparency Displays the Popup Screen s background as transparent The amount of transparency can be selected from 10 to 90 in 10 increments Superimpose Displays the Popup Screen s background as complet...

Page 362: ...een Numerical Input or Character Input when the user presses the ENT key Text can be input in Numerical Input or Character Input that has focus The focus order number starts from 0 Move Button Select...

Page 363: ...n the Security Settings dialog box you can select that created group For details refer to Chapter 23 2 2 Adding and Editing Security Groups on page 23 19 No Displays the security group numbers 1 to 15...

Page 364: ...Screen Display Area MICRO I MICRO I MICRO I When there is a title bar on the popup screen touch switches that are within 20 dots of the title bar will not respond 1 Press 2 Touch the position where t...

Page 365: ...3015 with the WindO I NV4 Example HG5G 4G 3G 2G V Decimal Number Value Keypad Uppercase Alphabet Keypad The Keypad Popup Screen will differ depending on the model selected The Keypad Popup Screen can...

Page 366: ...screen type when creating a new screen Number Enter the screen number 3026 to 3033 of the Password Input Screen Font Select the font to use for the title from the following items Western Japanese Sim...

Page 367: ...ackground Color Transparency Displays the Password Input Screen s background as transparent The amount of transparency can be selected from 10 to 90 in 10 increments Superimpose Displays the Password...

Page 368: ...Close Button Move Button Title Bar Screen Display Area When there is a title bar on the Password Input Screen touch switches that are within 20 dots of the title bar will not respond 1 Press 2 Touch...

Page 369: ...d Input Screens for screen numbers 3026 to 3028 Example HG5G 4G 3G 2G V Upper Case Alphanumerical Lower Case Alphanumerical Sign The Standard Password Input Screen varies based on the model selected D...

Page 370: ...4G V HG3G V HG2G V HG2G 5T HG4G HG1G HG1P HG2J 7U Item Number of screens Number of screens that can be created 3 000 max Number of layered screens 5 max Item Number of screens Number of screens that c...

Page 371: ...6 5 Vertical Installation Even if you choose for them to be installed and displayed vertically the screens in the System Mode will be the same as horizontal installation and display If the same device...

Page 372: ...6 Screen Restrictions 5 32 WindO I NV4 User s Manual...

Page 373: ...ictures and static text Parts are objects that generate a variety of events when triggered by a change in values of device addresses or by touch Chapter 6 Drawings and Parts 1 Overview HG3G HG2G 5F HG...

Page 374: ...G 4G 3G 2G V HG4G 3G HG2G 5F 5T HG1G 1P only 2 Drawing objects HG3G HG2G 5F HG5G V HG4G V HG3G V HG2G V HG2G 5T HG4G HG1G HG1P HG2J 7U Shapes Function Basic Shapes Line Draws a line Polyline Draws a p...

Page 375: ...word device Part Description Pilot Lamp Displays images Switches the displayed image according to the value of a bit device Multi State Lamp Displays images Switches the displayed image according to t...

Page 376: ...trigger conditions are satisfied Can be used to indirectly specify the destination address number or to perform operations on the written value Goto Screen Command Switches to another screen or displa...

Page 377: ...d to be placed on the top layer For details refer to the settings for the drawings or part 4 Drawings and Parts Overlapping HG3G HG2G 5F HG5G V HG4G V HG3G V HG2G V HG2G 5T HG4G HG1G HG1P HG2J 7U Base...

Page 378: ...is placed on the top layer If parts placed on the top layer overlap the display order of the parts does not change Example A Numerical Display is placed on the top layer and a Bit Button is placed in...

Page 379: ...op layer overlap the drawing placed on the top layer is always displayed in front Example A Numerical Display is placed on the base screen and an equilateral hexagon is placed on the top layer Display...

Page 380: ...ced on the top layer and a Picture Display is placed in front of it In the following situations the drawing and the part image type are hidden When the drawing or part is flashing When the hidden cond...

Page 381: ...g and a part that has None selected for Image Type placed on the top layer overlap if the value for the top layer part changes or if the picture for the part changes no part of the background drawing...

Page 382: ...Scroll check box selected on the Format tab in the Properties dialog box and they are placed on the top layer the scrolling speed of the text will be slower On the Top Layer magenta R 255 G 4 B 255 i...

Page 383: ...s and reuse them The custom library can be saved to a file for use in other projects or on other computers 5 Part Library Function HG3G HG2G 5F HG5G V HG4G V HG3G V HG2G V HG2G 5T HG4G HG1G HG1P HG2J...

Page 384: ...drag and drop it on the editing screen Drag and drop Part Library Library Screen If the library part is placed on the editing screen and the corresponding project does not recognize the device address...

Page 385: ...are not registered Device address cannot be registered when following external device is used Manufacturer is ABB Manufacturer is Allen Bradley and Communication Driver is Logix Native Tag Ethernet O...

Page 386: ...g library parts 1 Select the category folder to export from the custom library in the part library navigation and click Export on the toolbar The Save As dialog box is displayed 2 Specify the save loc...

Page 387: ...splayed 2 Select a part library file plf and then click Open The category folder of the imported part library file is displayed in the custom library This concludes importing the part library file If...

Page 388: ...y parts of the selected custom library Import Loads the category folder of the custom library saved as a part library file plf into the part library For details refer to Importing library parts on pag...

Page 389: ...the selected category folder on the library screen Clicking allows you to change the custom library name You can create up to 64 custom libraries and register up to 128 parts in one custom library Lib...

Page 390: ...5 Part Library Function 6 18 WindO I NV4 User s Manual...

Page 391: ...hold the mouse button at the location start point to start drawing the line on the edit screen 3 Drag the mouse to the stop point location A line is drawn that connects the start point and stop point...

Page 392: ...or for the line color 256 colors monochrome 16 shades Click this button to display the Color Palette Select a color from the Color Palette Flash Select this check box to make the line flash The flash...

Page 393: ...he last end point and the stop point HG3G HG2G 5F HG5G V HG4G V HG3G V HG2G V HG2G 5T HG4G HG1G HG1P HG2J 7U Stop point Start point End point End point The maximum number of end points in a polyline i...

Page 394: ...from the Color Palette Flash Select this check box to make the polyline flash The flash interval is specified with Flashing Cycle on the System tab in the Project Settings dialog box Coordinates Size...

Page 395: ...tart point and stop point connected HG3G HG2G 5F HG5G V HG4G V HG3G V HG2G V HG2G 5T HG4G HG1G HG1P HG2J 7U End point Start point Stop point End point The maximum number of end points in the polygon i...

Page 396: ...and the background color to use for the polygon color 256 colors monochrome 16 shades Click either button to display the Color Palette Select a color from the Color Palette Pattern Selects the pattern...

Page 397: ...e top layer The polygon will have precedence when other drawings and parts are overlapping with it For details refer to Chapter 6 4 Drawings and Parts Overlapping on page 6 5 W H Specifies the size of...

Page 398: ...e edit screen 3 Drag the mouse to the stop point location so that location becomes the opposite angle of the rectangle A rectangle is drawn with the start point and stop point set to opposite angles H...

Page 399: ...when 1 dot is selected for Line Width Foreground Color Background Color Selects the foreground color and the background color to use for the rectangle color 256 colors monochrome 16 shades Click eith...

Page 400: ...Size Place on the Top Layer Select this check box to display the rectangle on the top layer The rectangle will have precedence when other drawings and parts are overlapping with it For details refer t...

Page 401: ...Drag the mouse to the stop point location so that location becomes the opposite angle of the rectangle A circle or ellipse is drawn that inscribes the rectangle made from the opposite angles of the st...

Page 402: ...nd the background color to use for the circle or ellipse color 256 colors monochrome 16 shades Click either button to display the Color Palette Select a color from the Color Palette Pattern Selects th...

Page 403: ...on page 6 5 X Y Specifies the display position of the circle or ellipse in coordinates With the upper left corner of the screen as the origin the upper left corner of the rectangle that circumscribes...

Page 404: ...nscribes the rectangle made from the opposite angles of the start point and the stop point HG3G HG2G 5F HG5G V HG4G V HG3G V HG2G V HG2G 5T HG4G HG1G HG1P HG2J 7U Stop point Start point Drag To change...

Page 405: ...color from the Color Palette Flash Select this check box to make the arc flash The flash interval is specified with Flashing Cycle on the System tab in the Project Settings dialog box Coordinates Siz...

Page 406: ...that inscribes the rectangle made from the opposite angles of the start point and the stop point HG3G HG2G 5F HG5G V HG4G V HG3G V HG2G V HG2G 5T HG4G HG1G HG1P HG2J 7U Stop point Start point Drag To...

Page 407: ...ound color to use for the pie color 256 colors monochrome 16 shades Click either button to display the Color Palette Select a color from the Color Palette Pattern Selects the pattern or tonal gradatio...

Page 408: ...top layer The pie will have precedence when other drawings and parts are overlapping with it For details refer to Chapter 6 4 Drawings and Parts Overlapping on page 6 5 W H Specifies the size of the...

Page 409: ...old the mouse button at the location start point on the edit screen to start drawing the square that will circumscribe the equilateral polygon 3 Drag the mouse to the stop point location so that locat...

Page 410: ...nd color to use for the equilateral polygon color 256 colors monochrome 16 shades Click either button to display the Color Palette Select a color from the Color Palette Pattern Selects the pattern or...

Page 411: ...her drawings and parts are overlapping with it For details refer to Chapter 6 4 Drawings and Parts Overlapping on page 6 5 W Sets width to define the size of the equilateral polygon The maxium size va...

Page 412: ...shape that last had its style changed The clicked location is the fill start point HG3G HG2G 5F HG5G V HG4G V HG3G V HG2G V HG2G 5T HG4G HG1G HG1P HG2J 7U Fill start point To change the fill style per...

Page 413: ...isplay the Color Palette Select a color from the Color Palette Pattern Selects the pattern to fill with Click this button to display the Pattern Palette Select a pattern from the Pattern Palette Fill...

Page 414: ...ion on the edit screen to place the picture Picture Manager is displayed 3 Select a picture and click Select The selected picture is placed on the screen 2 Picture HG3G HG2G 5F HG5G V HG4G V HG3G V HG...

Page 415: ...x to display the picture on the top layer The picture will have precedence when other drawings and parts are overlapping with it For details refer to Chapter 6 4 Drawings and Parts Overlapping on page...

Page 416: ...isplay in Text and configure the options as necessary The maximum number is 3750 characters 4 Click OK The text is placed on the screen 3 Text HG3G HG2G 5F HG5G V HG4G V HG3G V HG2G V HG2G 5T HG4G HG1...

Page 417: ...the style of text from the following Regular Bold Shadow This option can only be configured when Western Japanese Simplified Chinese Traditional Chinese Hangul Central European Baltic Cyrillic is sel...

Page 418: ...to display The maximum number is 3750 characters The characters that can be entered vary based on the font selected by Font For details refer to Chapter 2 1 2 Available Text on page 2 6 This option ca...

Page 419: ...n the top layer The text will have precedence when other drawings and parts are overlapping with it For details refer to Chapter 6 4 Drawings and Parts Overlapping on page 6 5 1 HG5G 4G 3G 2G V HG4G 3...

Page 420: ...3 Text 7 30 WindO I NV4 User s Manual...

Page 421: ...ttons 1 Bit Button HG3G HG2G 5F HG5G V HG4G V HG3G V HG2G V HG2G 5T HG4G HG1G HG1P HG2J 7U MICRO I 0 1 External device Pressing the button writes a 1 to the bit device Release Initial image Press Rele...

Page 422: ...the bit device Each press of the button alternately writes a 1 or 0 to the bit device Release Initial image Press Release Press 1 Operation and view Data written 0 Write Action Write Pressing the but...

Page 423: ...point on the edit screen where you wish to place the Bit Button 3 Double click the placed Bit Button and a Properties dialog box will be displayed 4 Change the settings on each tab as necessary The T...

Page 424: ...button is OFF or ON Action Mode Select the behavior of the button from the following To specify the Registration Text to use when the button is ON select the Set by State check box on the Registratio...

Page 425: ...ressing and holding the button until the screen changes causes a 0 to be written to the bit device Alternate Each press of the button alternately writes a 1 or 0 to the bit device Toggle Pressing the...

Page 426: ...set to Move Example This button writes the values in a contiguous block of bit devices to a contiguous block of device addresses at the destination 1 Advanced mode only 1 M0 1 M1 1 M2 1 M3 1 M4 Actio...

Page 427: ...n the screen The button appears as a dashed line frame on the edit screen Pressing the corresponding area on the MICRO I activates the assigned function If No Image is selected the settings for View a...

Page 428: ...image displayed on the View tab OFF ON Selects the color and pattern of the standard graphic when ON and OFF Standard Uses the default graphics contained within WindO I NV4 Picture Uses an image file...

Page 429: ...the display position of parts using coordinates The X and Y coordinates of parts are defined relative to an origin at the top left corner of the screen X 0 to base screen horizontal size 1 Y 0 to bas...

Page 430: ...nt is set to Western Japanese Simplified Chinese Traditional Chinese Hangul Central European Baltic Cyrillic Size Specifies the text size to be displayed The fonts and sizes that can be set vary based...

Page 431: ...the font selected using Font For details refer to Chapter 2 1 2 Available Text on page 2 6 Text ID Specifies the Text Manager ID No 1 to 32000 when using the text registered in the Text Manager Click...

Page 432: ...le LM0 is 0 the condition is not satisfied and the Button is not operational While LM0 is 1 the condition is satisfied and the Button is operational Trigger Type Selects the condition to enable the Bu...

Page 433: ...Trigger Type Click to display the Tag Editor For the device address configuration procedure refer to Chapter 2 5 1 Device Address Settings on page 2 70 Condition Specifies the conditional expression...

Page 434: ...ble condition This option can only be configured when While ON or While OFF is selected for Trigger Type Click to display the Tag Editor For the device address configuration procedure refer to Chapter...

Page 435: ...other drawings and parts are overlapping with it For details refer to Chapter 6 4 Drawings and Parts Overlapping on page 6 5 Time x100 msec Specify the length of time that the button must be held down...

Page 436: ...not there is permission to display the part Only Permitted security groups can display this part If all security groups are set to Permitted this part will be displayed even if no user account has be...

Page 437: ...ator Reader 1 2 3 Display No Numerical Display Permitted Permitted Permitted Group Name Administrator Operator Reader 1 2 3 Display No Permitted Permitted Prohibited Group Name Administrator Operator...

Page 438: ...o No Name or Type in the object list Description Used for entering comments about parts The maximum number is 80 characters Example When mousing over the Button on the editing screen When there are mu...

Page 439: ...ss to a word device Pressing the button performs arithmetic on the value to write before writing it to a word device 2 Word Button HG3G HG2G 5F HG5G V HG4G V HG3G V HG2G V HG2G 5T HG4G HG1G HG1P HG2J...

Page 440: ...en Write Value in device address Pressing the button writes the fixed value of ON Data to a word device Releasing the button writes the fixed value of OFF Data to a word device Release Press Release P...

Page 441: ...ng the button adds the value in the Source 1 to the Source 2 value and writes the sum in the word device Release Initial image Press Release Press Arithmetic operation Write Operation and view Action...

Page 442: ...nt on the edit screen where you wish to place the Word Button 3 Double click the placed Word Button and a Properties dialog box will be displayed 4 Change the settings on each tab as necessary The Tri...

Page 443: ...ior of the button from the following To specify the Registration Text to use when the button is ON select the Set by State check box on the Registration Text tab If left unchecked the same Registratio...

Page 444: ...AND XOR Pressing the button performs arithmetic on a value of source device address and a constant value or the value of device address and writes the result to a word device Example Add Addition Pres...

Page 445: ...g error on page 36 3 Value Use a constant value Only a Value can be handled if Action Mode is set to Set Momentary or Alternate If Action Mode is set to Momentary or Alternate the value in the ON Data...

Page 446: ...on page 2 5 Write 1 Specify the number of word devices 1 to 64 at the destination For Move specify how many times to write This setting is enabled only if Action Mode is set to Set Momentary Alternat...

Page 447: ...n the screen The button appears as a dashed line frame on the edit screen Pressing the corresponding area on the MICRO I activates the assigned function If No Image is selected the settings for View a...

Page 448: ...image displayed on the View tab OFF ON Selects the color and pattern of the standard graphic when ON and OFF Standard Uses the default graphics contained within WindO I NV4 Picture Uses an image file...

Page 449: ...s the display position of parts using coordinates The X and Y coordinates of parts are defined relative to an origin at the top left corner of the screen X 0 to base screen horizontal size 1 Y 0 to ba...

Page 450: ...ont is set to Western Japanese Simplified Chinese Traditional Chinese Hangul Central European Baltic Cyrillic Size Specifies the text size to be displayed The fonts and sizes that can be set vary base...

Page 451: ...ext ID Specifies the Text Manager ID No 1 to 32000 when using the text registered in the Text Manager Click to display Text Manager Can only be set when the Use Text Manager check box is selected Text...

Page 452: ...le LM0 is 0 the condition is not satisfied and the Button is not operational While LM0 is 1 the condition is satisfied and the Button is operational Trigger Type Selects the condition to enable the Bu...

Page 453: ...Trigger Type Click to display the Tag Editor For the device address configuration procedure refer to Chapter 2 5 1 Device Address Settings on page 2 70 Condition Specifies the conditional expression...

Page 454: ...ble condition This option can only be configured when While ON or While OFF is selected for Trigger Type Click to display the Tag Editor For the device address configuration procedure refer to Chapter...

Page 455: ...other drawings and parts are overlapping with it For details refer to Chapter 6 4 Drawings and Parts Overlapping on page 6 5 Time x100 msec Specify the length of time that the button must be held down...

Page 456: ...not there is permission to display the part Only Permitted security groups can display this part If all security groups are set to Permitted this part will be displayed even if no user account has be...

Page 457: ...ator Reader 1 2 3 Display No Numerical Display Permitted Permitted Permitted Group Name Administrator Operator Reader 1 2 3 Display No Permitted Permitted Prohibited Group Name Administrator Operator...

Page 458: ...to No Name or Type in the object list Description Used for entering comments about parts The maximum number is 80 characters Example When mousing over the Button on the editing screen When there are m...

Page 459: ...Popup Screen Device Monitor Password Screen Adjust Brightness Screen File Screen and Open User Account Setting Screen Pressing the button switches to the System Mode Pressing the button resets the cu...

Page 460: ...point on the edit screen where you wish to place the Goto Screen Button 3 Double click the placed Goto Screen Button and a Properties dialog box will be displayed 4 Change the settings on each tab as...

Page 461: ...characters OFF Text ON Text Applies the text entered in the Part Name field to the Text field under the OFF or ON fields on the Registration Text tab This is used as the Registration Text when the bu...

Page 462: ...een Closes the Adjust Brightness Screen For details refer to Chapter 34 1 3 Adjusting Screen Brightness on page 34 2 Open File Screen for movie files 1 Opens the File Screen For details refer to Chapt...

Page 463: ...ess 2 Select this check box and specify a device address to specify the coordinates using the value of the specified device address Click to display the Tag Editor For the device address configuration...

Page 464: ...rd device to use Processing Area of User Account Setting Screen This option uses 152 words of address numbers starting from the address number of the specified device address You can only specify an i...

Page 465: ...tches the image displayed on the View tab OFF ON Selects the color and pattern of the standard graphic when ON and OFF Standard Uses the default graphics contained within WindO I NV4 Picture Uses an i...

Page 466: ...the display position of parts using coordinates The X and Y coordinates of parts are defined relative to an origin at the top left corner of the screen X 0 to base screen horizontal size 1 Y 0 to base...

Page 467: ...t when Font is set to Western Japanese Simplified Chinese Traditional Chinese Hangul Central European Baltic Cyrillic Size Specifies the text size to be displayed The fonts and sizes that can be set v...

Page 468: ...he font selected using Font For details refer to Chapter 2 1 2 Available Text on page 2 6 Text ID Specifies the Text Manager ID No 1 to 32000 when using the text registered in the Text Manager Click t...

Page 469: ...s LM0 While LM0 is 0 the condition is not satisfied and the Button is not operational While LM0 is 1 the condition is satisfied and the Button is operational Trigger Type Selects the condition to enab...

Page 470: ...e configured when While ON or While OFF is selected for Trigger Type Click to display the Tag Editor For the device address configuration procedure refer to Chapter 2 5 1 Device Address Settings on pa...

Page 471: ...the visible condition This option can only be configured when While ON or While OFF is selected for Trigger Type Click to display the Tag Editor For the device address configuration procedure refer t...

Page 472: ...ther drawings and parts are overlapping with it For details refer to Chapter 6 4 Drawings and Parts Overlapping on page 6 5 Time x100 msec Specify the length of time that the button must be held down...

Page 473: ...hether or not there is permission to display the part Only Permitted security groups can display this part If all security groups are set to Permitted this part will be displayed even if no user accou...

Page 474: ...tor Reader 1 2 3 Display No Numerical Display Permitted Permitted Permitted Group Name Administrator Operator Reader 1 2 3 Display No Permitted Permitted Prohibited Group Name Administrator Operator R...

Page 475: ...d close to No Name or Type in the object list Description Used for entering comments about parts The maximum number is 80 characters Example When mousing over the Button on the editing screen When the...

Page 476: ...G V HG4G 3G HG2G 5F only 2 USB flash drive inserted in USB1 for HG2J 7U SD memory card for HG5G 4G 3G 2G V HG4G 3G and HG2G 5F USB flash drive for HG2G 5T and HG1G 1P 4 Print Button HG3G HG2G 5F HG5G...

Page 477: ...a point on the edit screen where you wish to place the Print Button 3 Double click the placed Print Button and a Properties dialog box will be displayed 4 Change the settings on each tab as necessary...

Page 478: ...stration Text assigned for the OFF state is displayed for the ON state as well Printer 1 Outputs the screenshot to the printer connected to the MICRO I Print Time Stamp Adds the date and time of print...

Page 479: ...allows you to create an illuminated pushbutton The illuminated pushbutton switches state or image according to ON or OFF state of the device address allowing you to display the state of a device that...

Page 480: ...he All Screenshot data check box and then configure the trigger device address Assign that trigger device address to a part To erase files with WindO I NV4 click Clear on the Online tab and then click...

Page 481: ...es the image displayed on the View tab OFF ON Selects the color and pattern of the standard graphic when ON and OFF Standard Uses the default graphics contained within WindO I NV4 Picture Uses an imag...

Page 482: ...display position of parts using coordinates The X and Y coordinates of parts are defined relative to an origin at the top left corner of the screen X 0 to base screen horizontal size 1 Y 0 to base sc...

Page 483: ...hen Font is set to Western Japanese Simplified Chinese Traditional Chinese Hangul Central European Baltic Cyrillic Size Specifies the text size to be displayed The fonts and sizes that can be set vary...

Page 484: ...font selected using Font For details refer to Chapter 2 1 2 Available Text on page 2 6 Text ID Specifies the Text Manager ID No 1 to 32000 when using the text registered in the Text Manager Click to d...

Page 485: ...M0 While LM0 is 0 the condition is not satisfied and the Button is not operational While LM0 is 1 the condition is satisfied and the Button is operational Trigger Type Selects the condition to enable...

Page 486: ...onfigured when While ON or While OFF is selected for Trigger Type Click to display the Tag Editor For the device address configuration procedure refer to Chapter 2 5 1 Device Address Settings on page...

Page 487: ...e visible condition This option can only be configured when While ON or While OFF is selected for Trigger Type Click to display the Tag Editor For the device address configuration procedure refer to C...

Page 488: ...r drawings and parts are overlapping with it For details refer to Chapter 6 4 Drawings and Parts Overlapping on page 6 5 Time x100 msec Specify the length of time that the button must be held down bef...

Page 489: ...her or not there is permission to display the part Only Permitted security groups can display this part If all security groups are set to Permitted this part will be displayed even if no user account...

Page 490: ...Reader 1 2 3 Display No Numerical Display Permitted Permitted Permitted Group Name Administrator Operator Reader 1 2 3 Display No Permitted Permitted Prohibited Group Name Administrator Operator Read...

Page 491: ...lose to No Name or Type in the object list Description Used for entering comments about parts The maximum number is 80 characters Example When mousing over the Button on the editing screen When there...

Page 492: ...lay reference screen Up Down Delete Select Reference Occurrence Message Recovered Confirmed 12 01 09 15 Motor fault 12 01 10 02 Pump1 fault 12 50 12 01 10 28 High pressure 12 54 12 01 13 02 Pump1 faul...

Page 493: ...models with a video interface only 2 HG5G 4G 3G V only 3 HG4G 3G only 4 Recording sound function is for HG4G 3G only MICRO I Copy files USB flash drive SD memory card HG3G HG2G 5F HG4G HG5G V HG4G V H...

Page 494: ...t on the edit screen where you wish to place the Key Button 3 Double click the placed Key Button and a Properties dialog box will be displayed 4 Change the settings on each tab as necessary The Trigge...

Page 495: ...applicable to the selected key Key To specify the Registration Text to use when the button is ON select the Set by State check box on the Registration Text tab If left unchecked the same Registration...

Page 496: ...form the data transfer function specified by their names These settings specify the source data to be transferred and destination This setting is enabled only if one of these keys is selected after cl...

Page 497: ...x Starts running without displaying the Result window Select this check box to start running MICRO I without displaying the execution result screen after the project data is downloaded Destination Spe...

Page 498: ...bols can be used Path delimiters and characters that cannot be used vary based on the model Example Save file to the SOUND folder under HGDATA01 folder in an external memory device HG2J 7U HGDATA01 SO...

Page 499: ...ject Settings dialog box on the Communication Driver Network tab For details refer to Chapter 4 3 4 Communication Driver Network Tab on page 4 52 Interface Select the communication interface in which...

Page 500: ...cify External Device ID Specify the External Device ID 0 to 31 of the upload source PLC This is the External Device ID number set in the Project Settings dialog box on the Communication Driver Network...

Page 501: ...nd while data is being saved to the external memory device recording cannot be executed with a Key Button Multi Button or Multi Command configured with the recording function Also during these situati...

Page 502: ...screen The button appears as a dashed line frame on the edit screen Pressing the corresponding area on the MICRO I activates the assigned function If No Image is selected the settings for View and Reg...

Page 503: ...switches the image displayed on the View tab OFF ON Selects the color and pattern of the standard graphic when ON and OFF Standard Uses the default graphic for WindO I NV4 Picture Uses an image file s...

Page 504: ...display position of parts using coordinates The X and Y coordinates of parts are defined relative to an origin at the top left corner of the screen X 0 to base screen horizontal size 1 Y 0 to base scr...

Page 505: ...en Font is set to Western Japanese Simplified Chinese Traditional Chinese Hangul Central European Baltic Cyrillic Size Specifies the text size to be displayed The fonts and sizes that can be set vary...

Page 506: ...ont selected using Font For details refer to Chapter 2 1 2 Available Text on page 2 6 Text ID Specifies the Text Manager ID No 1 to 32000 when using the text registered in the Text Manager Click to di...

Page 507: ...0 While LM0 is 0 the condition is not satisfied and the Button is not operational While LM0 is 1 the condition is satisfied and the Button is operational Trigger Type Selects the condition to enable t...

Page 508: ...ger Type Click to display the Tag Editor For the device address configuration procedure refer to Chapter 2 5 1 Device Address Settings on page 2 70 Condition Specifies the conditional expression for t...

Page 509: ...visible condition This option can only be configured when While ON or While OFF is selected for Trigger Type Click to display the Tag Editor For the device address configuration procedure refer to Ch...

Page 510: ...drawings and parts are overlapping with it For details refer to Chapter 6 4 Drawings and Parts Overlapping on page 6 5 Time x100 msec Specify the length of time that the button must be held down befo...

Page 511: ...er or not there is permission to display the part Only Permitted security groups can display this part If all security groups are set to Permitted this part will be displayed even if no user account h...

Page 512: ...Reader 1 2 3 Display No Numerical Display Permitted Permitted Permitted Group Name Administrator Operator Reader 1 2 3 Display No Permitted Permitted Prohibited Group Name Administrator Operator Reade...

Page 513: ...ose to No Name or Type in the object list Description Used for entering comments about parts The maximum number is 80 characters Example When mousing over the Button on the editing screen When there a...

Page 514: ...can be moved according to the Focus Order setting Focus Order can be set on the Options tab of the Screen Properties dialog box Fcs Moves the focus one item before the current one as per the Focus Ord...

Page 515: ...in ASCII code form to a device address After the data is written the focus can be moved according to the Focus Order setting Focus Order can be set on the Options tab of the Screen Properties dialog...

Page 516: ...tes the text input in character code form to a device address After the data is written the focus can be moved according to the Focus Order setting Focus Order can be set on the Options tab of the Scr...

Page 517: ...s down the number of lines 1 to 1023 specified in Scroll Size Up Moves the focus the number of lines 1 to 1023 specified in Scroll Size The current point of focus can be shown by pressing Select Down...

Page 518: ...file Next When this button is pressed during playback the next movie file is played Back When this button is pressed during playback the previous movie file is played REW When this button is pressed...

Page 519: ...e from the following uses Keypad Half Width Character Keypad Hiragana 1 Data Transfer Alarm Display Multimedia Function 2 Keypad Half Width Character These buttons are used for Numerical Input and Cha...

Page 520: ...ton 8 100 WindO I NV4 User s Manual Data Transfer These buttons are used to execute Data Transfer functions Alarm Display These buttons are used to manipulate the Alarm List Display and Alarm Log Disp...

Page 521: ...utton 8 Buttons Data Log Display These keys operate the Data Log Display Multimedia Function 2 These buttons are used to start and stop recording and to operate the Video Display 2 This is applicable...

Page 522: ...5 Key Button 8 102 WindO I NV4 User s Manual Password Input These keys switch the user on the Password Input Screen...

Page 523: ...ome tab in the Parts group click Buttons and then click Key Button 2 Click a point on the edit screen where you wish to place the Key Button 3 Double click the placed Key Button and a Properties dialo...

Page 524: ...Channel 2 to record a video only no audio out of the signals input from the device This setting is enabled only if Rec was selected using the Key Browser Recording Target 3 In the signals input from t...

Page 525: ...page 31 12 The year month day folder name is the date the file was recorded The file name for the recorded file is the time the file was saved 1 Recording sound function is for HG4G 3G only 2 AVI for...

Page 526: ...rts group click Data Displays and then click Video Display 2 Click a point on the edit screen where you wish to place the Video Display 3 Double click the placed Video Display and the Properties dialo...

Page 527: ...creen to select a recorded images On the Home tab in the Parts group click Buttons and then click Goto Screen Button 7 Click a point on the edit screen where you wish to place the Goto Screen Button 8...

Page 528: ...splayed 2 Select the folder with the date of the recorded images Press to select 20110313 and then press Select The contents of the 20110313 folder will be displayed X 0 to base screen horizontal size...

Page 529: ...000 Folder Up Update Page Up Page Down Select 1 2 Restore RepeatON RepeatOFF Full REW FF Nest Back Stop Play Pause MICRO I Video Display Press Play While data is being recorded after an event occurs w...

Page 530: ...ton HG3G HG2G 5F HG5G V HG4G V HG3G V HG2G V HG2G 5T HG4G HG1G HG1P HG2J 7U Command Description Bit Write Writes a 0 or 1 to the specified bit device when pressed Word Write Writes a value to a word d...

Page 531: ...The button turns ON when pressed and OFF when released Release Initial image Press Release Press ON Operation and view Action ON OFF OFF The button switches between ON and OFF each time it is pressed...

Page 532: ...int on the edit screen where you wish to place the Multi Button 3 Double click the placed Multi Button and a Properties dialog box will be displayed 4 Change the settings on each tab as necessary The...

Page 533: ...the button is OFF or ON Action Mode Select the Action Mode for the Multi Button Momentary or Alternate To specify the Registration Text to use when the button is ON select the Set by State check box...

Page 534: ...e word device For details refer to Properties of Bit Write for Multi Functions Dialog Box on page 8 116 Word Write Writes a value to a word device Can be used to indirectly specify the destination add...

Page 535: ...on the screen The button appears as a dashed line frame on the edit screen Pressing the corresponding area on the MICRO I activates the assigned function If No Image is selected the settings for View...

Page 536: ...on Mode is set to Move For details refer to Source Data on page 8 6 1 Advanced mode only Set Pressing the Multi Button writes a 1 to the bit device Reset Pressing the Multi Button writes a 0 to the bi...

Page 537: ...writes a value in a source device address to a destination word device Set ON OFF Data Pressing the button writes a fixed value of ON Data to a word device Releasing the button writes a fixed value o...

Page 538: ...device address This setting is enabled only if Action Mode is set to Move For details refer to Chapter 2 Indirect Read and Indirect Write Settings on page 2 5 Transfer 1 Specify the number of word de...

Page 539: ...ile Screen for movie files 2 Opens the File Screen Close File Screen for movie files 2 Closes the File Screen Switch to System Mode Switches to the Top Page in the System Mode Reset current screen Res...

Page 540: ...configuration procedure refer to Chapter 2 5 1 Device Address Settings on page 2 70 This setting is enabled only if Action Mode is set to Open Popup Screen or Close Popup Screen Coordinates X Y Speci...

Page 541: ...to the printer The date and time format depends on the language selected in Language Language is available on the Project Details tab of the Project Settings dialog box The display formats are shown...

Page 542: ...canceled Print jobs after the current print job are canceled after the current page finishes printing The maximum number of screenshots that can be captured 1 to 999 can be set in HMI Special Data Reg...

Page 543: ...a Keypad for This setting is enabled only if Alt was selected using the Key Browser Displays settings applicable to the selected key Key Language Switches the display of the key that is displayed when...

Page 544: ...le to be transferred is stored SD Memory Card 1 USB Flash Drive 2 USB1 3 or USB2 3 Location Specify the location of the ZNV Project File znv The maximum number is 247 characters Only alphanumeric char...

Page 545: ...3 Location Specify the location where the uploaded project will be saved The maximum number is 247 characters Only alphanumeric characters and symbols can be used Path delimiters and characters that...

Page 546: ...mbols can be used Path delimiters and characters that cannot be used vary based on the model Example Save file to the SOUND folder under HGDATA01 folder in an external memory device HG2J 7U HGDATA01 S...

Page 547: ...oject Settings dialog box on the Communication Driver Network tab For details refer to Chapter 4 3 4 Communication Driver Network Tab on page 4 52 Interface Select the communication interface in which...

Page 548: ...ecify External Device ID Specify the External Device ID 0 to 31 of the upload source PLC This is the External Device ID number set in the Project Settings dialog box on the Communication Driver Networ...

Page 549: ...and while data is being saved to the external memory device recording cannot be executed with a Key Button Multi Button or Multi Command configured with the recording function Also during these situa...

Page 550: ...the script to operate Script Manager will open when is clicked Select a script from the script list For details refer to Chapter 20 2 2 Script Manager on page 20 7 Script Name Displays the name of the...

Page 551: ...es the image displayed on the View tab OFF ON Selects the color and pattern of the standard graphic when ON and OFF Standard Uses the default graphics contained within WindO I NV4 Picture Uses an imag...

Page 552: ...e display position of parts using coordinates The X and Y coordinates of parts are defined relative to an origin at the top left corner of the screen X 0 to base screen horizontal size 1 Y 0 to base s...

Page 553: ...when Font is set to Western Japanese Simplified Chinese Traditional Chinese Hangul Central European Baltic Cyrillic Size Specifies the text size to be displayed The fonts and sizes that can be set var...

Page 554: ...font selected using Font For details refer to Chapter 2 1 2 Available Text on page 2 6 Text ID Specifies the Text Manager ID No 1 to 32000 when using the text registered in the Text Manager Click to d...

Page 555: ...M0 While LM0 is 0 the condition is not satisfied and the Button is not operational While LM0 is 1 the condition is satisfied and the Button is operational Trigger Type Selects the condition to enable...

Page 556: ...gger Type Click to display the Tag Editor For the device address configuration procedure refer to Chapter 2 5 1 Device Address Settings on page 2 70 Condition Specifies the conditional expression for...

Page 557: ...e visible condition This option can only be configured when While ON or While OFF is selected for Trigger Type Click to display the Tag Editor For the device address configuration procedure refer to C...

Page 558: ...sec Specify the length of time that the button must be held down before activation by selecting a value from 0 to 600 units of 10 ms The button activates after it is held down for a specified period o...

Page 559: ...her or not there is permission to display the part Only Permitted security groups can display this part If all security groups are set to Permitted this part will be displayed even if no user account...

Page 560: ...Reader 1 2 3 Display No Numerical Display Permitted Permitted Permitted Group Name Administrator Operator Reader 1 2 3 Display No Permitted Permitted Prohibited Group Name Administrator Operator Read...

Page 561: ...close to No Name or Type in the object list Description Used for entering comments about parts The maximum number is 80 characters Example When mousing over the Button on the editing screen When there...

Page 562: ...tering characters in the Character Input 7 Keypad HG3G HG2G 5F HG5G V HG4G V HG3G V HG2G V HG2G 5T HG4G HG1G HG1P HG2J 7U MICRO I 1230 Numerical Input Keypad MICRO I HG SERIES Z U P K F A SP V Q L G B...

Page 563: ...eypad Properties dialog box is displayed until OK is clicked Refer to 7 3 Properties of Keypad Dialog Box on page 8 144 After OK on the Keypad Properties dialog box is clicked double clicking the Keyp...

Page 564: ...one of the following fonts to use for the text on the buttons Western Japanese Simplified Chinese Traditional Chinese Hangul Central European Baltic Cyrillic Stroke 1 The characters that can be displ...

Page 565: ...d Parts Overlapping on page 6 5 Coordinates Size X Y Specify the display coordinates of the Keypad X and Y specify the upper left corner of the Keypad using the upper left corner of the screen as the...

Page 566: ...Filling Stop Discharge 8 Selector Switch HG3G HG2G 5F HG5G V HG4G V HG3G V HG2G V HG2G 5T HG4G HG1G HG1P HG2J 7U Automatic Manual Automatic Auto Manual Auto Manual Auto Manual R button Ch2 Ch1 L butt...

Page 567: ...Click a point on the edit screen where you wish to place the Selector Switch 3 Double click the placed Selector Switch and a Properties dialog box will be displayed 4 Change the settings on each tab a...

Page 568: ...ress for Ch1 is set to 1 and Ch2 is set to 0 The 3 Notch action is as follows The knob behaves as follows for 3 Notch No return 3 Notch R return and 3 Notch L return button Press R button knob switche...

Page 569: ...If the knob is switched to Ch1 or from Ch1 to Ch2 it stays where it is even if the button is released Release Default state Press 0 1 1 0 Write Write Ch1 Ch2 Action Operation and view Data written Re...

Page 570: ...s set for the Selector Switch are the following states When values of multiple device addresses are 1 When values of all device addresses are 0 When the value of the device address of the return chann...

Page 571: ...the screen Ch1 Makes Ch1 the default knob position Writes 1 to the device address configured for Ch1 writes 0 to the device addresses configured for the other channels Ch2 Makes Ch2 the default knob p...

Page 572: ...e 2 70 Text Enter the Registration Text for the channel The characters that can be entered depends on the font selected for Font on the Format tab For details refer to Chapter 2 1 2 Available Text on...

Page 573: ...kground colors of the flange color 256 colors monochrome 16 shades Click Color to display the Color Palette Select a color from the Color Palette Pattern Selects a pattern for the flange Click Pattern...

Page 574: ...coordinates of parts are defined relative to an origin at the top left corner of the screen X 0 to base screen horizontal size 1 Y 0 to base screen vertical size 1 0 0 X Y Screen Parts W H Sets width...

Page 575: ...depend on the font For details refer to Chapter 2 1 2 Available Text on page 2 6 Style Selects Regular or Bold for text style Can only be set when Font is set to Western Japanese Simplified Chinese Tr...

Page 576: ...condition is not satisfied and the Selector Switch is not operational While LM0 is 1 the condition is satisfied and the Selector Switch is operational Trigger Type Selects the condition to enable the...

Page 577: ...ag Editor For the device address configuration procedure refer to Chapter 2 5 1 Device Address Settings on page 2 70 Condition Specifies the conditional expression for the input condition This option...

Page 578: ...he visible condition This option can only be configured when While ON or While OFF is selected for Trigger Type Click to display the Tag Editor For the device address configuration procedure refer to...

Page 579: ...t this check box to display disable touch sounds for this part Place on the Top Layer Select this check box to display the parts on the top layer The parts will have precedence when other drawings and...

Page 580: ...or not there is permission to display the part Only Permitted security groups can display this part If all security groups are set to Permitted this part will be displayed even if no user account has...

Page 581: ...eader 1 2 3 Display No Numerical Display Permitted Permitted Permitted Group Name Administrator Operator Reader 1 2 3 Display No Permitted Permitted Prohibited Group Name Administrator Operator Reader...

Page 582: ...No Name or Type in the object list Description Used for entering comments about parts The maximum number is 80 characters Example When mousing over the Selector Switch on the editing screen When ther...

Page 583: ...position is written to the device address when the button is released 9 Potentiometer HG3G HG2G 5F HG5G V HG4G V HG3G V HG2G V HG2G 5T HG4G HG1G HG1P HG2J 7U D0 0 Value of slider at displayed position...

Page 584: ...point on the edit screen where you wish to place the Potentiometer 3 Double click the placed Potentiometer and a Properties dialog box will be displayed 4 Change the settings on each tab as necessary...

Page 585: ...by the Potentiometer For details refer to Chapter 2 1 1 Available Data on page 2 1 Minimum Specify the minimum value that can be entered The minimum value differs depending on the data type Maximum S...

Page 586: ...from the Color Palette Plate Color Selects the plate color color 256 colors monochrome 16 shades Click Color to display the Color Palette Select a color from the Color Palette Flange Slider Plate col...

Page 587: ...on for the button Click Pattern to display the Pattern Palette Select a pattern or tonal gradation from the Pattern Palette Buttons X Y Sets the display position of parts using coordinates The X and Y...

Page 588: ...the condition is not satisfied and the Potentiometer is not operational While LM0 is 1 the condition is satisfied and the Potentiometer is operational Trigger Type Selects the condition to enable the...

Page 589: ...ice to serve as the input condition This option can only be configured when While ON or While OFF is selected for Trigger Type Click to display the Tag Editor For the device address configuration proc...

Page 590: ...visible condition This option can only be configured when While ON or While OFF is selected for Trigger Type Click to display the Tag Editor For the device address configuration procedure refer to Ch...

Page 591: ...this check box to display disable touch sounds for this part Place on the Top Layer Select this check box to display the parts on the top layer The parts will have precedence when other drawings and...

Page 592: ...or not there is permission to display the part Only Permitted security groups can display this part If all security groups are set to Permitted this part will be displayed even if no user account has...

Page 593: ...ator Operator Reader 1 2 3 Display No Numerical Display Permitted Permitted Permitted Group Name Administrator Operator Reader 1 2 3 Display No Permitted Permitted Prohibited Group Name Administrator...

Page 594: ...No Name or Type in the object list Description Used for entering comments about parts The maximum number is 80 characters Example When mousing over the Potentiometer on the editing screen When there...

Page 595: ...ow the Pilot Lamp is Used Pilot Lamp parts display drawing objects The value of a bit device is used to switch the drawing object displayed Switch and display pictures by values of device addresses Ch...

Page 596: ...lick a point on the Edit screen where you wish to place the Pilot Lamp 3 Double click the placed Pilot Lamp and a Properties dialog box will be displayed 4 Change the settings on each tab as necessary...

Page 597: ...e same Registration Text assigned for the OFF state is displayed for the ON state as well No Flash only ON Displays the drawing object for the ON state when the trigger condition is satisfied Flash ON...

Page 598: ...ss is LM0 0 Displayed drawing object Trigger Condition Device Address LM0 value 1 1 0 0 Action Mode Value of Flash Trigger Device Address M0 0 1 1 Displays OFF drawing object Action Displays ON drawin...

Page 599: ...play no drawing object in the OFF state 1 Advanced mode only Standard Uses the default graphic for WindO I NV4 Picture Uses an image file saved using Picture Manager For details about image file restr...

Page 600: ...en X 0 to base screen horizontal size 1 Y 0 to base screen vertical size 1 0 0 X Y Screen Parts Sets width and height to define the size of parts The minimum size varies based on the item selected for...

Page 601: ...al Chinese Hangul Central European Baltic Cyrillic Size Specifies the text size to be displayed The fonts and sizes that can be set vary based on the model Magnification 1 Can only be set when Font is...

Page 602: ...nt selected using Font For details refer to Chapter 2 1 2 Available Text on page 2 6 Text ID Specifies the Text Manager ID No 1 to 32000 when using the text registered in the Text Manager Click to dis...

Page 603: ...s While ON and Device Address is LM0 When LM0 is 0 condition is not satisfied so Lamp displays OFF graphic When LM0 is 1 condition is satisfied so Lamp displays ON graphic Trigger Type Selects the con...

Page 604: ...page 2 1 Device Address Specifies the bit device or the bit number of the word device to serve as the ON condition This option can only be configured when While ON or While OFF is selected for Trigger...

Page 605: ...e visible condition This option can only be configured when While ON or While OFF is selected for Trigger Type Click to display the Tag Editor For the device address configuration procedure refer to C...

Page 606: ...s displayed in Advanced mode Place on the Top Layer Select this check box to display the parts on the top layer The parts will have precedence when other drawings and parts are overlapping with it For...

Page 607: ...t created group For details refer to Chapter 23 2 2 Adding and Editing Security Groups on page 23 19 Settings No Displays the security group numbers 1 to 15 Group Name Displays the name of the securit...

Page 608: ...1 2 3 Display Pilot Lamp Group Name Administrator Operator Reader 1 2 3 Display No Numerical Display Permitted Permitted Permitted Group Name Administrator Operator Reader 1 2 3 Display No Permitted...

Page 609: ...to No Name or Type in the object list Description Used for entering comments about parts The maximum number is 80 characters Example When mousing over the Pilot Lamp on the editing screen When there...

Page 610: ...ord device is used to switch the drawing object to be displayed Switch and display pictures by values of device addresses 2 Multi State Lamp HG3G HG2G 5F HG5G V HG4G V HG3G V HG2G V HG2G 5T HG4G HG1G...

Page 611: ...1 State 2 The conditions to display the picture set by the OFF state on the screen are as follows Y is selected under Flash on the State tab and the trigger condition is not satisfied Switching Metho...

Page 612: ...2 Click a point on the edit screen where you wish to place the Multi State Lamp 3 Double click the placed Multi State Lamp and a Properties dialog box will be displayed 4 Change the settings on each...

Page 613: ...address D0 corresponds to the following pictures and the OFF state is None Switches the picture to display according to the status of the bits bit15 bit0 bit3 Value of Trigger Device Address D0 Pictu...

Page 614: ...ture for bit 2 Display picture for OFF state Display picture for bit 1 Display picture for bit 2 0001 0010 0100 1000 1110 1100 State 0 State 1 State 1 State 2 State 2 Picture to display Bit state of T...

Page 615: ...Lamps Trigger Device Address Specifies the word device to use as the condition for switching the drawing object Click to display the Tag Editor For the device address configuration procedure refer to...

Page 616: ...e display position of parts using coordinates The X and Y coordinates of parts is defined relative to an origin at the top left corner of the screen X 0 to base screen horizontal size 1 Y 0 to base sc...

Page 617: ...ional Chinese Hangul Central European Baltic Cyrillic Size Specifies the text size to be displayed The fonts and sizes that can be set vary based on the model Magnification 1 Can only be set when Font...

Page 618: ...option can only be configured when Left Center or Right is selected for Align Text Horizontal If Center Left is selected for Align Text Horizontal Center Top is set as this option For details refer t...

Page 619: ...he View Browser if Standard is selected under Image Type on the View tab or Picture Manager if Picture is selected This allows you to change the drawing object to display Text Shows the registration t...

Page 620: ...box where you can change the Windows Font This setting can only be changed when Windows is selected for Font on the Registration Text tab Line Spacing Shows the line spacing for Windows Font Double c...

Page 621: ...setting is only enabled if the Use Text Manager check box is cleared For details refer to Chapter 2 Windows Font on page 2 13 Browse Select the drawing object to use for the lamp part Clicking this b...

Page 622: ...0 the condition is not satisfied and the Multi State Lamp is hidden While LM0 is 1 the condition is satisfied and the Multi State Lamp is displayed Trigger Type Selects the condition to display the M...

Page 623: ...nfigured when While ON or While OFF is selected for Trigger Type Click to display the Tag Editor For the device address configuration procedure refer to Chapter 2 5 1 Device Address Settings on page 2...

Page 624: ...b is displayed in Advanced mode Place on the Top Layer Select this check box to display the parts on the top layer The parts will have precedence when other drawings and parts are overlapping with it...

Page 625: ...that created group For details refer to Chapter 23 2 2 Adding and Editing Security Groups on page 23 19 Settings No Displays the security group numbers 1 to 15 Group Name Displays the name of the secu...

Page 626: ...Operator Reader 1 2 3 Display Multi State Lamp Group Name Administrator Operator Reader 1 2 3 Display No Numerical Display Permitted Permitted Permitted Group Name 1 2 3 Display No Permitted Permitted...

Page 627: ...to No Name or Type in the object list Description Used for entering comments about parts The maximum number is 80 characters Example When mousing over the Multi State Lamp on the editing screen When...

Page 628: ...2 Multi State Lamp 9 34 WindO I NV4 User s Manual...

Page 629: ...the keypad or key buttons touch the Numerical Input to switch it to entry mode In entry mode the value of device address is displayed until a value is entered The Numerical Input can perform the foll...

Page 630: ...on the edit screen where you wish to place the Numerical Input 3 Double click the placed Numerical Input and a Properties dialog box will be displayed 4 Change the settings on each tab as necessary T...

Page 631: ...e the Numerical Input Use as Numerical Input Uses the Numerical Input to enter or display values Use as Display for Keypad Uses the Numerical Input as a part to display the value entered with a Keypad...

Page 632: ...elected for Type and the Adjust location automatically check box is cleared Specify the coordinates in 1 dot units X 0 to base screen horizontal size 1 Y 0 to base screen vertical size 1 Data Type Sel...

Page 633: ...ct this check box to show a blank display if the value is 0 If the value is zero and it is not displayed the unit set on the Format tab is also not displayed Even if the Do not display when the value...

Page 634: ...the value of device address to maximum value Entry mode Display value of device address Display mode Display focus Entry mode Display value of device address Display mode 1234 Operations and display 1...

Page 635: ...address configuration procedure refer to Chapter 2 5 1 Device Address Settings on page 2 70 Use Reference Device Address 1 Select this check box and specify a device address to change the destination...

Page 636: ...ce address Display mode Display value of device address Display mode Display value of device address Entry mode Write value to device address Entry mode Display value of device address Display mode Di...

Page 637: ...Palette Flange Standard Uses the default graphic for WindO I NV4 Picture Uses an image file saved using Picture Manager For details about image file restrictions refer to Chapter 2 1 4 Available Imag...

Page 638: ...rdinates of parts is defined relative to an origin at the top left corner of the screen X 0 to base screen horizontal size 1 Y 0 to base screen vertical size 1 999 0 0 X Y Screen Parts W H Sets width...

Page 639: ...is selected for Font Align Text Selects the text alignment in the horizontal direction from the following Left Center Right For details refer to Appendix 5 Text Alignment on page A 7 Text Color Selec...

Page 640: ...ext Displays the characters of the specified Text ID The maximum number that can be displayed with this function is 4 characters The fifth and subsequent characters of a character string are not displ...

Page 641: ...d Plate Color under Flash are alternately displayed 3 Advanced mode only 1234 1234 1234 1234 Flashing Trigger device address under Flash Trigger device address under Flash 0 1 MICRO I External device...

Page 642: ...s are set in the Flashing Cycle on the System tab in the Project Settings dialog box Text Color Selects the color color 256 colors monochrome 16 shades of text when flashing Click this button to displ...

Page 643: ...n page 2 70 Select UBIN16 W BIN16 I UBIN32 D BIN32 L BCD4 B or BCD8 EB for Data Type under the General tab and to display a fractional number specify the values of Minimum and Maximum as an integer Ex...

Page 644: ...Over Report Select this check box to write 1 in the Report Device Address when the entered value or the value of the device address to display exceeds the allowable range Report Device Address Specifi...

Page 645: ...on is not satisfied and the Numerical Input is not operational While LM0 is 1 the condition is satisfied and the Numerical Input is operational Trigger Type Selects the condition to enable the Numeric...

Page 646: ...n While satisfying the condition is selected for Trigger Type Click to display the Trigger Condition Settings dialog box For the conditional expression configuration procedure refer to Chapter 2 5 2 S...

Page 647: ...condition This option can only be configured when While ON or While OFF is selected for Trigger Type Click to display the Tag Editor For the device address configuration procedure refer to Chapter 2 5...

Page 648: ...displayed by 60 Arithmetic Formulas Arithmetic formulas can be specified by freely combining multiple kinds of data and operators in the following format There is no limit on the number of data items...

Page 649: ...kets and Item Description Arithmetic operators Sets the arithmetic operators Addition Adds and Subtraction Subtracts from Multiplication Multiplies and Division Divides by Modulo Calculates remainder...

Page 650: ...or not there is permission to display the part Only Permitted security groups can display this part If all security groups are set to Permitted this part will be displayed even if no user account has...

Page 651: ...2 3 Display No Numerical Display Permitted Permitted Permitted Group Name Administrator Operator Reader 1 2 3 Display No Permitted Permitted Prohibited Group Name Administrator Operator Reader 1 2 3 D...

Page 652: ...to No Name or Type in the object list Description Used for entering comments about parts Maximum number is 80 characters Example When mousing over the Numerical Input on the editing screen When there...

Page 653: ...0 999 999 D100 999 Press Numerical Input Write value to device address Press ENT Display value of device address Entry mode Display value of device address Entry mode Close standard keypad Display sta...

Page 654: ...1 To clear the System Area 2 numerical input setting complete bit or the numerical input setting cancel bit write 1 to System Area 1 Numerical Input Setting Clear bit address number 1 bit 10 To autom...

Page 655: ...keypad or key buttons to device addresses Display the character codes in current values of device addresses as text Display entered text as asterisk Enter Kanji characters 2 Character Input HG3G HG2G...

Page 656: ...a point on the edit screen where you wish to place the Character Input 3 Double click the placed Character Input and a Properties dialog box will be displayed 4 Change the settings on each tab as nece...

Page 657: ...ord Input Screen Use as Display for Password in Password Input Screen Uses the Character Input as a part to display the password on the Password Input Screen Use as Display for Keypad 1 Select this ch...

Page 658: ...st location automatically check box is cleared Specify the coordinates in 1 dot units X 0 to base screen horizontal size 1 Y 0 to base screen vertical size 1 Input Digits Specifies the number of digit...

Page 659: ...SERIES MICRO U P K F A SP V Q L G B W R M H C X Cur Cur S N I D Y Z T O J E BS CLR CAN ENT Num Sign Lower case MICRO_ HG SERIES MICRO Character Input display Value of destination device address Values...

Page 660: ...r codes to device addresses Entry mode Enter IDEC Deletes text E C IDEC_ HG_ _ IDEC_ Action Operations and display Value of Destination Device Address If you use a Numerical Input or a Character Input...

Page 661: ...ed Entry mode Display values of device addresses as text Display mode T I R M C O S A R T H G S E R I E S NULL H G S E R I E S NULL H G S E R I E S NULL H G S E R I E S NULL NULL A R I R M C O S M O N...

Page 662: ...Flange Standard Uses the default graphic for WindO I NV4 Picture Uses an image file saved using Picture Manager For details about image file restrictions refer to Chapter 2 1 4 Available Image Files...

Page 663: ...coordinates of parts is defined relative to an origin at the top left corner of the screen X 0 to base screen horizontal size 1 Y 0 to base screen vertical size 1 HG SERIES 0 0 X Y Screen Parts W H Se...

Page 664: ...in the horizontal direction from the following Left Center Right For details refer to Appendix 5 Text Alignment on page A 7 Text Color Selects the color of displayed text color 256 colors monochrome...

Page 665: ...eypad popup screen 3003 Write 6 to D100 and 100 to D101 Font number Popup screen No 1stword 3rdword 2ndword 1 Japanese 2 Western 6 Central European 7 Baltic 8 Cyrillic 1 to 3015 Font number Popup scre...

Page 666: ...isplayed 2 Advanced mode only Flashing Trigger device address under Flash Trigger device address under Flash 0 1 MICRO I External device HG SERIES HG SERIES HG SERIES HG SERIES Text Color Plate Color...

Page 667: ...intervals are set in the Flashing Cycle on the System tab in the Project Settings dialog box Text Color Selects the color color 256 colors monochrome 16 shades of text when flashing Click this button...

Page 668: ...isfied and the Character Input is not operational While LM0 is 1 the condition is satisfied and the Character Input is operational Trigger Type Selects the condition to enable the Character Input from...

Page 669: ...hen While satisfying the condition is selected for Trigger Type Click to display the Trigger Condition Settings dialog box For the conditional expression configuration procedure refer to Chapter 2 5 2...

Page 670: ...option can only be configured when While ON or While OFF is selected for Trigger Type Click to display the Tag Editor For the device address configuration procedure refer to Chapter 2 5 1 Device Addr...

Page 671: ...lect this check box to display disable touch sounds for this part Place on the Top Layer Select this check box to display the parts on the top layer The parts will have precedence when other drawings...

Page 672: ...or not there is permission to display the part Only Permitted security groups can display this part If all security groups are set to Permitted this part will be displayed even if no user account has...

Page 673: ...ermitted Group Name Administrator Operator Reader 1 2 3 Display No Permitted Permitted Prohibited Group Name Administrator Operator Reader 1 2 3 Display No Line Chart and Bar Chart Permitted Permitted...

Page 674: ...to No Name or Type in the object list Description Used for entering comments about parts Maximum number is 80 characters Example When mousing over the Character Input on the editing screen When there...

Page 675: ...ex 4552 Hex 4945 Hex 5300 Hex E R D102 D103 D104 D100 D101 4847 Hex H G 2053 Hex 4552 Hex 4945 Hex 5300 Hex E R D102 D103 D104 S NULL I E S I E S NULL S HG_ HG SERIES_ Press Character Input Write text...

Page 676: ...together with the text group settings The font and popup screen with this setting will change simultaneously with the text group change and text can be entered with the same font as the text group Spe...

Page 677: ...ters in the Character Input Configuration Procedure 1 On the Home tab in the Parts group click Data Displays and then click Character Input 2 Click a point on the edit screen where you place the Chara...

Page 678: ...select the 16x16 as the Size 6 Click OK The Properties of Character Input dialog box closes 7 On the Configuration tab in the System Setup group click Project The Project Settings dialog box is displa...

Page 679: ...municating with the MICRO I To change Communication Settings click Change to display the Communication Settings dialog box Change Communicate with Port and Baud Rate For details refer to Chapter 24 1...

Page 680: ...i characters The popup screen for the standard keypad screen number 3008 will be displayed 2 Press the Kanji to switch it to Kanji input mode 3 Enter the reading of Kanji with Hiragana The maximum num...

Page 681: ...idates 5 Press ENT to apply the entered characters 6 Repeat steps 2 through 5 to enter all the characters ENT BS Cur Cur CLR CAN Kanji Alphabet Num Sign Small SP Characters exceeding the number of Inp...

Page 682: ...aracter Input The Shift_JIS code of the entering characters are written to the device address This concludes entering Kanji characters to the Character Input On the simulator you can not enter Kanji c...

Page 683: ...closed by pressing close on the popup screen s title bar or another Character Input is pressed and selected before finished entering the text by pressing ENT entry mode is canceled and 1 is not writte...

Page 684: ...or scale the displayed picture according to value of device address Switch and display pictures by value of device address 3 Picture Display HG3G HG2G 5F HG5G V HG4G V HG3G V HG2G V HG2G 5T HG4G HG1G...

Page 685: ...tion by values of device addresses MICRO I Picture List 5 x 100 ms 5 x 100 ms 5 x 100 ms Pic0 Pic1 Pic2 External device MICRO I Display picture at X 0 Y 0 Move picture to X 300 Y 250 Move picture to X...

Page 686: ...00 from the center of picture When the size of pictures to switch differs and the Dynamic Size check box is cleared all the pictures are displayed with the same size as Pic0 External device MICRO I Sh...

Page 687: ...2 Click a point on the edit screen where you wish to place the Picture Display 3 Double click the placed Picture Display and a Properties dialog box will be displayed 4 Change the settings on each ta...

Page 688: ...xample When Bit Number is selected and the bits of trigger device address D0 are allocated to the following pictures Switches the picture to display according to the status of the bits bit15 bit0 bit3...

Page 689: ...Period Switches the pictures to display at a regular interval in picture number order on the picture list Example When Fixed Period is selected and the following pictures are allocated to the picture...

Page 690: ...ress for the X coordinate is D100 and a device address for the Y coordinate is D101 The picture is moved to the values of D100 and D101 0 0 300 250 600 500 Position of picture to display Value of the...

Page 691: ...namic Rotation dialog box For details refer to Dynamic Rotation Dialog Box on page 10 64 Only the top layer is valid if the picture is NMF NV Metafile When the size of pictures to switch differs and t...

Page 692: ...or details refer to Chapter 2 1 1 Available Data on page 2 1 Use Custom Settings Select this check box to configure the range of values to read from the Source Device Address the range of the rotation...

Page 693: ...alue is selected the minimum and maximum values that can be specified will depend on the data type selected by Data Type For details about data types refer to Chapter 2 1 1 Available Data on page 2 1...

Page 694: ...ation procedure refer to Chapter 2 5 1 Device Address Settings on page 2 70 Coordinate points outside the screen s display area can also be specified as the pivot point of rotation If the size of both...

Page 695: ...as the pivot point for rotation perform one of the following operations For the coordinates the X coordinate and Y coordinate of the center point are displayed with the center of the picture as the or...

Page 696: ...the Picture Manager where you can specify the picture The picture number Pic number and the file name of the registered picture are displayed Remove Deletes the registered picture from the list Up Shi...

Page 697: ...4 User s Manual 10 69 3 Picture Display 10 Data Displays Size W H Sets width and height to define the size of parts W 2 to base screen horizontal size H 2 to base screen vertical size Screen Parts Wid...

Page 698: ...ts the condition to enable the Picture Display from the following Example When Trigger Type is While ON Device Address is LM0 and While not satisfying the condition is Not show Picture Display While L...

Page 699: ...characters While not satisfying the condition Selects operation of parts when condition is not satisfied While ON Enables the Picture Display when the value of device address is 1 Example When While n...

Page 700: ...b is displayed in Advanced mode Place on the Top Layer Select this check box to display the parts on the top layer The parts will have precedence when other drawings and parts are overlapping with it...

Page 701: ...ect that created group For details refer to Chapter 23 2 2 Adding and Editing Security Groups on page 23 19 Settings No Displays the security group numbers 1 to 15 Group Name Displays the name of the...

Page 702: ...1 2 3 Display Picture Display Group Name Administrator Operator Reader 1 2 3 Display No Numerical Display Permitted Permitted Permitted Group Name Administrator Operator Reader 1 2 3 Display No Permi...

Page 703: ...d close to No Name or Type in the object list Description Used for entering comments about parts Maximum number is 80 characters Example When mousing over the Picture Display on the editing screen Whe...

Page 704: ...ating and displaying a picture by the values of device addresses 1 On the Home tab in the Parts group click Data Displays and then click Picture Display 2 Click a point on the edit screen where you wi...

Page 705: ...a Displays 5 Registers the pictures to display on the Picture List Double click pic0 Unregistered Picture Manager is displayed 6 Click Import Open dialog box is displayed 7 Specify the image file and...

Page 706: ...3 Picture Display 10 78 WindO I NV4 User s Manual 8 Specify the image file and then click Select The picture is saved in Settings 9 Repeat steps 5 through 8 and register all pictures for switching...

Page 707: ...WindO I NV4 User s Manual 10 79 3 Picture Display 10 Data Displays 10 Click the General tab 11 Select the Dynamic Rotation check box and then click Edit...

Page 708: ...hat will be used to rotate and display the picture For details refer to Chapter 2 1 1 Available Data on page 2 1 14 Specify the maximum of the value to read from the Source Device Address in the Maxim...

Page 709: ...I 1 1 HG5G 4G 3G V only 2 This is applicable for HG4G 3G with a video interface only 3 Recording sound function is for HG4G 3G only 4 Video Display HG3G HG2G 5F HG5G V HG4G V HG3G V HG2G V HG2G 5T HG...

Page 710: ...of the Video Display the displayed image may be shrunk When the frame size of the movie file to be played is less than or equal to half the size of the Video Display the movie file cannot be played I...

Page 711: ...Video Display 2 Click a point on the edit screen where you wish to place the Video Display 3 Double click the placed Video Display and a Properties dialog box will be displayed 4 Change the settings o...

Page 712: ...lects Channel 1 or Channel 2 to display one of the images from the video interface Play a movie or recorded file from the File Screen Selects and plays files using the File Screen For details refer to...

Page 713: ...ect the check box and specify the bit number of a bit device or word device if you want to switch between display in full screen or not using the value of a device address Full screen is displayed whe...

Page 714: ...16 shades Click Color to display the Color Palette Select a color from the Color Palette Flange Plate color Foreground Color Background Color Selects the foreground and background colors of the flang...

Page 715: ...alette Pause Back Full Stop REW Restore Play FF Restore Next RepeatOFF Buttons Can be set only when there are grouped Key Buttons X Y Sets the display position of parts using coordinates The X and Y c...

Page 716: ...is displayed in Advanced mode Place on the Top Layer Select this check box to display the parts on the top layer The parts will have precedence when other drawings and parts are overlapping with it F...

Page 717: ...whether or not there is permission to display the part Only Permitted security groups can display this part If all security groups are set to Permitted this part will be displayed even if no user acco...

Page 718: ...ted Group Name Administrator Operator Reader 1 2 3 Display No Line Chart and Bar Chart Permitted Permitted Prohibited Pause Back Full Stop REW Restore Play FF Restore Next RepeatOFF Open Password Scre...

Page 719: ...d close to No Name or Type in the object list Description Used for entering comments about parts Maximum number is 80 characters Example When mousing over the Video Display on the editing screen When...

Page 720: ...er Page No Displays the current page number Folder Up button Moves to a folder that is 1 level higher in the hierarchy 123000 avi Modified Date 2011 3 13 13 00 30 Page No 1 File Screen DRIVE SD Card H...

Page 721: ...wn Moves down by one page Select Selects the file or folder that is in focus If a folder has been selected this will open the folder and display its contents File Name Displays a list of the files and...

Page 722: ...External Memory Device folder HGDATA01 1 Press to select HGDATA01 and then press Select The contents of the HGDATA01 folder will be displayed 2 Press to select RECORD and then press Select The conten...

Page 723: ...key or when you execute a Multi Command the movie file plays Modified Date 2011 3 13 13 00 30 Page No 1 File Screen DRIVE SD Card HGDATA01 RECORD Update Page Up Page Down Select File name Size Folder...

Page 724: ...1 Hex 3233 Hex D102 4B00 Hex D100 D101 3132 Hex 1 2 3334 Hex D102 4B00 Hex D100 D101 3536 Hex 5 6 3738 Hex D102 4B00 Hex 4 3 K 7 NULL 1 3 2 8 NULL K NULL K NULL Always show Show according to values of...

Page 725: ...device address MICRO I Line A A 1234K pcs pcs Line B 8K pcs Message details Line A 1234K pcs Line B 5678K pcs External device MICRO I HG SERIES HG SERIES D0 D0 D0 D0 Lower byte Upper byte 0x00 Lower...

Page 726: ...a point on the edit screen where you wish to place the Message Display 3 Double click the placed Message Display and a Properties dialog box will be displayed 4 Change the settings on each tab as nece...

Page 727: ...text registered in Text Manager and display it as text enter 1 to 8 in Text for the Text ID at the position to display the value of device address as text The channels configured under Data are alloca...

Page 728: ...kslash enter a backslash before the backslash Example Settings Lists the settings for the text to display according to values of device addresses No Shows the channel numbers Ch1 to Ch8 Device Address...

Page 729: ...r Palette Flange Standard Uses the default graphic for WindO I NV4 Picture Uses an image file saved using Picture Manager For details about image file restrictions refer to Chapter 2 1 4 Available Ima...

Page 730: ...ates of parts is defined relative to an origin at the top left corner of the screen X 0 to base screen horizontal size 1 Y 0 to base screen vertical size 1 HG SERIES 0 0 X Y Screen Parts W H Sets widt...

Page 731: ...uropean Baltic Cyrillic is selected for Font Align Text Horizontal Selects the text alignment in the horizontal direction from the following Left Center Right Center Left Left Right If Top Center or B...

Page 732: ...tally Symbols representing voiced and semi voiced sounds of single byte characters are shown as follows When using text displayed according to values of device addresses the characters are counted as...

Page 733: ...age Display a message and align left Voltage abnormal V Vo oltage abnormal Vol ltage abnormal When the Scroll check box is selected the number of parts that can be arranged on a single screen decrease...

Page 734: ...ext Color or in Plate Color on the View tab will be displayed When the value of device address is 1 the color displayed and specified in Text Color or Plate Color under the Specify Color Text Color Se...

Page 735: ...signments that are stored to device addresses are given below For color data refer to Appendix 1 Color Number on page A 1 D0 Lower byte Upper byte 0x00 Lower byte Upper byte 0xF7 D0 Lower byte Upper b...

Page 736: ...Color and Plate Color under Flash are alternately displayed 2 Advanced mode only Flashing Trigger device address under Flash Trigger device address under Flash 0 1 MICRO I External device HG SERIES HG...

Page 737: ...button to display the Color Palette Select a color from the Color Palette This option can only be configured when the Change Display Colors check box is cleared or selected and Specify Color is selec...

Page 738: ...igger Type Selects the condition to enable the Message Display from the following Example When Trigger Type is While ON Device Address is LM0 and While not satisfying the condition is Not display mess...

Page 739: ...elects the operation of the part when the condition is not satisfied While ON Enables the Message Display when the value of device address is 1 Example When While not satisfying the condition is Not d...

Page 740: ...ab is displayed in Advanced mode Place on the Top Layer Select this check box to display the parts on the top layer The parts will have precedence when other drawings and parts are overlapping with it...

Page 741: ...lect that created group For details refer to Chapter 23 2 2 Adding and Editing Security Groups on page 23 19 Settings No Displays the security group numbers 1 to 15 Group Name Displays the name of the...

Page 742: ...Reader 1 2 3 Display Message Display Group Name Administrator Operator Reader 1 2 3 Display No Numerical Display Permitted Permitted Permitted Group Name 1 2 3 Display No Permitted Permitted Prohibite...

Page 743: ...ed close to No Name or Type in the object list Description Used for entering comments about parts Maximum number is 80 characters Example When mousing over the Message Display on the editing screen Wh...

Page 744: ...ethod of String Data NULL terminating character Device address Stored value Displayed string Upper byte Lower byte D100 31 Hex 32 Hex 12 D101 33 Hex 34 Hex 34 D102 35 Hex 0 5 NULL terminating characte...

Page 745: ...is used to switch the displayed message according to the value of a word device 6 Message Switching Display HG3G HG2G 5F HG5G V HG4G V HG3G V HG2G V HG2G 5T HG4G HG1G HG1P HG2J 7U MICRO I External dev...

Page 746: ...Click a point on the edit screen where you wish to place the Message Switching Display 3 Double click the placed Message Switching Display and a Properties dialog box will be displayed 4 Change the se...

Page 747: ...e status of bits in a device address Example When Bit Number is selected and the bits of trigger device address D0 are allocated to the following messages Switches the message to display according to...

Page 748: ...the value of a device address Example When Value is selected and the trigger device addresses D0 are allocated to the following messages Switches the message to display according to the value of the d...

Page 749: ...able Text on page 2 6 This option can only be configured if the Use Text Manager check box is cleared To display the backslash enter a backslash before the backslash A line feed is added with pressing...

Page 750: ...Switching Display 10 122 WindO I NV4 User s Manual Remove Deletes the registered settings from the list Up Shifts the selected settings upward in the list Down Shifts the selected settings downward in...

Page 751: ...Color Palette Flange Standard Uses the default graphic for WindO I NV4 Picture Uses an image file saved using Picture Manager For details about image file restrictions refer to Chapter 2 1 4 Availabl...

Page 752: ...ordinates of parts is defined relative to an origin at the top left corner of the screen X 0 to base screen horizontal size 1 Y 0 to base screen vertical size 1 HG SERIES 0 0 X Y Screen Parts W H Sets...

Page 753: ...ral European Baltic Cyrillic is selected for Font Align Text Horizontal Selects the text alignment in the horizontal direction from the following Left Center Right Center Left Left Right If Top Center...

Page 754: ...oiced and semi voiced sounds of single byte characters are shown as follows Aligned to le edge Horizontal display Next characters Speed 1 Fastest Sets the scrolling speed 1 to 10 1 is fastest 10 is sl...

Page 755: ...hen the value of device address is 1 the color displayed and specified in Text Color or Plate Color under the Change Display Colors Text Color Selects the color color 256 colors monochrome 16 shades o...

Page 756: ...ernately displayed 2 Advanced mode only Flashing Trigger device address under Flash Trigger device address under Flash 0 1 MICRO I External device HG SERIES HG SERIES HG SERIES HG SERIES Text Color Pl...

Page 757: ...Flash intervals are set in the Flashing Cycle on the System tab in the Project Settings dialog box Text Color Selects the color color 256 colors monochrome 16 shades of text when flashing Click this b...

Page 758: ...n is satisfied The Message Switching Display is hidden while the condition is not satisfied Example When Trigger Type is While ON and Device Address is LM0 While LM0 is 0 the condition is not satisfie...

Page 759: ...n can only be configured when While ON or While OFF is selected for Trigger Type Click to display the Tag Editor For the device address configuration procedure refer to Chapter 2 5 1 Device Address Se...

Page 760: ...ons tab is displayed in Advanced mode Place on the Top Layer Select this check box to display the parts on the top layer The parts will have precedence when other drawings and parts are overlapping wi...

Page 761: ...an select that created group For details refer to Chapter 23 2 2 Adding and Editing Security Groups on page 23 19 Settings No Displays the security group numbers 1 to 15 Group Name Displays the name o...

Page 762: ...splay Message Switching Display Group Name Administrator Operator Reader 1 2 3 Display No Numerical Display Permitted Permitted Permitted Group Name Administrator Operator Reader 1 2 3 Display No Perm...

Page 763: ...ed close to No Name or Type in the object list Description Used for entering comments about parts Maximum number is 80 characters Example When mousing over the Message Switching Display on the editing...

Page 764: ...Log Display Lock Unlock is configured on the Channel tab in the Alarm Log Settings dialog box For the key buttons used with the Alarm List Display refer to Chapter 8 Alarm List Display on page 8 97 T...

Page 765: ...m List Display 2 Click a point on the edit screen where you wish to place the Alarm List Display 3 Double click the placed Alarm List Display and a Properties dialog box will be displayed 4 Change the...

Page 766: ...ss configured on the List tab Example When Use Alarm Log Settings is selected the source device address device address to monitor configured by the Alarm Log function is D0 and the following messages...

Page 767: ...becomes 1 display nothing List Simultaneously displays multiple messages Sort Selects the display order when displaying multiple messages Old and New can only be configured when the Use Alarm Log Sett...

Page 768: ...with sequential addresses Random Configures trigger device addresses for each block number Block No Shows the block numbers in the amount specified by Number of Blocks Double clicking the cell display...

Page 769: ...om the list Select a block number on the list and click this button to delete the selected settings from the list Settings Example When the number of blocks is 1 and D0 is specified as the trigger dev...

Page 770: ...nes are displayed select this check box and select line color color 256 colors monochrome 16 shades Click Color to display the Color Palette Select a color from the Color Palette Flange Plate color Pa...

Page 771: ...ect a pattern or tonal gradation from the Pattern Palette Page Up Page Down Buttons Current fault Can be set only when there are grouped Key Buttons X Y Sets the display position of parts using coordi...

Page 772: ...lay color 256 colors monochrome 16 shades Click this button to display the Color Palette Select a color from the Color Palette When this check box is cleared the color for messages is the text color c...

Page 773: ...Number of Lines Character height Line Spacing 1 24 24 dots Current fault Current fault has occurred Pump fault Pump fault has occurred 2 24 Current fault has occurred Pump fault has occurred 3 24 Num...

Page 774: ...dots or higher is required HG5G 4G 3G 2G V HG4G 3G HG2G 5F 5T HG1G 1P Magnification H is 2 To display a one line message 2 x 16 x 1 32 dots a line spacing of 32 dots or higher is required To display...

Page 775: ...message Display a message and align left Page Up Page Down Page Up Page Down Voltage abnormal Page Up Page Down V Page Up Page Down oltage abnormal Page Up Page Down ltage abnormal When the Scroll che...

Page 776: ...g Settings dialog box Coordinates Reference screen list Reference screen 1 Select a message displayed on the Alarm List Display 2 Press the key button Ref Reference screen opens Motor fault Pump1 faul...

Page 777: ...0 Screen numbers 100 101 102 are automatically specified in order from message number 1 0 Example 2 When screen number 200 has been entered for message number 1 5 Message numbers 1 0 to 1 4 are left...

Page 778: ...er or not there is permission to display the part Only Permitted security groups can display this part If all security groups are set to Permitted this part will be displayed even if no user account h...

Page 779: ...itted Group Name Administrator Operator Reader 1 2 3 Display No Permitted Permitted Prohibited Group Name Administrator Operator Reader 1 2 3 Display No Line Chart Permitted Permitted Prohibited Page...

Page 780: ...to No Name or Type in the object list Description Used for entering comments about parts Maximum number is 80 characters Example When mousing over the Alarm List Display on the editing screen When the...

Page 781: ...pressure 12 54 12 01 13 02 Pump1 fault Up Down Delete Select Reference Occurrence Message Recovered Confirmed 12 01 09 15 Motor fault 12 01 10 02 Pump1 fault 12 50 12 01 10 28 High pressure 12 54 12...

Page 782: ...splay 2 Click a point on the edit screen where you wish to place the Alarm Log Display 3 Double click the placed Alarm Log Display and a Properties dialog box will be displayed 4 Change the settings o...

Page 783: ...ms have occurred The range that can be specified varies based on the model type HG2J 7U HG2G 5T HG1G 1P 1 to 5520 HG5G 4G 3G 2G V HG4G 3G HG2G 5F 1 to 11660 Sort Selects the display order for alarms t...

Page 784: ...ck For details on the color data refer to Appendix Windows RGB Value Correspondence Table on page A 2 Example Inverts Text Color and Background Color when a color is set to Background Color When the B...

Page 785: ...ime the alarm was recovered from Confirmation Time Shows the time the alarm was confirmed by pressing the key button CHECK Up Down Check Select Delete Occurrence Message Recovered Confirmed 12 01 12 0...

Page 786: ...me Selects the display type of the time from the following HH MM HH MM SS non display If the characters displayed in the title contain a newline the text after the newline will not be displayed Howeve...

Page 787: ...lines are displayed select this check box and select line color color 256 colors monochrome 16 shades Click Color to display the Color Palette Select a color from the Color Palette Flange Plate color...

Page 788: ...irmed 12 01 12 00 Current fault 12 53 12 54 Buttons Can be set only when there are grouped Key Buttons X Y Sets the display position of parts using coordinates The X and Y coordinates of parts is defi...

Page 789: ...d on the font For details refer to Chapter 2 1 2 Available Text on page 2 6 Style 1 Selects Regular or Bold for text style Size 2 Specifies the character size 8 to 512 Magnification 1 Title Color Sele...

Page 790: ...256 colors monochrome 16 shades Click Color to display the Color Palette Select a color from the Color Palette Flash Selects whether or not to flash alarms Double clicking the cell toggles between Y a...

Page 791: ...Number of Lines Character height Line Spacing 1 24 24 dots Current fault Current fault has occurred Pump fault Pump fault has occurred 2 24 Current fault has occurred Pump fault has occurred 3 24 Num...

Page 792: ...e line message 2 x 16 x 1 32 dots a line spacing of 32 dots or higher is required To display a two line message 2 x 16 x 2 64 dots a line spacing of 64 dots or higher is required 24 dots Line Spacing...

Page 793: ...splay Occurred Recovered Confirmed Edit the settings for text color background color and flashing according to the status of alarm occurrence recovery and confirmation Text Color Selects the text colo...

Page 794: ...en Base Screen or Popup Screen is selected for Reference Screen Specify the coordinates in 1 dot units X 0 to base screen horizontal size 1 Y 0 to base screen vertical size 1 Reference screen 1 Select...

Page 795: ...6 enter the following To specify blocks 1 to 3 1 3 To specify blocks 1 3 6 1 3 6 To specify blocks 1 4 to 6 1 4 6 No Device address 1 0 1 1 1 2 1 13 1 14 1 15 D100 0 D100 1 D100 2 D100 13 D100 14 D10...

Page 796: ...r or not there is permission to display the part Only Permitted security groups can display this part If all security groups are set to Permitted this part will be displayed even if no user account ha...

Page 797: ...rmitted Prohibited Up Down Check Select Delete Occurrence Message Recovered Confirmed 12 01 12 00 Current fault 12 53 12 54 Open Password Screen enter password and switch to User2 For User1 parts for...

Page 798: ...to No Name or Type in the object list Description Used for entering comments about parts Maximum number is 80 characters Example When mousing over the Alarm Log Display on the editing screen When ther...

Page 799: ...ge Up Left Page Left Operate Down MICRO I External Device Samplong Data and Time Data001 Data002 Data003 2019 09 06 12 00 30 20 120 201 2019 09 06 12 01 30 21 121 204 2019 09 06 12 02 30 22 122 206 20...

Page 800: ...splay 2 Click a point on the edit screen where you wish to place the Data Log Display 3 Double click the placed Data Log Display and a Properties dialog box will be displayed 4 Change the settings on...

Page 801: ...ay Click to display the Tag Editor For the device address configuration procedure refer to Chapter 2 5 1 Device Address Settings on page 2 70 Displays from the data of Start Date when the value of dev...

Page 802: ...or the sampling time configured as the Output Items in the Individual Settings dialog box of the Data Log Settings Date Selects the display type of the sampling date from the following YY MM DD MM DD...

Page 803: ...The data number cannot be edited Label Displays the Label under the Output Data in the Individual Settings dialog box of the Data Log Settings The label cannot be edited Column Width Configures the c...

Page 804: ...this check box and select line color color 256 colors monochrome 16 shades Click Color to display the Color Palette Select a color from the Color Palette Flange Plate color Left Page Left Page Down U...

Page 805: ...X Y Sets the display position of parts using coordinates The X and Y coordinates of parts is defined relative to an origin at the top left corner of the screen X 0 to base screen horizontal size 1 Y 0...

Page 806: ...nese Traditional Chinese Hangul Central European Baltic Cyrillic The characters that can be displayed depend on the font For details refer to Chapter 2 1 2 Available Text on page 2 6 Style 1 Selects R...

Page 807: ...a Number of lines X Character height Height of rows dots The character height setting varies based on the model HG2J 7U Size Size is 16 HG5G 4G 3G 2G V HG4G 3G HG2G 5F 5T HG1G 1P Magnification H x 16...

Page 808: ...3G HG2G 5F 5T HG1G 1P Magnification H is 2 To display a one line message 1 x 32 32 dots a height of rows of 32 dots or higher is required To display a two line message 2 x 32 64 dots a height of rows...

Page 809: ...Options tab is displayed in Advanced mode Place on the Top Layer Select this check box to display the parts on the top layer The parts will have precedence when other drawings and parts are overlappin...

Page 810: ...r or not there is permission to display the part Only Permitted security groups can display this part If all security groups are set to Permitted this part will be displayed even if no user account ha...

Page 811: ...perator are displayed MICRO I 130 MICRO I MICRO I 130 User1 User2 Samplong Data and Time Data001 Data002 Data003 2019 09 06 12 00 30 20 120 201 2019 09 06 12 01 30 21 121 204 2019 09 06 12 02 30 22 12...

Page 812: ...to No Name or Type in the object list Description Used for entering comments about parts Maximum number is 80 characters Example When mousing over the Data Log Display on the editing screen When there...

Page 813: ...lay Type Decimal Data Type BIN16 I Digits 5 External device Hex AD2 MICRO I D100 1234 Display Device Address D100 Display Type Hexadecimal Data Type UBIN16 W Digits 4 Display Device Address D100 Displ...

Page 814: ...int on the edit screen where you wish to place the Numerical Display 3 Double click the placed Numerical Display and a Properties dialog box will be displayed 4 Change the settings on each tab as nece...

Page 815: ...of digits that can be set varies based on the display type and data type The digits that can be set are as follows Display Type Data Type Digits Decimal display UBIN16 W BIN16 I 1 to 5 UBIN32 D BIN32...

Page 816: ...s Zeros cleared 00001234 Do not display when the value is zero Select this check box to show a blank display if the value is 0 If the value is zero and it is not displayed the unit set on the Format t...

Page 817: ...ess configuration procedure refer to Chapter 2 5 1 Device Address Settings on page 2 70 Use Reference Device Address 1 Select this check box and specify a device address to change the source device ad...

Page 818: ...te Flange Standard Uses the default graphic for WindO I NV4 Picture Uses an image file saved using Picture Manager For details about image file restrictions refer to Chapter 2 1 4 Available Image File...

Page 819: ...X and Y coordinates of parts is defined relative to an origin at the top left corner of the screen X 0 to base screen horizontal size 1 Y 0 to base screen vertical size 1 1234 0 0 X Y Screen Parts W H...

Page 820: ...Standard is selected for Font Magnification 2 Can only be set when Standard is selected for Font Align Text Selects the text alignment in the horizontal direction from the following Left Center Right...

Page 821: ...f a carriage return CR is included the characters after the CR are not displayed Trigger Device Address Specifies the bit device or the bit number of the word device to use as the trigger to switch th...

Page 822: ...Color under Flash are alternately displayed 3 Advanced mode only 1234 1234 1234 1234 Flashing Trigger device address under Flash Trigger device address under Flash 0 1 MICRO I External device Text Co...

Page 823: ...Selects the color color 256 colors monochrome 16 shades of text when flashing Click this button to display the Color Palette Select a color from the Color Palette Plate Color Selects the plate color c...

Page 824: ...s refer to Chapter 2 1 1 Available Data on page 2 1 When Device Address is selected these options specify the source word devices Click to display the Tag Editor For the device address configuration p...

Page 825: ...splayed data exceeds the allowable range Report Device Address Specifies the Report Device Address Click to display the Tag Editor For the device address configuration procedure refer to Chapter 2 5 1...

Page 826: ...ger Type is While ON Device Address is LM0 and While not satisfying the condition is Not display Numerical data While LM0 is 0 the condition is not satisfied and the Numerical Display does not display...

Page 827: ...ay when the condition is not satisfied While ON Enables the Numerical Display when the value of device address is 1 Example When While not satisfying the condition is Not update Numerical data While O...

Page 828: ...etic operation is performed is specified in the arithmetic formula Only one device address can be set for an arithmetic operation The device address is as specified for Display Device Address under th...

Page 829: ...ical sum OR of each bit of and Logical XOR exclusive OR Calculates the exclusive logical sum XOR of each bit of and Left shift Shifts each bit of to left by bit s Right shift Shifts each bit of to rig...

Page 830: ...at created group For details refer to Chapter 23 2 2 Adding and Editing Security Groups on page 23 19 Settings No Displays the security group numbers 1 to 15 Group Name Displays the name of the securi...

Page 831: ...ader 1 2 3 Display Numerical Display Group Name Administrator Operator Reader 1 2 3 Display No Numerical Display Permitted Permitted Permitted Group Name Administrator Operator Reader 1 2 3 Display No...

Page 832: ...to No Name or Type in the object list Description Used for entering comments about parts Maximum number is 80 characters Example When mousing over the Numerical Display on the editing screen When the...

Page 833: ...11 Calendar HG3G HG2G 5F HG5G V HG4G V HG3G V HG2G V HG2G 5T HG4G HG1G HG1P HG2J 7U MICRO I 12 07 13 45 MICRO I ON Time 10 00 OFF Time 11 00 External device 09 00 10 00 11 00 0 1 10 00 0 1 11 00 0 09...

Page 834: ...point on the edit screen where you wish to place the Calendar 3 Double click the placed Calendar and a Properties dialog box will be displayed 4 Change the settings on each tab as necessary The Trigge...

Page 835: ...fer to Chapter 2 5 1 Device Address Settings on page 2 70 Use Value of Device Address Specifies the source of elapsed time data to display It handles as a value whose data type is UBIN32 D This option...

Page 836: ...time display format from the following dd hh mm ss h mm ss hh mm ss hhh mm ss hhhh mm ss dd hh mm h mm hh mm hhh mm hhhh mm d day h hour m minute s second Separator Configures the symbol that separat...

Page 837: ...Enter the year 0 to 99 Month Enter the month 1 to 12 Day Enter the day 1 to 31 Day of the Week Select the day of the week Hour Enter the hour 0 to 23 Minute Enter the minute 0 to 59 Second Enter the...

Page 838: ...fter a screen configured with the Calendar is displayed if the time is in between ON Time and OFF Time 1 is written to the Report Device Address Value of device address retained after ON Time elapses...

Page 839: ...alette Flange Standard Uses the default graphic for WindO I NV4 Picture Uses an image file saved using Picture Manager For details about image file restrictions refer to Chapter 2 1 4 Available Image...

Page 840: ...of parts is defined relative to an origin at the top left corner of the screen X 0 to base screen horizontal size 1 Y 0 to base screen vertical size 1 12 07 13 45 0 0 X Y Screen Parts W H Sets width a...

Page 841: ...Central European Baltic Cyrillic is selected for Font Magnification 1 Can only be set when Western Japanese Simplified Chinese Traditional Chinese Hangul Central European Baltic Cyrillic is selected...

Page 842: ...the horizontal direction from the following Left Center Right For details refer to Appendix 5 Text Alignment on page A 7 Text Color Selects the color of displayed text color 256 colors monochrome 16...

Page 843: ...nd flange are also hidden and the part image is not displayed Trigger Type Selects the condition to enable the Calendar from the following Example When Trigger Type is While ON Device Address is LM0 a...

Page 844: ...umber is 80 characters Not show Calendar When this check box is cleared the part image is not displayed when the condition is not satisfied While ON Enables the Calendar when the value of device addre...

Page 845: ...ns tab is displayed in Advanced mode Place on the Top Layer Select this check box to place the parts on the top layer When drawings and parts overlap those place on the top layer are displayed in pref...

Page 846: ...eated group For details refer to Chapter 23 2 2 Adding and Editing Security Groups on page 23 19 Settings No Displays the security group numbers 1 to 15 Group Name Displays the name of the security gr...

Page 847: ...2 3 Display Calendar Group Name Administrator Operator Reader 1 2 3 Display No Numerical Display Permitted Permitted Permitted Group Name Administrator Operator Reader 1 2 3 Display No Permitted Perm...

Page 848: ...to No Name or Type in the object list Description Used for entering comments about parts Maximum number is 80 characters Example When mousing over the Calendar on the editing screen When there are mu...

Page 849: ...bar chart Display word device values in a peak chart Make the chart flash when the displayed data exceeds the maximum or minimum Chapter 11 Charts 1 Bar Chart HG3G HG2G 5F HG5G V HG4G V HG3G V HG2G V...

Page 850: ...en where you wish to place the Bar Chart 3 Double click the placed Bar Chart and a Properties dialog box will be displayed 4 Change the settings on each tab as necessary The Data Over tab Scale tab La...

Page 851: ...the Properties dialog box General Tab Part Name Enter a name for the part The maximum number is 20 characters Chart Type Selects the type of chart from the following items Horizontal Bar Vertical Bar...

Page 852: ...ces Click to display the Tag Editor For the device address configuration procedure refer to Chapter 2 5 1 Device Address Settings on page 2 70 If the data displayed in the chart is invalid 1 is writte...

Page 853: ...for the data to display in the chart Double clicking the cell displays the Tag Editor where you can edit the device address For the device address configuration procedure refer to Chapter 2 5 1 Device...

Page 854: ...shades Double clicking the cell displays the Color Palette where you can change the background color of the chart when normal Bg Over 1 Selects the background color of the chart when data over color 2...

Page 855: ...he Color Palette Select a color from the Color Palette Flange Standard Uses the default graphic for WindO I NV4 None The plate and the flange of the part are not displayed 100 50 0 Plate color Foregro...

Page 856: ...rt spacing 100 200 0 Scale not shown Show scale 10 dots 10 dots 10 dots X Y Sets the display position of parts using coordinates The X and Y coordinates of parts are defined relative to an origin at t...

Page 857: ...e value Minimum Maximum Select these check boxes to specify the minimum and or maximum The minimum and maximum that can be specified when Value is selected vary based on the data type selected with Da...

Page 858: ...Select this check box to make the chart flash when the displayed data exceeds the allowable range Report Select this check box to write 1 in the Report Device Address when the displayed data exceeds...

Page 859: ...Can only be set when Float32 F is selected for Data Type under the General tab Display Floating Point Select this check box to display a floating point along the scale Can only be set when Float32 F i...

Page 860: ...e Select a color from the Color Palette If the area for displaying the scale is small the scale will not be displayed properly Display Position Select from Scale and Data Over to specify the grid line...

Page 861: ...The characters that can be displayed depend on the font For details refer to Chapter 2 1 2 Available Text on page 2 6 Text ID Specifies the Text Manager ID No 1 to 32000 when text registered in the Te...

Page 862: ...isplay Chart data While LM0 is 0 the condition is not satisfied and the bar chart is not displayed While LM0 is 1 the condition is satisfied and the bar chart is displayed Trigger Type Selects the con...

Page 863: ...Setting Conditional Expressions on page 2 73 While ON Enables the bar chart when the value of device address is 1 Example When While not satisfying the condition is Not update Chart data While OFF En...

Page 864: ...um number is 80 characters While not satisfying the condition Selects operation of the Bar Chart when condition is not satisfied Not display Chart data The plate and flange are displayed but Bar Chart...

Page 865: ...tab is displayed in Advanced mode Place on the Top Layer Select this check box to display the parts on the top layer The parts will have precedence when other drawings and parts are overlapping with i...

Page 866: ...eated group For details refer to Chapter 23 2 2 Adding and Editing Security Groups on page 23 19 Settings No Displays the security group numbers 1 to 15 Group Name Displays the name of the security gr...

Page 867: ...perator Reader 1 2 3 Display Button Group Name Administrator Operator Reader 1 2 3 Display No Numerical Display Permitted Permitted Permitted Group Name Administrator Operator Reader 1 2 3 Display No...

Page 868: ...to No Name or Type in the object list Description Used for entering comments about parts Maximum number is 80 characters Example When mousing over the bar chart on the editing screen When there are mu...

Page 869: ...the cursor and the date and time at the cursor 2 Line Chart HG3G HG2G 5F HG5G V HG4G V HG3G V HG2G V HG2G 5T HG4G HG1G HG1P HG2J 7U External device MICRO I D100 60 80 70 70 90 D101 30 40 40 50 70 D10...

Page 870: ...then click Line Chart 2 Click a point on the edit screen where you wish to place the Line Chart 3 Double click the placed Line Chart and a Properties dialog box will be displayed 4 Change the settings...

Page 871: ...test data is sampled and the latest data is charted from the left edge If the sampled data exceeds the number of display points the entire chart is shifted to the left by the configured scroll size an...

Page 872: ...single line chart Updating and erasing the display is controlled by the lower 2 bits of the start address number value control status The value of the starting address number is automatically changes...

Page 873: ...the beginning when switching screens This option can only be configured when Log Trend Normal or Log Trend Pen Recorder is selected for Chart Type MICRO I MICRO I MICRO I 1234 0 20 40 60 80 100 20 0 2...

Page 874: ...Select a color from the Color Palette Flange Standard Uses the default graphic for WindO I NV4 None The plate and the flange of the part are not displayed 0 20 40 60 80 100 20 Plate color Foreground...

Page 875: ...rts are defined relative to an origin at the top left corner of the screen X 0 to base screen horizontal size 1 Y 0 to base screen vertical size 1 0 0 X Y 0 20 40 60 80 100 20 Screen Parts W H Sets wi...

Page 876: ...isplay the Tag Editor For the device address configuration procedure refer to Chapter 2 5 1 Device Address Settings on page 2 70 The maximum number of data that can be displayed is the number of dots...

Page 877: ...dress is selected for Data Type the scroll size can be specified in the word device Click to display the Tag Editor For the device address configuration procedure refer to Chapter 2 5 1 Device Address...

Page 878: ...pter 14 Save Data Log Data and Display in Line Chart or Data Log Display on page 14 23 Right Scroll Device Address Left Scroll Device Address The chart can be scrolled to the right or to the left when...

Page 879: ...rocedure refer to Chapter 2 5 1 Device Address Settings on page 2 70 For address number assignment refer to Specifying Date and Time with Values of device addresses on page 11 33 This option can only...

Page 880: ...ified date and time as the center when the value of device address changes from 0 to 1 Date and Time Specify the date and time of the data to display the center of the chart It handles as a value whos...

Page 881: ...source Date and time data the address number of Top Device Address LDR 100 2018 Year 1 LDR 101 10 Month 2 LDR 102 1 Day 3 LDR 103 12 Hour 4 LDR 104 1 Minute 5 LDR 105 30 Second Show Ticks Select this...

Page 882: ...check box is cleared The characters that can be displayed depend on the font For details refer to Chapter 2 1 2 Available Text on page 2 6 Text ID Specifies the Text Manager ID No 1 to 32000 when tex...

Page 883: ...n can only be configured when Log Trend Normal or Log Trend Pen Recorder is selected from Chart Type on the General tab 3 This option can only be configured when Device Address Display is selected fro...

Page 884: ...t is initially displayed when the display is updated and when it is erased For details refer to Chapter 4 Processing error on page 4 32 and Chapter 36 Processing error on page 36 3 An error occurs in...

Page 885: ...and reopened the list is displayed filled from the beginning Trigger Type Always visible Always display the graph While ON The graph is displayed when the value of device address is 1 Device Address S...

Page 886: ...re as follows Line Type Specifies the type of line You can also specify it using the value of device address Value Selects the type of line from the following Solid Dot Dash Long Dash Long Dash Dot Lo...

Page 887: ...ice Address Specifies the line color using the value of device address Click to display the Tag Editor For the device address configuration procedure refer to Chapter 2 5 1 Device Address Settings on...

Page 888: ...its for the fractional parts of numbers 1 to 8 from the number of digits specified for Digits Can only be set when the Display Floating Point check box is selected Font Selects the font used for displ...

Page 889: ...ay position Scale Grid lines are displayed according to the number of major scale divisions Data Over Grid lines are displayed at the positions of values specified for Maximum and Minimum under the Da...

Page 890: ...er check box is cleared The characters that can be displayed depend on the font For details refer to Chapter 2 1 2 Available Text on page 2 6 Text ID Specifies the Text Manager ID No 1 to 32000 when t...

Page 891: ...This option specifies the word device that is the cursor s display position Click to display the Tag Editor For the device address configuration procedure refer to Chapter 2 5 1 Device Address Setting...

Page 892: ...inute and second in consecutive address numbers starting with the specified device address If there is no data at the cursor position 0 is stored in the device address Example When storing the date an...

Page 893: ...he font For details refer to Chapter 2 1 2 Available Text on page 2 6 Style 2 Selects the character style as Regular or Bold This option can only be configured when Standard is selected for Font Size...

Page 894: ...te from the following YY MM DD MM DD YY DD MM YY MM DD DD MM This option can only be configured when Date or Date Time is selected for Display items Year Selects the display type for the year as Doubl...

Page 895: ...yed Example When Trigger Type is While ON and Device Address is LM0 While LM0 is 0 the condition is not satisfied and the line chart is not displayed While LM0 is 1 the condition is satisfied and the...

Page 896: ...comments about trigger conditions Maximum number is 80 characters While ON Enables the line chart when the value of device address is 1 While OFF Enables the line chart when the value of device addres...

Page 897: ...tab is displayed in Advanced mode Place on the Top Layer Select this check box to display the parts on the top layer The parts will have precedence when other drawings and parts are overlapping with...

Page 898: ...eated group For details refer to Chapter 23 2 2 Adding and Editing Security Groups on page 23 19 Settings No Displays the security group numbers 1 to 15 Group Name Displays the name of the security gr...

Page 899: ...perator Reader 1 2 3 Display Button Group Name Administrator Operator Reader 1 2 3 Display No Numerical Display Permitted Permitted Permitted Group Name Administrator Operator Reader 1 2 3 Display No...

Page 900: ...to No Name or Type in the object list Description Used for entering comments about parts Maximum number is 80 characters Example When mousing over the line chart on the editing screen When there are m...

Page 901: ...lative change in multiple values of device addresses in real time Display the proportion of the sum of multiple values of device addresses in a stacked bar chart or a pie chart 3 Pie Chart HG3G HG2G 5...

Page 902: ...Click a point on the edit screen where you wish to place the Pie Chart 3 Double click the placed Pie Chart and a Properties dialog box will be displayed 4 Change the settings on each tab as necessary...

Page 903: ...s the proportion of the sum of the data as a horizontal stacked bar chart Example When displaying the values for three device addresses Vertical Bar Shows the proportion of the sum of the data as a ve...

Page 904: ...or on page 4 32 and Chapter 36 Processing error on page 36 3 No Shows the numbers for the chart Ch1 to Ch10 For Horizontal Bar the numbers are listed in order from the left For Vertical Bar the number...

Page 905: ...I NV4 User s Manual 11 57 3 Pie Chart 11 Charts Remove Deletes the registered settings from the list Up Shifts the selected settings upward in the list Down Shifts the selected settings downward in th...

Page 906: ...or Selects the foreground and background colors of the flange of the standard graphic color 256 colors monochrome 16 shades Click Color to display the Color Palette Select a color from the Color Palet...

Page 907: ...dO I NV4 User s Manual 11 59 3 Pie Chart 11 Charts Size W H Sets width and height to define the size of parts W 5 to base screen horizontal size H 5 to base screen vertical size Width Height Screen Pa...

Page 908: ...s displayed in Advanced mode Place on the Top Layer Select this check box to display the parts on the top layer The parts will have precedence when other drawings and parts are overlapping with it For...

Page 909: ...at created group For details refer to Chapter 23 2 2 Adding and Editing Security Groups on page 23 19 Settings No Displays the security group numbers 1 to 15 Group Name Displays the name of the securi...

Page 910: ...1 2 3 Display Pie Chart Group Name Administrator Operator Reader 1 2 3 Display No Numerical Display Permitted Permitted Permitted Group Name Administrator Operator Reader 1 2 3 Display No Permitted P...

Page 911: ...lose to No Name or Type in the object list Description Used for entering comments about parts Maximum number is 80 characters Example When mousing over the pie chart on the editing screen When there a...

Page 912: ...meter displays the value of a word device as the movement of a needle Display the value of a word device in a meter 4 Meter HG3G HG2G 5F HG5G V HG4G V HG3G V HG2G V HG2G 5T HG4G HG1G HG1P HG2J 7U Exte...

Page 913: ...point on the edit screen where you wish to place the Meter 3 Double click the placed Meter and a Properties dialog box will be displayed 4 Change the settings on each tab as necessary The Range tab Sc...

Page 914: ...rties dialog box General Tab Part Name Enter a name for the part The maximum number is 20 characters Meter Type Select the type of meter from the following items 90 Degree Meter 180 Degree Meter 270 D...

Page 915: ...not move past the left edge when the data value is the minimum or lower The needle stops at the right edge when the data value is the maximum or higher When Device Address is selected for Data Type t...

Page 916: ...shades Click Color to display the Color Palette Select a color from the Color Palette Flange Standard Uses the default graphic for WindO I NV4 Picture Uses an image file saved using Picture Manager F...

Page 917: ...Y coordinates of parts are defined relative to an origin at the top left corner of the screen X 0 to base screen horizontal size 1 Y 0 to base screen vertical size 1 0 0 X Y Screen Parts W H Sets widt...

Page 918: ...aximum can be specified in the word device Click to display the Tag Editor For the device address configuration procedure refer to Chapter 2 5 1 Device Address Settings on page 2 70 If the data displa...

Page 919: ...e number of digits to be displayed 1 to 10 Can only be set when Float32 F is selected for Data Type under the General tab Display Floating Point Select this check box to display a floating point along...

Page 920: ...displayed in Advanced mode Place on the Top Layer Select this check box to display the parts on the top layer The parts will have precedence when other drawings and parts are overlapping with it For d...

Page 921: ...created group For details refer to Chapter 23 2 2 Adding and Editing Security Groups on page 23 19 Settings No Displays the security group numbers 1 to 15 Group Name Displays the name of the security...

Page 922: ...1 2 3 Display Meter Group Name Administrator Operator Reader 1 2 3 Display No Numerical Display Permitted Permitted Permitted Group Name Administrator Operator Reader 1 2 3 Display No Permitted Permi...

Page 923: ...lose to No Name or Type in the object list Description Used for entering comments about parts Maximum number is 80 characters Example When mousing over the meter on the editing screen When there are m...

Page 924: ...4 Meter 11 76 WindO I NV4 User s Manual...

Page 925: ...atisfied Not satisfied Not satisfied Satisfied Satisfied Satisfied Not satisfied Not satisfied Not satisfied Writes a 0 to the specified bit device when the trigger condition is satisfied 0 State of c...

Page 926: ...isfied Satisfied Satisfied Not satisfied Not satisfied Not satisfied Satisfied Satisfied Satisfied Not satisfied Not satisfied Not satisfied This function writes the value in the source bit device to...

Page 927: ...ation procedure for the Bit Write Command 1 On the Home tab in the Parts group click Commands and then click Bit Write Command 2 Click a point on the edit screen where you wish to place the Bit Write...

Page 928: ...trigger condition is no longer satisfied a 0 is written to the specified bit device 1 State of condition Data written 1 Action Write Write Condition Condition Condition Condition Satisfied Satisfied...

Page 929: ...versa Move This function writes the value in the source bit device to the value in the destination bit device when the trigger condition is satisfied State of condition Action Toggle Toggle Condition...

Page 930: ...when LM0 changes from 0 to 1 Trigger Type Selects the condition to execute the command from the following LM0 MICRO I 0 LM0 1 Not executed Executed Condition Not satisfied Condition Satisfied Rising e...

Page 931: ...Condition Specifies the conditional expression This option can only be configured when Satisfy the condition or While satisfying the condition is selected for Trigger Type Click to display the Trigge...

Page 932: ...No Name or Type in the object list Description Used for entering comments about parts The maximum number is 80 characters Example When mousing over the Bit Write Command on the editing screen When the...

Page 933: ...gger condition is satisfied 2 Word Write Command HG3G HG2G 5F HG5G V HG4G V HG3G V HG2G V HG2G 5T HG4G HG1G HG1P HG2J 7U MICRO I External device D1 0 100 D1 100 Write Destination word device 100 Value...

Page 934: ...ger satisfied State of condition Data written Write Action OFF Data Write ON Data Write OFF Data Write ON Data Condition Condition Condition Condition Satisfied Satisfied Satisfied Not satisfied Not s...

Page 935: ...tion procedure for the Word Write Command 1 On the Home tab in the Parts group click Commands and then click Word Write Command 2 Click a point on the edit screen where you wish to place the Word Writ...

Page 936: ...Data value to the specified word device when the trigger condition is no longer satisfied State of condition Data written Write Action Write Value Value Condition Condition Condition Condition Satisf...

Page 937: ...ndition Condition Condition Condition Satisfied Satisfied Satisfied Not satisfied Not satisfied Not satisfied Satisfied Satisfied Satisfied Not satisfied Not satisfied Not satisfied State of condition...

Page 938: ...he destination word device Click to display the Tag Editor For the device address configuration procedure refer to Chapter 2 5 1 Device Address Settings on page 2 70 Use Reference Device Address 1 Sel...

Page 939: ...ecuted when LM0 changes from 0 to 1 Trigger Type Selects the condition to execute the command from the following LM0 MICRO I 0 LM0 1 Not executed Executed Condition Not satisfied Condition Satisfied R...

Page 940: ...ition Specifies the conditional expression This option can only be configured when Satisfy the condition or While satisfying the condition is selected for Trigger Type Click to display the Trigger Con...

Page 941: ...ose to No Name or Type in the object list Description Used for entering comments about parts The maximum number is 80 characters Example When mousing over the Word Write Command on the editing screen...

Page 942: ...trigger condition is satisfied Switches to the System Mode when the trigger condition is satisfied Resets the current screen when the trigger condition is satisfied 3 Goto Screen Command HG3G HG2G 5F...

Page 943: ...ion procedure for the Goto Screen Command 1 On the Home tab in the Parts group click Commands and then click Goto Screen Command 2 Click a point on the edit screen where you wish to place the Goto Scr...

Page 944: ...Popup Screen For details refer to Chapter 5 4 Popup Screen on page 5 20 Open Device Monitor Screen Opens the Device Monitor Screen For details refer to Chapter 25 2 2 Device Monitor on page 25 21 Clos...

Page 945: ...t Click this button to display the Configure Processing Area of User Account Setting Screen dialog box Screen Number If Action Mode is set to Switch to Base Screen specify the Base Screen number to sw...

Page 946: ...d when LM0 changes from 0 to 1 Trigger Type Selects the condition to execute the command from the following LM0 MICRO I 0 LM0 1 Not executed Executed Condition Not satisfied Condition Satisfied Rising...

Page 947: ...70 Condition Specifies the conditional expression This option can only be configured when Satisfy the condition or While satisfying the condition is selected for Trigger Type Click to display the Trig...

Page 948: ...No Name or Type in the object list Description Used for entering comments about parts The maximum number is 80 characters Example When mousing over the Goto Screen Command on the editing screen When...

Page 949: ...F only 2 USB flash drive inserted in USB1 for HG2J 7U SD memory card for HG5G 4G 3G 2G V HG4G 3G and HG2G 5F USB flash drive for HG2G 5T and HG1G 1P 4 Print Command HG3G HG2G 5F HG5G V HG4G V HG3G V H...

Page 950: ...ion procedure for the Print Command 1 On the Home tab in the Parts group click Commands and then click Print Command 2 Click a point on the edit screen where you wish to place the Print Command 3 Doub...

Page 951: ...e screenshot before sending it to the printer The date and time format depends on the language selected in Language Language is available on the Project Details tab of the Project Settings dialog box...

Page 952: ...eled Print jobs after the current print job are canceled after the current page finishes printing The maximum number of screenshots that can be captured 1 to 999 can be set in HMI Special Data Registe...

Page 953: ...uted when LM0 changes from 0 to 1 Trigger Type Selects the condition to execute the command from the following LM0 MICRO I 0 LM0 1 Not executed Executed Condition Not satisfied Condition Satisfied Ris...

Page 954: ...ion Specifies the conditional expression This option can only be configured when Satisfy the condition or While satisfying the condition is selected for Trigger Type Click to display the Trigger Condi...

Page 955: ...ose to No Name or Type in the object list Description Used for entering comments about parts The maximum number is 80 characters Example When mousing over the Print Command on the editing screen When...

Page 956: ...G5G V HG4G V HG3G V HG2G V HG2G 5T HG4G HG1G HG1P HG2J 7U MICRO I Script A D 100 D 100 1 if D 100 50 D 100 0 Executes Script Start Condition Satisfied Satisfied Satisfied Complex processes such as con...

Page 957: ...figuration procedure for Script Commands 1 On the Home tab in the Parts group click Commands and then click Script Command 2 Click a point on the edit screen where you wish to place the Script Command...

Page 958: ...32000 of the script to operate The Script Manager will open when is clicked Select a script from the script list For details refer to Chapter 20 2 2 Script Manager on page 20 7 Script Name Displays th...

Page 959: ...command from the following LM0 MICRO I 0 LM0 1 Not executed Executed Condition Not satisfied Condition Satisfied Rising edge Command is executed when a value of device address changes from 0 to 1 Fall...

Page 960: ...e configured when Satisfy the condition or While satisfying the condition is selected for Trigger Type Click to display the Trigger Condition Settings dialog box For the conditional expression configu...

Page 961: ...ose to No Name or Type in the object list Description Used for entering comments about parts The maximum number is 80 characters Example When mousing over the Script Command on the editing screen When...

Page 962: ...1G 1P 6 Multi Command HG3G HG2G 5F HG5G V HG4G V HG3G V HG2G V HG2G 5T HG4G HG1G HG1P HG2J 7U Command Description Bit Write Writes a 0 or 1 to the specified bit device Word Write Writes a value to a w...

Page 963: ...nfiguration procedure for Multi Commands 1 On the Home tab in the Parts group click Commands and then click Multi Command 2 Click a point on the edit screen where you wish to place the Multi Command 3...

Page 964: ...Screen type commands are set for Action Mode Goto Screen commands are not executed from top to bottom as they appear in the Function List Rather they are executed at the end of the scan when the trig...

Page 965: ...49 Script Executes a script For details refer to Properties of Script for Multi Functions Dialog Box on page 12 56 Add Adds a command to the list A maximum of 32 commands may be added Click this butt...

Page 966: ...2 5 1 Advanced mode only Set Writes a 1 to the specified bit device when the trigger condition is satisfied Reset Writes a 0 to the specified bit device when the trigger condition is satisfied Set Res...

Page 967: ...stination word device when the trigger condition is satisfied Set ON OFF Data Writes a fixed value of ON Data to the specified word device when the trigger condition is satisfied Writes a fixed value...

Page 968: ...value of the specified device address This setting is enabled only if Action Mode is set to Move For details refer to Chapter 2 Indirect Read and Indirect Write Settings on page 2 5 Transfer 1 Specify...

Page 969: ...en Open File Screen for movie files 1 Opens the File Screen Close File Screen for movie files 1 Closes the File Screen Switch to System Mode Switches to the Top Page in the System Mode Reset current s...

Page 970: ...configuration procedure refer to Chapter 2 5 1 Device Address Settings on page 2 70 This setting is enabled only if Action Mode is set to Open Popup Screen or Close Popup Screen Coordinates X Y Speci...

Page 971: ...t to the printer The date and time format depends on the language selected in Language Language is available on the Project Details tab of the Project Settings dialog box The display formats are shown...

Page 972: ...that can be captured 1 to 999 can be set in HMI Special Data Register LSD65 Default 99 The methods to erase screenshot files saved on the external memory device are as follows To erase files during op...

Page 973: ...eypad for This setting is enabled only if Alt was selected using the Key Browser Displays settings applicable to the selected key Key Language Switches the display of the key that is displayed when Ke...

Page 974: ...le to be transferred is stored SD Memory Card 1 USB Flash Drive 2 USB1 3 or USB2 3 Location Specify the location of the ZNV Project File znv The maximum number is 247 characters Only alphanumeric char...

Page 975: ...2 3 Location Specify the location where the uploaded project will be saved The maximum number is 247 characters Only alphanumeric characters and symbols can be used Path delimiters and characters that...

Page 976: ...mbols can be used Path delimiters and characters that cannot be used vary based on the model Example Save a file to the SOUND folder under HGDATA01 folder in an external memory device HG2J 7U HGDATA01...

Page 977: ...Project Settings dialog box on the Communication Driver Network tab For details refer to Chapter 4 3 4 Communication Driver Network Tab on page 4 52 Interface Select the communication interface in whi...

Page 978: ...ecify External Device ID Specify the External Device ID 0 to 31 of the upload source PLC This is the External Device ID number set in the Project Settings dialog box on the Communication Driver Networ...

Page 979: ...n and while data is being saved to the external memory device recording cannot be executed with a Key Button Multi Button or Multi Command configured with the recording function Also during these situ...

Page 980: ...the script to operate Script Manager will open when is clicked Select a script from the script list For details refer to Chapter 20 2 2 Script Manager on page 20 7 Script Name Displays the name of th...

Page 981: ...uted when LM0 changes from 0 to 1 Trigger Type Selects the condition to execute the command from the following LM0 MICRO I 0 LM0 1 Not executed Executed Condition Not satisfied Condition Satisfied Ris...

Page 982: ...ion Specifies the conditional expression This option can only be configured when Satisfy the condition or While satisfying the condition is selected for Trigger Type Click to display the Trigger Condi...

Page 983: ...ose to No Name or Type in the object list Description Used for entering comments about parts The maximum number is 80 characters Example When mousing over the Multi Command on the editing screen When...

Page 984: ...Timer Relay LTC0 value HMI Timer Current Value LTD0 value 1999 1999 1998 999 1 1999 0 Condition Condition Condition Condition Not satisfied Not satisfied Not satisfied Satisfied Satisfied Satisfied S...

Page 985: ...s the configuration procedure for Timers 1 On the Home tab in the Parts group click Commands and then click Timer 2 Click a point on the edit screen where you wish to place the Timer 3 Double click th...

Page 986: ...and the enter the preset value The preset value is the time from when the timer starts its countdown until 1 is written to the HMI Timer Relay LTC Example When 0 is specified for Timer Address Number...

Page 987: ...e command from the following LM0 MICRO I 0 LM0 1 Not executed Executed Condition Not satisfied Condition Satisfied While ON Command is executed when a value of device address is 1 While OFF Command is...

Page 988: ...is selected as Trigger Type Click to display the Tag Editor For the device address configuration procedure refer to Chapter 2 5 1 Device Address Settings on page 2 70 Condition Specifies the condition...

Page 989: ...ose to No Name or Type in the object list Description Used for entering comments about parts The maximum number is 80 characters Example When mousing over the Timer on the editing screen When there ar...

Page 990: ...7 Timer 12 66 WindO I NV4 User s Manual...

Page 991: ...vice addresses and detect alarms Display an alarm screen when an alarm occurs Make a sound of the buzzer and screen flashing the screen when an alarm occurs Chapter 13 Alarm Log Function 1 Overview HG...

Page 992: ...G 2G V HG4G 3G and HG2G 5F USB flash drive for HG2G 5T and HG1G 1P Output to External memory device Alarm Log data CSV External Memory Device MICRO I USB flash drive SD memory card Output to printer P...

Page 993: ...t Alarm The first alarm that occurs in a state where no alarms have occurred Second and later An alarm that has occurred while another alarm is active Recovered Indicates that the alarm that occurred...

Page 994: ...h No Message Occurrence Time Recovery Time Confirmation Time 12 50 30 1 1 Voltage drop 12 01 2011 12 50 00 12 01 12 50 20 12 01 12 50 30 Channel No 1 2 Alarm 1 2 Abnormal temperature 12 01 2011 12 50...

Page 995: ...g box is selected 4 Message The message displayed when an alarm has occurred 5 Alarm state and time The alarm state occurred recovered confirmed and the time the alarm occurred was recovered from and...

Page 996: ...me that state on a single line each time an alarm occurs is recovered from or is confirmed The labels displayed in the label row are Time State Ch No Level and Message Can only output the Level when t...

Page 997: ...area the data is processed with either of the following methods Fixed If the saved data exceeds the Alarm Log data storage amount the new data is not saved Rotate If the saved data exceeds the Alarm L...

Page 998: ...he Alarm List Display Deleting Data The method to delete sampled data from the data storage area is as follows On the Online tab in WindO I NV4 click the arrow under Clear and click All or Alarm Log D...

Page 999: ...uter For details refer to 4 4 Saving the Data as a CSV File on page 13 38 Print data with the printer 2 Print Alarm Log data with the printer connected to the MICRO I For details refer to Chapter 32 P...

Page 1000: ...r channel 3 Set the number of blocks to manage in Number of Blocks 1 channel is used for 1 device address to monitor 1 block is 16 channels The number of blocks that can be set varies based on the Sou...

Page 1001: ...rms is in ascending order lowest to highest Default is set to 1 10 Under NO NC select the alarm detection condition If you select NO the alarm occurs when the monitored bit changes from 0 to 1 If you...

Page 1002: ...ute using saved data and detected alarms 4 1 Displaying Saved Data with the Alarm Log Display on page 13 31 4 2 Displaying Registered Messages with the Alarm List Display According to the Active Alarm...

Page 1003: ...Method Selects the data processing method when the number of active alarms exceeds the Alarm Log data storage amount set for the data storage area 3 Alarm Log Settings Dialog Box HG3G HG2G 5F HG5G V...

Page 1004: ...number of alarms that has occurred for channel 1 1 is saved in LKR101 and this pattern continues up to LKR131 where the number of alarms that has occurred for channel number 2 15 is saved Top Device A...

Page 1005: ...fies a word device to write the alarm state Number of blocks x 16 number of channels address numbers are used starting from the set device address For the device address configuration procedure refer...

Page 1006: ...word device Device Addresses are configured per block Bit Uses a bit device Device Addresses are configured per channel Word 0 to 128 Bit 0 to 8 1 block is composed of 16 channels 1 device address can...

Page 1007: ...Double clicking the cell switches between Store and No Store Setting to Store makes the buzzer sound when the value of bit for the channel changes to 1 Alarm function Shows whether or not the alarm f...

Page 1008: ...sequentially set from block number 1 channel number 1 starting with the specified device address For the Individual Settings dialog box if Source Device Address Type on the Channel tab is Word the 16...

Page 1009: ...ally recovered from based on the bit state when the monitored bit returns the normal state Example NO NC is NO Press CHECK Record con rma on me Record recovery me Record occurrence me Unlock Record co...

Page 1010: ...xternal Memory Device folder The default External Memory Device folder name is HGDATA01 For details refer to Chapter 31 1 4 File structure on page 31 3 and Chapter 31 1 6 Setting the External Memory D...

Page 1011: ...tion refer to Chapter 33 HMI Special Data Register LSD on page 33 8 HG2J 7U HG5G 4G 3G 2G V HG4G 3G HG2G 5F LSD42 HG2G 5T HG1G 1P LSD33 Trigger Device Address Specifies the bit device or the bit numbe...

Page 1012: ...ing points If the number of data files saved on the external memory device increases it may take some time for the data output processing or the output of the next data may not be processed normally W...

Page 1013: ...rcurrent Data to be output 3 minutes after operation starts Data to be output 3 minutes after that Data to be output after another 3 minutes 3 minute interval after operation starts Output to External...

Page 1014: ...o the end of the file name for the output data File Name Device Address Specifies the word device that is the source for the value to add to the file name For the device address configuration procedur...

Page 1015: ...of files saved on the external memory device already exceeds the limit when operation starts the number of files at that time is the limit From there the data is discarded in order from the oldest da...

Page 1016: ...y Add Device Address data to File Name YYMMDD The year month and day of the month set on Add Time Stamp hhmmss The hour minute and second of the time configured on Add Time Stamp Item Setting File Nam...

Page 1017: ...Device Address Settings on page 2 70 The data prints when the value of the Trigger Device Address changes from 0 to 1 Output to printer Printer 0 1 Trigger Device Address MICRO I Alarm Log data Ch No...

Page 1018: ...onds Paper Feed Direction Selects the paper feed direction as either Vertical or Horizontal Vertical Horizontal ABC ABC For A4 size paper up to 40 items of Alarm Log data are printed on a single sheet...

Page 1019: ...of the buzzer and screen flashing to stop 1 The first alarm that has occurred in a state where no alarms are active All Alarms The buzzer is triggered and the screen flashing each time an alarm occur...

Page 1020: ...and Screen flashing check boxes is satisfied To stop the sound of the buzzer set System Area 1 address number 1 bit 6 to 0 To stop the screen flashing set System Area 1 address number 1 bit 1 to 4 to...

Page 1021: ...log box is displayed 2 Select the type of device address to monitor under Source Device Address Type on the Channel tab and specify Number of Blocks 3 Select the channel number to register and click E...

Page 1022: ...the Parts group click Data Displays and then click Alarm Log Display 9 Click a point on the edit screen where you wish to place the Alarm Log Display 10 Double click the placed Alarm Log Display and a...

Page 1023: ...the System Setup group click Alarm Log The Alarm Log Settings dialog box is displayed 2 Select the type of device address to monitor under Source Device Address Type on the Channel tab and specify Num...

Page 1024: ...rm function and configure Level NO NC and Lock Unlock 6 Select the Text ID check box and click Text Manager opens 7 Double click the Text and enter the message 8 Click OK You are returned to the Indiv...

Page 1025: ...uble click the placed Alarm List Display and a Properties dialog box will be displayed 15 On the General tab under Message Settings select Use Alarm Log Settings 16 Configure the other settings and th...

Page 1026: ...Select the type of device address to monitor under Source Device Address Type on the Channel tab and specify Number of Blocks 3 Select the channel number to register a message to and click Edit The In...

Page 1027: ...er when Alarm occurs check box to make a sound of the buzzer when an alarm has occurred 8 Select the Screen flashing when Alarm occurs check box to have the screen flashing when an alarm has occurred...

Page 1028: ...User s Manual Data Structure and Output Example The data structure for files output with batch output and real time output is different Batch Batch output shows the recovery and confirmation time for...

Page 1029: ...te Ch No Level Message 43 bytes 08 11 2011 14 46 12 Occurred 1 0 Level 8 Voltage drop 65 bytes 08 11 2011 14 46 13 Recovered 1 0 Level 8 Voltage drop 66 bytes 08 11 2011 14 46 16 Confirmed 1 0 Level 8...

Page 1030: ...4 Using Data and Detected Alarms 13 40 WindO I NV4 User s Manual...

Page 1031: ...n can perform the following functions Sample values of device addresses at a fixed interval Sample values of device addresses when a value of device address changes Output Data Log data to the externa...

Page 1032: ...I External device Internal device 124 125 126 Data Log data Sampling Time Data001 01 01 2011 12 00 30 120 01 01 2011 12 01 30 121 01 01 2011 12 02 30 122 01 01 2011 12 03 30 123 01 01 2011 12 04 30 1...

Page 1033: ...a is deleted in order to make room for the newest data MICRO I External device 12 05 00 12 10 00 12 15 00 D100 D101 D102 20 80 2 10 70 3 30 90 1 I O R C I M e h t n o d e r o t s a t a D Values of Dev...

Page 1034: ...Data Storage Area switches from 0 to 1 the fourth time the MICRO I stores the values for device addresses D100 to D102 Since the data storage amount in the data storage area is set to 3 the oldest da...

Page 1035: ...nd on the Sampling Method setting For details refer to Sampling Method on page 14 14 4 Sampling time label When the sampled data is output as a CSV file this label is displayed in the label row for th...

Page 1036: ...delete sampled data from the data storage area is as follows On the Online tab in WindO I NV4 click the arrow under Clear and click All or Data Log Data For details refer to Chapter 24 4 Clear on pag...

Page 1037: ...efer to 4 2 Displaying Data on the Data Log Display on page 14 35 Display the data with the Numerical Input or the Numerical Display Copy the data to an internal device and display it with the Numeric...

Page 1038: ...read When the condition of writing to the data storage area is satisfied the values that were read at that point in time are written to the data storage area While satisfying the condition of writing...

Page 1039: ...lue of source device address each time the monitored bit device or the bit number of the word device changes from 0 to 1 If Event Bit is selected specify the device address to monitor as the condition...

Page 1040: ...he sampling time column when the data is output as CSV To use text registered in Text Manager select the Use Text Manager check box and specify the ID number of the text to use as the label Click to o...

Page 1041: ...e data is output as CSV When String S is selected use Words to specify the number of words of device addresses to read starting from the set device address and proceed to step 15 The set number of wor...

Page 1042: ...are returned to the Data Log Settings dialog box 17 Repeat steps 3 through 16 to register Data Log settings for all of the channel numbers to use 18 Click OK The Data Log Settings dialog box closes Th...

Page 1043: ...settings For details refer to 3 2 Individual Settings Dialog Box on page 14 15 This option can only be set when Enable is selected in Log Function Condition of Writing Shows the condition for writing...

Page 1044: ...ouble clicking the cell displays the Individual Settings dialog box where you can edit the settings For details refer to 3 2 Individual Settings Dialog Box on page 14 15 Real Time Shows whether or not...

Page 1045: ...channel number selected in Settings in the Data Log Settings dialog box General Tab Sets the channel name and device address values to write to the data storage area Log function Selects whether or n...

Page 1046: ...ess to monitor as the condition for Writing data For the device address configuration procedure refer to Chapter 2 5 1 Device Address Settings on page 2 70 This option can only be set when Event Bit o...

Page 1047: ...rs the Line Chart cannot be displayed If differing channels of data were displayed in the same chart the chart can no longer be displayed if the Data Log data is erased by channel units Status Device...

Page 1048: ...al Memory Device folder The default External Memory Device folder name is HGDATA01 For details refer to Chapter 31 1 4 File structure on page 31 3 and Chapter 31 1 6 Setting the External Memory Device...

Page 1049: ...Specifies the bit device or the bit number of the word device to serve as condition for batch output For the device address configuration procedure refer to Chapter 2 5 1 Device Address Settings on p...

Page 1050: ...e number of files to be output When the Set limit on files check box is selected note the following points If the number of data files saved on the external memory device increases it may take some ti...

Page 1051: ...ata Sampling Time Data001 Data002 Data003 01 01 2011 12 00 30 20 120 201 01 01 2011 12 01 30 21 121 204 01 01 2011 12 02 30 22 122 206 01 01 2011 12 03 30 23 123 206 01 01 2011 12 04 30 24 124 210 01...

Page 1052: ...to File Name Select this check box to add the bottom three digits of the value of the device address configured by File Name Device Address to the end of the file name for the output data File Name De...

Page 1053: ...s saved to the external memory device the blinking period may slow down when data output processing occurs The following single byte characters cannot be used in the file name configured by File Name...

Page 1054: ...n the external memory device are as follows To erase files during operation using parts on the External Memory Device tab on the Project Settings dialog box select the Remove Files check box and the A...

Page 1055: ...nfigured by Add Device Address data to File Name YYMMDD The year month and day of the month set on Add Time Stamp hhmmss The hour minute and second of the time configured on Add Time Stamp Item Settin...

Page 1056: ...outputting data as CSV Output Data Output Data is used to configure the details of the data to sample for each data number in the selected channel Label Text ID Specifies the Text Manager ID number 1...

Page 1057: ...f the Use Text Manager check box is selected the text of the specified text ID is displayed Double clicking the cell displays Text Manager where you can edit the text Top Device Address Shows the star...

Page 1058: ...label when data is output as CSV The maximum number is 40 characters This is displayed only when the Use Text Manager check box is cleared When Number of Data is 2 or higher Data Number is automatica...

Page 1059: ...1 to 10 Hexadecimal display UBIN16 W 1 to 4 UBIN32 D 1 to 8 Display Floating Point Select this check box to display the decimal point When the Display Floating Point check box is selected and UBIN16 W...

Page 1060: ...O I copy this data to the specified internal device Copy Data Log Data Select this check box to copy data to a device address Destination Device Address Specifies the destination device address for co...

Page 1061: ...e Address Settings on page 2 70 Data log data Sampling Time Value 2 Oldest Data read starting point 12 18 2011 17 44 10 20 12 18 2011 18 34 10 21 3 Specify by Value of Device Address read starting poi...

Page 1062: ...y the source device address You can only specify an internal device For the device address configuration procedure refer to Chapter 2 5 1 Device Address Settings on page 2 70 When the Sampling Time ch...

Page 1063: ...he Parts group click Charts and then click Line Chart 2 Click a point on the edit screen where you wish to place the Line Chart 3 Double click the placed Line Chart and a Properties dialog box will be...

Page 1064: ...e data number can be checked on the Data Log Settings dialog box When While ON is selected as Trigger Type displays the graph when the value of device address is 1 Specifies the bit device or the bit...

Page 1065: ...then click Data Log Display 2 Click a point on the edit screen where you wish to place the Data Log Display 3 Double click the placed Data Log Display and a Properties dialog box will be displayed 4...

Page 1066: ...s Data Read Start Position and Copy Order of Data to the Destination Device Address The data to copy and the order differs according to the Starting Point and the Stored Order for Data settings Exampl...

Page 1067: ...red device address LDR10 LDR11 LDR12 24 Copy from oldest data 26 12 19 2011 19 24 43 22 28 12 19 2011 20 01 54 24 Newest data read starting point 12 19 2011 21 39 21 26 12 20 2011 05 57 06 28 Amount o...

Page 1068: ...ng Time Value Destination Device Address Value 12 18 2011 17 44 10 87654321 Hex Configured device address LDR10 3344 Copy from newest data LDR11 LDR12 1122 7788 12 19 2011 19 24 43 12345678 Hex LDR13...

Page 1069: ...ored Order of Data From Oldest to Newest Target Data Sampling Time Value of Device Address Data No Start No 1 End No 3 When writing with the following settings Device range error is displayed Starting...

Page 1070: ...s that were read at that point in time are written to the data storage area While satisfying the condition of writing to data storage area The values of the device addresses set for the data of each c...

Page 1071: ...9 Select the data that is the start point for copying data in Starting Point Newest Data Set the starting point to read as the newest data Oldest Data Set the starting point to read as the oldest data...

Page 1072: ...e data to copy with Start Number If you select Value specify the data number 1 to 128 If you select Device Address specify the source device address You can only specify an internal device Click to di...

Page 1073: ...re you wish to place the Numerical Display 21 Double click the placed Numerical Display and a Properties dialog box will be displayed 22 Select the display type for the copied data with Display Type o...

Page 1074: ...ree Numerical Displays with Display Device Address specified as LDR10 LDR11 LDR12 Click to display the Tag Editor For the device address configuration procedure refer to Chapter 2 5 1 Device Address S...

Page 1075: ...les output with batch output and real time output is the same Bold items are replaced by the Data Log settings the sampled data the running project name and WindO I NV4 version number 1 USB flash driv...

Page 1076: ...s 3 Stored values LDR0 0x312C LDR1 0x3334 LDR2 0x0000 Output value 1 34 Stored values LDR0 0x310D LDR1 0x3334 LDR2 0x0000 Output value 1 CR 34 Stored values LDR0 0x3122 LDR1 0x3334 LDR2 0x0000 Output...

Page 1077: ...ning on the MICRO I power Record switching the base screen Record changing the user Record changing the operation mode Chapter 15 Operation Log Function 1 Overview HG3G HG2G 5F HG5G V HG4G V HG3G V HG...

Page 1078: ...vice 1 1 USB flash drive inserted in USB1 for HG2J 7U SD memory card for HG5G 4G 3G 2G V HG4G 3G and HG2G 5F USB flash drive for HG2G 5T and HG1G 1P MICRO I 130 12 04 Press touch switch MICRO I 100 10...

Page 1079: ...onitor on the WindO I NV4 Online tab Switched to Offline Mode from Monitor Mode by clicking Go Offline on the WindO I NV4 Online tab Switched to Monitor Mode from Offline Mode by clicking Go Online on...

Page 1080: ...h mm ss Western Simplified Chinese Traditional Chinese Hangul Central European Baltic Cyrillic 5 User Name The user name when the event occurred The user name is only recorded when the Use Security fu...

Page 1081: ...ess by pressing the touch switch This value is handled as UBIN16 W For details refer to Chapter 2 1 1 Available Data on page 2 1 The value written to the device address is recorded as UBIN16 W regardl...

Page 1082: ...e2 Change Users User2 12 01 2011 12 03 06 User2 Base2 Change Operation Modes System Mode 12 01 2011 12 04 11 User2 Base2 Press buttons BitSwitch 12 01 2011 12 04 11 User2 Base2 Write Data to any Devic...

Page 1083: ...Base1 Power ON 12 01 2011 12 01 23 User1 Base1 Switch to Base Screen Base2 12 01 2011 12 02 45 User1 Base2 Change Users User2 12 01 2011 12 03 06 User2 Base2 Change Operation Modes System Mode 12 01...

Page 1084: ...items are recorded when the MICRO I power is turned on Time Screen Number Event Name Switch to Base Screen The following items are recorded when the base screen is switched Time User Name Screen Numb...

Page 1085: ...for Operation Log and click OK The Data Storage Area Management dialog box closes 5 Select the condition to record events in Trigger condition Always Always records events Device Address Records event...

Page 1086: ...screen is switched Time user name screen number event name changed to Change Users The following items are recorded when the user is changed Time user name screen number event name changed to Change...

Page 1087: ...that is the basis for reporting Report Device Address Specifies the destination bit device or the bit number of the destination word device For the device address configuration procedure refer to Cha...

Page 1088: ...en using text registered in Text Manager as the label This option is only enabled if you select the Use Text Manager check box Sampling Time The label for the column to display the time the event occu...

Page 1089: ...ext Manager check box is cleared Text ID Double click the cell to specify the Text Manager ID number 1 to 32000 when using text registered in Text Manager as the event name This option is only enabled...

Page 1090: ...e External Memory Device folder The default External Memory Device folder name is HGDATA01 For details refer to Chapter 31 1 4 File structure on page 31 3 and Chapter 31 1 6 Setting the External Memor...

Page 1091: ...rs For details about the error information refer to Chapter 33 HMI Special Data Register LSD on page 33 8 HG2J 7U HG5G 4G 3G 2G V HG4G 3G HG2G 5F LSD42 HG2G 5T HG1G 1P LSD33 Trigger Device Address Spe...

Page 1092: ...on the external memory device increases it may take some time for the data output processing or the output of the next data may not be processed normally When displaying pictures saved on the external...

Page 1093: ...11 12 00 10 Base1 Power ON 12 01 2011 12 01 23 User1 Base1 Switch to Base Screen Base2 12 01 2011 12 02 45 User1 Base2 Change Users User2 12 01 2011 12 03 06 User2 Base2 Change Operation Modes System...

Page 1094: ...onfigured by File Name Device Address to the end of the file name for the output data File Name Device Address Specifies the word device that is the source for the value to add to the file name For th...

Page 1095: ...he external memory device already exceeds the limit when operation starts the number of files at that time is the limit From there the data is discarded in order from the oldest data and replaced with...

Page 1096: ...by Add Device Address data to File Name YYMMDD The year month and day of the month set on Add Time Stamp hhmmss The hour minute and second of the time configured on Add Time Stamp Item Setting File N...

Page 1097: ...the same Bold items are replaced by the Operation Log settings the recorded data the running project name and WindO I NV4 version number 1 USB flash drive inserted in USB1 for HG2J 7U SD memory card...

Page 1098: ...4 Using the Data 15 22 WindO I NV4 User s Manual...

Page 1099: ...ata Chapter 13 Alarm Log Function on page 13 1 Data Log data Chapter 14 Data Log Function on page 14 1 Operation Log data Chapter 15 Operation Log Function on page 15 1 Chapter 16 Data Storage Area 1...

Page 1100: ...nd maximum amount of data storage and the minimum and maximum number of addresses that can be configured for the data storage area is as follows Alarm Log data Operation Log data Data Log data HMI Kee...

Page 1101: ...in Number of Stored Data for Operation Log HG5G 4G 3G 2G V HG4G 3G HG2G 5F 0 to 8330 HG2J 7U HG2G 5T HG1G 1P 0 to 3945 4 Specify the amount of Data Log data per device address to save in the data stor...

Page 1102: ...F 0 to 8330 HG2J 7U HG2G 5T HG1G 1P 0 to 3945 Number of Stored Data for Data Log per Device Address Specifies the amount of Data Log data per device address to save in the data storage area HG5G 4G 3G...

Page 1103: ...warning lights and count the operation time Report the replacement time for lighting and warning lights by the counted operation time Monitor device addresses connected to buttons and relays and count...

Page 1104: ...value of the monitored device address changes from 0 to 1 1 is added to the value of the device address operation count device address configured in Measure Operation Count The counted operation coun...

Page 1105: ...ress when the operation time and operation count reach the threshold Example When the value of Operation Time Device Address LKR0 reaches the threshold set for level 1 through level 3 1 is written to...

Page 1106: ...lay in Settings with Display Options Select Operation Time Operation Count The Operation Time and Operation Count settings are displayed in Settings 4 Select the number to register the Preventive Main...

Page 1107: ...count leave the Measure Operation Count check box cleared and proceed to step 13 11 Specify the destination device address for the counted operation count You can only specify an HMI Keep Register LKR...

Page 1108: ...s the number of the preventive maintenance settings to manage Double clicking the cell displays the Individual Settings dialog box For details refer to 3 2 Individual Settings Dialog Box on page 17 8...

Page 1109: ...n Count is selected as Display Options Operation Count Device Address Shows the destination device address for the counted operation count You can only specify an HMI Keep Register LKR Double clicking...

Page 1110: ...t of devices configured by Number of Items in the Preventive Maintenance Settings dialog box Monitor Device Address Specifies the bit device or the bit number of the word device to count the operation...

Page 1111: ...t device or the bit number of the word device for reporting when the operation time reaches or exceeds the level 2 threshold Click to display the Tag Editor For the device address configuration proced...

Page 1112: ...eaches or exceeds the level 1 threshold Click to display the Tag Editor For the device address configuration procedure refer to Chapter 2 5 1 Device Address Settings on page 2 70 Threshold Specifies t...

Page 1113: ...vice addresses to monitor in Number of Items 3 Select the item to display in Settings with Display Options Select Operation Count Operation count settings are displayed in Settings 4 Select the number...

Page 1114: ...counted operation count 8 Select the data type for the value of Measure Operation Count device address with Data Type 9 On the Home tab in the Parts group click Data Displays and then click Numerical...

Page 1115: ...box 14 Specify Digits for the value to display The digits that can be set varies based on the display type or data type 15 Under Display Method in Display Device Address specify the destination devic...

Page 1116: ...monitor in Number of Items 3 Select the number to register the Preventive Maintenance settings to in Settings then click Edit The Individual Settings dialog box is displayed 4 Specify the bit device...

Page 1117: ...hold as a value of device address Click to display the Tag Editor For the device address configuration procedure refer to Chapter 2 5 1 Device Address Settings on page 2 70 10 Configure Report Device...

Page 1118: ...eport Device Address to and click Edit The Individual Settings dialog box is displayed 16 Specify the level 1 Report Device Address in Source and select Store under Data Set Source to the level 1 Repo...

Page 1119: ...arm Log Settings dialog box switch the alarm function for all the unused channel numbers to Disable Select all the unused channels with the key click or the key click and click Edit The Individual Set...

Page 1120: ...ions tab in the Alarm Log Settings dialog box 20 Select the Trigger Buzzer when Alarm occurs check box 21 Click OK The Alarm Log Settings dialog box closes This concludes the configuration to notify w...

Page 1121: ...aved on the external memory device 1 to device addresses when a value of device address changes from 0 to 1 Batch read values of device addresses and save them to the external memory device 1 as a rec...

Page 1122: ...by the Recipe function is based on the top device address and the amount of data selected Example The top device address is D100 and the amount of data is 10 Device Address Value D100 1111 D101 2222 D...

Page 1123: ...D100 D101 D102 D103 D104 600 700 800 900 1000 100 200 300 400 500 106 107 108 109 110 101 102 103 104 105 5 Data 4 Top Device Address 1 Number of blocks 2 Channel 0 to 15 3 Amount of data Recipe setti...

Page 1124: ...pe in Number of Blocks The operation using the data for the recipe is configured in blocks 0 to 64 1 channel is used for 1 item of data for the recipe 1 block is 16 channels The maximum number of bloc...

Page 1125: ...e for the values to write with Data Type To read values of device addresses and save them as a recipe file specify the type of data for the read values 8 With Number of Data specify the number of dest...

Page 1126: ...ddress that can be configured varies based on Data Type and Display Type configured on the Channel tab When Read only is selected under Trigger Setting on the Block tab entering values of device addre...

Page 1127: ...roceed to step 17 16 Specify the device address that triggers batch reading values of device addresses and saving them to the external memory device as a recipe file in Read Trigger This option is set...

Page 1128: ...tings Dialog Box on page 18 10 Access to Shows the save destination for the data for the recipe Double clicking the cell switches between Internal Memory and External Memory Device Trigger Setting Sho...

Page 1129: ...sses for values of device addresses Double clicking the cell displays the Tag Editor For the device address configuration procedure refer to Chapter 2 5 1 Device Address Settings on page 2 70 This opt...

Page 1130: ...me on the external memory device 1 USB flash drive inserted in USB1 for HG2J 7U SD memory card for HG5G 4G 3G 2G V HG4G 3G and HG2G 5F USB flash drive for HG2G 5T and HG1G 1P External Memory Device 1...

Page 1131: ...sses to the external memory device as a recipe file This option can only be configured when External Memory Device is selected under Access to Write only Writes recipe values to device addresses If Fl...

Page 1132: ...pe values to write and values of device addresses that are read For details refer to Chapter 2 1 1 Available Data on page 2 1 Number of Data Specifies the number of source or destination device addres...

Page 1133: ...click Save to save the recipe file for the selected channel The saved recipe file can be edited using Notepad commercially available text editors and spreadsheet software Block Number Shows the block...

Page 1134: ...NV4 1 On the Configuration tab in the System Setup group click Recipe The Recipe Settings dialog box is displayed 2 Select the channel number to export its recipe data in Settings then click Edit The...

Page 1135: ...specified on the Block tab in the Individual Settings dialog box is entered in File name 5 Open the exported recipe data file Use Notepad a commercially available text editor or spreadsheet software...

Page 1136: ...ipes 18 16 WindO I NV4 User s Manual 8 Specify the file and click Open The recipe data is imported 9 Click OK The Individual Settings dialog box closes 10 Click OK The Recipe Settings dialog box close...

Page 1137: ...Creating Recipe Files in the Recipe Settings Dialog Box 1 Insert an external memory device in the computer Insert an external memory device 1 into the USB port or memory card slot of your computer or...

Page 1138: ...l Memory Device Folder Specifies the folder to save the created recipe file Click to display the Project Settings dialog box You can specify the External Memory Device folder used as the save destinat...

Page 1139: ...ab in the Project group click the Download icon The Download dialog box is displayed If the project data was changed a confirmation message to save the project data is displayed Click OK to save the p...

Page 1140: ...h a Text Editor You can edit recipe files using Notepad commercially available text editors or spreadsheet software 1 Write the data for the amount of data in value of device address comma new line or...

Page 1141: ...You can read and display the data saved from the MICRO I to the external memory device 1 as a recipe file on a computer External Memory Device Book1 Recipe File 100 150 200 You can upload recipe files...

Page 1142: ...oup click Clear and then click Stored Data in External Memory Device to display the Clear Data dialog box Select the Recipe Files check box and click OK To delete files on the HG5G 4G 3G 2G V HG4G 3G...

Page 1143: ...ed when displaying parts and screens The text can be managed collectively including editing the registered text and adding or deleting text Text groups can perform the following functions Switch the d...

Page 1144: ...Message Alarm Log Display Message Title Data Log Display Label Numerical Display Unit Charts Bar Chart X axis and Y axis scale labels Line Chart X axis and Y axis scale labels Alarm Log Messages disp...

Page 1145: ...the Configuration tab in the Manager group click Text Manager Text Manager is displayed 2 In Number of Text Groups specify the number of text groups to create 1 to 32 The configured number of text gro...

Page 1146: ...tern Japanese Simplified Chinese Traditional Chinese Hangul Central European Baltic Cyrillic Windows 9 With Text Color select the color of the text to register color 256 colors monochrome 16 shades Cl...

Page 1147: ...r is 3750 characters The characters that can be entered vary based on the font selected For details refer to Chapter 2 1 2 Available Text on page 2 6 11 Repeat steps 8 through 10 to create the necessa...

Page 1148: ...k Export The Export dialog box is displayed 4 Enter the location to Location and then select the file format txt or csv as the Save as type The file name becomes TextGroup is the same number as the gr...

Page 1149: ...r the project being edited 1 On the Configuration tab in the Manager group click Text Manager Text Manager is displayed 2 Select the Text of the Text Group to import 3 Click Import The Open dialog box...

Page 1150: ...xt list with the text of the displayed text ID and then to display confirmation to overwrite the next text ID Click Yes To All to overwrite all the text in the text list without displaying the Import...

Page 1151: ...and Text Registrations on page 19 3 specify Number of Text Groups as 3 and under Text Group Name enter English for Group 1 Chinese for Group 2 and Japanese for Group 3 Set Change Text Group by Device...

Page 1152: ...nd then select the Use Text Manager check box 6 Specify 1 for the Text ID under OFF 7 Configure the settings on each tab as necessary and then click OK The Properties of Bit Button dialog box closes 8...

Page 1153: ...d contents to that cell Delete Unused Texts Deletes the text with Text ID numbers that are registered in the Text Manager but are not used in the project 3 Text Manager HG3G HG2G 5F HG5G V HG4G V HG3G...

Page 1154: ...lick this button to display the Open dialog box For details refer to Importing Text from a Text List on page 19 7 Export Saves the text for the text group being edited as a Unicode text file or as a C...

Page 1155: ...character spacing 0 to 100 and the line spacing 0 to 100 To change the settings other than the character spacing and line spacing click Change to display the Font Settings dialog box For details refe...

Page 1156: ...default Text Group Name Enters the names of the text groups The maximum number for the Text Group Name is 20 characters Use this Text Group as Default Select this check box to setup the group to use...

Page 1157: ...100 LM101 By using the Script Editor conditional expressions operators and functions can be inserted by selecting them from a list and an error in the script can be checked as well The script can also...

Page 1158: ...and output delay of the expansion module can be kept to a minimum by this script Only one cyclic script can be set to a project For details refer to Chapter 30 4 Cyclic Script on page 30 29 Trigger c...

Page 1159: ...ript Editor on page 20 12 Data Types There are 7 types of data that can be processed by the script function For details about the data types refer to Chapter 2 1 1 Available Data on page 2 1 Types of...

Page 1160: ...r to Chapter 4 System Area on page 4 30 Beginning device address 1 2 3 4 5 6 7 System Area 1 System Area 2 System Area 3 System Area 4 8 9 0 1 2 3 4 5 6 7 8 9 10 11 12 13 14 15 1st word 2nd word 11th...

Page 1161: ...red script can be used in a Multi Button Script Command Multi Command Global Script and Cyclic Script 1 On the Configuration tab in the Manager group click Script Manager Script Manager opens 2 Click...

Page 1162: ...contained in a script select Float32 F for the Data Type of the script If there are only integer values from 0 to 65 535 select UBIN16 W To create a script using the samples provided by WindO I NV4 u...

Page 1163: ...roject or parts it cannot be deleted Reduce Deletes the scripts that are registered in the script list but are not used in the project Import Imports a saved script file with Export Click this button...

Page 1164: ...ed script as a file 1 On the Configuration tab in the Manager group click Script Manager Script Manager opens 2 Select the script in Script List and then click Export The Browse For Folder dialog box...

Page 1165: ...file extension If the number of the script ID is less than 5 digits 0 is written in the rest of the digits It is omitted if the script name is not configured Example 1 In Script List on the Script Man...

Page 1166: ...a script ID already registered on the Script Manager an overwrite confirmation message is displayed Click Yes to overwrite the script displayed in the confirmation message Click Yes To All to overwri...

Page 1167: ...WindO I NV4 User s Manual 20 11 2 Editing and Management of the Script 20 Script 4 Click OK The imported script is displayed on the Script Manager This concludes importing script...

Page 1168: ...data type refer to 1 3 Data Type of the Script on page 20 3 Script Enter the script Single script limitation is 240 characters per line with up to 1024 lines Error Check The script being edited is ch...

Page 1169: ...cking on the Save button the script being edited is saved in text format txt A saved script can be inserted in the script using the Import button Options The Options dialog box is displayed The fonts...

Page 1170: ...he Script text box it will only search and replace within the selected range The size of the script edit box can be changed by dragging the right bottom corner of the Script Editor By hiding the Funct...

Page 1171: ...d or selected Size The font size dots for the text displayed in the Script is entered or selected Sample Displays a sample of the text with the Font and Size as specified in the Script text box Color...

Page 1172: ...onfiguration tab in the System Setup group click Global Script The Global Script Settings dialog box is displayed 2 Under Settings select the script ID to configure and then click Edit The Global Scri...

Page 1173: ...ce Address Click to display the Tag Editor For the device address configuration procedure refer to Chapter 2 5 1 Device Address Settings on page 2 70 Falling edge Script is executed when trigger devic...

Page 1174: ...e list Down Shifts the selected Global Script settings down the list Delete Deletes the registered settings from the list Order Displays the number 1 to 16 for the order to execute the Global Script S...

Page 1175: ...Script Manager is displayed when the button is clicked The script can be selected from the script list of the Script Manager For details refer to 2 2 Script Manager on page 20 7 Script Name Displays...

Page 1176: ...Falling edge is selected in Trigger Type Period sec Specify the scan frequency in seconds 1 to 3 600 This is enabled only when Fixed Period is selected in Trigger Type Rising edge Script is executed w...

Page 1177: ...s executed if the conditional expression is satisfied Execution line 2 is executed if it is not satisfied if else if else Execution line 1 is executed if the conditional expression 1 is satisfied Cond...

Page 1178: ...will be as follows while the conditional expression 1 is satisfied Execution line 2 is continuously executed while the conditional expression 2 is not satisfied Once the conditional expression is sat...

Page 1179: ...roduct AND of and Calculates the logical sum OR of and Reverses the logic of Expr 1 Expr 2 Expr 1 Expr 2 Expr 1 Expr 2 Expr 1 Expr 2 Expr Expr Operator Format Description Adds and Subtracts from Multi...

Page 1180: ...ument This function can only be configured when the Float32 F is specified as the Data Type Common logarithm Base 10 LOG10 Common logarithm base is 10 for argument is returned Set a value larger than...

Page 1181: ...BCD2BIN BCD value of is returned in binary value This function can only be configured when UBIN16 W BIN16 I UBIN32 D or BIN32 L is specified as the Data Type Conversion from Binary to BCD BIN2BCD Bina...

Page 1182: ...ice address of copy target Range of copy in words Values of device address from for words are copied to for words respectively Specified range is copied in word unit Function Format Description Charac...

Page 1183: ...the pattern is 2 Continued to next page Function Format Description Drawing of straight line LINE Straight line connecting the start coordinate and end coordinate is drawn Start coordinate X Start co...

Page 1184: ...than 1 1 dot Foreground color Background color is specified by the color data It will be set to 255 white when omitted For color data refer to Appendix Color Data Correspondence Table on page A 1 Spec...

Page 1185: ...rmat Description Indirect specification OFFSET Reference device address Device address to store the indirect value 0 to 32767 Specify the device address words from Indirect read Specify OFFSET functio...

Page 1186: ...configured in the Data Type on the Script Editor Specifies the BIN32 L aslong asl aslong Executes the executable statement 1 with the data type BIN32 L Executes the executable statement 2 with the da...

Page 1187: ...te Double byte characters can be used after Definition of comment Sample definition 1234 Define the numeric value directly 1234 Define the negative number with a minus symbol at the beginning 12 34 De...

Page 1188: ...e is stored in LDR200 Script Operation description If the value of LDR100 is not 0 and the value of LDR200 is also not 0 then 0x1234 is stored in LDR300 If the value of LDR100 is not 0 and the value o...

Page 1189: ...or 1 then 0x9999 is stored in LDR200 Script Operation description If the values of LDR100 LDR200 and LDR300 are all not 0 then 100 is stored in LDR400 If the values of LDR100 and LDR200 are not 0 and...

Page 1190: ...ile statement repeats Inside the while statement if the values of LDR200 and LDR300 are equal the while statement will terminate and after LM 0 changes to 1 execution breaks out of the while statement...

Page 1191: ...added to the value of the indirect value LDR0 so that it becomes 2 Repeats in this manner for the third to ninth iterations Tenth iteration loop The value of LDR0 is 9 so the condition LDR 0 10 is tr...

Page 1192: ...cimal to octal conversion using a while statement Convert a decimal value to octal For example convert 10 Dec to 12 Oct 16 Dec to 20 Oct Convert a value to octal up to 4 digits max 1 0 while counter 2...

Page 1193: ...ion description If the value of LDR100 is not 0x1234 then 0 is stored in LDR300 If the value of LDR100 is 0x1234 then 0x5678 is stored in LDR200 and the script terminates The return statement does not...

Page 1194: ...he value of LDR300 is 5 and the value of LM0 is 1 5 2 Relational Operators Script Operation description If the value of LDR100 is equal to the value of LDR200 then 0x100 is stored in LDR300 Script Ope...

Page 1195: ...If the value of LDR100 is greater than the value of LDR200 then 0x100 is stored in LDR300 Script Operation description If the value of LDR100 is greater than or equal to the value of LDR200 then 0x10...

Page 1196: ...LDR100 is not 0 or the value of LDR200 is not 0 then 100 is stored in LDR300 If either is true the processing in the brackets is executed Script Operation description If the value of LDR100 is not eq...

Page 1197: ...es of LDR100 and LDR200 are multiplied together and the result is stored in LDR300 Script Operation description The value of LDR100 is divided into the value of LDR200 and the result is stored in LDR3...

Page 1198: ...values of LM100 and LM101 is 1 LM200 changes to 1 If the bitwise logical OR operation on the values of LM100 and LM101 is 0 LM200 changes to 0 The operation is the same as the following ladder diagra...

Page 1199: ...o 0 The operation is the same as the following ladder diagram Script Operation description The value of LDR100 is shifted left by only the amount of the value of LDR200 and the result is stored in LDR...

Page 1200: ...1 The result is the same as LM 100 1 Script Operation description Turns LM100 to 0 The result is the same as LM 100 0 Script Operation description Flips LM100 1 and 0 The result is the same as LM 100...

Page 1201: ...thm of the value of D20 and the result is stored in D10 Only the data type Float32 F can be used Script Operation description Calculates the logarithm of the value of D20 with 10 as the base and the r...

Page 1202: ...an be used Script Operation description Calculates the tangent of the radian value of D20 and stores the result in D10 Only the data type Float32 F can be used Script Operation description Calculates...

Page 1203: ...tion description Converts the value of D20 from degrees to radians and stores the result in D10 Only the data type Float32 F can be used Script Operation description Converts the value of D20 from rad...

Page 1204: ...xample if the floating point value 1234 0x449A4000 as a binary value is stored in LDR100 1234 binary value is stored in LDR200 If the floating point value 1234 56 0x449A51EC as a binary value is store...

Page 1205: ...lanation For details refer to Chapter 4 3 1 System Tab on page 4 25 A NULL terminating character 0x00 is added to the end of the string Device address Stored value Device address Stored value Upper by...

Page 1206: ...etting on the System tab in the Project Settings dialog box Depending on the setting the upper and lower bytes are stored in the reverse of the following explanation For details refer to Chapter 4 3 1...

Page 1207: ...d in LDR0 If even a single one is not equal 0 is stored Example 5 7 22 Word unit data comparison LDR 0 MEMCMP LDR 100 LDR 200 10 LDR100 LDR101 LDR102 LDR108 LDR109 LDR200 LDR201 LDR202 LDR208 LDR209 C...

Page 1208: ...opy MEMCPY LDR 100 LDR 200 10 LDR100 LDR101 LDR102 LDR108 LDR109 LDR200 LDR201 LDR202 LDR208 LDR209 Copy each LDR107 LDR207 Even if the Data Type is set to UBIN32 D BIN32 L BCD8 EB or Float32 F the da...

Page 1209: ...can be specified in the range from 1 to 128 STRCUT LDR 100 LDR 200 1 4 Device address Stored value Start position Character count Device address Stored value LDR200 Upper byte A 0x41 0 LDR100 Upper by...

Page 1210: ...The terminating character is not included in the string length Device address Stored value Device address Stored value LDR200 Upper byte A 0x41 LDR100 7 Lower byte B 0x42 LDR201 Upper byte C 0x43 Lowe...

Page 1211: ...g The terminating character is not included in the string length Device address Stored value Device address Stored value LDR100 Upper byte A 0x41 LDR100 Upper byte A 0x41 Lower byte B 0x42 Lower byte...

Page 1212: ...D 0x44 LDR100 Upper byte A 0x41 0 LDR0 3 Lower byte E 0x45 Lower byte B 0x42 1 LDR201 Upper byte F 0x46 LDR101 Upper byte C 0x43 2 Lower byte G 0x47 Lower byte D 0x44 3 LDR202 Upper byte 0x00 Termina...

Page 1213: ...00 Upper byte E 0x45 LDR100 Upper byte A 0x41 0 LDR0 4 Lower byte 0x7E Lower byte B 0x42 1 LDR201 Upper byte 0x3F LDR101 Upper byte C 0x43 2 Lower byte G 0x47 Lower byte D 0x44 3 LDR202 Upper byte H 0...

Page 1214: ...s of the rectangle s lower right corner X 150 Y 100 on the screen where the script is running The line width line type foreground color background color pattern rounding type and rounding radius are o...

Page 1215: ...words from LDR10 is read and stored in LDR200 Script Operation description When the value of D20 is 3 the constant 1234 is stored in LDR13 the device address 3 words from LDR10 Example 5 7 36 Indirec...

Page 1216: ...DR100 LDR101 LDR200 Stored value 0 1 0 Stored value 0 1 0 Data Type Device Address UBIN16 W LDR100 LDR101 LDR200 LDR300 Stored value 65535 0 0 0 Lower word Upper word Data Type Device Address UBIN32 D...

Page 1217: ...ontinues for more than the time limit due to a while definition etc an execution time over error occurs and that script will be halted Define the script so the execution time for one script does not e...

Page 1218: ...ombined they are calculated in following priority Item Number of devices Destination external device addresses 64 max Source external device addresses 64 max The maximum number of source external devi...

Page 1219: ...HG1P HG2J 7U When using the HG2J 7U note the following points To use the speaker USB port must be configured Select the USB1 USB A or the USB2 USB A in the Interface under the Interface Configuration...

Page 1220: ...lick Sound The Sound Settings dialog box is displayed 2 Double click the cell in the File Name column to register a sound file The Open dialog box is displayed 3 Specify the sound file to register and...

Page 1221: ...her options and then click OK The Sound Settings dialog box closes This concludes the configuration to play a sound file when a value of device address changes to 1 To play a sound file as a touch sou...

Page 1222: ...tings dialog box is displayed 1 USB flash drive inserted in USB1 for HG2J 7U SD memory card for HG5G 4G 3G V and HG4G 3G Only sound files with file names that use alphanumeric characters are supported...

Page 1223: ...ck box 9 Select Sound File and specify the ID of the sound file to play in Sound ID Enter a sound ID number or click to specify the sound ID number with the displayed Sound Settings dialog box 10 Clic...

Page 1224: ...to delete the contents of that row Sound file play Select an ID and click the button to play that row s sound file Sound file stop Stops playing the sound file 3 Sound Settings Dialog Box HG3G HG2G 5F...

Page 1225: ...owever if Save To is set to Internal Memory file names with double byte characters and symbols are also supported Save To Select the location to save the sound file to as Internal Memory or External M...

Page 1226: ...in the text box or click to specify the address in the displayed Tag Editor For the device address configuration procedure refer to Chapter 2 5 1 Device Address Settings on page 2 70 Individual Settin...

Page 1227: ...Address Specify the device address that will be the condition for playing the sound file Click to display Tag Editor and specify the device address For the device address configuration procedure refe...

Page 1228: ...ouch sound s beep and a sound file can be played simultaneously When touch panel is touched twice before sound from first touch has finished playing For the same touch sound file the one played later...

Page 1229: ...device addresses For sound files set by trigger device addresses the one played first has priority If both change to 1 simultaneously the smaller sound ID has priority When multiple trigger device ad...

Page 1230: ...nabled no other sound IDs will play until the trigger condition for this sound ID is no longer satisfied For example when playing sound ID1 when trigger device address 1 is 1 and sound ID2 when trigge...

Page 1231: ...movie files on the Video Display Save video camera images and microphone audio 1 to the external memory device before and after an event occurs 1 Recording sound function is for HG4G 3G only 2 HG5G 4G...

Page 1232: ...G4G V HG3G V Video Camera Images Channel 1 Images Channel 2 MICRO I HG5G V HG4G V HG3G V CH1 CH2 The MICRO I can play movie files display video and output audio using the Video Display Chapter 10 4 Vi...

Page 1233: ...d enter the file path of the movie file The maximum number is 250 alphanumeric characters Example When specifying the movie file sample01 mp4 that has been saved to the MOVIE folder in the External Me...

Page 1234: ...the Video Display 2 On the Home tab in the Parts group click Data Displays and then click Video Display 3 Click a point on the edit screen where you wish to place the Video Display 4 Double click the...

Page 1235: ...when the Play button is pressed Click to display the Multimedia Settings dialog box Select the ID number from the movie file list The movie files registered in the movie file list are played in order...

Page 1236: ...cify the bit device that will trigger the start of recording in Trigger Device Address Click to display the Tag Editor For the device address configuration procedure refer to Chapter 2 5 1 Device Addr...

Page 1237: ...e Video Display to play the recorded images On the Home tab in the Parts group click Data Displays and then click Video Display 2 Click a point on the edit screen where you wish to place the Video Dis...

Page 1238: ...e you wish to place the Goto Screen Button 8 Double click the placed Goto Screen Button and a Properties dialog box will be displayed 9 On the General tab select Open File Screen for Movie Files for A...

Page 1239: ...images Press to select 20110313 and then press Select The contents of the 20110313 folder will be displayed Movie files that meet the following specifications can be played with the MICRO I HG5G 4G 3G...

Page 1240: ...000 512 000 000 Folder Up Update Page Up Page Down Select 1 2 Restore RepeatON RepeatOFF Full REW FF Next Back Stop Play Pause MICRO I Video Display Press Play While data is being recorded after an ev...

Page 1241: ...is displayed 2 Click the Video Input tab 3 Select NTSC or PAL for the signal standard of the device connected to the MICRO I 4 Click OK The Multimedia Settings dialog box closes This concludes configu...

Page 1242: ...G4G HG1G HG1P HG2J 7U ID Displays the movie file list ID File Path Displays the file path of the movie file Click the cell and then enter the file path of a movie file The maximum number is 250 charac...

Page 1243: ...lick this button Up Shifts the selected movie file upward on this list Down Shifts the selected movie file downward on this list Import Imports an exported movie file list Existing movie file lists wi...

Page 1244: ...page 2 70 Recording Time Before Event Specifies the amount of time 1 to 15 sec to record before the value of trigger device address changes from 0 to 1 This option can only be set when Use Event Recor...

Page 1245: ...at will connect to the MICRO I Input Signal Select from NTSC or PAL for the signal standard of the device connected with the MICRO I The adopted format for signal standards will differ depending on th...

Page 1246: ...Checking the Status of the Function HG3G HG2G 5F HG5G V HG4G V HG3G V HG2G V HG2G 5T HG4G HG1G HG1P HG2J 7U Bit number Description 0 While data is recording after an event occurs and while recorded d...

Page 1247: ...ile playing movie files nothing is recorded if an event occurs When data was recorded with a part it takes approximately 1 second after the data is finished being saved to the external memory device u...

Page 1248: ...5 Restrictions 22 18 WindO I NV4 User s Manual...

Page 1249: ...of security groups provided security groups Administrator Operator and Reader and user created security groups One or more of these security groups can be assigned to users One or more users must alwa...

Page 1250: ...U I O P CLR 123 abc A S D F G H J K L CAN Z X C V B N M ENT Password You can set a dedicated password when opening the project In the Security dialog box on the Options tab select the Use Password to...

Page 1251: ...with an audio interface only 3 This is applicable for models with a video interface only The Enter Password dialog box is displayed Opening project data Computer MICRO I The Enter Password dialog box...

Page 1252: ...HG2G 5F 5T HG1G 1P only Computer MICRO I The Enter Password dialog box is displayed Upload Upload Screenshot data Alarm Log data Data Log data Operation Log data Recipe files Picture files Sound files...

Page 1253: ...ord screen is displayed Maintenance System Mode Device Monitor Adjust Brightness 1 User 2 3 4 5 6 7 8 9 0 BS Q W E R T Y U I O P CLR 123 abc A S D F G H J K L CAN Z X C V B N M ENT Password MICRO I MI...

Page 1254: ...can partially change project data by changing values of device addresses This security group download data to external memory device and copy files from USB flash drives to SD memory cards Reader The...

Page 1255: ...evice to external devices YES NO NO NO Uploading PLC programs from external devices to an external memory device YES NO NO NO Deleting files in external memory device 2 YES NO NO NO Formatting 4 exter...

Page 1256: ...MICRO I MICRO I Base screen 2 Cannot be displayed Base screen 2 Can be displayed Switch user account The Password screen is displayed Line Chart is displayed Goto Screen Button Open password screen L...

Page 1257: ...Permitted Permitted Permitted Prohibited Group Name Administrator Operator Reader GroupA 1 2 3 4 Display No Prohibited Permitted Permitted Permitted Group Name Display No Numerical Input Input Permitt...

Page 1258: ...switch to User3 999 999 999 1 User3 2 3 4 5 6 7 8 9 0 BS Q W E R T Y U I O P CLR 123 abc A S D F G H J K L CAN Z X C V B N M ENT Password 999 Cannot be operated Can be operated Displayed Not displaye...

Page 1259: ...he Protect group click User Accounts The Security dialog box is displayed 2 Select the Use Security functions check box The settings related to user accounts are displayed The user account already pro...

Page 1260: ...ick the Group Membership tab Assign the security groups to the user being created Administrator Operator and Reader have already been provided in Security Group If you will not add a new security grou...

Page 1261: ...he Security Settings dialog box is displayed 10 Click Add The New Security Group dialog box is displayed 11 Specify the Security Group number 4 to 15 in Number 12 Enter the name for the new group in G...

Page 1262: ...to 3 Double clicking the Permission cells switches between Permitted and Prohibited 14 Click OK The group added is displayed in Security Group 15 Repeat steps 10 to 14 and create all of the necessary...

Page 1263: ...roceed to step 20 19 Repeat steps 3 to 18 and create all of the necessary user accounts 20 Click OK The Security dialog box closes This concludes creating a user account User3 User4 User2 User1 Create...

Page 1264: ...alog box is displayed 2 Select the user account to edit and click Edit The Change User Account dialog box is displayed 3 On the General tab change User Name and New Password 4 Enter the password in Co...

Page 1265: ...he security groups are copied to To If you will not delete a security group proceed to step 8 7 Select the security groups assigned to the user to delete in To and click Delete The security groups are...

Page 1266: ...This concludes editing a user account Deleting a User Account 1 On the Configuration tab in the Protect group click User Accounts The Security dialog box is displayed 2 Select the user account to del...

Page 1267: ...he Security Function 2 2 Adding and Editing Security Groups Adding a Security Group 1 On the Project window double click Security Settings The Security Settings dialog box is displayed 2 Click Add The...

Page 1268: ...haracters 5 Under Permission set whether or not to permit the operations subject to password protection in No 1 to 3 Double clicking the Permission cells switches between Permitted and Prohibited Japa...

Page 1269: ...Security Function Configuration Procedure 23 User Accounts and the Security Function 6 Click OK The group added is displayed in Security Group 7 Click OK The Security Settings dialog box closes This...

Page 1270: ...Rename The Change Security Group Name dialog box is displayed 3 Change the name of the security group to the new group name in New Name The maximum number for the group name is 15 characters 4 Click O...

Page 1271: ...er Security Group select the security group for which the operation privileges will be changed and under Permission set whether or not to permit the operations subject to password protection in No 1 t...

Page 1272: ...security group in Security Group to delete and click Delete The security group is deleted 3 Click OK The Security Settings dialog box closes This concludes deleting a security group To select multipl...

Page 1273: ...utomatically display the Password screen when the user attempts to switch to a base screen they cannot access with the current user account using the Goto Screen button select the Change Screen check...

Page 1274: ...on 3 Click a point on the edit screen where you wish to place the Goto Screen Button 4 Double click the placed Goto Screen Button and the Properties dialog box is displayed 5 Select Switch to Base Scr...

Page 1275: ...9 Specify the screen number of the base screen to switch to with Number on the General tab This is the same screen number as the screen number specified in step 6 2 is specified here 10 Click the Secu...

Page 1276: ...rect password is entered the user account changes to User2 and the Password screen closes Base screen 2 is displayed Press the Goto Screen Button Base screen 1 No user MICRO I 1 User2 2 3 4 5 6 7 8 9...

Page 1277: ...unt on page 23 11 create the following user account 2 Create a Line Chart and configure the display security group On the Home tab in the Parts group click Charts and then click Line Chart 3 Click a p...

Page 1278: ...Chart Set Display to Permitted for GroupA 7 Configure the settings on each tab as necessary and click OK The Properties of Line Chart dialog box closes 8 Place a Goto Screen Button to display the pas...

Page 1279: ...e 12 Specify the display location in coordinates for the password screen to open above the base screen with Coordinates X Y With the upper left corner of the screen as the origin the upper left corner...

Page 1280: ...f the correct password is entered the user account changes to User2 from no default user and the Password screen closes The Line Chart is displayed Press the Goto Screen Button No user MICRO I 1 User2...

Page 1281: ...account 2 Create a Numerical Input and configure the input security group On the Home tab in the Parts group click Data Displays and then click Numerical Input 3 Click a point on the edit screen wher...

Page 1282: ...nput Set Input to Permitted for GroupA 7 Configure the settings on each tab as necessary and click OK The Properties of Numerical Input dialog box closes 8 Place a Goto Screen Button to display the pa...

Page 1283: ...12 Specify the display location in coordinates for the password screen to open above the base screen with Coordinates X Y With the upper left corner of the screen as the origin the upper left corner...

Page 1284: ...ss ENT If the correct password is entered the user account changes to User2 from no default user and the Password screen closes Press the Goto Screen Button No user 999 MICRO I 1 User2 2 3 4 5 6 7 8 9...

Page 1285: ...ed When this check box is cleared the switching to the System Mode monitor display or downloading or uploading data are protected by a single password Note the MICRO I is not password protected if Pas...

Page 1286: ...ration mode is changed Screens and parts cannot be displayed or operated that are protected by a security group Confirm Password Re enter the same password This option is only displayed when the Show...

Page 1287: ...er Account dialog box was displayed this item displays the selected user account number User Name Enter the name for the user account The maximum number is 16 characters Only alphanumeric characters a...

Page 1288: ...plays a list of all the security groups The provided security groups Administrator Operator and Reader are grayed out if assigned to another user account Add This button adds a security group You can...

Page 1289: ...e 23 19 Delete Deletes the security groups selected for Security Group For details refer to Deleting a Security Group on page 23 24 Rename Select a security group in Security Group and click this butt...

Page 1290: ...Name Displays the file name of the Custom Web Page created by the Web Page Editor For details about the Web Page Editor refer to Chapter 28 Web Page Editor on page 28 12 Security Group Name Displays t...

Page 1291: ...urity group selected under Security Group Japanese None English and Chinese cannot be used for the group name No Displays the number of the operations subject to password protection 1 to 17 Operation...

Page 1292: ...er1 The user account switches according to the value of device address Confirm Password Re enter the password that was entered in Use Password to open Project Write down the password so you do not for...

Page 1293: ...uration procedure refer to Chapter 2 5 1 Device Address Settings on page 2 70 After Specify the time 0 to 60 minutes to switch to the default user after the MICRO I is last used If 0 is set the MICRO...

Page 1294: ...n that the current user account is not allowed to display Opening a popup that the current user account is not allowed to display Manipulating a part set to a security group that the current user acco...

Page 1295: ...to Screen Command or Multi Command Downloading or uploading project data or PLC programs with a Key Button Multi Button or Multi Command Executing the USB Autorun function 4 Password Input HG3G HG2G 5...

Page 1296: ...screen closes CLR Clears the entered password and continues input ENT Confirms the entered password and starts verifying the user name and password If the entered password is correct the Password scre...

Page 1297: ...Delete data stored in the internal memory Deleting data in external memory device 1 Formatting 2 external memory device 3 Enter Password Dialog Box User Name Selects the user name This item can only...

Page 1298: ...Detail Reader Operator Admin Security Group Password User1 1 User Name User ID User Account Setting Screen Edit Add Delete X Detail Reader Operator Admin Security Group Password User1 1 User Name Use...

Page 1299: ...n or execute the Goto Screen Command or Multi Command The User Account Setting Screen will be displayed 2 Press or to change the user number of the user account to edit 3 Press Edit 4 Change the user...

Page 1300: ...ame 2 Enter the password and press ENT Test02_ 1 2 3 4 5 6 7 8 9 0 BS CLR _ CAN Cur Cur SP ENT Alpha bet 1 2 X GroupA Test02 2 Change Security Group Password User Name User ID CANCEL OK Edit User 1 2...

Page 1301: ...groups to remove 3 Press Close X GroupA Password02 Test02 2 Change Security Group Password User Name User ID CANCEL OK Edit User Security groups are selected and cleared each time the names are presse...

Page 1302: ...p assignments will be changed This concludes editing a user account X GroupA Admin Password02 Test02 2 Change Security Group Password User Name User ID CANCEL OK Edit User X GroupA Admin Password02 Te...

Page 1303: ...n Command or Multi Command The User Account Setting Screen will be displayed 2 Press Add 3 Enter the User Name 1 Press the User Name input frame 2 Enter the user name and press ENT X Reader Operator A...

Page 1304: ...Press Change X User5 5 Change Security Group Password User Name User ID Add User CANCEL OK 1 2 3 4 5 6 7 8 9 0 BS q w e r t y u i o p CLR 123 ABC a s d f g h j k l CAN z x c v b n m ENT Hide Pass05_...

Page 1305: ...he names are pressed Press Gr 1 5 Gr 6 10 and Gr 11 15 to switch between the different sets of five security groups Close Administrator Gr 1 Operator Gr 2 Reader Gr 3 GroupA Gr 4 GroupB Gr 5 Gr 1 5 Gr...

Page 1306: ...n User Account Setting Screen or execute the Goto Screen Command or Multi Command The User Account Setting Screen will be displayed 2 Press or to change the user number of the user account to delete 3...

Page 1307: ...on 4 Press OK 5 Press OK The user account will be deleted This concludes deleting the User Account X GroupB User5 5 Change Security Group Password User Name User ID Delete User CANCEL OK X GroupA Admi...

Page 1308: ...igned to the displayed user account Detail Change Detail is displayed when the user account is loaded Press Detail to display the security group details screen where you can check details about the as...

Page 1309: ...V HG2G V HG2G 5T HG4G HG1G HG1P HG2J 7U Computer Download MICRO I Project data The following functions can be executed with downloading of project data Force download the system software and the oper...

Page 1310: ...for HG2G 5T and HG1G 1P 6 This is applicable for models with a video interface only Computer MICRO I Download Recipe file Picture file Sound file 4 Custom Web Page file Movie file 6 Movie file list 6...

Page 1311: ...ration by displaying and changing values of device addresses and switching screens using the monitor function Computer MICRO I System Information Computer External device Screen monitor LDR1 0 130 MIC...

Page 1312: ...ck on the How to install USB driver to display the How to install USB driver The USB driver does not have to be installed for subsequent connections Note the connection must use the same USB port that...

Page 1313: ...Settings dialog box is displayed 2 Change the settings on each tab as necessary and then click OK Communicate with Select the device to communicate with from the following items Operator Interface Co...

Page 1314: ...d The network adapter can only be set when Communicate with is set to Operator Interface and Port to Ethernet 1 HG5G 4G 3G 2G V HG4G 3G HG2G 5F 5T HG1G 1P only 2 HG2J 7U only USB 1 Connect the USB por...

Page 1315: ...to which you are downloading Delete Deletes download destinations from the Target List IP Address Manager Open IP Address Manager Specify the IP address for the target MICRO I with IP Address Manager...

Page 1316: ...is clear are not changed IP Address Enter the IP address to register in the project data Subnet Mask Enter the subnet mask to register in the project data Default Gateway Enter the default gateway to...

Page 1317: ...se Closes the Search MICRO I dialog box Results List IP Address Displays the IP address of the MICRO I MAC Address Displays the MAC address of the MICRO I Type Number Displays the part number of the M...

Page 1318: ...ed in the internal memory Delete data from or formatting an external memory device inserted in the MICRO I Display information about system software and project data Monitor the MICRO I The dialog box...

Page 1319: ...r in the project data Default Gateway Enter the default gateway to register in the project data Port Number Enter the port number to register in the project data Comment Enter comment to register in t...

Page 1320: ...Download dialog box is displayed For the HG2J 7U proceed to step 5 2 Downloading HG3G HG2G 5F HG5G V HG4G V HG3G V HG2G V HG2G 5T HG4G HG1G HG1P HG2J 7U Target list To download a project without open...

Page 1321: ...concludes downloading project data If security is enabled in the MICRO I project the Enter Password dialog box is displayed Enter the password For details refer to Chapter 23 User Accounts and the Sec...

Page 1322: ...ox of the target to download the project data to Can only be set when Communicate with is set to Operator Interface Target IP Address Displays the current IP address for the MICRO I to download the pr...

Page 1323: ...d to the MICRO I 1 HG2J 7U only 2 HG5G 4G 3G 2G V HG4G 3G HG2G 5F 5T HG1G 1P only 3 HG5G 4G 3G 2G V only All All project data is downloaded Modified Data Only Only files that were updated since the pr...

Page 1324: ...device inserted in the MICRO I when downloading projects Only on channels for which Save to in the Recipe Settings dialog box is set to External Memory Device and Recipe Function is set to Use When Do...

Page 1325: ...s check box to download the latest version of the system software to all the digital I O modules attached to the MICRO I Analog I O module Version Number Select this check box to download the latest v...

Page 1326: ...row under Download 4 Select the method for downloading the file to the external memory device The Open dialog box is displayed Files to External Memory Device Stops operation of the MICRO I and downlo...

Page 1327: ...ck Close in the External Memory Device Maintenance dialog box 2 HG5G 4G 3G 2G V HG4G 3G HG2G 5F 5T HG1G 1P only If security is enabled in the MICRO I project the Password Screen is displayed Select th...

Page 1328: ...ownload the latest version of the system software to all the analog I O modules attached to the MICRO I When Communicate with is set to Operator Interface and Port to USB the Runtime System of Expansi...

Page 1329: ...to start the upload For details refer to To execute a function other than the project data download on page 24 10 1 HG5G 4G 3G 2G V HG4G 3G HG2G 5F 5T HG1G 1P only 3 Uploading HG3G HG2G 5F HG5G V HG4G...

Page 1330: ...onfirmation message to open the project is displayed 6 Click OK The uploaded project opens This concludes uploading of project data You cannot use the following characters in the project name If a pas...

Page 1331: ...WindO I NV4 Location Specifies the location for saving uploaded project files Click to display the Browse folders dialog box Select the location for saving then click OK Upload files used in this pro...

Page 1332: ...O I In the Communication Settings dialog box select Operator Interface from Communicate with For details refer to 1 3 Change Communication Settings on page 24 5 3 On the Home tab in the Project group...

Page 1333: ...ry Device Maintenance dialog box 1 This is applicable for HG2J 7U and models with an audio interface only 2 This is applicable for models with a video interface only If security is enabled for the pro...

Page 1334: ...After stopping operation deletes data saved to the External Memory Device folder on an external memory device Click this to display the Clear Data dialog box For details refer to 4 2 Deleting Data fr...

Page 1335: ...Log files Data Log files Operation Log files and Recipe Files 5 Click OK When Communicate with is set to Operator Interface and Port to USB 1 deletion of the data starts When Communicate with is set...

Page 1336: ...face and Port is set to USB a formatting confirmation message is displayed When Communicate with is set to Operator Interface and Port is set to Ethernet the Target IP Address dialog box is displayed...

Page 1337: ...unication Settings on page 24 5 2 On the Home tab in the Project group click Target Info When Communicate with is set to Operator Interface and Port is set to USB 1 the System Information dialog box i...

Page 1338: ...on about the external memory device inserted in the MICRO I click External Memory Device Information to display the External Memory Device Information dialog box For details refer to External Memory D...

Page 1339: ...s the optional fonts and the Kanji dictionary data currently installed on the MICRO I Click this button to display the Font Information dialog box For details refer to Font Kanji Dictionary Data Infor...

Page 1340: ...ed to the MICRO I was last saved in WindO I NV4 WindO I NV4 Version Displays the version of WindO I NV4 used to create the project data downloaded to the MICRO I Communication Driver Information Check...

Page 1341: ...5F USB flash drive for HG2G 5T and HG1G 1P Status Displays the state of the external memory device inserted in the MICRO I Memory Capacity Displays the total capacity of the external memory device ins...

Page 1342: ...ICRO I External Device Communication 1 to 4 HG3G HG2G 5F HG5G V HG4G V HG3G V HG2G V HG2G 5T HG4G HG1G HG1P HG2J 7U HG3G HG2G 5F HG5G V HG4G V HG3G V HG2G V HG2G 5T HG4G HG1G HG1P HG2J 7U Manufacturer...

Page 1343: ...on in WindO I NV4 can be performed as follows Checking values of device addresses used on the screen of the MICRO I Checking values of specified device addresses Checking values of device addresses of...

Page 1344: ...ying conditions Object List window Script Editor Computer MICRO I 130 Disconnect Connect External device External device External Device Monitor External Device ID 0 External Device ID 1 External Devi...

Page 1345: ...roject data offline Computer MICRO I Switches to Base Screen 2 Full Tank 1 External device External device Base Screen 1 Base Screen 2 130 Computer MICRO I Opens Base Screen 2 Full Tank 1 Full Tank 1...

Page 1346: ...First Screen Switches to the Base Screen of the lowest screen number in the project data Previous Screen Switches to the Base Screen of screen number one lower than the Base Screen currently displayed...

Page 1347: ...on page 25 18 Custom Registers monitored device addresses individually and displays the value of device addresses For details refer to Custom Monitor on page 25 7 Batch Registers monitored device addr...

Page 1348: ...ing Data on the System tab in the Project Settings For details refer to Chapter 4 Storage Method of String Data on page 4 29 Value Enables values of device addresses to be display and changed The valu...

Page 1349: ...ils refer to Batch Saving Device Addresses Used in Scripts on page 25 9 Import Imports the device addresses from a device address list saved as a CSV text file Click this button to display the Device...

Page 1350: ...rage order for word device address data is set according to Storage Method of String Data on the System tab in the Project Settings For details refer to Chapter 4 Storage Method of String Data on page...

Page 1351: ...dresses to monitor individually Click Device Address Or double click a cell under Device Address in Monitor and then click The Tag Editor is displayed For details on configuring device address setting...

Page 1352: ...ng with WindO I NV4 25 10 WindO I NV4 User s Manual 2 Select the script ID of the script for the device address to be batch saved and then click Select All the device addresses used by the script are...

Page 1353: ...e device addresses can be called from the List to be reutilized 1 Click Add to List The Device Address List Name Setting dialog box is displayed 2 Enter a name for the device address list The maximum...

Page 1354: ...o use a device address list registered device addresses list in another project save it as a CSV text file This file is called a Device Address List 1 Click Export The Save As dialog box is displayed...

Page 1355: ...Device Address List Imports the device addresses from a device address list saved as a CSV text file into custom monitor 1 Click Import The Device Address List dialog box is displayed 2 Click The Ope...

Page 1356: ...to overwrite the device address displayed in the confirmation message Click Yes To All to overwrite all the device addresses Click No to display the next confirmation message without overwriting the...

Page 1357: ...r details refer to Chapter 4 3 4 Communication Driver Network Tab on page 4 52 Device Type Selects the device type The list only shows device types that can be used Address Number Specify the address...

Page 1358: ...ailable Data on page 2 1 UBIN16 W BIN16 I UBIN32 D BIN32 L BCD4 B BCD8 EB Float32 F Displays the current value of device address in decimal format To change a value double click a cell and then enter...

Page 1359: ...ted to the MICRO I If a red cross appears over the icon of an external device communication is stopped Clicking the External Device icon enables switching between connection and disconnection External...

Page 1360: ...are being satisfied are highlighted in the Object List window Popup viewing of values of device addresses in the Object List window works only if the screen displayed in the Object List window matches...

Page 1361: ...f the screen numbers are not consecutive numbers this command switches to the closest number Specified Screen Switches to the Base Screen of a specified number Next Screen Switches to the Base Screen...

Page 1362: ...ing and changing the value of specified device address 2 Monitoring on the MICRO I HG3G HG2G 5F HG5G V HG4G V HG3G V HG2G V HG2G 5T HG4G HG1G HG1P HG2J 7U MICRO I 130 Device Monitor LDR1 LM0 Device LM...

Page 1363: ...evice address range depends on types and settings of external devices Selecting unavailable device address Communication error happens and it can not be back in without reboot For details refer to Cha...

Page 1364: ...to select the device type For Internal Device proceed to step 4 3 Enter the External Device ID as a hexadecimal value and press Device Data Del Select 0 Device Monitor Dec Hex LM bit 0 Select Device A...

Page 1365: ...Press CAN to stop registering device addresses The device address is registered to Device Monitor 5 Repeat steps 1 through 4 to register all device addresses to be monitored LM bit 1 Select Device Add...

Page 1366: ...f Device Address 1 Press or to select the device address to be changed the value 2 Press Data on Device Monitor The Write Data screen is displayed LM LDR Data Del Select 0 00000 1 2 Device Monitor Dec...

Page 1367: ...entered value of device address Press CAN to stop entering the value of device address The value of device address is changed Write Data 0 CLR CAN ENT 1 2 3 4 5 6 F 7 8 9 E A B C D Dec Hex Current wo...

Page 1368: ...us up by one line Moves the focus down by one line Data Changes the value of the selected device address Press to display the Write Data Screen For details refer to Changing Value of Device Address on...

Page 1369: ...and Offline Mode is displayed at the bottom left of the screen 4 Monitor and change the values of device addresses with Device Monitor to check the operation of project data If there are any errors e...

Page 1370: ...2 Monitoring on the MICRO I 25 28 WindO I NV4 User s Manual...

Page 1371: ...1 1 How the Simulator Function is Used Simulator function in WindO I NV4 can be performed as follows Check the operation of parts Save the screen displayed in the simulator as an image Check the value...

Page 1372: ...reen displayed in the simulator Check the operation of Script Computer Custom Monitor Simulator Select device address Computer Simulator Batch Monitor Sequential address numbers LSD10 LSD11 LSD12 Leng...

Page 1373: ...the external device HMI keep relays LK and HMI keep registers LKR will be loaded when the project data is loaded Clear Value of Device Address External Device LK LKR and Run The saved values of devic...

Page 1374: ...en was switched using Back First Screen Switches to the Base Screen of the lowest screen number in the project data Previous Screen Switches to the Base Screen of screen number one lower than the Base...

Page 1375: ...resses and edit project data if there is an error If the monitored screen is switches repeat steps 1 4 If you have edited the project data click Reload project data to update the project displayed in...

Page 1376: ...ar Saved Value of Device Address External Device LK LKR The saved values of device addresses on the external device HMI keep relays LK and HMI keep registers LKR will be cleared when the project data...

Page 1377: ...lays the value of device addresses For details refer to 3 3 Custom Monitor on page 26 11 Batch Registers monitored device address as a batch for sequential address numbers and displays the value of de...

Page 1378: ...he project data Script Debugger Check the operation of the script used in the project For details refer to 3 5 Script Debugger on page 26 15 Reload project data Reloads the edited project data Setting...

Page 1379: ...xternal device HMI keep relays LK and HMI keep registers LKR that were input in the simulator The values of device addresses will be saved in the project data The Reload Project dialog box will be dis...

Page 1380: ...ata on the System tab in the Project Settings For details refer to Chapter 4 Storage Method of String Data on page 4 29 Value Enables values of device addresses to be display and changed The value ran...

Page 1381: ...ter 25 Batch Saving Device Addresses Used in Scripts on page 25 9 Import Imports the device addresses from a device address list saved as a CSV text file Click this button to display the Device Addres...

Page 1382: ...System tab in the Project Settings For details refer to Chapter 4 Storage Method of String Data on page 4 29 Value Enables values of device addresses to be display and changed The value range depends...

Page 1383: ...ils refer to Chapter 4 3 4 Communication Driver Network Tab on page 4 52 Device Type Selects the device type The list only shows device types that can be used Address Number Specify the address The ra...

Page 1384: ...4 29 Value Enables values of device addresses to be display and changed The value range depends on the data type For details refer to Chapter 2 1 1 Available Data on page 2 1 UBIN16 W BIN16 I UBIN32...

Page 1385: ...Executes the script paused at the breakpoint up to the next breakpoint If there is no next breakpoint execute the script to the end and exit Step Over Executes the script while pausing each step one...

Page 1386: ...ber of word devices 1 to 16 stored the display value 2 single byte characters can be displayed by 1 word This option can only be configured String Western String Japanese String Simplified Chinese Str...

Page 1387: ...Sound and Beep Sound The function to save log data of the Alarm Log Function to the external memory as a CSV file The function to save log data of the Data Log Function to the external memory as a CS...

Page 1388: ...4 Restrictions 26 18 WindO I NV4 User s Manual...

Page 1389: ...ugh Function is Used The Pass through function downloads or uploads a PLC program from a computer or an external device via the MICRO I Chapter 27 Pass Through Function 1 Overview HG3G HG2G 5F HG5G V...

Page 1390: ...EC FX2N CPU FX3U FX3UC MELSEC FX3UC CPU QCPU Q02CPU Q02HCPU MELSEC Q CPU The corresponding device type differs depending on the communication driver which be used For FC6A type please select MICROSmar...

Page 1391: ...operates under the following conditions The MICRO I is in the Run mode or Monitor mode A communication driver that supports the Pass through operation In the Project Settings dialog box on the Commun...

Page 1392: ...ngs dialog box is displayed 2 Click the Communication Driver tab 3 Select the external device communication from the Function to make the Pass through function is enabled 4 Under External Device selec...

Page 1393: ...he System Mode 3 Press Main Menu The Main Menu screen is displayed Press and hold 3 or more seconds MICRO I Maintenance System Mode Device Monitor Adjust Brightness If a password has been configured f...

Page 1394: ...ation 1 to External Device Communication 4 HG5G 4G 3G 2G V HG4G 3G HG2G 5F or press Ext Device 1 to Ext Device 4 HG2G 5T HG1G 1P 2010 OCT 14 THU 14 56 44 Main Menu Offline Run Initial Setting Clock Se...

Page 1395: ...d press Save HG5G 4G 3G 2G V HG4G 3G HG2G 5F or SAVE HG2G 5T HG1G 1P When the setting is saved The value was updated is displayed This concludes the configuration to enable the Pass through function T...

Page 1396: ...I NV4 and Programming software at the same time If the communication via Pass through fails change the settings such as Baud Rate Timeout Transfer Mode etc on PLC programming software If one of the fo...

Page 1397: ...Server Function HG3G HG2G 5F HG5G V HG4G V HG3G V HG2G V HG2G 5T HG4G HG1G HG1P HG2J 7U Custom web pages are downloaded to external memory 1 The external memory 1 must be inserted before downloading...

Page 1398: ...fer to Web Server Function Configuration Procedure on page 28 4 3 Connect the MICRO I Start the web browser on the web browser terminal and connect the following URL http MICRO I IP address In the exa...

Page 1399: ...I IP address Port number viewer view htm pagepath File name Example The MICRO I s IP address is 192 168 0 1 and the Page1 page is displayed http 192 168 0 1 viewer view htm pagepath Page1 page User na...

Page 1400: ...lower Change this value if the display speed of custom web pages is slow Port Number Specifies the port number to use for the web server function Default Showing Page Select the web page to display fi...

Page 1401: ...rt the remote functions Accesses the MICRO I from a web browser terminal to browse it Page configuration The MICRO I web pages have the following page configuration There are links to each page from t...

Page 1402: ...ks to each page are shown in this menu frame Right frame Shows the function page Except for the full screen remote monitoring screen and remote operation screen all of the pages shown in the right fra...

Page 1403: ...scription Mode Shows the system s current mode Run Mode System Mode Monitor Mode Offline Mode Data Transfer Mode Error Shows the following errors Communication Error No Screen Data Waiting for Default...

Page 1404: ...ice Communication 1 to 4 Time Out msec Shows the response waiting time from the External Device Communication 1 to 4 Transmission Wait msec Shows the transmission interval for a communication command...

Page 1405: ...is prohibited in the web browser settings the web page will not operate correctly Please enable JavaScript The screen image cannot be displayed on web browsers that do not support the bitmap or JPEG...

Page 1406: ...rol link in the left frame to display the remote control page An image of the screen displayed on the MICRO I is shown You can also control the MICRO I by clicking on the displayed screen image This s...

Page 1407: ...d to 256 colors The screen image displayed on the MICRO I is somewhat degraded but the update speed of the display on the web browser speeds up and the impact on the MICRO I screen update speed is red...

Page 1408: ...flash drive inserted in USB1 for HG2J 7U SD memory card for HG5G 4G 3G 2G V HG4G 3G and HG2G 5F USB flash drive for HG2G 5T and HG1G 1P Custom web pages are downloaded to external memory 1 The externa...

Page 1409: ...and drop it on the editing area The switch will be placed on the area with the predefined size 3 Click the switch placed on the work area and on the Property tab for Link Box click The Device Tree dia...

Page 1410: ...devices of the MICRO I are displayed in the Device Tree dialog box To display an address number it needs to be configured in the project being edited before Web Page Editor opens For device addresses...

Page 1411: ...name is displayed in Web Page Editor on the Project window For details on Web Page Editor refer to the Web Page Editor help that is displayed by clicking Help of Help on the menu bar The image files a...

Page 1412: ...V HG4G V HG3G V HG2G V HG2G 5T HG4G HG1G HG1P HG2J 7U 1 Access the MICRO I from a FTP client connected to the local network to use the FTP server function and read or write the file contained in the e...

Page 1413: ...4 HG2J 7U as of December 2021 HG5G 4G 3G 2G V HG4G 3G HG2G 5F 5T HG1G 1P type as of January 2019 Example A 1 B HGDATA01 The root folder of the External Memory Device 2 The root folder of hte FTP serv...

Page 1414: ...on page 28 19 3 Login to the MICRO I Start the web browser and go to the following URL After the user name and password are successfully verified the folder of external memory device inserted in the M...

Page 1415: ...eriod of time the MICRO I will disconnect the FTP client Default 15 minutes Specify Target Specify the folder and the external memory device inserted in the MICRO I to be accessed from the FTP client...

Page 1416: ...to a local network Configures the target FTP server to the MICRO I When the trigger condition for the FTP client function File Transfer Settings is satisfied the following prosess is executed Copying...

Page 1417: ...ation procedure for the FTP server and the FTP client function Configure the FTP Server Configures the target FTP server 1 On the Configuration tab in the Manager group click FTP Server Manager The FT...

Page 1418: ...255 User Name Enter the name of the user account for the FTP server The maximum number for the user name is 40 characters Only alphanumeric characters and symbols can be used Password Enter the passw...

Page 1419: ...1 On the Configuration tab in the System Setup group click File Transfer The File Transfer Settings dialog box is displayed 2 Select the number to configure the File Transfer Settings in Settings then...

Page 1420: ...yte characters Click to display the Tag Editor For the device address configuration procedure refer to Chapter 2 5 1 Device Address Settings on page 2 70 Files cannot be copied or moved from the FTP s...

Page 1421: ...lebyte characters Click to display the Tag Editor For the device address configuration procedure refer to Chapter 2 5 1 Device Address Settings on page 2 70 Files cannot be copied or moved from the FT...

Page 1422: ...d as Trigger Type For details refer to Chapter 2 1 1 Available Data on page 2 1 Device Address Specifies the bit device or the bit number of the word device to serve as condition Can only be set if Wh...

Page 1423: ...for managing the FTP server settings Server Name Displays the name of the FTP server Host Name IP Address Displays the Host Name or IP address of the FTP server User Name Displays the user name of th...

Page 1424: ...ter the name of the user account for the FTP server The maximum number for the user name is 40 characters Only alphanumeric characters and symbols can be used Password Enter the password for the FTP s...

Page 1425: ...ou can only specify an internal device Click to display the Tag Editor For the device address configuration procedure refer to Chapter 2 5 1 Device Address Settings on page 2 70 Copy the settings as d...

Page 1426: ...125 LKR 126 LKR 127 LKR 128 LKR 129 to LKR 141 String ASCII t e s t _ u s e r 0 0 1 0 0 0 0 Value Hexadecimal 7465h 7374h 5F75h 7365h 7230h 3031h 0000h 0000h Password Device Address LKR 142 LKR 143 L...

Page 1427: ...he configured content for the selected number is reflected in the Individual Settings dialog box For details refer to Individual Settings Dialog Box on page 28 32 Delete Deletes the settings for the s...

Page 1428: ...button to display the FTP Server Manager For details refer to FTP Server Manager on page 28 27 Location Selects the method to specify the save location of source files to copy or move Fixed Specify t...

Page 1429: ...m external memory to external memory and HMI special internal relay LSM67 is 0 subfolders can be copied and moved up to five folders deep When HMI special internal relay LSM67 is changed from 0 to 1 s...

Page 1430: ...Device Folder Click this button to enter the configured content of the External Memory Device Folder in the External Memory Device tab on the Project Settings dialog box Click on to the right on the...

Page 1431: ...t be used are as follows When the text of the folder or file path exceeds the maximum number of device addresses no NULL the text stored in device addresses up to the maximum number of device addresse...

Page 1432: ...le external memory device Mount the external memory device 1 External Memory Device Reading or Writing Error The folders and files in the external memory device specified as the source or the destinat...

Page 1433: ...onfiguration procedure refer to Chapter 2 5 1 Device Address Settings on page 2 70 Condition Sets the condition formula Can only be set if While satisfying the condition is selected as Trigger Type Cl...

Page 1434: ...LOGIN for the SMTP Authentication SMTPs SSL communications 4 E mail Function HG3G HG2G 5F HG5G V HG4G V HG3G V HG2G V HG2G 5T HG4G HG1G HG1P HG2J 7U 1 When the trigger condition for the E mail functi...

Page 1435: ...e mail number 2 is in Waiting status After the e mail number 1 has been sent the e mail number 2 starts to be sent When the trigger condition is satisfied during the other e mail is being sent When se...

Page 1436: ...atus Cause 0 Successfully Completed 1 Parameter error The value of the device address allocated to the following setting is 0 IP address of the Outgoing mail server SMTP Sender E mail Address Sender N...

Page 1437: ...When an E mail Group is set the number of e mail addresses in the E mail Group is counted If the same e mail address is used in multiple destination the number of destination addresses will be counted...

Page 1438: ...SMTP The maximum number is 40 characters Only alphanumeric characters and symbols can be used IP Address Specifies the IP address of the outgoing mail server SMTP The format is xxx xxx xxx xxx xxx st...

Page 1439: ...ls refer to Chapter 4 Authentication Setting on page 4 71 Advanced Setting Specifies the General Setting and the Authentication Setting by the values of the device addresses The settings for both the...

Page 1440: ...mail Selects the source character code from the following ASCII Japanese Shift JIS Simplified Chinese GB2312 Western ISO 8859 1 Unicode UTF 8 4 Select the condition to send an e mail in Trigger Type...

Page 1441: ...E mail Address The maximum number is 60 characters Only alphanumeric characters and symbols can be used Select the Use Reference Device Address check box to specify the e mail address with the value...

Page 1442: ...in the Attach Files dialog box displayed by clicking Attach Files For details refer to Attach Files Dialog Box on page 28 60 To insert the value of the device address in the body text of the e mail c...

Page 1443: ...right of New E mail Address then click New E mail Group The New E mail Group dialog box is displayed 3 Enter the name for the E mail Group in the Group Name The maximum number is 60 characters Only a...

Page 1444: ...OK to close the E mail Group dialog box The created E mail Group is added to the E mail Address List on the E mail Address Book dialog box 7 Repeat steps 2 through 6 to create the necessary E mail Gro...

Page 1445: ...E mail Address Book as a file and then import it to a project Note the E mail Groups and the device addresses to specify the e mail address are not supported Save the E mail Address Book settings as...

Page 1446: ...ayed 2 Click Import The Open dialog box is displayed 3 Select a file for the E mail Address Book and then click Open The e mail addresses are added to the E mail Address Book dialog box The e mail add...

Page 1447: ...as follows Notepad Microsoft Excel E mail Address Comment Tab Line Feed E mail Address Comment The maximum number for the e mail address is 60 characters The maximum number for the comment is 80 char...

Page 1448: ...umber and click this button to delete the contents of that row Settings Displays a list of the E mail settings Number Displays the number of the e mail selected from Settings Settings Body No Displays...

Page 1449: ...ddress Settings on page 2 70 Trigger Condition is satisfied Value of Device Address LM100 when Trigger Condition is Rising edge 1 0 Value of Report Device Address LM101 1 0 E mails cannot be sent E ma...

Page 1450: ...n page 2 1 Device Address Specifies the bit device or the bit number of the word device to serve as condition You can only specify the internal device Can only be set if Rising edge or Falling edge is...

Page 1451: ...Cc in the E mail Address Book dialog box When multiple e mail addresses and E mail Groups are allocated they are separated by semicolons Bcc Specify the sending destination which is not to be known by...

Page 1452: ...Address Dialog Box on page 28 58 Select an E mail Group in People and then click this button to display the E mail Group dialog box For details refer to E mail Group Dialog Box on page 28 59 Delete D...

Page 1453: ...the cell of the e mail address displays the E mail Address dialog box For details refer to E mail Address Dialog Box on page 28 58 Double clicking the cell of the E mail Group displays the E mail Grou...

Page 1454: ...eck box to specify the e mail address with the value of the device address Top Device Address Specifies a word device to use an e mail address The e mail address is set by reading the values sequentia...

Page 1455: ...il addresses assigned to the Members Members Find The text entered is searched for People in the E mail address list People The e mail addresses registered in the E mail Address Book dialog box are di...

Page 1456: ...on outputs to the external memory device in real time For details refer to Chapter 13 Real Time on page 13 39 Range of Blocks Specifies the range of block numbers that will output in the collected ala...

Page 1457: ...time Select this check box to specify the period of data log output data Outputs the specified period of the data log data after the Trigger Condition is satisfied Specify the maximum number of items...

Page 1458: ...etting can only be configured when Decimal or Hexadecimal is selected for Display Type Digits Specifies the digits to display The range of digits that can be set varies based on the display type and d...

Page 1459: ...e number of digits specified by Digits This option can only be configured when the Display Floating Point check box is selected The range of digits that can be set for the fractional part varies based...

Page 1460: ...messages and it may not work due to changes in the specifications of Twitter For Twitter API restrictions and how to use Twitter please check the Twitter website December 2021 1 Configure the MICRO I...

Page 1461: ...ssage number 1 has been sent the social media message number 2 starts to be sent When the trigger condition is satisfied during the other social media message is being sent When sending a social media...

Page 1462: ...dia message sending The sending result of the social media message last sent is stored LSD370 Social media message Number which has been sent The social media message number which has been sent is sto...

Page 1463: ...device address configuration procedure refer to Chapter 2 5 1 Device Address Settings on page 2 70 Falling edge A social media message is sent when the value of device address changes from 1 to 0 Spec...

Page 1464: ...ize app The PIN code 7 digit number used for authentication is displayed 8 Copy the PIN code displayed on the screen and then return to the Twitter Account dialog box 9 Enter the obtained PIN code and...

Page 1465: ...screenshot of the current screen to a social media message To insert the value of the device address in the social media message configure it in the Insert Value of Device Address dialog box displaye...

Page 1466: ...k this button to delete the contents of that row Settings Displays a list of the Social Media Function Number Displays the number of the social media message selected from Settings Settings Message No...

Page 1467: ...ing when the social media message has been sent Click to display the Tag Editor For the device address configuration procedure refer to Chapter 2 5 1 Device Address Settings on page 2 70 Trigger Condi...

Page 1468: ...uration procedure refer to Chapter 2 5 1 Device Address Settings on page 2 70 Condition Sets the condition formula Can only be set if Satisfy the condition is selected as Trigger Type Click to display...

Page 1469: ...nt Select a Twitter account in Account and then click this button to display the Twitter Account dialog box For details refer to Twitter Account Dialog Box Edit on page 28 74 Delete Deletes the select...

Page 1470: ...sages the PIN code 7 digit number used for authentication is displayed Please enter your PIN code Enter the PIN code that you obtained by logging in to your Twitter account Authenticate Authenticate y...

Page 1471: ...on page 2 1 This setting can only be configured when Decimal or Hexadecimal is selected for Display Type Digits Specifies the digits to display The range of digits that can be set varies based on the...

Page 1472: ...mber of digits specified by Digits This option can only be configured when the Display Floating Point check box is selected The range of digits that can be set for the fractional part varies based on...

Page 1473: ...rnal memory device to the MICRO I Uploading a project Uploads the project used to operate the MICRO I and saves it to an external memory device 2 1 For HG2J 7U between USB flash drives and in USB flas...

Page 1474: ...Autorun function For details refer to Chapter 31 2 USB Autorun Function on page 31 19 Using Key Buttons Multi Buttons or Multi Commands For details refer to 1 4 Using Key Buttons Multi Buttons or Mult...

Page 1475: ...WindO I NV4 3 On the Home tab in the Project group click the Download icon The Download dialog box is displayed 1 Only USB flash drive for HG2J 7U HG2G 5T and HG1G 1P The Project Transfer function sup...

Page 1476: ...lder Specify the folder where the project data is to be downloaded Click the button to display the Project Settings dialog box You can specify an External Memory Device folder as the download destinat...

Page 1477: ...ayed 7 Click the OK button 8 Click the Close button in the Download dialog box The project data for transfer is created in the External Memory Device folder on an external memory device For details ab...

Page 1478: ...r on the Key Browser Upload 1 Insert an external memory device 1 in the MICRO I 2 Press the Key Button or Multi Button or execute the Multi Command configured with Upload Project under Data Transfer o...

Page 1479: ...maintenance screen is now displayed 4 Press System Mode MICRO I displays the Top Page in the System Mode HG3G HG2G 5F HG5G V HG4G V HG3G V HG2G V HG2G 5T HG4G HG1G HG1P HG2J 7U HG3G HG2G 5F HG4G HG5G...

Page 1480: ...SD memory card is selected Run Offline Main Menu BRIGHTNESS 31 MAC Address 00 03 7B F0 12 A8 IP Address 192 168 0 1 DHCP 2010 OCT 14 THU 14 56 44 IDEC HG G SERIES SYSTEM MODE TOP PAGE ENG JPN Main Men...

Page 1481: ...ELOAD ENT COPY DIRECTION FILTER ALL FILTERS DRIVE SD card FORMAT DRIVE MICRO I FORMAT HGDATA00 DIR HGDATA01 DIR HGDATA02 DIR MICROI ZNV 1 2 Main Menu File Manager DEL RELOAD ENT COPY DIRECTION FILTER...

Page 1482: ...ager MICROI ZNV is always displayed This is not the project name downloaded to the MICRO I Main Menu File Manager DEL RELOAD ENT COPY DIRECTION FILTER ALL FILTERS DRIVE SD card FORMAT DRIVE MICRO I FO...

Page 1483: ...d screen is displayed Select a user name and enter its password For details refer to Chapter 23 User Accounts and the Security Function on page 23 1 Download MICRO I Project Function The following fun...

Page 1484: ...HCP 2010 OCT 14 THU 14 56 44 IDEC HG G SERIES SYSTEM MODE TOP PAGE ENG JPN Main Menu Offline Run Initial Setting Clock Setting Top Page Self Diagnosis System Information File Manager 2010 OCT 14 THU 1...

Page 1485: ...e cursor to the transfer destination on the SD memory card 2 Press to select 001 and then press ENT Main Menu File Manager DEL RELOAD ENT COPY DIRECTION FILTER ALL FILTERS DRIVE MICRO I FORMAT DRIVE S...

Page 1486: ...the results screen You are returned to the Top Page of System Mode Main Menu File Manager DEL RELOAD ENT COPY DIRECTION FILTER ALL FILTERS DRIVE MICRO I FORMAT DRIVE SD card FORMAT DIR DIR MICROI ZNV...

Page 1487: ...in the following characters While running the project transfer function using a Key Button Multi Button or Multi Command if a data transfer function project transfer PLC program transfer or file copy...

Page 1488: ...OSmart SmartAXIS Pro Lite Ethernet The corresponding device type differs depending on the communication driver which be used For FC6A type please select MICROSmart FC6A RS232C 485 MICROSmart FC6A Ethe...

Page 1489: ...unction For details refer to Chapter 31 2 USB Autorun Function on page 31 19 Using Key Buttons Multi Buttons or Multi Commands For details refer to 2 5 Using Key Buttons Multi Buttons or Multi Command...

Page 1490: ...must be converted to a ZLD Project File zld 1 Open the PLC program to to be transferred using WindLDR 2 Click to the right of Save As on the application menu and click PLC Program The Save As dialog...

Page 1491: ...i Button or execute the Multi Command configured with Download PLC Program under Data Transfer on the Key Browser 1 Only USB flash drive for HG2J 7U HG2G 5T and HG1G 1P Allocate a Key Button Multi But...

Page 1492: ...emory device 1 in the MICRO I 2 Press the Key Button or Multi Button or execute the Multi Command configured with Upload PLC Program under Data Transfer on the Key Browser 1 Only USB flash drive for H...

Page 1493: ...Insert an external memory device in the MICRO I 4 Press the upper left edge of the MICRO I screen for three seconds or more The maintenance screen is displayed HG3G HG2G 5F HG5G V HG4G V HG3G V HG2G...

Page 1494: ...project configured with security to the MICRO I the password screen is displayed Select a user name and enter its password For details refer to Chapter 23 User Accounts and the Security Function on pa...

Page 1495: ...estination and select PLC Main Menu File Manager DEL RELOAD ENT COPY DIRECTION FILTER ALL FILTERS DRIVE SD card FORMAT DRIVE MICRO I FORMAT HGDATA01 DIR PLOGRAM01 zld MICROI ZNV Main Menu File Manager...

Page 1496: ...tarts When the download finishes the results are displayed 13 Press Ack to close the results screen You are returned to the Top Page of System Mode Main Menu File Manager DEL RELOAD ENT COPY DIRECTION...

Page 1497: ...V HG2G V PLC MICRO I USB flash drive SD memory card External Memory Device Press and hold 3 or more seconds HG3G HG2G 5F HG4G HG5G V HG4G V HG3G V HG2G V MICRO I Maintenance System Mode Device Monitor...

Page 1498: ...Initial Setting Clock Setting Top Page Self Diagnosis System Information File Manager 2010 OCT 14 THU 14 57 17 Main Menu File Manager DEL RELOAD ENT COPY DIRECTION FILTER ALL FILTERS DRIVE PLC FORMAT...

Page 1499: ...en press ENT 9 Press COPY A process confirmation message is displayed Main Menu File Manager DEL RELOAD ENT COPY DIRECTION FILTER ALL FILTERS DRIVE PLC FORMAT DRIVE SD card FORMAT PLC ZLD HGDATA01 DIR...

Page 1500: ...displayed 11 Press Ack to close the screen You are returned to the Top Page of System Mode YES NO Copy This File PLC ZLD Comm I F Slave Number Communication port Slave number or External Device ID 0 0...

Page 1501: ...running the PLC program transfer function If a file exists with the same name in the save destination when uploading a PLC program the file is overwritten with the uploaded file without displaying an...

Page 1502: ...py files on an SD memory card inserted in the MICRO I Internally copy files on a USB flash drive Internally copy files on a USB flash drive inserted in the MICRO I 1 HG5G 4G 3G 2G V HG4G 3G HG2G 5F on...

Page 1503: ...d 1 or a USB flash drive inserted in the MICRO I Using the USB Autorun function For details refer to Chapter 31 2 USB Autorun Function on page 31 19 Using Key Buttons Multi Buttons or Multi Commands F...

Page 1504: ...the Key Browser HG3G HG2G 5F HG5G V HG4G V HG3G V HG2G V HG2G 5T HG4G HG1G HG1P HG2J 7U Allocate a Key Button Multi Button or Multi Command configured with the file copy function to the MICRO I For de...

Page 1505: ...ystem Mode HG3G HG2G 5F HG5G V HG4G V HG3G V HG2G V HG2G 5T HG4G HG1G HG1P HG2J 7U HG3G HG2G 5F HG4G HG5G V HG4G V HG3G V HG2G V MICRO I USB flash drive SD memory card External Memory Device Press and...

Page 1506: ...when an SD memory card is selected Run Offline Main Menu BRIGHTNESS 31 MAC Address 00 03 7B F0 12 A8 IP Address 192 168 0 1 DHCP 2010 OCT 14 THU 14 56 44 IDEC HG G SERIES SYSTEM MODE TOP PAGE ENG JPN...

Page 1507: ...select AUDIO1 WAV Main Menu File Manager DEL RELOAD ENT COPY DIRECTION FILTER ALL FILTERS DRIVE SD card FORMAT DRIVE MICRO I FORMAT HGDATA00 DIR HGDATA01 DIR HGDATA02 DIR MICROI ZNV 1 2 Main Menu File...

Page 1508: ...n on the USB flash drive 2 Press to select 002 and then press ENT Main Menu File Manager DEL RELOAD ENT COPY DIRECTION FILTER ALL FILTERS DRIVE SD card FORMAT DRIVE USB memory FORMAT DIR DIR AUDIO2 WA...

Page 1509: ...file is shown in the save destination Main Menu File Manager DEL RELOAD ENT COPY DIRECTION FILTER ALL FILTERS DRIVE SD card FORMAT DRIVE USB memory FORMAT DIR DIR AUDIO2 WAV AUDIO1 WAV DIR DIR YES NO...

Page 1510: ...t such as log data When copying a file used by the running project use File Manager on the MICRO I under the System Mode While running the file copy function using a Key Button Multi Button or Multi C...

Page 1511: ...ansion I O modules may be installed For the HG2G V HG2G 5F up to two IDEC MICROSmart PLC expansion I O modules may be installed Expansion I O modules can be used to configure a display and I O control...

Page 1512: ...oints Transistor Sink Output FC4A T08K1 90 0 23 5 70 0 10 20 NO NO YES YES 8 points Transistor Source Output FC4A T08S1 90 0 23 5 70 0 10 20 NO NO YES YES 16 points Transistor Sink Output FC4A T16K3 M...

Page 1513: ...G4G V HG3G V HG2G V HG2G 5T HG4G HG1G HG1P HG2J 7U Type Model No Input Type Voltage Current Thermocouple Resistance Thermometer Thermistor 2 points Input FC6A J2C1 FC6A J2C4 0 to 10 V 10 to 10 V 0 to...

Page 1514: ...hing or detaching an expansion module Use the expansion module clamp sold separately when using expansion modules Order the module clamp by referring to the width of the module shown in the dimensions...

Page 1515: ...0x00 0000 0000 Normal 0x81 1000 0001 Communication error An error has occurred in the communication between MICRO I and an expansion module 0x82 1000 0010 Unknown device detected 0x83 1000 0011 Devic...

Page 1516: ...ay process will slow the control time down and result in delayed input response Priority on control processing This mode places priority on control processing speed It can be used for screens where pa...

Page 1517: ...delay When there is an external input to the expansion module the delay time until that input is reflected to the Input I D and LEX is as follows Minimum 5 milliseconds Maximum 15 milliseconds the sc...

Page 1518: ...lows Minimum 1 millisecond Maximum 11 milliseconds This does not affect the display processing Control processing Expansion module output Output refresh Output Output External output External output 1...

Page 1519: ...resh Output refresh Input Output External input I O control Sleep Display processing executed Ends processing the part at the bottom of screen Starts processing the part at the top of screen Execution...

Page 1520: ...or waits for the output refresh in the next scan before reflecting the output to the Output Q D and LEY Output External output Input refresh Output refresh I O control Sleep Display processing execute...

Page 1521: ...from 5 to 105 milliseconds and the output delay can be from 1 to 101 milliseconds Since the sleep time is 100 12 88 milliseconds display processing is executed every 88 milliseconds for each scan Cycl...

Page 1522: ...a unit has four input output ports address numbers 0 to 3 are assigned to each and address numbers 4 to 7 cannot be used 2 Digital I O Modules HG3G HG2G 5F HG5G V HG4G V HG3G V HG2G V HG2G 5T HG4G HG...

Page 1523: ...necting them to the back of the MICRO I Analog I O module inputs support voltage current thermocouples resistance thermometers and thermistors Analog I O module outputs support voltage and current To...

Page 1524: ...lowing parameters are for configuring the analog inputs on the analog input modules and the mixed analog I O modules YES Parameters NO No parameters Parameter FC6A J2C1 FC6A J2C4 FC6A J4A1 FC6A J4A4 F...

Page 1525: ...L06A4 FC6A L03CN1 FC6A L03CN4 Unused 1 YES YES YES YES YES YES YES YES 0 to 10V DC YES YES YES YES NO NO YES YES 10 to 10V DC YES YES YES YES NO NO YES YES 0 to 20mA DC YES YES YES YES NO NO YES YES 4...

Page 1526: ...following versions FC6A J8A1 FC6A J8A4 Hardware version 200 or later Refer to Checking the Hardware Version Number on page 30 4 If an FC6A J8A1 or FC6A J8A4 that does not correspond to the above vers...

Page 1527: ...7 0 to 65 535 32 768 to 32 767 Type K thermocouple 0 to 65 535 32 768 to 32 767 2 000 to 13 000 3 280 to 23 720 Type J thermocouple 0 to 65 535 32 768 to 32 767 2 000 to 10 000 3 280 to 18 320 Type R...

Page 1528: ...g input filter can be set in 50 milliseconds increments The analog input is filtered so that approximately 99 of the analog input is reached in the specified filter 20 0 Elapsed time msec Analog input...

Page 1529: ...ommercial power supply noise 50 60 Hz noise and fluctuations in input values may become larger If there are large fluctuations in input values change the Sampling Time to 120 milliseconds 2 Informatio...

Page 1530: ...range error 6 Wiring fault out of minimum range error 7 Reserved 8 When the analog input value is greater than 20 mA and less than the upper limit value 1 9 When the analog input value is greater tha...

Page 1531: ...If the resistance of the PTC thermistor is greater than 10 000 status 5 Wiring fault out of maximum range error is stored in Status Value stored in Data 1 Min PTC thermistor resistance Value stored in...

Page 1532: ...A channel set to unused always outputs 0 V The circuit is setup the same as when 0 to 10V DC is selected as Signal Type Parameter FC6A K2A1 FC6A K2A4 FC6A K4A1 FC6A K4A4 FC6A L06A1 FC6A L06A4 FC6A L0...

Page 1533: ...in the END progressing of each scan The actual analog output data is not guaranteed when the analog output Status is a value other than 0 However 0V is output when Signal Type is set to 10 to 10V DC...

Page 1534: ...ting from the configured data register The number of words of data registers that are used varies based on the analog I O module model Used Data Registers words FC6A J2C1 FC6A J2C4 FC6A J4A1 FC6A J4A4...

Page 1535: ...mber CH0 Analog input data R 0 0 0 0 0 0 Analog input status R 1 1 1 1 1 1 CH1 Analog input data R 2 2 2 2 2 2 Analog input status R 3 3 3 3 3 3 CH2 Analog input data R 4 4 4 4 4 Analog input status R...

Page 1536: ...Filter The setting value is rounded by 50 When 50 001 to 65 535 is stored for the setting value the filter operates as the maximum value of 50 000 milliseconds Thermistor constant 17 Ni1000 18 NTC Th...

Page 1537: ...ue is 2 to 65 535 a parameter setting error will occur Min Max The minimum and maximum values can be set only when Optional range is selected as Data Type Set the minimum and maximum values between 32...

Page 1538: ...ge 30 25 For analog outputs refer to Analog Output Parameter Setting Values on page 30 27 Channel Parameter R W FC6A L06A1 FC6A L06A4 FC6A L03CN1 FC6A L03CN4 No I O Address Number I O Address Number C...

Page 1539: ...clic Script Follow these steps to program a Cyclic Script 1 On the Configuration tab in the System Setup group click Project The Project Settings dialog box appears 2 On the Expansion Module tab selec...

Page 1540: ...V HG3G V HG2G V HG2G 5T HG4G HG1G HG1P HG2J 7U Module Configuration Area Displays the configuration of connected expansion modules Preview Module Configuration Previews the image of the CPU module an...

Page 1541: ...uration Dialog Box Open the Module Configuration dialog box 1 On the Configuration tab in the System Setup group click Project The Project Settings dialog box is displayed 2 Click the Expansion Module...

Page 1542: ...the Expansion Module List and then drag and drop it to the Module Configuration Area 2 Click the inserted expansion module in the Module Configuration Area and then click Configure The configuration d...

Page 1543: ...WindO I NV4 User s Manual 30 33 5 Module Configuration Dialog Box 30 Expansion Modules 3 In the configuration dialog box configure the parameters for the expansion module...

Page 1544: ...move in the Module Configuration Area 2 Right click the expansion module to delete and then click Remove The selected expansion module is deleted and all of the extension modules placed on the right s...

Page 1545: ...device addresses configured in the editing project are not changed Example When swapping the digital input modules reassign the device addresses as follows However the device address of the part Pilot...

Page 1546: ...5 Module Configuration Dialog Box 30 36 WindO I NV4 User s Manual...

Page 1547: ...ted first either USB1 or USB2 Chapter 31 External Memory Devices 1 External Memory Devices HG3G HG2G 5F HG5G V HG4G V HG3G V HG2G V HG2G 5T HG4G HG1G HG1P HG2J 7U External Memory Device HG2J 7U HG2G 5...

Page 1548: ...file names and folder names However must not contain the following characters USB flash drive Models support USB flash drives with the following specifications Max capacity 32 GB Compatible with FAT16...

Page 1549: ...Batch ALMHTO CSV Real time ALMHTA CSV Alarm Log data DATALOG user defined CSV Default file name Batch LOGOn CSV Real time LOGAn CSV Data Log data n Data log channel number DATALOG DATA user defined B...

Page 1550: ...ommunication settings Follow these procedures to configure the communication device and port to allow reading and writing to the external memory device inserted in the MICRO I 1 On the Home tab in the...

Page 1551: ...device inserted in the MICRO I MICRO I resumes running when files have been downloaded Files to External Memory Device while running This function downloads files to the external memory device inserte...

Page 1552: ...st 2 Movie Files 2 4 Click OK The External Memory Device Maintenance dialog box appears and the data upload begins A message box appears when the data upload is complete 5 Click OK 6 Click Close on th...

Page 1553: ...V4 the external memory device must be specified as the communication device Configure the communication settings as follows before downloading or uploading 1 On the Home tab in the Project group click...

Page 1554: ...elect Drive dialog box appears 4 Select the external memory device drive then click OK A confirmation message appears Drive Specify the computer s drive assigned as the external memory device drive Ne...

Page 1555: ...in the computer to the computer using WindO I NV4 1 On the Home tab in the Project group click Upload The Select External Memory Device folder dialog box appears 2 Select the external memory device d...

Page 1556: ...older under the External Memory Device folder For the picture files that can be used with the MICRO I refer to Chapter 2 1 4 Available Image Files on page 2 20 For the sound files that can be used wit...

Page 1557: ...ess This creates a processing delay which can cause WindO I NV4 to raise a communication error when downloading or uploading a project If a communication error occurs try downloading or uploading the...

Page 1558: ...Device tab enter the desired name in the External Memory Device Folder text box Use only alphabetic characters A to Z and numbers 0 to 9 and the maximum is 8 characters 3 Click OK 1 USB flash drive i...

Page 1559: ...TURE folder All Alarm Log files Deletes all files in the ALARMLOG folder All Data Log files Deletes all files in the DATALOG folder All Operation Log files Deletes all files in the OPERATIONLOG folder...

Page 1560: ...e HG3G HG2G 5F HG5G V HG4G V HG3G V HG2G V HG2G 5T HG4G HG1G HG1P HG2J 7U Always format the external memory device before using it HG5G 4G 3G 2G V HG4G 3G HG2G 5F SD memory card HG2G 5T HG1G 1P USB fl...

Page 1561: ...Press the System Mode MICRO I switches to the Top Page in the System Mode 4 Press the Main Menu The Main Menu appears MICRO I USB flash drive SD memory card External memory device Press and hold 3 or...

Page 1562: ...memory for a USB flash drive 7 Press FORMAT A confirmation message appears Main Menu Offline Run Initial Setting Clock Setting Top Page Self Diagnosis System Information File Manager 2010 OCT 14 THU 1...

Page 1563: ...nual 31 17 1 External Memory Devices 31 External Memory Devices 8 Press YES MICRO I starts formatting the external memory device When formatting is completed The format completed is displayed YES NO F...

Page 1564: ...rd slot a docking station is required to read write to the SD memory card Multiple USB flash drives cannot be used at the same time Do not connect the USB flash drive to the MICRO I through a USB hub...

Page 1565: ...Copy PLC program to USB flash drive Production line A replace PLC program Run All Cancel Confirmation Press the command to execute USB Autorun definition file hgauto ini MICRO I This allows operators...

Page 1566: ...SD memory card 1 1 HG5G 4G 3G 2G V HG4G 3G HG2G 5F only Save Upload Computer ZNV Project File znv USB Autorun definition file hgauto ini SD memory card USB flash drive MICRO I Refer to Chapter 29 1 Pr...

Page 1567: ...MICRO I to the USB flash drive HG3G HG2G 5F HG5G V HG4G V HG3G V HG2G V HG2G 5T HG4G HG1G HG1P HG2J 7U Save Computer USB Autorun definition file hgauto ini File Copy File SD memory card USB flash driv...

Page 1568: ...2G V HG2G 5T HG4G HG1G HG1P HG2J 7U HG3G HG2G 5F HG4G HG5G V HG4G V HG3G V HG2G V Copy File File Save Computer USB Autorun definition file hgauto ini SD memory card USB flash drive MICRO I HG3G HG2G 5...

Page 1569: ...For details refer to 2 3 Creating a USB Autorun Definition File on page 31 26 If the USB Autorun function of the MICRO I is not enabled the menu screen will not be displayed even if a USB flash drive...

Page 1570: ...e into the MICRO I The menu for the USB Autorun function appears Save Computer ZNV Project File znv ZLD Project File zld File Copy files Only when downloading SD memory card USB flash drive USB flash...

Page 1571: ...ute Pressing Run All causes all commands defined in the USB Autorun definition file hgauto ini to execute one by one If security is enabled for the project on MICRO I a dialog appears for you to enter...

Page 1572: ...ton_command Enable button_runall Enable language English COMMAND section required Specify the command to execute and its parameters Create buttons to execute the number of commands specified in the AU...

Page 1573: ...ble disables the button If this item is left blank or contains an illegal value the MICRO I assumes Enable Specify the language to use for the button labels and messages Japanese Japanese Shift JIS Eu...

Page 1574: ...2G V HG4G 3G HG2G 5F Use A for an SD memory card and B for a USB flash drive HG2G 5T HG1G 1P Use B for a USB flash drive Enable Initializes the keep devices Disable Does not initialize the keep devic...

Page 1575: ...the External Device ID Specify the same number set as the slave number or External Device ID for the PLC src_plc_ip required when specifying the destination as an IP address Specify the IP address of...

Page 1576: ...ngle byte characters on the line Each item must be described as a single line If a line feed occurs before the end of the description all characters after the line feed are ignored The maximum size of...

Page 1577: ...ror wav source path dst_path A HGDATA01 SOUND destination path title Replace sound data button label 4 COMMAND_3 command LDR_DOWNLOAD download a ZLD Project File src_path B LDRDATA LDR_PROGRAM ZLD sou...

Page 1578: ...line A replace MICRO I program as the button label COMMAND_2 Defines the command assigned to execution button COMMAND_2 This is the second command that executes when Run All is pressed command FILE_C...

Page 1579: ...load a PLC program dst_path B Uploaded_Program Uploads the PLC program running on the PLC slave number 0 connected to the MICRO I s COM1 port and saves it as the ZLD Project File in the folder Uploade...

Page 1580: ...User 2 3 4 5 6 7 8 9 0 BS Q W E R T Y U I O P CLR 123 abc A S D F G H J K L CAN Z X C V B N M ENT Password Enter the appropriate password for Data Transfer Function Command Security Group Administrat...

Page 1581: ...Screen when a USB Flash Drive is Inserted Configuration Procedure 1 On the Configuration tab in the System Setup group click the Project The Project Settings dialog box appears 2 On the Autorun tab s...

Page 1582: ...reen If security is enabled for the Popup Screen that is displayed by the USB Popup Screen function a dialog appears for you to enter a user name and password For details refer to 2 4 USB Autorun Func...

Page 1583: ...h a USB cable 1 3 Supported Printers The following printers can be used Chapter 32 Printer 1 Functions and Connections HG3G HG2G 5F HG5G V HG4G V HG3G V HG2G V HG2G 5T HG4G HG1G HG1P HG2J 7U HG3G HG2G...

Page 1584: ...is printing bit 9 at the system area address number 2 will turn ON 2 Setting and Monitoring the Printer HG3G HG2G 5F HG5G V HG4G V HG3G V HG2G V HG2G 5T HG4G HG1G HG1P HG2J 7U If the printer does not...

Page 1585: ...Modules on page 30 12 HMI Temporary Relay LBM This is a bit unit device for temporarily storing values The value of this device switches between screens and text groups and user accounts and it becom...

Page 1586: ...this bit changes to 1 When switching to another screen from the default screen or when switching text group or user account then the value changes to 0 Yes Yes Yes Yes LSM9 When value changes from 0...

Page 1587: ...rved LSM42 Alternates between 0 and 1 each time data is read read scan from all external device addresses being used by External Device Communication 2 Yes Yes Yes Yes LSM43 Alternates between 0 and 1...

Page 1588: ...ted Yes Yes Yes Yes LSM68 69 Reserved LSM70 When the value of this bit changes from 0 to 1 BACnet communication is enabled When the value of this bit changes from 1 to 0 BACnet communication is prohib...

Page 1589: ...the power to the MICRO I has been turned on LSM1 2 3 and 11 also operates when switches the Text Group Once a value of LSM18 20 and 22 changes from 0 to 1 it remains at a value of 1 until MICRO I is...

Page 1590: ...er 3 7 BACnet Communication on page 3 94 Internal Relay M This is a bit unit device for the BACnet communication For details refer to Chapter 3 7 BACnet Communication on page 3 94 1 The last digit of...

Page 1591: ...stores the data of the registered device addresses for the external device during when HG5G 4G 3G 2G V HG4G 3G HG2G 5F 5T or HG1G 1p make Sub Host Communication 64 points are available This register...

Page 1592: ...riday 6 Saturday Yes Yes Yes Yes LSD20 When a value of 1 is written into this special register the Internal clock in MICRO I is updated according to the data stored in LSD21 26 It automatically resets...

Page 1593: ...e 6 free memory capacity Upper word Kbytes Yes Yes Yes No LSD45 External memory device 6 total memory capacity Lower word Kbytes Yes Yes Yes No LSD46 External memory device 6 total memory capacity Upp...

Page 1594: ...tatus for TCP clients and the TCP server for the User Communication set to the Ethernet interface Bit 0 User Communication 1 Bit 1 User Communication 2 Bit 2 User Communication 3 Yes Yes Yes Yes LSD68...

Page 1595: ...ter an event occurs with the event recording function or while recorded data is being saved to the external memory device the value of bit 0 changes to 1 It changes to 0 when the saving operation comp...

Page 1596: ...the various Ethernet communications functions has failed The bits are 0 when allocating the port numbers was successful or a function is not used Bit 0 Maintenance Communication Bit 1 Pass Through 2...

Page 1597: ...t changes to 0 after the transfer Bit 2 Recipe file Bit 4 ZNV Project File Bit 5 Picture file Bit 8 Sound file 9 Bit 9 ZLD Project File Bit 10 Movie file 11 Bit 15 Other file No Yes Yes Yes LSD249 Fil...

Page 1598: ...ata when the string length is less than sixteen words Yes No No No Example The SSID of the access point is z1xfujisan LSD292 z1 0x7A 0x31 LSD293 x_ 0x78 0x5F LSD294 fu 0x66 0x75 LSD295 ji 0x6A 0x69 LS...

Page 1599: ...ded errors of 10 msec The values of LSD38 to 40 are included errors of 10 msec When registers LSD7 8 9 10 11 or 12 contain FFFF H and are incremented the value becomes 0 When you reckon time by using...

Page 1600: ...alog I O module and BACnet communication 1 Multiples of 20 only Device Name Symbol R W Address Range Base Expansion Input Word WI R 30 50 70 90 10 Expansion Output Word WQ R W 30 50 70 90 110 10 Inter...

Page 1601: ...changed to its initial settings and data can be initialized For details refer to 2 System Mode Overview on page 34 3 Device Monitor Shows the Device Monitor This screen can be used to register device...

Page 1602: ...rightness screen is displayed Also press or to adjust to your preferred brightness Maintenance System Mode Device Monitor Adjust Brightness Maintenance Adjust Brightness Screen brightness can be adjus...

Page 1603: ...V HG2G V HG2G 5T HG4G HG1G HG1P HG2J 7U Top Page Main Menu screen Press Main Menu to display the Main Menu screen shown in the right figure Run O ine Main Menu BRIGHTNESS 31 SYSTEM MODE TOP PAGE ENG J...

Page 1604: ...Clock Setting Sets the internal clock of the MICRO I Page 34 11 Offline Offline Goes to Offline mode Page 34 11 Run Run Goes to Run mode Page 34 11 System Information System Info Displays information...

Page 1605: ...ernal Device 4 O I Link Setting 1 O I Link Setting 2 O I Link Serial 1 Serial 2 Serial 3 Communication I F Ethernet IP Address Ethernet Default Gateway Ethernet Misc Setting Ext Device IP Address Cloc...

Page 1606: ...tem Op Ext Device Ext Device 1 Ext Device 2 Ext Device 3 Ext Device 4 System Info Ext Mem Device Self Diag Retry Cycles Time Out Trans Wait Pass Through Parameter 1 Parameter 2 Parameter 3 Parameter 4...

Page 1607: ...ht buttons to select the item and then enter the time until the backlight automatically turns off with the numeric keys 4 Press SAVE SAVE button to save the settings Start Time Start Time It can be se...

Page 1608: ...registered in the security group from the touchscreen From the Main Menu screen press Initial Setting Initial Setting System Operation System Op and then Password Password Press CHG to change the user...

Page 1609: ...nal Device 4 Ext Device 4 to display the menu screen for the external device communication To specify settings press the button to select a choice External Device Communication setting items vary base...

Page 1610: ...procedure to set the IP address and Subnet mask settings From the Main Menu screen press Initial Setting Initial Setting Communication I F Comm I F and then Ethernet IP Address IP Address Press the l...

Page 1611: ...save the settings 3 2 Clock Setting Press Clock Setting Clock Setting in the Main Menu screen to display the clock settings screen Use this screen to set MICRO I s internal clock To return to the Mai...

Page 1612: ...m Info System Info at the top of the screen System 2 From the Main Menu screen press System Information System Info and then press System 2 System 2 Displays the following settings Project name Extern...

Page 1613: ...d If the source or the destination device is PLC PLC Program Data Transfer function will be executed and PLC Program will be downloaded or uploaded Refer to Chapter 29 1 Project Transfer Function on p...

Page 1614: ...3 Settings 34 14 WindO I NV4 User s Manual...

Page 1615: ...e received is what you actually ordered and no parts are damaged to accidents during shipping 1 2 Type No Chapter 35 MICRO I Specifications 1 HG2J 7U Name HG2J 7U HG2J 7U Unit Mounting clips Communica...

Page 1616: ...uch Panel 4 Serial Interface COM RS232C RS422 485 Connector Terminal Block 9 pin Push in type Maximum cable length 15m RS232C 1 200m RS422 RS485 5 USB Interface USB1 USB2 0 Host Connector Type A Outpu...

Page 1617: ...2C and RS422 485 interfaces at same time Use the SELV Safety Extra Low Voltage circuit to connect the Serial USB and Ethernet interfaces Interface Specification RS232C RS422 485 Connector Detachable T...

Page 1618: ...70 C Storage Humidity 10 to 90 RH no condensation Altitude 0 to 2000m Pollution Degree 2 Corrosion Immunity Free from corrosive gases Rated Voltage 12V DC 24V DC Power Consumption 13W maximum When no...

Page 1619: ...y LCD Type 2 TFT color LCD TN Type Display Colors 65536 Colors Effective Display Area 154 08 W 85 92 H mm Display Resolution 800 W 480 H dots Dot pitch 0 1926 W x 0 179 H mm View angle Left Right Top...

Page 1620: ...mm Cable Attached Dimensions Depending on the type of connection cable used the dimensions shown above will change The dimensions given here are representative values and are intended for reference o...

Page 1621: ...ity Ambient Temperature Allow sufficient space for ventilation and install the equipment away from heat sources Allow at least 100mm between the HG2J 7U and walls or other equipment Do not install the...

Page 1622: ...wise the HG2J 7U may warp the display or impair the waterproof characteristics If the mounting clips are tightened obliquely to the panel the HG2J 7U may fall off the panel When installing the HG2J 7U...

Page 1623: ...on Operating Temperature Output current Vertical Landscape 20 45 55 to to to 45 55 60 1000mA 500mA 150mA Portrait Clockwise 20 40 55 to to to 40 55 60 1000mA 500mA 150mA Portrait Counter Clockwise 20...

Page 1624: ...ire without pressing the pusher 1 Strip the sheath of the wire 7 to 9 mm from the end CAUTION Turn off the power supply before wiring Make the wiring as short as possible and run all wires as far away...

Page 1625: ...ut electrode or ground the earth lead respectively If the personal computer has a 2 pin power plug without ground lead follow the procedure below when connect the HG2J 7U to the personal computer 1 Pu...

Page 1626: ...an be executed in the System Mode Maintenance and Inspection Parts Description Display Wipe any stain of the display using a soft cloth slightly dampened with neutral detergent or alcoholic solvent Do...

Page 1627: ...tness Screen 1 10 Software License Information This product contains various open source software in addition to the software owned by IDEC Corporation Information about open source software can be ob...

Page 1628: ...Mounting clips Communication plug for external devices Attached to the HG5G 4G 3G 2G V USB Cable Lock Pin USB Clamp Band Screw lock bracket Metric Screw Thread M2 6 x 0 45 x 1 x 1 x 6 x 4 x 4 x 1 x 1...

Page 1629: ...HG5G 4G 3G 2G V 35 MICRO I Specifications 2 3 Part Names HG5G V 15 0inch HG4G V 12 1inch HG3G VA 10 4inch 2 1 3 11 10 9 8 12 13 14 4 5 6 7 16 17 15 2 1 3 11 10 9 8 12 13 14 4 5 6 7 16 17 15 2 1 3 11...

Page 1630: ...nterface AUDIO OUT LINE OUT Stereo Recommended minimum load 10k Connector Mini Jack 3 5mm Except for HG2G V 8 Ethernet Interface LAN IEEE802 3u 10BASE T 100BASE TX Connector RJ 45 With Auto MDI MDI X...

Page 1631: ...in failure of the HG5G 4G 3G 2G V Wire only the interface used Note that the serial interface COM2 can be used as the RS232C and RS422 485 interfaces at same time Interface Specification RS232C RS422...

Page 1632: ...Specification RS232C RS422 485 Connector Detachable Terminal Block 9 pin Applicable cable AWG20 to AWG22 Recommended ferrule AI 0 34 8 TQ AI 0 5 8 WH AI TWIN 2 x 0 5 8 WH Phoenix Contact H0 34 12 TK...

Page 1633: ...tion Degree 2 Corrosion Immunity Free from corrosive gases Type No HG5G V HG4G V HG3G VA HG3G V8 HG2G V Rated Voltage 24V DC Power Consumption 27W maximum 25W maximum 22W maximum 18W maximum When not...

Page 1634: ...115 2 W 86 4 H mm Display Resolution 1024 W 768 H dots 640 W 480 H dots View angle Left Right Bottom 80 Top 60 Left Right Top Bottom 85 Left Right Top Bottom 80 Brightness of LCD only 650 cd m2 600 cd...

Page 1635: ...size to the expansion module installation side Cable Attached Dimensions Depending on the type of connection cable used the dimensions shown above will change The dimensions given here are representa...

Page 1636: ...nsion module installation side Cable Attached Dimensions Depending on the type of connection cable used the dimensions shown above will change The dimensions given here are representative values and a...

Page 1637: ...to the expansion module installation side Cable Attached Dimensions Depending on the type of connection cable used the dimensions shown above will change The dimensions given here are representative v...

Page 1638: ...dule installation side Cable Attached Dimensions Depending on the type of connection cable used the dimensions shown above will change The dimensions given here are representative values and are inten...

Page 1639: ...the expansion module installation side Cable Attached Dimensions Depending on the type of connection cable used the dimensions shown above will change The dimensions given here are representative valu...

Page 1640: ...es Allow at least 100mm between the HG5G 4G 3G 2G V and walls or other equipment Do not install the HG5G 4G 3G 2G V where the ambient temperature exceeds the rated operating ambient temperature range...

Page 1641: ...y warp and cause wrinkle on the display or impair the waterproof characteristics If the mounting clips are tightened obliquely to the panel the HG5G 4G 3G 2G V may fall off the panel When installing t...

Page 1642: ...n Operating Temperature w o expansion modules w expansion modules Vertical Landscape HG5G V 20 to 60 C 10 to 50 C HG4G V HG3G V HG2G V Portrait Clockwise HG5G V 20 to 60 C unavailable HG4G V HG3G V HG...

Page 1643: ...tor on the communication line of the HG5G 4G 3G 2G V and the non isolated communication device i e PLC to prevent damage CAUTION Turn off the power supply before wiring Make the wiring as short as pos...

Page 1644: ...o the USB2 port 2 Strain the Edge part of the USB Cable Lock Pin and insert the Edge part to the 2 holes upper the USB2 port 3 Fasten the USB Clamp Band around the USB cable and the Clamp part secure...

Page 1645: ...ice for the battery at customer s expense Contact your vendor or IDEC Corporation Display Wipe any stain of the display using a soft cloth slightly dampened with neutral detergent or alcoholic solvent...

Page 1646: ...l regulation Maintenance Screen Turn on the power to the HG5G 4G 3G 2G V then press and hold the touch panel on the upper left corner of the screen for three seconds or longer The Maintenance Screen a...

Page 1647: ...reen appears 2 Press the and at the bottom the Adjust Brightness Screen to adjust the contrast to the optimal setting 3 Press the X to close the Adjust Brightness Screen Run Offline Main Menu BRIGHTNE...

Page 1648: ...l setting Press Yes then the Touch Panel Adjust screen appears 3 Press the center of the X mark then the position of the mark changes one after another Press five marks sequentially 4 When normally re...

Page 1649: ...al devices Attached to the HG4G 3G HG2G 5F USB Cable Lock Pin USB Clamp Band Screw lock bracket Metric Screw Thread M2 6 x 0 45 x 1 x 1 x 4 x 4 x 1 x 1 x 1 x 1 x 1 x 1 x 2 x 2 LCD size AUDIO IN VIDEO...

Page 1650: ...35 36 WindO I NV4 User s Manual 3 3 Part Names HG4G 12 1inch HG3G A 10 4inch HG3G 8 8 4inch 2 3 1 11 10 9 8 12 13 14 4 5 6 7 16 17 15 1 11 10 9 8 12 13 14 4 5 6 7 16 17 15 2 3 1 11 10 9 8 12 13 14 4 5...

Page 1651: ...232C 1 200m RS422 RS485 7 Audio Interface AUDIO OUT 1 LINE OUT Stereo Recommended minimum load 10k Connector Mini Jack 3 5mm 8 Ethernet Interface LAN IEEE802 3u 10BASE T 100BASE TX Connector RJ 45 Wit...

Page 1652: ...of the HG4G 3G HG2G 5F Wire only the interface used Interface Specification RS232C RS422 485 Connector D sub 9 pin Plug Screw lock bracket Inch Screw Thread 4 40 UNC No Name I O Function Communicatio...

Page 1653: ...able Expansion Modules on page 30 2 for the number the types and the combination of the expansion modules that can be installed Interface Specification RS232C RS422 485 Connector Detachable Terminal B...

Page 1654: ...ure 0 to 50 C Operating Humidity 10 to 90 RH no condensation Storage Temperature 20 to 60 C Storage Humidity 10 to 90 RH no condensation Altitude 0 to 2000m Pollution Degree 2 Corrosion Immunity Free...

Page 1655: ...ent 48 levels Backlight LED Backlight Life 3 Approx 100 000 hours The time until brightness becomes 50 of the initial value Approx 50 000 hours The time until brightness becomes 50 of the initial valu...

Page 1656: ...expansion module installation side Cable Attached Dimensions Depending on the type of connection cable used the dimensions shown above will change The dimensions given here are representative values a...

Page 1657: ...he expansion module installation side Cable Attached Dimensions Depending on the type of connection cable used the dimensions shown above will change The dimensions given here are representative value...

Page 1658: ...e installation side Cable Attached Dimensions Depending on the type of connection cable used the dimensions shown above will change The dimensions given here are representative values and are intended...

Page 1659: ...to the expansion module installation side Cable Attached Dimensions Depending on the type of connection cable used the dimensions shown above will change The dimensions given here are representative v...

Page 1660: ...ovided If you install it using any other orientation use forced air cooling or lower the ambient operating temperature HG4G 3G HG2G 5F Installation Make a panel cut out on the panel with the dimension...

Page 1661: ...he Ambient Temperature is 0 to 45 C Orientation Operating Temperature w o expansion modules w expansion modules Vertical Landscape HG4G 0 to 50 C 0 to 50 C HG3G 0 to 45 C HG2G 5F 0 to 40 C 1 Portrait...

Page 1662: ...prevent an accident If the personal computer has a 3 pin power plug or power plug with a ground lead type make sure to use a plug socket including a ground input electrode or ground the earth lead re...

Page 1663: ...the USB cable into the USB2 port 2 Strain the Edge part of the USB Cable Lock Pin and insert the Edge part to the 2 holes upper the USB2 port 3 Fasten the USB Clamp Band around the USB cable and the C...

Page 1664: ...inner ammonia strong acid and strong alkaline Terminals Connectors Check the terminals and connectors to make sure of no loose screws incomplete insertion or disconnected lines Mounting Clips Make sur...

Page 1665: ...ury 0 0005 Cd cadmium 0 002 Pd lead 0 004 In the European Union there are separate collection systems for used batteries and accumulators Please dispose of batteries and accumulators correctly in acco...

Page 1666: ...2 Press the and at the bottom the Adjust Brightness Screen to adjust the contrast to the optimal setting 3 Press the X to close the Adjust Brightness Screen Run Offline Main Menu BRIGHTNESS 31 MAC Add...

Page 1667: ...st Touch Panel setting Press Yes then the Touch Panel Adjust screen appears 3 Press the center of the X mark then the position of the mark changes one after another Press five marks sequentially 4 Whe...

Page 1668: ...Unit Instruction Sheet Japanese English Simplified Chinese x 1 x 1 Mounting clips Communication plug for external devices Attached to the HG2G 5T HG1G USB Cable Lock Pin USB Clamp Band x 1 x 1 x 4 x...

Page 1669: ...S232C RS422 485 Connector Terminal Block 9 pin Screw fastened type Maximum cable length 15m RS232C 1 200m RS422 RS485 6 Ethernet Interface LAN IEEE802 3u 10BASE T 100BASE TX Connector RJ 45 With Auto...

Page 1670: ...Serial Interface COM RS232C RS422 485 Connector Terminal Block 9 pin Screw fastened type Maximum cable length 15m RS232C 1 200m RS422 RS485 5 Ethernet Interface LAN IEEE802 3u 10BASE T 100BASE TX Con...

Page 1671: ...inal number 8 RDA and terminal number 9 RDB if necessary CAUTION Make sure to turn off the power to the HG2G 5T HG1G before wiring each interface or switching the terminating resistor selector switch...

Page 1672: ...o condensation Storage Temperature 20 to 70 C Storage Humidity 10 to 90 RH no condensation Altitude 0 to 2000m Pollution Degree 2 Corrosion Immunity Free from corrosive gases Rated Voltage 12V DC 24V...

Page 1673: ...0 Top 60 Bottom 65 Brightness of LCD only 1100 cd m2 500 cd m2 800 cd m2 Brightness Adjustment 32 levels Backlight LED Backlight Life 4 Approx 100 000 hours The time until brightness becomes 50 of the...

Page 1674: ...tion cables Recommended ferrite core ZCAT3035 1330 manufactured by TDK Corporation Power supply section FE Communication section External device MICRO I DC power supply Attach the ferrite core near th...

Page 1675: ...G2G 5T Unit mm Cable Attached Dimensions Depending on the type of connection cable used the dimensions shown above will change The dimensions given here are representative values and are intended for...

Page 1676: ...m Cable Attached Dimensions Depending on the type of connection cable used the dimensions shown above will change The dimensions given here are representative values and are intended for reference onl...

Page 1677: ...fan or air conditioner to keep the ambient temperature within the rated temperature range HG2G 5T HG1G Installation Make a panel cut out on the panel with the dimensions shown below Use the attached...

Page 1678: ...ect the HG2G 5T HG1G to the personal computer 1 Pull out the power plug of the personal computer from the AC outlet 2 Connect the HG2G 5T HG1G to the personal computer 3 Insert the power plug of the p...

Page 1679: ...le into the USB2 port 2 Strain the Edge part of the USB Cable Lock Pin and insert the Edge part to the 2 holes lower the USB2 port 3 Fasten the USB Clamp Band around the USB cable and the Clamp part s...

Page 1680: ...ne Terminals Connectors Check the terminals and connectors to make sure of no loose screws incomplete insertion or disconnected lines Mounting Clips Make sure that all mounting clips and screws are ti...

Page 1681: ...a chemical symbol is printed beneath the symbol shown above this chemical symbol means that the battery or accumulator contains a heavy metal at a certain concentration This will be indicated as foll...

Page 1682: ...reen appears Initial Setting Self Diagnosis and Initialization of the data etc can be executed in the System Mode Adjusting the Brightness The brightness of the HG2G 5T HG1G display can be adjusted on...

Page 1683: ...e center of the X mark then the position of the mark changes one after another Press five marks sequentially 4 When normally recognized the confirmation screen of 2 is restored At procedure 3 when pre...

Page 1684: ...e received is what you actually ordered and no parts are damaged to accidents during shipping 5 2 Part Numbers 5 HG1P Name HG1P HG1P Unit Instruction Sheet Japanese English x1 Instruction Sheet Chines...

Page 1685: ...lit Normal Operation Power is on Not lit Power is off 7 Connector Removable 19 pin Female Connector 8 Mounting Hole For Wall Mounted Hook Wall mounted hook screw mounting part 2 9 Nameplate Label pri...

Page 1686: ...ct 1 NC 2 C_NO1 Selector Switch Contact 1 NO 3 B_C1 Enabling Switch Contact 1 COM 4 B_C2 Enabling Switch Contact 2 COM 5 B_NO2 Enabling Switch Contact 2 NO 6 FG Frame Ground 7 RDA TP1 Receive Data 8 R...

Page 1687: ...10 to 60 C Storage Humidity 10 to 90 RH no condensation Altitude and Atmospheric Pressure Up to 2000m RUN 750 to 1060hPa Pollution Degree 2 Corrosion Immunity Free from corrosive gases Rated Voltage 2...

Page 1688: ...tment 32 levels Backlight White LED It cannot be replaced Backlight Life 2 Approx 30 000 hours The time until brightness becomes 50 of the initial value Touch Panel Switch Type Analog Resistive Film O...

Page 1689: ...z 43 5dB V m quasi peak 88M to 216MHz 46 4dB V m quasi peak 216M to 960MHz 49 5dB V m quasi peak 960M to 1GHz Electrostatic Discharge Contact 4kV Air 8kV Electromagnetic Field 10V m 80M to 1 0GHz 3V m...

Page 1690: ...ipped 12 Contact Normally open contact Internal Devices Device Name HMI Expansion Input Bit Symbol LI R W R R W is an abbreviation of Read Write R W indicate that both reading and writing are possible...

Page 1691: ...cy Stop Switch OFF ON ON OFF Maximum 41 ms 20 ms ON 20 ms OFF ON OFF OFF OFF ON State of the function key Reading the state of the function key Read result of the function key While executing transmit...

Page 1692: ...inputs so that they are monitored mutually design the sequence control to take into consideration this time difference Part Number Manufacturer HE6B M200Y IDEC Number Mounted 1 Contact 2 contacts exte...

Page 1693: ...switch through the HG1P optional cable as a control signal for external devices Part Number Manufacturer LB6S 2T1 IDEC Number Mounted 1 Contact SPDT external wiring Contact Rating 0 1A DC30V resistanc...

Page 1694: ...5 HG1P 35 80 WindO I NV4 User s Manual 5 6 Dimensions Unit mm Cable Dimensions 191 169 56 70 6 51 55 7...

Page 1695: ...evices that generate a lot of heat Such as a boiler Use the wall mounted hook optional item for wall mounting HG1P Installation Attaching the Optional Cable HG9Z XCP13 XCP15 XCP17 to the HG1P 1 Turn t...

Page 1696: ...ing the connector The connector will stop turning at 90 Do not try to turn it past 90 CAUTION When attaching the cover tighten the screw to the recommended tightening torque 0 6 N m When installing th...

Page 1697: ...Wall Mounting Hook HG9Z PK3 1 Fit the indented surface of the wall mounted hook into the HG1P 2 Use the wall mounted hook screws M3 10 and tighten in two locations to the recommended tightening torqu...

Page 1698: ...ices D sub 25 pin Male Connector Jackscrew M2 6 Length 3m 5m 7m Cable Length 3m 5m 7m 1 13 25 14 Connector for the External Devices View of mating surface of the removable connector No Name Function N...

Page 1699: ...Cores Sheath Outer Diameter 7 0 mm Cable Length 2m Stripped Wires Shield White Black Black Red Green Orange Blue Brown Yellow Shield Sheath Wire pair 2 Single wire 1 Single wire 5 Single wire 4 Singl...

Page 1700: ...e and Inspection Parts Description Display Wipe any stain of the display using a soft cloth slightly dampened with neutral detergent or alcoholic solvent Do not use solvents such as thinner ammonia st...

Page 1701: ...ars 2 Press the and at the bottom the Adjust Brightness Screen to adjust the brightness to the optimal setting 3 Press the X to close the Adjust Brightness Screen Maintenance System Mode Device Monito...

Page 1702: ...Panel setting Press Yes then the Touch Panel Adjust screen appears 3 Press the center of the X mark then the position of the mark changes one after another Press five marks sequentially 4 When recogni...

Page 1703: ...g to USB2 Type A port on front panel Length 1m PLC Connection Cable FC2A KP1C For IDEC FC4A 5A MICROSmart Length 2 4m Connector MICRO I Parted Wire Host Mini DIN 8 pin HG9Z XC275 For IDEC FC4A 5A MICR...

Page 1704: ...HG9Z XC275 For IDEC FC4A 5A MICROSmart Length 5m Connector MICRO I Parted Wire Host Mini DIN 8 pin YES YES YES YES HG9Z XC295 For IDEC FC4A 5A MICROSmart Communication Mode RS232C Length 5m Connector...

Page 1705: ...back of the MICRO I Long 5 pcs pack For total width 47 0 to 69 4 mm YES YES YES YES HG9Z XJ5PN05 For installing the expansion modules on the back of the MICRO I Extra Long 5 pcs pack For total width...

Page 1706: ...ect connection Communication Mode RS422 Length 5m Connector MICRO I D sub 9 pin Host Mini DIN 8 pin YES YES YES NO NO HG9Z XC315 For Mitsubishi Q series direct connection Communication Mode RS232C Len...

Page 1707: ...2 pcs pack YES YES YES NO NO HG9Z PMT11LPN02 For MicroSmart I O Module 11 pole 2 pcs pack YES YES YES NO NO Name Type No Description Maintenance Cable HG9Z XCM42 USB cable to connect to a computer Len...

Page 1708: ...6 Options 35 94 WindO I NV4 User s Manual External Dimensions Hand Strap HG9Z PS4 Unit mm Wall Mounted Hook HG9Z PK3 Unit mm Length Adjuster Black 50 205 1 5 9 16 54 5 39 6 44 1 21 68 6 5 1 2 35 48...

Page 1709: ...ement Battery HG9Z XR1 Coin type lithium manganese dioxide battery CR2032W YES YES YES YES Communication Plug for external devices HG9Z XT09 Right angle type YES YES YES NO HG9Z XT09V Vertical type NO...

Page 1710: ...Products are improved modified or altered by the party other than IDEC or 4 The failure or defects and damages of the Products arise from the usage of the Product in the way that is not intended or 5...

Page 1711: ...ot available 1 The type of inserted SD memory card is not recognized The SD memory card is broken Please use a new recommended SD memory card This USB flash is not available 2 The type of USB flash dr...

Page 1712: ...the source file exceeded the limit when the File Copy function was executed Check the source file size For the maximum file size that can be copied refer to Chapter 29 3 5 Precautions on page 29 38 I...

Page 1713: ...y from Ext device Con firm PLC Cable Com settings There was no response from the external device for an initialization request to start communications from the MICRO I Processing error A value is divi...

Page 1714: ...ery error of address number 2 in the System Area 2 is set and it is set whenever the MICRO I is powered on HG3G HG2G 5F HG5G V HG4G V HG3G V HG2G V HG2G 5T HG4G HG1G HG1P HG2J 7U To display the warnin...

Page 1715: ...bleep each second be sure to download a project using a port for USB 2 2 If the backlight is OFF and the buzzer sounds If you fail to download the runtime program to MICRO I the backlight may turn to...

Page 1716: ...rating system may be corrupted please download the project and update the operating system For details refer to Chapter 24 2 2 Download Dialog Box on page 24 14 If updating the operating system does n...

Page 1717: ...39 098 0x62 139 0x8B 179 0xB3 220 0xDC 013 0x0D 058 0x3A 099 0x63 140 0x8C 180 0xB4 221 0xDD 014 0x0E 059 0x3B 100 0x64 141 0x8D 181 0xB5 223 0xDF 019 0x13 060 0x3C 102 0x66 142 0x8E 182 0xB6 224 0xE0...

Page 1718: ...00 142 99CC99 182 CC33CC 224 FF6633 020 FF0000 062 00FFCC 103 660000 143 99CCCC 183 CC3399 225 FF6666 021 888800 063 00FF99 104 660033 144 99CCFF 184 CC3366 226 FF6699 022 FFFF00 064 00FF66 105 660066...

Page 1719: ...rts These graphics can be used as the outline of parts Example Bit Button Type Selects the category of graphics OFF ON Displays the graphic when OFF or ON Click ON or OFF to switch the graphics displa...

Page 1720: ...sic colors assignable to the Color button Text Manager Color This feature allows use of the text color specified in the Text Manager Click here to use the text color specified in the Text Manager This...

Page 1721: ...ts are formed by foreground and background colors Pattern The selected pattern is applied to the foreground color The background color is visible through the unpainted parts of the foreground color Gr...

Page 1722: ...any color at all Pattern name None 1 Foreground 100 Foreground 25 Foreground 50 Background 100 Pattern buttons Display sample Pattern name Horizontal lines Vertical lines Slant Upwards Slant Downward...

Page 1723: ...Center Left Align Text Vertical Top Center Center Top Bottom Left Aligns the text along the left edge Center Centers the text horizontally in the center Right Aligns the text along the right edge Cent...

Page 1724: ...orizontal Align Text Vertical defaults to Top Top Aligns the text along the top edge Center Center Top Centers the text vertically in the center Bottom Aligns the text along the bottom edge Aligns tex...

Page 1725: ...edge Centers text in the middle Aligns along right edge Vertical text cannot be set if Font is set to Stroke 1 Take note of these points when the Vertical Writing check box is selected When there is a...

Page 1726: ...5 Text Alignment A 10 WindO I NV4 User s Manual...

Page 1727: ...zer Updater Dialog Box 2 39 Autoplay 10 85 Autorun Tab 4 64 AutoSave 2 66 Auto Setup Dialog Box Alarm Log Settings 13 18 Available Fonts for Drawings and Parts 2 9 Available Updates 2 39 B Background...

Page 1728: ...int Button 8 71 Print Command 12 31 Script Command 12 37 Selector Switch 8 162 Timer 12 65 Video Display 10 91 Word Button 8 38 Word Write Command 12 17 Communicate with 24 5 Communication 2 51 Commun...

Page 1729: ...ess Display 11 24 Device Address Settings 2 70 Device Link Communication 3 1 Device Monitor 25 21 Device Object Properties List 3 131 Digital I O Modules 30 12 Disable Switch 4 28 Display a Picture at...

Page 1730: ...e 2 53 Size 2 54 Text Style 2 53 Format Tab Alarm List Display 10 144 Alarm Log Display 10 161 Calendar 10 213 Character Input 10 36 Data Log Display 10 178 Message Display 10 103 Message Switching Di...

Page 1731: ...21 8 Input Method Editor IME 2 62 Input Signal 22 15 Input with Arithmetic Operation 10 20 Insert Value of Device Address Dialog Box E mail Function 28 62 Social Media Function 28 75 Installed Fonts...

Page 1732: ...23 50 Operating Modes 1 4 Operation Count Tab 17 9 Operation Log Function 15 1 Operation Log Settings Dialog Box 15 10 Operation Time Tab 17 8 Operation with priority on control processing 30 9 Operat...

Page 1733: ...ton 8 4 Bit Write Command 12 4 Bit Write for Multi Functions 8 116 12 42 Calendar 10 207 Character Input 10 29 Circle Ellipse 7 12 Data Log Display 10 173 Equilateral Polygons 7 20 Fill 7 23 Goto Scre...

Page 1734: ...ules Dialog Box 24 17 RXD 3 37 S SAFETY PRECAUTIONS P 1 Sampling Method 14 14 Save 4 5 Save As 4 6 Save Project 2 66 Save Tab 2 66 Saving Data Alarm Log Function 13 7 Data Log Function 14 6 Operation...

Page 1735: ...5 14 Specify from Picture dialog box 10 67 Stacked bar chart 11 55 Standard Keypad Popup Screen 5 25 Standard Password Input Screen 5 29 Start Code 3 78 Start Part with synchronous 4 29 Start Time 4 2...

Page 1736: ...nd 12 15 Troubleshooting 36 1 Twitter Account Dialog Box Edit 28 74 New 28 74 TXD 3 37 Type Number 2 58 U Upload Dialog Box 24 23 Uploading Alarm Log Files 24 24 31 6 Custom Web Page Files 24 23 Data...

Page 1737: ...Word Button 8 28 W Watch Dog 4 28 Web Page Configuration 28 5 Web Page Editor 28 12 Web Page Tab 23 42 Web Server Function 28 1 Web Server Function Configuration Procedure 28 4 Web Server Tab 4 66 Whe...

Page 1738: ...ion All Rights Reserved B 1701 16 USA IDEC Corporation EMEA APEM SAS China IDEC Shanghai Corporation IDEC Izumi H K Co Ltd Taiwan IDEC Taiwan Corporation Singapore IDEC Izumi Asia Pte Ltd Thailand IDE...

Reviews:

Related manuals for WindO/I-NV4