2-4
2
2.3.3 4819A/4829A Installation Guide
The following steps should be used as a guide to the 4819A or 4829A
installation.
1. Review Section 2.10 to select and/or design the serial interface
cables.
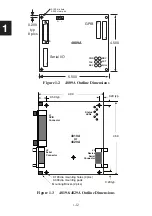
2. Select a spot on the rear panel to mount the board. The 4819A/4829A
mounts perpendicular to the rear panel and is held in place with
mounting blocks. Use the cutouts and mounting dimensions shown
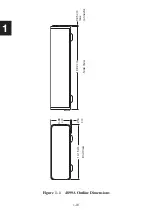
in Figure 2-1 for the connector cutouts. Cutout 'A' is for the IEEE-
488/GPIB connector. Cutout 'B' is for the DE-9 serial connector.
Do not mount the board directly over a heat emitting surface. Pro-
vide a 0.1 inch (2.5 mm) clearance underneath the board or use an
insulator if the board is being mounted on a metal surface.
A
B
Notes: 1. Grayed lines are PC board and mounting blocks
2. Mounting holes are 0.150 dia thru
3. Cutout A is 1.575 in x 0.625 in with 0.150 dia holes
4. Cutout B is 0.875 in x 0.450 in 'D' shell with 10 slope to bottom
and with 0.125 dia holes
0.247
0.320
0.218
0
0
0.200
0.679
2.521
2.
95
0
3.934
4.300
4.
50
0
1.600
3.442
Download a mounting template from http://www.icselect.com/pdfs/4819Alayout.pdf.
Figure 2-1 4819A and 4829A Rear Panel Cutouts
3. To minimize EMI/RFI and to maximize electrical immunity, use
the mounting blocks to fasten the board to the rear panel of the host
chassis. The connector shells should fit against the rear panel. Use
the recommended cutouts in Figure 2-1 to overlap the connectors.
De burr the panel after machining and remove any insulating finish
that would prevent the board from making good chassis connec-
tions.
4. Use a twisted pair of #24 wires to connect external DC power to
the screw terminals at P1. Connect the board directly to the power
Summary of Contents for 4809A
Page 5: ...ii This page left intentionally blank...
Page 51: ...2 30 2 This page left intentionally blank...
Page 89: ...4 8 4 This page intentionally left blank...
Page 99: ...5 10 5 This page left intentionally blank...
Page 125: ...A 26 A3 This page intentionally left blank...
Page 131: ...I Index 6 This page left intentionally blank...

