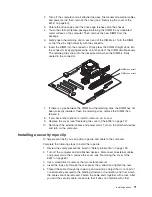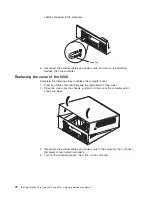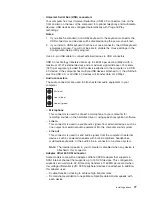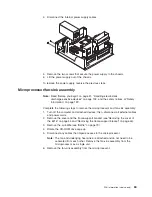
Lever closed
Lever open
8. Lift the microprocessor up and out of the computer.
To install a microprocessor and fan-sink assembly, reverse the previous steps.
System board
Notes:
1. Read “Before you begin” on page 41, “Handling electrostatic discharge-sensitive
devices” on page 132, and “Safety information” on page 129.
2. When replacing the system board, you must either update the system with the
latest firmware or restore the pre-existing firmware that the customer provides
on a diskette or CD image.
Complete the following steps to remove the system board:
1. Turn off the computer and attached devices; then, disconnect all external
cables and power cords.
2. Remove the cover and the frame-support bracket (see“Removing the cover of
the 6216” on page 45 and “Removing the frame-support bracket” on page 45).
3. Remove the air baffle (see “Baffle” on page 79).
4. Disconnect all cables on the system board.
5. Pivot the drive cages up; then, remove the drives and cages from the
computer.
6. Remove any of the following components that are installed on the system
board:
v
Battery (see “Replacing the battery” on page 39).
v
Microprocessor (see “Microprocessor/fan-sink assembly” on page 83).
Important:
If you plan to reinstall an existing microprocessor to the new
system board, be careful when handling the adhesive material
on the microprocessor. If the adhesive material on the
microprocessor will be reused, do not contaminate it. If
replacement adhesive material is provided with the replacement
system board, be sure to remove all traces of existing adhesive
material from the microprocessor before applying the new
adhesive material.
v
Adapters (see “Working with adapters” on page 46).
v
DIMMs (“Installing memory modules” on page 54).
Note:
The power supply has been removed in the illustration for purposes of
clarification (see “Power supply” on page 82). If any installed items
impede your ability to easily access the system board, you can remove
FRU information (service only)
85
Summary of Contents for IntelliStation E Pro
Page 1: ...IBM IntelliStation E Pro Types 6216 and 6226 Hardware Maintenance Manual...
Page 2: ......
Page 3: ...IBM IntelliStation E Pro Types 6216 and 6226 Hardware Maintenance Manual...
Page 6: ...iv IBM IntelliStation E Pro Types 6216 and 6226 Hardware Maintenance Manual...
Page 10: ...viii IBM IntelliStation E Pro Types 6216 and 6226 Hardware Maintenance Manual...
Page 20: ...10 IBM IntelliStation E Pro Types 6216 and 6226 Hardware Maintenance Manual...
Page 138: ...128 IBM IntelliStation E Pro Types 6216 and 6226 Hardware Maintenance Manual...
Page 149: ...Related service information 139...
Page 150: ...140 IBM IntelliStation E Pro Types 6216 and 6226 Hardware Maintenance Manual...
Page 151: ...Related service information 141...
Page 152: ...142 IBM IntelliStation E Pro Types 6216 and 6226 Hardware Maintenance Manual...
Page 153: ...Related service information 143...
Page 154: ...144 IBM IntelliStation E Pro Types 6216 and 6226 Hardware Maintenance Manual...
Page 155: ...Related service information 145...
Page 156: ...146 IBM IntelliStation E Pro Types 6216 and 6226 Hardware Maintenance Manual...
Page 166: ...156 IBM IntelliStation E Pro Types 6216 and 6226 Hardware Maintenance Manual...
Page 167: ...Related service information 157...
Page 168: ...158 IBM IntelliStation E Pro Types 6216 and 6226 Hardware Maintenance Manual...
Page 169: ...Related service information 159...
Page 170: ...160 IBM IntelliStation E Pro Types 6216 and 6226 Hardware Maintenance Manual...
Page 171: ...Related service information 161...
Page 172: ...162 IBM IntelliStation E Pro Types 6216 and 6226 Hardware Maintenance Manual...
Page 181: ......
Page 182: ...Part Number 71P7605 1P P N 71P7605...

