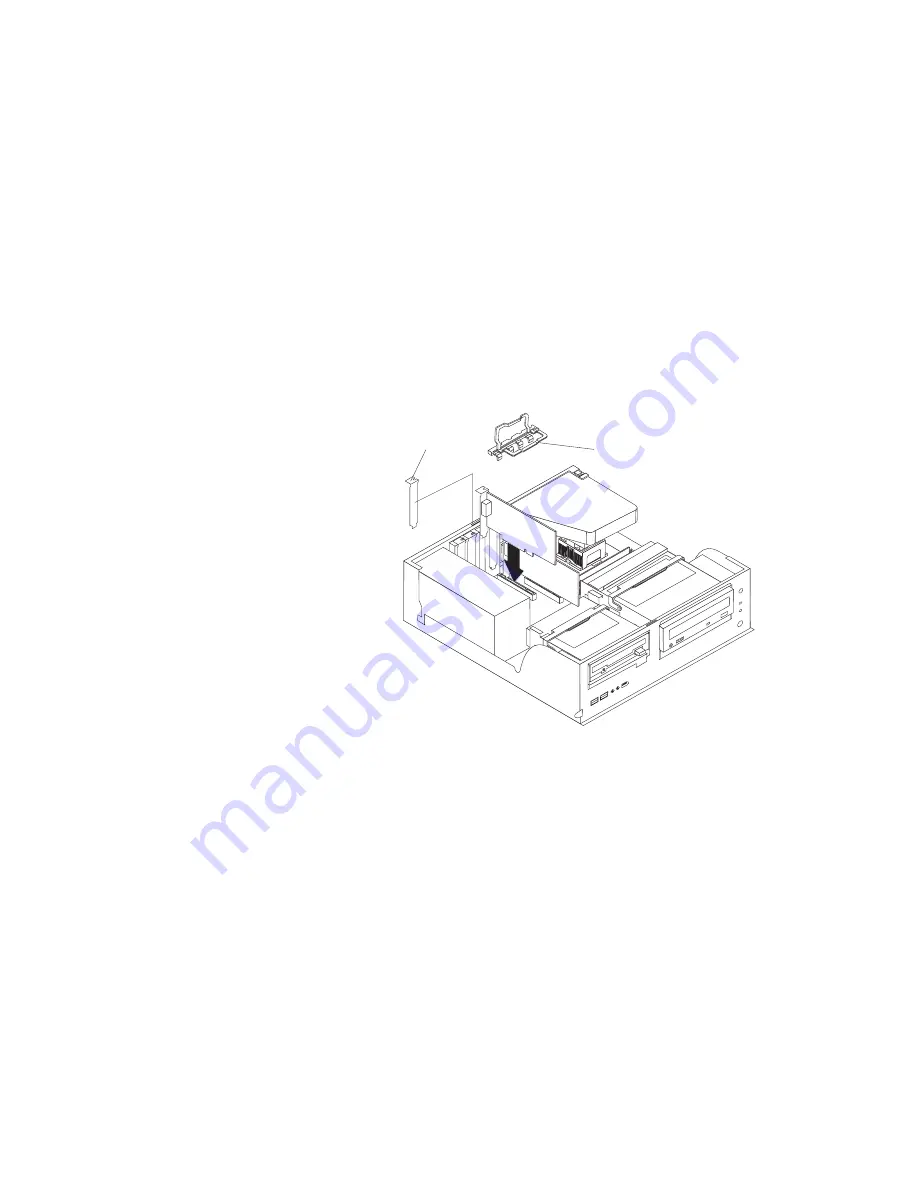
8. Remove the expansion-slot cover. From the rear of the computer, press on the
slot cover. Grasp it and pull it out of the expansion slot. Store it in a safe place
for future use.
Attention:
Expansion-slot covers must be installed on all vacant slots. This
maintains the electronic emissions standards of the computer and ensures
proper ventilation of computer components.
9. When you are ready, remove the adapter from the static-protective package. It
is best to move the adapter directly from the static-protective package to the
adapter slot. If this is not possible, set the adapter down in its static-protective
package on a hard surface. Avoid touching the components and gold-edge
connectors on the adapter.
10. Set any jumpers or switches on the adapter or system board as described by
the adapter manufacturer.
11. To install the adapter, carefully grasp the adapter by the top edge or upper
corners, and align it with the expansion slot guides; then, press the adapter
firmly
into the expansion slot.
Expansion-slot cover
Adapter-support bracket
Attention:
Be certain that the adapter is correctly seated in the expansion slot
before you turn on the computer. Incomplete installation of an adapter might
damage the system board or the adapter.
12. Connect required cables to the adapter.
13. If you have another adapter to install, repeat steps 1 through 12 If you have
another option to install, do so now. Otherwise, complete the remaining steps
in this section.
14. Reinstall the rear adapter support bracket; then, rotate the bracket to the
closed (locked) position.
15. Replace the frame-support bracket.
16. Return the drive-bay cages to their original positions in the computer.
17. Replace the cover (see “Replacing the cover of the 6216” on page 55).
18. Reconnect the external cables and power cords; then, turn on the attached
devices and the computer.
Installing a SCSI adapter
Complete the following steps to install an optional SCSI adapter:
1. Complete steps 1 through 12 of “Installing an adapter” on page 46; then,
continue with step 2.
Installing options
47
Summary of Contents for IntelliStation E Pro
Page 1: ...IBM IntelliStation E Pro Types 6216 and 6226 Hardware Maintenance Manual...
Page 2: ......
Page 3: ...IBM IntelliStation E Pro Types 6216 and 6226 Hardware Maintenance Manual...
Page 6: ...iv IBM IntelliStation E Pro Types 6216 and 6226 Hardware Maintenance Manual...
Page 10: ...viii IBM IntelliStation E Pro Types 6216 and 6226 Hardware Maintenance Manual...
Page 20: ...10 IBM IntelliStation E Pro Types 6216 and 6226 Hardware Maintenance Manual...
Page 138: ...128 IBM IntelliStation E Pro Types 6216 and 6226 Hardware Maintenance Manual...
Page 149: ...Related service information 139...
Page 150: ...140 IBM IntelliStation E Pro Types 6216 and 6226 Hardware Maintenance Manual...
Page 151: ...Related service information 141...
Page 152: ...142 IBM IntelliStation E Pro Types 6216 and 6226 Hardware Maintenance Manual...
Page 153: ...Related service information 143...
Page 154: ...144 IBM IntelliStation E Pro Types 6216 and 6226 Hardware Maintenance Manual...
Page 155: ...Related service information 145...
Page 156: ...146 IBM IntelliStation E Pro Types 6216 and 6226 Hardware Maintenance Manual...
Page 166: ...156 IBM IntelliStation E Pro Types 6216 and 6226 Hardware Maintenance Manual...
Page 167: ...Related service information 157...
Page 168: ...158 IBM IntelliStation E Pro Types 6216 and 6226 Hardware Maintenance Manual...
Page 169: ...Related service information 159...
Page 170: ...160 IBM IntelliStation E Pro Types 6216 and 6226 Hardware Maintenance Manual...
Page 171: ...Related service information 161...
Page 172: ...162 IBM IntelliStation E Pro Types 6216 and 6226 Hardware Maintenance Manual...
Page 181: ......
Page 182: ...Part Number 71P7605 1P P N 71P7605...


