background image

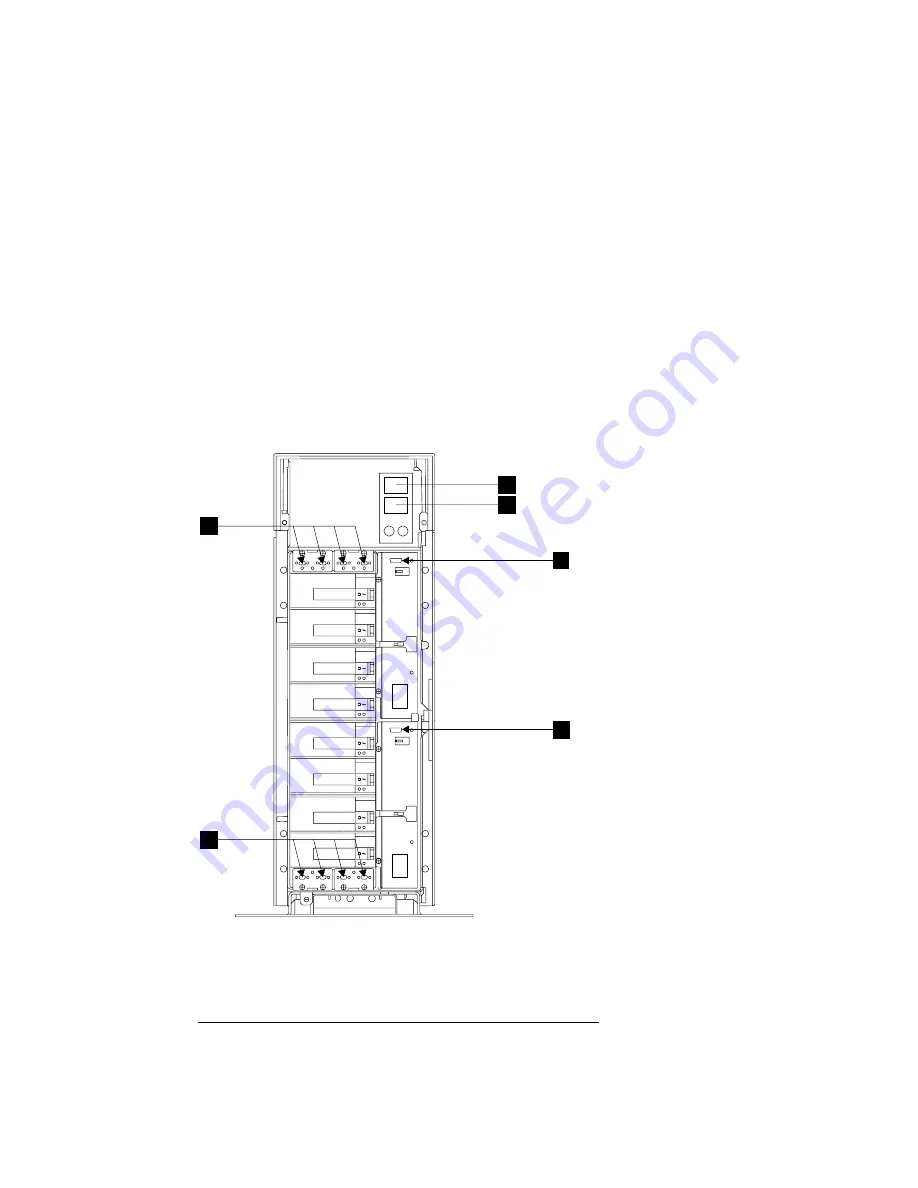
Back Connectors (Model T40)

1

Mainline power connectors

2

Reserved

3

Power control connector

4

SSA connectors

Table 4. Relationship between Strings and Connectors of Model
T40

Connectors

Disk Drive Modules

1 and 4

Front disk drive modules 1 through 4

5 and 8

Front disk drive modules 5 through 8

9 and 12

Back disk drive modules 9 through 12

13 and 16

Back disk drive modules 13 through 16

3

2

1
1

4

4

Figure 13. Back Connectors of Model T40

Chapter 1. Reference Information

29

Summary of Contents for 7133 D40

Page 1: ...7133 Models D40 and T40 Serial Disk Systems Service Guide GY33 0192 07 ...

Page 2: ......

Page 3: ...7133 Models D40 and T40 Serial Disk Systems Service Guide GY33 0192 07 ...

Page 4: ...iodically made to the information herein these changes will be incorporated in new editions of the publication It is possible that this publication may contain reference to or information about products machines and programs programming or services that are not announced in your country Such references or information must not be construed to mean that such products programming or services will be ...

Page 5: ... Laser Safety Information xiv About This Book xv Numbering Convention xv Trademarks xv Related Publications xvi Chapter 1 Reference Information 1 Controller Card 3 SSA Loops and Links 3 Advanced SSA Optical Extender Pair Feature 4 Remote Power On Control Feature 4 48 Volt Power Supply Model D40 Only 4 Lights and Controls 5 Operator Panel Lights and Controls 8 Disk Drive Status Lights 12 Controller...

Page 6: ...n 41 SSA Bypass Cards 41 Automatic Mode 42 Forced Inline Mode 43 Forced Bypass Mode 44 Forced Open Mode 44 Resetting Bypass Card Modes 44 Bypass Card Jumpers 45 SSA Subsystem Configurations 47 Rules for SSA Loops 47 Cable Configurations 47 Larger Configurations 49 SSA Cables for 7133 Models D40 and T40 56 Preventing the Isolation of Disk Drives in Higher Availability Configurations 57 Physical Loc...

Page 7: ...ermination 132 Link Status Ready Lights 135 Optical Extender Lights 136 Displaying Link Problems 136 Chapter 3 Removal and Replacement Procedures 137 Concurrent Maintenance 137 Covers 138 Operator Panel Flap 138 Front Cover Model D40 139 Front Cover Model T40 143 Back Cover Model T40 144 All Power 145 Power Model D40 146 Power Model T40 148 Disk Drive Modules and Dummy Disk Drive Modules 150 Remov...

Page 8: ...upport Rails 232 Netfinity Support Rails 237 Chapter 4 Parts Catalog 241 Conventions 241 Assembly 1 7133 Model D40 242 Assembly 2 7133 Model T40 248 Country Power Cables 252 Appendix A Additional Information for RISC Systems 253 Related Publications 254 Web Support Pages 254 Addressing SSA Disk Drives 255 Location Code Format 255 Pdisks Hdisks and Disk Drive Module Identification 255 Software and ...

Page 9: ...Microcode Errors 277 Controller Card Microcode Maintenance 277 Downloading Disk Drive Microcode 277 Diagnostics Information 278 Concurrent Diagnostics 278 Nonconcurrent Diagnostics 278 Problems Corrected 278 Displaying Link and Power Problems 278 Service Aids 279 Command Line Tools 279 Disk Drive Modules in Use 280 Configuring a Disk Drive Module to the Using System 280 Configuring a 7133 to the U...

Page 10: ...viii 7133 Models D40 and T40 Service Guide ...

Page 11: ...nd connectors or by unauthorized changes or modifications to this equipment Unauthorized changes or modifications could void the user s authority to operate the equipment This device complies with Part 15 of FCC Rules Operation is subject to the following two conditions 1 this device may not cause harmful interference and 2 this device must accept any interference received including interference t...

Page 12: ...acturer can accept responsibility for any failure to satisfy the protection requirements resulting from a non recommended modification of the product including the fitting of option cards not supplied by the manufacturer This product is in conformity with the EU council directive 73 23 EEC and the Complementary Markings Directive 93 68 EEC on the approximation of the laws of the Member States rela...

Page 13: ...Genehmigungsverfahren ist nach Paragraph 9 EMVG in Verbindung mit der entsprechenden Kostenverordnung Amtsblatt 14 93 kostenpflichtig Nach der EN 55022 Dies ist eine Einrichtung der Klasse A Diese Einrichtung kann im Wohnbereich Funkstörungen verursachen in diesem Fall kann vom Betreiber verlangt werden angemessene Massnahmen durchzuführen und dafür aufzukommen Anmerkung Um die Einhaltung des EMVG...

Page 14: ...xii 7133 Models D40 and T40 Service Guide ...

Page 15: ...zard that has the potential of causing moderate or minor personal injury This book contains a caution notice on pages 210 213 215 216 219 222 223 227 229 and 231 An attention notice indicates an action that could cause damage to a program device system or data Safety Notice for Installing Relocating or Servicing Before connecting or removing any cables to or from connectors at the using system be ...

Page 16: ...s a Class 1 laser product that conforms to the requirements contained in the International Electrotechnical Commission IEC standard 825 1 1993 Class 1 laser products are not considered to be hazardous The optical extender internally contains an indium gallium arsenide indium phosphide InGaAs InP semiconductor laser diode emitting in the wavelength range of 1280 to 1340 nanometers This laser diode ...

Page 17: ...ms gives additional information for 7133 Models D40 and T40 that are attached to RISC systems v Appendix B Additional Information for PC Servers gives additional information for 7133 Models D40 and T40 that are attached to PC servers An index is provided at the back of the book Important This book does not include service information for 7133 Models 010 020 500 and 600 SSA Disk Subsystems For thos...

Page 18: ...uide GA33 3280 7133 Models D40 and T40 Serial Disk Systems Hardware Technical Information SA33 3281 7133 Serial Disk Systems and SSA Adapters Translated Safety Notices SA33 3274 For other publications see Related Publications in the Additional Information appendix in this book for your using system For the latest information about SSA SSA microcode levels and SSA publications see the web support p...

Page 19: ...upport for SSA Model D40 1 is a rack mounted unit that can be installed in a standard Electrical Industries Association EIA 19 inch rack Model T40 2 is a deskside unit The 7133 can contain up to 16 SSA disk drive modules eight at the front and eight at the back The disk drive modules are connected to each other in strings of four modules two strings at the front of the 7133 and two strings at the ...

Page 20: ...tional Information appendix in this book for your using system When a 7133 is configured as a device v Errors that are detected in the 7133 are logged in the system error log against that 7133 v Vital product data VPD for the 7133 can be accessed Each FRU contains its own VPD A using system can access this VPD while the 7133 is being configured to that particular using system Enclosure configurati...

Page 21: ... through the power supply assembly that is in position 1 v Monitors and controls the bypass cards v Monitors and controls the operator panel v Provides support for SCSI Enclosure Services SES SSA Loops and Links The disk drive modules of the 7133 are connected through two or more SSA links to an SSA attachment that is located in the using system The disk drive modules SSA links and SSA attachment ...

Page 22: ...lectrical power in 7133 Models D40 and T40 The feature consists of a control unit a cable that connects the control unit to the 7133 and cables that connect the control unit to the using system See also Remote Power On Control Unit and Cables on page 21 48 Volt Power Supply Model D40 Only The 48 Volt Power Supply feature provides power supply assemblies that allow the 7133 Model D40 to be connecte...

Page 23: ...rols v Bypass card lights v Disk drive module lights The operator panel of the 7133 is located behind a flap to prevent accidental operation of the controls To open the flap press and release the latch button 1 see Figure 2 The flap pivots to the left Figure 3 shows the lights and controls of Model D40 Figure 4 shows the lights and controls of Model T40 1 Figure 2 Operator Panel Flap and Latch But...

Page 24: ...7 9 1 2 3 4 5 6 8 10 10 10 10 11 11 10 10 10 10 11 11 12 13 14 12 13 14 Figure 3 Lights and Controls of Model D40 6 7133 Models D40 and T40 Service Guide ...

Page 25: ...4 7 1 2 3 8 8 6 5 9 10 10 10 10 11 11 10 10 10 10 11 11 12 13 14 12 13 14 Figure 4 Lights and Controls of Model T40 Chapter 1 Reference Information 7 ...

Page 26: ...nline power is present in the power supply assemblies To switch on the mainline power press and release the Power switch 7133 Power light 1 This green light is on continuously when the Power switch has been pressed to switch on the 7133 and dc voltage is present in the 7133 The light flashes when the 7133 is in Standby mode Note On Model D40 Standby mode can be set by the 7133 Power switch or by t...

Page 27: ...g a 7133 to the Using System in the Additional Information appendix in this book for your using system You can also use the Enclosure Settings service aid and the command line tools to display the location information of the 7133 See also Location Code Format in the Additional Information appendix in this book for your using system If a failure occurs in the 7133 the display shows an error ID alte...

Page 28: ...four minutes the internal dc power switches off that is the 7133 enters Standby mode If the error ID is COLD the internal dc power switches on automatically after the temperature has increased and has remained more than 5 C above the critical temperature for 15 minutes If the error ID is WARM the error is not reset until the ambient temperature has fallen at least 2 C below the warning level If th...

Page 29: ...ters Press the button the appropriate number of times to select the character that you want to enter v Press the right button to store the selected ID If you do not press any button in 10 seconds the display resets to its last known valid entries Note When you change the ID you might need to reconfigure your 7133 to the using system See the Additional Information appendix in this book for your usi...

Page 30: ...ive v A power on self test POST is running on this disk drive module Permanently on Both SSA links are active and the disk drive module is ready to accept commands from the using system The Ready light does not show that the motor of the disk drive module is running The module might be waiting for a Motor Start command or might have received a Motor Stop Command Slow flash two seconds on two secon...

Page 31: ... supply assembly CHK PWR GOOD light 12 This light shows amber if the dc output from the power supply assembly fails On 7133s that have the Remote Power On Control feature the light goes off when power is switched off at the using system or at the remote power on control unit The light shows green when the dc output from the power supply assembly is active Bypass Card Lights To identify the lights ...

Page 32: ...Off The bypass card is switched to Inline state Table 2 summarizes the states of the three bypass card lights Table 2 Summary of Bypass Card Lights Operating Mode Status Link Status Light Mode Light Link Status Light Automatic Inline On Off On Automatic Bypass Off Amber Off Forced Inline Inline Off Green Off Forced Bypass Bypass On Amber On Forced Open Open Off Off Off Jumpered Forced Inline Inlin...

Page 33: ...e v A power on self test POST is running on this disk drive module Permanently on Both SSA links are active and the disk drive module is ready to accept commands from the using system The Ready light does not show that the motor of the disk drive module is running The module might be waiting for a Motor Start command or might have received a Motor Stop Command Slow flash two seconds on two seconds...

Page 34: ...nute after the disk drive module is switched on the POSTs have failed v Neither SSA link is active v The disk drive module is in Service mode and can be removed from the 7133 Flashing The Check light has been set by a service aid to identify the position of this particular disk drive module Other 7133 Settings The 7133 Models D40 and T40 have other settings that you can change by way of the servic...

Page 35: ...Parts Locations This section has two subsections one is for Model D40 the other is for Model T40 Go to the appropriate subsection Chapter 1 Reference Information 17 ...

Page 36: ...ion 1 3 Disk drive status lights assembly 10 Bypass card 1 ports 4 and 5 4 Controller card assembly 11 Bypass card 2 ports 8 and 9 5 Disk drive modules 12 Fan assembly position 3 6 Bypass card 3 ports 1 and 16 13 Fan assembly position 2 7 Bypass card 4 ports 12 and 13 14 Fan assembly position 1 2 3 4 6 7 8 9 10 11 12 13 14 1 5 Figure 6 Parts Locations of Model D40 18 7133 Models D40 and T40 Servic...

Page 37: ... modules are numbered 1 through 8 from left to right viewed from the front of the 7133 The back disk drive modules are numbered 9 through 16 from left to right viewed from the back of the 7133 Chapter 1 Reference Information 19 ...

Page 38: ... and 9 5 Power switch and cable assembly 13 Disk drive modules 6 Bypass card 4 ports 12 and 13 14 Fan assembly position 3 7 Bypass card 3 ports 1 and 16 15 Fan assembly position 2 8 Power supply assembly position 2 16 Fan assembly position 1 Note The front disk drive modules are numbered 1 through 8 from top to bottom The back disk drive modules are numbered 9 through 16 from bottom to top 1 2 3 4...

Page 39: ...n Control Unit and Cables 1 Remote power on control unit 2 7133 power control cable 3 Using system power control cables 1 2 3 1 2 3 Figure 8 Remote Power On Control Unit and Cables Chapter 1 Reference Information 21 ...

Page 40: ... the Receive connector note the symbol 4 of one Advanced SSA Optical Extender and the Transmit connector note the symbol 5 of the other Advanced SSA Optical Extender At the Receive connector the Advanced SSA Optical Extender receives data from a using system or device via the fibre optic cable At the Transmit connector the Advanced SSA Optical Extender sends data to a using system or device via th...

Page 41: ...uch as IPA D 1 Water Mix 106 17F to the end faces v When the wrap cable and adapter assembly is not in use the ends of the wrap cable are protected as follows If the wrap cable is 400 mm 15 in long each of its ends is connected to the wrap adapter to make a closed loop If the wrap cable is 150 mm 6 in long one end of the cable is connected to the wrap adapter and protective covers are placed over ...

Page 42: ...o the Transmit connector note the symbol 4 of the Advanced SSA Optical Extender The orange fibre 7 of the Advanced Multi Mode Conditioner is connected to the Receive connector note the symbol 3 of the Advanced SSA Optical Extender The fibre optic cables are connected via uniters 9 to the two connectors labeled Cable Plant at the other end of the Advanced Multi Mode Conditioner Each fibre optic cab...

Page 43: ...ter connects the two fibre optic cables to each other Attention v Before fibre optic cables are connected they must be checked to ensure that their end faces are clean If necessary use a small cotton pad to apply a fibre cleaning fluid such as IPA D 1 Water Mix 106 17F to the end faces v When the wrap cable and adapter assembly is not in use the ends of the wrap cable are protected as follows If t...

Page 44: ... multi mode operations but see also Note 10 kilometers 32800 feet for single mode operations but see also Note Note Lengths of 3 kilometers and 10 kilometers are permitted only if the fibre optic connection is between v Two 7133s Model D40 or T40 v A 7133 Model D40 and a 7133 Model T40 v A 7133 Model D40 or T40 and an Advanced SerialRAID Adapter v A 7133 Model D40 or T40 and an Advanced SerialRAID...

Page 45: ...Power control connector Table 3 Relationship between Strings and Connectors of Model D40 Connectors Disk Drive Modules 1 and 4 Front disk drive modules 1 through 4 5 and 8 Front disk drive modules 5 through 8 9 and 12 Back disk drive modules 9 through 12 13 and 16 Back disk drive modules 13 through 16 4 1 1 3 3 2 Figure 11 Back Connectors of Model D40 Chapter 1 Reference Information 27 ...

Page 46: ...ors at the back of the 7133 Figure 12 shows the relationships between the disk drive module strings and the external SSA connectors at the back of the 7133 Model D40 Table 3 on page 27 summarizes the relationship between the disk drive module strings and the external SSA connectors Figure 12 Internal Connections of Model D40 28 7133 Models D40 and T40 Service Guide ...

Page 47: ...n Strings and Connectors of Model T40 Connectors Disk Drive Modules 1 and 4 Front disk drive modules 1 through 4 5 and 8 Front disk drive modules 5 through 8 9 and 12 Back disk drive modules 9 through 12 13 and 16 Back disk drive modules 13 through 16 3 2 1 1 4 4 Figure 13 Back Connectors of Model T40 Chapter 1 Reference Information 29 ...

Page 48: ...tors at the back of the 7133 Figure 14 show the relationships between the disk drive module strings and the external SSA connectors at the back of the 7133 Model T40 Table 4 on page 29 summarizes the relationship between the disk drive module strings and the external SSA connectors Figure 14 Internal Connections of Model T40 30 7133 Models D40 and T40 Service Guide ...

Page 49: ...ut 7 Advanced SSA Optical Extender 3 Ground 8 5 V 4 Line In 9 Line In 5 Ground Because SSA systems are always cabled in loops no terminators are required Notes 1 If pin 1 is at ground it indicates that a 40 MB s cable is attached 2 If pin 7 is at ground it indicates that an Advanced SSA Optical Extender is connected 5 9 6 1 Figure 15 SSA Connectors Chapter 1 Reference Information 31 ...

Page 50: ...wer cables that are supplied with the 7133 Model D40 Mainline Power Connector Model D40 48 V dc This type of connector is on each 48 V power supply assembly Pin Assignment Pin Assignment 1 Frame ground 7 Frame ground 2 Not used 8 Not used 3 48 V return 0 V 9 48 V return 0V 4 48 V return 0 V 10 48 V return 0V 5 48 V in 11 48 V in 6 48 V in 12 48 V in Live Neutral Ground Figure 16 Mainline Power Con...

Page 51: ...e 7133 to be connected to a mainline power source Internal Power Connector Model T40 This type of connector is on each power supply assembly Live Neutral Ground Figure 18 Mainline Power Connector 220 V ac Model T40 Live Neutral Ground Figure 19 Internal Power Connector 220V ac Model T40 Chapter 1 Reference Information 33 ...

Page 52: ... Power On Control Unit On Off switch Main MAIN Connector Pin Assignments Pin Assignment 1 Main power control 2 Main power control 3 Link 4 Ground Auxiliary AUX Connector Pin Assignments Pin Assignment 1 Auxiliary power control 2 Auxiliary power control 3 No connection 4 No connection 3 5 4 4 3 2 1 Pin 1 Pin 3 Pin 4 Pin 2 or Figure 20 Remote Power On Control Unit Connectors and Switch 34 7133 Model...

Page 53: ...Disk Drive Module Disk Drive Module Fan Assembly 1 Fan Assembly 2 Fan Assembly 3 5V 12V Power Supply Assembly 2 Power Supply Assembly 1 Power Light Power Light Power Light Power Light Power Light Power Light Power Control 12V 5V Mainline Power Switch Model T40 Only Figure 21 Power Distribution Chapter 1 Reference Information 35 ...

Page 54: ...uct information labels one is attached to the frame assembly the other is attached to the inside of the back cover The label that is attached to the back cover shows the correct information for the 7133 1 2 nnnnnnnn X XGb nnnnnn nnnnnn nnnn nnnnnn nnnnnn 5 3 4 ASM P N UNIQUE ID CONTAINED FILE S N PP ALL RIGHTS RESERVED MACHINES CORP INTERNATIONAL BUSINESS REGISTERED TRADEMARK OF MANUFACTURED ON DD...

Page 55: ...lways refer to this label Ignore the label that is on the frame assembly it might not be correct The frame assembly might have been exchanged during a repair operation Chapter 1 Reference Information 37 ...

Page 56: ...nput Voltage Requirements Power Supply Assembly Type Voltage Frequency 220 V 88 to 264 V ac or 240 to 375 V dc 47 to 63 Hz 48 V 40 to 60 V dc Environment Operating Environment Nonoperating Environment Storing Environment Shipping Environment Air temperature 10 C to 40 C 50 F to 104 F 10 C to 52 C 50 F to 125 F 1 C to 60 C 34 F to 140 F 40 C to 60 C 40 F to 140 F Relative Humidity 8 to 80 nonconden...

Page 57: ...hat remain between the racks For details of Suite Attach Kits contact your marketing representative Where racks are in rows front to front or back to back a gap of at least 1220 mm 48 in must separate the rows across the cold aisle Where cold air is supplied through perforated tiles or gratings in the floor it is recommended that the front of racks be located on floor tile seams A full line of per...

Page 58: ... 36 446 367 744 bytes 71 184 312 36 4 GB 10 000 36 446 367 744 bytes 71 184 312 36 4 GB 15 000 36 446 367 744 bytes 71 184 312 72 8 GB 10 000 72 892 735 488 bytes 142 368 624 145 6 GB 10 000 145 785 470 976 bytes 284 737 248 Limitations 1 Various types of 10 000 rpm disk drives are available Their actual speeds are in the range 9 991 through 10 091 rpm 2 If the customer configures an ERserver pSer...

Page 59: ...ove the disk drive module from any shipping packaging but leave it in its sealed plastic bag if present to prevent condensation forming SSA Bypass Cards The four bypass cards that are at the back of the 7133 Models D40 and T40 provide the connections between the external SSA cables and the disk drive module strings Each bypass card has two external SSA connectors Through these connectors the bypas...

Page 60: ...rings together and disconnects them from the external connectors Therefore when a 7133 that has all its bypass cards jumpered for Automatic mode is not connected externally all 16 disk drive module slots are connected in one internal SSA loop In figures 23 and Figure 24 on page 43 two strings of four disk drive modules in a 7133 are connected to two SSA adapters If power is on at both adapters the...

Page 61: ...e connected to each other In this type of configuration Forced Inline mode removes the risk that a fault condition might break the connection between the two 7133s The second example in Higher Availability Configurations on page 54 shows a typical configuration of this type v The disk drive modules in one 7133 are not all connected to the same SSA loop In this type of configuration Forced Inline m...

Page 62: ...e on each side of the bypass card cannot be broken or changed by the addition of external cables Forced Open Mode When the bypass card is set for Forced Open mode no connections through this bypass card are active A typical use for Forced Open mode is to ensure that the interface is isolated Resetting Bypass Card Modes If the bypass card modes have been set in such a way that the using system can ...

Page 63: ...pass card operates is set by two jumpers The default setting is for Automatic mode The mode can be changed by relocating the jumpers For instructions on how to remove a bypass card and change its mode see Bypass SNBC Cards on page 201 Jumpers Set for Automatic Mode 1 SSA connectors 2 Jumpers 1 2 3 1 2 3 1 1 2 2 Figure 25 Bypass Card Jumpers Set for Automatic Mode Chapter 1 Reference Information 45...

Page 64: ...Jumpers Set for Forced Inline Mode 1 SSA connectors 2 Jumpers 1 2 3 1 2 3 1 1 2 2 Figure 26 Bypass Card Jumpers Set for Forced Inline Mode 46 7133 Models D40 and T40 Service Guide ...

Page 65: ...t are installed in a 7133 Model D40 or Model T40 must also follow these additional rules v A maximum of three dummy disk drive modules can be connected to each other in a particular SSA loop v The maximum permitted length for an external SSA cable that connects two SSA nodes for example disk drives is 25 meters 82 feet v Under some conditions the maximum permitted length for a fibre optic cable th...

Page 66: ...f the two pairs of connectors on an SSA attachment in the using system see Figure 27 No improvement in performance is gained if the disk drive modules are moved to other slots and connected in more than one loop The cables are described in SSA Cables for 7133 Models D40 and T40 on page 56 The internal connections of the 7133 are shown in Internal Connections Model D40 on page 28 and Internal Conne...

Page 67: ...the disk drive modules are moved to other slots and connected in more than two loops by way of an additional SSA attachment The cables are described in SSA Cables for 7133 Models D40 and T40 on page 56 The internal connections of the 7133 are shown in Internal Connections Model D40 on page 28 and Internal Connections Model T40 on page 30 For information about the rules for SSA loops see the Rules ...

Page 68: ...sk drive modules are connected in more than two loops by way of an additional SSA attachment The cables are described in SSA Cables for 7133 Models D40 and T40 on page 56 The internal connections of the 7133 are shown in Internal Connections Model D40 on page 28 and Internal Connections Model T40 on page 30 For information about the rules for SSA loops see the Rules for SSA Loops on page 47 1 2 2 ...

Page 69: ...e available In the following example 32 disk drive modules are connected to an SSA attachment They can all be connected in one loop but for better performance and better serviceability it is recommended that the disk drive modules be connected in two loops each of which is connected to a separate pair of connectors on the SSA attachment see Figure 30 1 2 2 2 2 7133 unit 1 4 8 1 12 4 3 2 1 5 6 7 8 ...

Page 70: ...n page 56 The internal connections of the 7133 shown in Internal Connections Model D40 on page 28 and Internal Connections Model T40 on page 30 For information about the rules for SSA loops see the Rules for SSA Loops on page 47 52 7133 Models D40 and T40 Service Guide ...

Page 71: ... 8 9 10 11 12 13 14 15 16 13 5 9 16 7133 unit 6 4 8 1 12 4 3 2 1 5 6 7 8 9 10 11 12 13 14 15 16 13 5 9 16 Using system A1 A2 B1 B2 7133 unit 2 4 8 1 12 4 3 2 1 5 6 7 8 9 10 11 12 13 14 15 16 13 5 9 16 4 8 1 12 4 3 2 1 5 6 7 8 9 10 11 12 13 14 15 16 13 5 9 16 7133 unit 3 4 8 1 12 4 3 2 1 5 6 7 8 9 10 11 12 13 14 15 16 13 5 9 16 1 2 2 2 Figure 31 Multiple Unit Configuration Six 7133s Chapter 1 Refer...

Page 72: ... D40 and T40 on page 56 The internal connections of the 7133 are shown in Internal Connections Model D40 on page 28 and Internal Connections Model T40 on page 30 For information about the rules for SSA loops see the Rules for SSA Loops on page 47 Figure 33 on page 55 shows three 7133s connected in one loop with six SSA attachments The broken line represents optional cables that provide additional ...

Page 73: ... A2 B1 B2 7133 unit 2 4 8 1 12 4 3 2 1 5 6 7 8 9 10 11 12 13 14 15 16 13 5 9 16 7133 unit 1 4 8 1 12 4 3 2 1 5 6 7 8 9 10 11 12 13 14 15 16 13 5 9 16 7133 unit 3 4 8 1 12 4 3 2 1 5 6 7 8 9 10 11 12 13 14 15 16 13 5 9 16 2 2 2 2 2 2 2 2 2 2 2 2 1 1 1 1 1 1 Figure 33 Higher Availability Configuration Three 7133s Chapter 1 Reference Information 55 ...

Page 74: ...em SSA attachment hardware 2 08L7908 08L7909 08L7910 08L7911 08L7912 External SSA copper cable 1 0 m 3 3 ft External SSA copper cable 2 5 m 8 2 ft External SSA copper cable 5 0 m 16 4 ft External SSA copper cable 10 m 32 8 ft External SSA copper cable 25 m 82 0 ft Attention The correct SSA copper cables for the 7133 Models D40 and T40 are colored blue Note If the 7133 has the Advanced SSA Optical ...

Page 75: ...re held reset but remain powered on the bypass card does not operate and the disk drive modules become isolated In Figure 34 SSA attachments 1 and 2 are in using system 1 SSA attachments 3 and 4 are in using system 2 In each using system the two SSA attachments are connected to each other If the two SSA attachments of either using system fail or are held reset but remain powered on all the disk dr...

Page 76: ...n powered on disk drives 1 through 12 can still communicate with using system 2 Disk drives 13 through 16 however cannot communicate with using system 2 because their data paths are through the SSA attachments in using system 1 When using system 1 is rebooted disk drives 13 through 16 remain unavailable for a long time Using System 1 A1 A2 B1 B2 A1 A2 B1 B2 Disk 1 Disk 2 Disk 3 Disk 4 Disk 5 Disk ...

Page 77: ...Service Aids in the user or maintenance information for your using system SSA attachment Some devices for example SSA adapters do not have Check lights To find such a device you can either use the Identify function to identify devices that are next to the SSA adapter on the SSA loop or use the procedure described in Additional Device Location Information Additional Device Location Information You ...

Page 78: ...vel of microcode provides two types of download function v Temporary This type of download function downloads the new microcode into RAM and activates it When the controller card is next powered off then powered on the new microcode is lost and the original microcode is used v Permanent This type of download function downloads the microcode into RAM and EEPROM See also Controller Card Microcode Ma...

Page 79: ...oad part number Device specific Z3 Disk drive FRU part number Device specific Z4 Disk enclosure date of manufacture 7133 Models D40 and T40 Part number Controller card assembly FRU part number EC Level Controller card assembly engineering change level Serial number Controller card assembly serial number Manufacturer Manufacturer and plant code ROS Level and ID ROM and RAM code revision levels Desc...

Page 80: ...ids allow you to display the following v Loop and link configuration information v Enclosure configuration information v Enclosure environment information v Change enclosure settings information These service aids also allow you to change the enclosure settings For more information see Service Aids in the Additional Information appendix in this book for your using system Loop and Link Configuratio...

Page 81: ...el T40 the service aids allow you to change the following settings v Enclosure ID v Bypass card mode Automatic Forced Inline Forced Bypass and Forced Open v Temperature warning levels low and high You can also reset the Exchanged and Swap flags for the FRU Note The Exchanged and Swap flags show whether a FRU has been removed or exchanged since its flag was last reset These flags are especially use...

Page 82: ...table safety publications Inspection Checklist 1 Remove all power from the 7133 see All Power on page 145 2 Check the frame for damage loose broken or sharp edges 3 Check the power cables and ensure that a The third wire ground connector is in good condition Use a meter to check that the third wire ground continuity is 0 1 ohm or less between the external ground pin and the frame ground b The insu...

Page 83: ...r supply assembly Ensure also that the other ends of the power cables are connected to the power supply in the rack see the Installation and Service Guide or equivalent for the rack or using system 4 Attention Some electrical circuits could be damaged if the external SSA cables or power control cables are present at the 7133 while the grounding check is being done Ensure that no external SSA cable...

Page 84: ...uipment must be connected to the frame of the 7133 3 in Figure 36 on page 65 If the grounding is correct go no further with these instructions If the grounding is not correct unplug the power cables from the power supply assemblies in the 7133 If you are servicing a 220 volt 7133 go to step 9 on page 67 If you are servicing a 48 volt 7133 go to step 12 on page 67 1 Figure 37 Remote Power On Contro...

Page 85: ...er Supply Assemblies on page 162 then do the complete grounding check again If each power supply assembly has continuity you might have a problem with the power cable or with the grounding of the using system If you are servicing a 220 volt 7133 go to step 16 If you are servicing a 48 volt 7133 see the rack or using system Installation and Service Guide or equivalent to isolate the fault then do t...

Page 86: ... exchange it for a new one then do the complete grounding check again If the power cable does have continuity see the rack or using system Installation and Service Guide or equivalent to isolate the fault 68 7133 Models D40 and T40 Service Guide ...

Page 87: ...ctrical power outlets Unplug the cables if necessary 4 Attention Some electrical circuits could be damaged if the external SSA cables or power control cables are present at the 7133 while the grounding check is being done Ensure that no external SSA cables are present at the eight connectors 5 5 If the 7133 has a Remote Power On Control feature go to step 6 on page 70 Otherwise go to step 8 on pag...

Page 88: ...e of the 7133 6 in Figure 40 on page 69 and the ground pin of each power cable 9 If the continuity is good the grounding of the 7133 is correct Go no further with these instructions 10 If the grounding is not correct unplug the power cables from the mainline power connectors at the top of the 7133 Then continue with step 11 1 Figure 41 Remote Power On Control Unit 70 7133 Models D40 and T40 Servic...

Page 89: ...0 on page 69 and check for continuity between the frame of the 7133 and the ground pin of the power connector on each power supply assembly see Figure 19 on page 33 17 If either power supply assembly does not have continuity exchange that power supply assembly for a new one see Power Supply Assemblies on page 162 then do the complete grounding check again If both power supply assemblies have conti...

Page 90: ...72 7133 Models D40 and T40 Service Guide ...

Page 91: ...en a Send Diagnostic command is received from the SSA attachment They check whether the disk drive module is working correctly The POSTs also help verify a repair after a FRU has been exchanged The tests are POST 1 and POST 2 POST 1 runs immediately after the power on reset line goes inactive and before the disk drive module motor starts POST 1 includes tests of v Microprocessor v ROM v Safety cir...

Page 92: ...the POSTs fail v All the fans are set to full speed v The Controller Card Check light and the 7133 Check light come on v If the failure occurs at the 7133 power on time the bypass cards go into Automatic mode the default mode unless they are jumpered for Forced Inline mode v The functional operation of the 7133 is not affected For example the customer still has access to all the disk drive modules...

Page 93: ...tion Information on page 59 Using the SRN Table Important You should have been sent here from MAP 2010 7133 Models D40 and T40 START Do not start problem determination from the SRN table always go to MAP 2010 7133 Models D40 and T40 START on page 87 first 1 Locate the SRN in the table If you cannot find a particular SRN in the table go to the SRN list that is in the user or maintenance information...

Page 94: ...ply assemblies Fan assembly An assembly that contains a dc cooling fan The 7133 has three fan assemblies Bypass card One of the four cards at the back of a 7133 The cards are plugged into the backplane assemblies Each bypass card has two SSA connectors for the external SSA cables and a switch that automatically connects or disconnects the disk drive module strings internally when external SSA cabl...

Page 95: ...k drive module 100 Disk Drive Modules and Dummy Disk Drive Modules on page 150 Description Disk drive module error Action Exchange the FRU for a new FRU see Physical Location of a Device on page 59 Note In this SRN an X represents a digit 0 through F 20PAA Disk drive module 45 Disk Drive Modules and Dummy Disk Drive Modules on page 150 SSA attachment 45 using system Installation and Service Guide ...

Page 96: ... 150 SSA attachment 50 using system Installation and Service Guide Description Async code 03 has been received Probably a software error has occurred Action Go to Software and Microcode Errors in the Additional Information appendix in this book for your using system before exchanging any FRUs 2A004 Disk drive module 50 Disk Drive Modules and Dummy Disk Drive Modules on page 150 SSA attachment 50 u...

Page 97: ...199 Frame assembly 3 Frame Assembly on page 208 Description A health check has reported that one or more disk drive modules have detected the loss of redundant power or cooling Action Go to MAP 2010 7133 Models D40 and T40 START on page 87 to further isolate the problem 303FE Disk drive module 100 Disk Drive Modules and Dummy Disk Drive Modules on page 150 Description A disk drive module has repor...

Page 98: ...user or maintenance information for your using system SSA attachment If no device is listed with a status of Failed use the PAA part of the SRN to determine which device is failing Before you exchange the failing device run concurrent diagnostics to that device to determine the cause of the problem For information about how to run concurrent diagnostics see Concurrent Diagnostics in the Additional...

Page 99: ...page 199 Description The controller card has failed Action Exchange the FRU for a new FRU 80211 Operator panel 95 Operator Panel and Disk Drive Status Light Assemblies Flexible Circuits and Front Bezel Assembly on page 175 Controller card asm 5 Controller Card Assembly on page 199 Description The operator panel has failed Action Exchange the FRUs for new FRUs 80215 None Description The 7133 has an...

Page 100: ... requirements for good airflow have been met For details see the Notes under Environment on page 38 Note If this error causes the internal dc power of the 7133 to switch off that is the 7133 enters Standby mode the internal dc power switches on automatically after the temperature has decreased and has remained more than 5 C below the critical temperature for 15 minutes 80252 None Description Over ...

Page 101: ...e 7133 v If you can get access run the failing function again If the same SRN is generated exchange the FRU for a new FRU v If you cannot get access solve the problem that prevents access to the disk drives the run the failing function again D0000 Disk drive module 100 Disk Drive Modules and Dummy Disk Drive Modules on page 150 Description The using system cannot configure the disk drive module Ac...

Page 102: ... Exchange the FRU for a new FRU D0400 Disk drive module 100 Disk Drive Modules and Dummy Disk Drive Modules on page 150 Description The disk drive module is not ready while the diagnostics are running Action Rerun the diagnostics If the problem remains exchange the FRU for a new FRU D0450 None Description A Format operation is in progress Action The Format operation that was started on this disk d...

Page 103: ...nly if you have run diagnostics to a 7133 Model D40 or Model T40 enclosure If this SRN has occurred because you have run diagnostics to some other device see the service information for that device Description A command or parameter that has been sent is not valid This problem can be caused by the controller or by an error in the microcode Action Go to Software and Microcode Errors in the Addition...

Page 104: ...cables that connect the 7133 to the using system can be disconnected while that system is running v To isolate the FRUs in the failing 7133 do the actions and answer the questions given in these MAPs v When instructed to exchange two or more FRUs in sequence 1 Exchange the first FRU in the list for a new one 2 Verify that the problem is solved For some problems verification means running the diagn...

Page 105: ... using system needs to be switched off for some other reason do not switch off the using system when servicing the 7133 or an SSA link Power cables and external SSA cables that connect the 7133 to the using system can be disconnected while that system is running Step 1 from MAP 2410 7133 Models D40 and T40 Repair Verification step 2 and from MAP 2020 7133 Models D40 and T40 Power step 4 Is the 713...

Page 106: ...e 107 in MAP 2030 7133 Models D40 and T40 Remote Power On Control Feature Step 3 from step 2 Are you at this MAP because the using system has configured some disk drive modules of a 7133 Model D40 or Model T40 but it has configured those modules without any enclosure information NO Go to step 7 on page 90 YES Go to step 4 Step 4 from step 3 Is only one disk drive module affected NO Go to step 5 on...

Page 107: ... opening its handle see step 9 on page 151 through step 15 on page 153 You do not need to remove the modules completely c Try to reconfigure each disk drive module in turn by plugging in one module at a time d Go to step 6 Step 6 from step 5 Does only one disk drive module fail to configure correctly NO In the sequence shown exchange the following FRUs for new FRUs Ensure that for each FRU exchang...

Page 108: ...alone diagnostics b Go to step 11 v If neither the system diagnostics nor the stand alone diagnostics are available go to step 12 YES Go to Service Request Numbers SRNs on page 75 Step 10 from step 9 a Run the concurrent diagnostics For information about how to run concurrent diagnostics see Concurrent Diagnostics in the Additional Information appendix in this book for your using system b When the...

Page 109: ...e module is reporting the loss of redundant power or cooling the problem might have been already solved or it is intermittent Go to MAP 2410 7133 Models D40 and T40 Repair Verification on page 131 to verify the repair Step 15 from step 14 Do you have SRN 301C0 or 2A106 NO Go to the SSA Link MAP in the user or maintenance information for your using system SSA attachment YES v If the system error lo...

Page 110: ...ntrol feature NO Switch on the 7133 and return to step 12 on page 90 YES Go to MAP 2030 7133 Models D40 and T40 Remote Power On Control Feature on page 103 Step 19 from step 12 Observe the ID display of the 7133 whose Check light is on Does the display show the word POST for longer than 10 seconds NO Go to step 20 on page 93 YES a Exchange the controller card assembly for a new one see Controller ...

Page 111: ...d SRNs Error ID See SRN Information BP1 BP16 80241 80242 BP4 BP5 80243 80244 BP8 BP9 80245 80246 BP12 BP13 80247 80248 CODE 80210 COLD 80253 COOL 80254 CTRL 80210 FAN1 80231 FAN2 80232 FAN3 80233 HOT 80251 OPNL 80211 POST FAIL XXXX Where XXXX XROM WDOG IROM IRAM LED I2C RTC1 RTC2 TIME UART FAN XRAM 80210 PSU1 80221 PSU2 80222 SLOT 80260 WARM 80252 Note If the COLD or HOT error ID remains for four ...

Page 112: ...mbly on page 199 b Go to MAP 2410 7133 Models D40 and T40 Repair Verification on page 131 to verify the repair Step 22 from step 21 Does any disk drive module have its Check light on NO a Exchange the controller card assembly for a new one see Controller Card Assembly on page 199 b Go to MAP 2410 7133 Models D40 and T40 Repair Verification on page 131 to verify the repair YES Check whether the dis...

Page 113: ...e 7133 Power light On NO Go to step 7 on page 96 YES Go to step 2 Step 2 from step 1 Does either power supply assembly have its PWR light on NO Check the mainline power source YES Go to step 3 Step 3 from steps 2 and 8 Is the CHK PWR GOOD light of either power supply assembly showing amber NO Go to step 6 on page 96 YES a Switch off the PWR FAULT RESET switch of power supply assembly whose CHK PWR...

Page 114: ...age 131 to verify the repair YES In the sequence shown exchange the following FRUs for new FRUs Ensure that for each FRU exchange you go to MAP 2410 7133 Models D40 and T40 Repair Verification on page 131 to verify the repair a Controller card assembly see Controller Card Assembly on page 199 b Operator panel see Operator Panel and Disk Drive Status Light Assemblies Flexible Circuits and Front Bez...

Page 115: ...d Front Bezel Assembly on page 175 b Go to MAP 2410 7133 Models D40 and T40 Repair Verification on page 131 to verify the repair Step 9 from step 8 Are you servicing a 7133 Model T40 deskside unit NO Go to step 11 on page 98 YES a Press the 7133 Power switch b Go to step 10 Step 10 from step 9 Does each power supply assembly have its PWR light on NO Go to step 11 on page 98 YES Go to step 1 on pag...

Page 116: ...133 power cables for new cables b Go to MAP 2410 7133 Models D40 and T40 Repair Verification on page 131 to verify the repair v If you are servicing a 7133 Model T40 exchange in the sequence shown the following FRUs for new FRUs Ensure that for each FRU exchange you go to MAP 2410 7133 Models D40 and T40 Repair Verification on page 131 to verify the repair a Power cables b Power switch and cable a...

Page 117: ...2020 7133 Models D40 and T40 Power step 5 a Remove all power from the 7133 see All Power on page 145 Note Ensure that you switch off both power supply assemblies b Remove both power supply assemblies see Power Supply Assemblies on page 162 c Remove the three fan assemblies see Fan Assemblies on page 173 d Disconnect all the disk drive modules from the backplanes To do this open the handle on each ...

Page 118: ...e just reinstalled see Power Supply Assemblies on page 162 2 Frame assembly see Frame Assembly on page 208 b Go to step 3 Step 3 from step 2 a Reinstall the other power supply assembly b Connect a power cable to the power supply assembly c Switch on the power supply assembly Note Unless a procedure needs you to switch off the 7133 leave the 7133 switched on for the remainder of this MAP Does the 7...

Page 119: ...ll the controller card assembly Does the 7133 emit smoke or a smell of burning NO Go to step 7 YES a Exchange controller card assembly for a new one b Go to step 7 Step 7 from steps 6 and 8 Reinstall one of the bypass cards Does the 7133 emit smoke or a smell of burning NO Go to step 8 YES a Exchange for a new one the bypass card that you have just reinstalled b Go to step 8 Step 8 from step 7 Hav...

Page 120: ...next disk drive module Does the 7133 emit smoke or a smell of burning NO Go to step 11 YES a Exchange for a new one the disk drive module that you have just reconnected b Go to step 11 Step 11 from step 10 Have you reconnected all the disk drive modules NO Return to step 10 YES Go to step 12 Step 12 from step 11 Have you solved the problem NO Remove all power from the 7133 and call for assistance ...

Page 121: ...33 to the using system can be disconnected while that system is running Step 1 from MAP 2010 7133 Models D40 and T40 START step 18 Is the power switched on at the using system NO The power supply assemblies receive no power on signal if the using system power control cables are installed and the using system power is switched off a Switch on the using system power b Go to MAP 2410 7133 Models D40 ...

Page 122: ...t one CHK PWR GOOD light show green NO a Reconnect the MAIN using system power control cables to the remote power on control unit b Go to step 4 on page 105 YES The remote power on control unit has not received a signal from the using system a Reconnect the MAIN using system power control cables to the remote power on control unit b Go to step 5 on page 106 104 7133 Models D40 and T40 Service Guid...

Page 123: ...0 7133 Models D40 and T40 Repair Verification on page 131 to verify the repair 1 The controller card assembly see Controller Card Assembly on page 199 2 The power supply assembly that is in position 1 see Power Supply Assemblies on page 162 3 Frame assembly see Frame Assembly on page 208 YES In the sequence shown exchange the following FRUs for new FRUs Ensure that for each FRU exchange you go to ...

Page 124: ...e sequence shown the following FRUs for new FRUs Ensure that for each FRU exchange you go to MAP 2410 7133 Models D40 and T40 Repair Verification on page 131 to verify the repair 1 Remote power on control unit see Remote Power On Control Unit on page 204 2 MAIN using system power control cables b If only one using system is powered on exchange in the sequence shown the following FRUs for new FRUs ...

Page 125: ...assembly see Frame Assembly on page 208 YES Go to step 7 Step 7 from step 6 a Set the remote power on control unit switch to O off b Observe the power supply assemblies Does the CHK PWR GOOD light of each power supply assembly show green NO In the sequence shown exchange the following FRUs for new FRUs Ensure that for each FRU exchange you go to MAP 2410 7133 Models D40 and T40 Repair Verification...

Page 126: ...usly removed b Disconnect the far ends of both MAIN power control cables from the device or power distribution unit to which they are connected c Observe the power supply assemblies Does the CHK PWR GOOD light of each power supply assembly show green NO a A power on signal is being detected on the power control cables that are connected to the MAIN connectors of the remote power on control unit Re...

Page 127: ...ers if present between the Receive connector of one optical extender and the Transmit connector of the other optical extender Note The connectors are identified by symbols An arrow entering a circle identifies the Receive connector An arrow leaving a circle identifies the Transmit connector See also Figure 9 on page 22 2 Before connecting fibre optic cables and devices ensure that the end faces of...

Page 128: ...dapter assembly must be kept in its plastic bag in a safe place that is as close to the optical extender as possible At least one wrap cable and adapter assembly must be kept at each end of the link 4 For multi mode operations ensure that the correct type of multi mode conditioner has been installed see Specifications for Fibre Optic Cables and Connectors on page 26 110 7133 Models D40 and T40 Ser...

Page 129: ...ee Specifications for Fibre Optic Cables and Connectors on page 26 Does the problem remain NO Go to MAP 2410 7133 Models D40 and T40 Repair Verification on page 131 to verify the repair YES Go to step 2 Step 2 from steps 1 14 and 19 If you are at this step for the first time observe the lights on either of the two optical extenders of the link If you have come to this step from any step in this MA...

Page 130: ...le is connected to a Receive connector at each end and the other cable is connected to a Transmit connector at each end If the cables are not crossed over go to step 6 on page 115 If the cables are crossed over a Reconnect the cables correctly b Go to MAP 2410 7133 Models D40 and T40 Repair Verification on page 131 to verify the repair 112 7133 Models D40 and T40 Service Guide ...

Page 131: ...150 For information about disk drive module strings see Internal Connections Model D40 on page 28 or Internal Connections Model T40 on page 30 b If present the dummy disk drive modules that are between the connector and the first disk drive module of the string see Disk Drive Modules and Dummy Disk Drive Modules on page 150 c The bypass card containing the connector that you have just checked see ...

Page 132: ...or information about disk drive module strings see Internal Connections Model D40 on page 28 or Internal Connections Model T40 on page 30 2 If present the dummy disk drive modules that are between the connector and the first disk drive module of the string see Disk Drive Modules and Dummy Disk Drive Modules on page 150 3 The bypass card into which the new optical extender is plugged see Bypass SNB...

Page 133: ...able and adapter assembly that is provided with the optical extender e Remove the wrap cable and adapter assembly from its plastic bag f If the wrap cable and adapter assembly has a protective cover at each end remove those covers g Refer to Figure 46 h Disconnect the wrap cable 1 from the wrap adapter 2 Part Number nnnnnnn Class 1 Laser Product FCC Class A See Manual 1 Figure 45 Optical Extender ...

Page 134: ...f the complete wrap cable and adapter assembly b Place the wrap cable and adapter assembly into its plastic bag and return it to the place where it is normally kept c Exchange the optical extender for a new one d Observing the identifications of the fibre optic cables connect the cables to the new optical extender e Go to MAP 2410 7133 Models D40 and T40 Repair Verification on page 131 to verify t...

Page 135: ...p 7 from step 6 Is a multi mode conditioner present in the optical link NO Go to step 9 YES a In the next step you are going to disconnect the main fibre optic cables Before you do so note the identifications of the main fibre optic cables to ensure that you reconnect them correctly later b Refer to Figure 48 c Disconnect the main fibre optic cables 1 from the multi mode conditioner d Find the wra...

Page 136: ...n long connect one end to the wrap adapter then install a protective cover at each end of the complete wrap cable and adapter assembly b Place the wrap cable and adapter assembly into its plastic bag and return it to the place where it is normally kept c Exchange the multi mode conditioner for a new one d Observing the identifications of the fibre optic cables connect the cables to the new multi m...

Page 137: ... its ends to the wrap adapter to make a closed loop v If the wrap cable is 150 mm 6 in long connect one end to the wrap adapter then install a protective cover at each end of the complete wrap cable and adapter assembly b Place the wrap cable and adapter assembly into its plastic bag and return it to the place where it is normally kept c Observing the identifications of the main fibre optic cables...

Page 138: ...hat is provided with the optical extender f Remove the wrap cable and adapter assembly from its plastic bag g If the wrap cable and adapter assembly has a protective cover at each end remove those covers h Refer to Figure 52 i Disconnect the wrap cable 1 from the wrap adapter 2 j Refer to Figure 53 Part Number nnnnnnn Class 1 Laser Product FCC Class A See Manual 1 Figure 51 Optical Extender and Fi...

Page 139: ...ive cover at each end of the complete wrap cable and adapter assembly b Place the wrap cable and adapter assembly into its plastic bag and return it to the place where it is normally kept c Exchange the optical extender for a new one d Observing the identifications of the fibre optic cables connect the cables to the new optical extender e Go to MAP 2410 7133 Models D40 and T40 Repair Verification ...

Page 140: ...mode conditioner d Find the wrap cable and adapter assembly that is provided with the optical extender e Remove the wrap cable and adapter assembly from its plastic bag f If the wrap cable and adapter assembly has a protective cover at each end remove those covers g Refer to Figure 55 h Disconnect the wrap cable 1 from the wrap adapter 2 Part Number nnnnnnn Class 1 Laser Product FCC Class A See Ma...

Page 141: ...ner for a new one d Observing the identifications of the main fibre optic cables connect the cables to the new multi mode conditioner e Go to MAP 2410 7133 Models D40 and T40 Repair Verification on page 131 to verify the repair Note If the problem remains find another wrap cable and adapter assembly and repeat this step The original wrap cable might have failed YES a Remove the wrap cable from the...

Page 142: ...has failed a Remove the wrap cable from the optical extender and do whichever of the two following actions is appropriate v If the wrap cable is 400 mm 15 in long connect each of its ends to the wrap adapter to make a closed loop v If the wrap cable is 150 mm 6 in long connect one end to the wrap adapter then install a protective cover at each end of the complete wrap cable and adapter assembly b ...

Page 143: ...t observe the Ready light of the first disk drive module on the string to which the optical extender is connected Is the Ready light on continuously NO Go to step 15 on page 126 YES Go to step 14 Step 14 from step 13 The device is receiving SSA signals correctly Have you checked both ends of the optical link NO a Find the optical extender that is at the other end of the link b Go to step 2 on page...

Page 144: ...p cable and adapter assembly that is provided with the optical extender e Remove the wrap cable and adapter assembly from its plastic bag f If the wrap cable and adapter assembly has a protective cover at each end remove those covers g Refer to Figure 59 h Disconnect the wrap cable 1 from the wrap adapter 2 Part Number nnnnnnn Class 1 Laser Product FCC Class A See Manual 1 Figure 58 Optical Extend...

Page 145: ...ap cable and adapter assembly b Place the wrap cable and adapter assembly into its plastic bag and return it to the place where it is normally kept c Exchange the optical extender for a new one d Observing the identifications of the fibre optic cables connect the cables to the new optical extender e Go to MAP 2410 7133 Models D40 and T40 Repair Verification on page 131 to verify the repair Note If...

Page 146: ... protective cover at each end of the complete wrap cable and adapter assembly b Place the wrap cable and adapter assembly into its plastic bag and return it to the place where it is normally kept c Observing the identifications of the main fibre optic cables reconnect the cables to the optical extender d Exchange in the sequence shown the following FRUs for new FRUs Ensure that for each FRU exchan...

Page 147: ...lastic bag and return it to the place where it is normally kept c Observing the identifications of the fibre optic cables reconnect the cables to the optical extender Is the Ready light flashing NO The problem is in the 7133 or in the SSA attachment Go to MAP 2010 7133 Models D40 and T40 START on page 87 YES a Disconnect the fibre optic cables from the optical extender b Exchange the optical exten...

Page 148: ...s to the optical extender d Find the optical extender that is at the other end of the link e Go to step 2 on page 111 YES a Remove the wrap cable from the optical extender and do whichever of the two following actions is appropriate v If the wrap cable is 400 mm 15 in long connect each of its ends to the wrap adapter to make a closed loop v If the wrap cable is 150 mm 6 in long connect one end to ...

Page 149: ...Power light is off b Go to step 2 YES Go to step 2 Step 2 from step 1 Are all Check lights off or showing green NO Go to MAP 2010 7133 Models D40 and T40 START on page 87 YES a Run concurrent diagnostics to the device that reported the problem If the original problem was not reported by a device run concurrent diagnostics to each SSA attachment in the using system For information about how to run ...

Page 150: ...omatic mode in this 7133 Your configuration might be seriously affected To reset the modes hold all three ID push buttons see ID push buttons on page 11 pressed until the display flashes after approximately 10 seconds All bypass cards that are not jumpered for Forced Inline mode are reset to Automatic mode in this 7133 SSA Link Error Problem Determination Instead of using the normal MAPs to solve ...

Page 151: ...isk drive modules that are in the same SSA subsystem or 7133 It has five parts although the two backplane parts are on the same backplane assembly of the SSA subsystem Internal Connection Disk Drive 1 Disk Drive 2 SSA Subsystem Figure 61 Three Part Link in One Subsystem Internal Connection Dummy Disk Drive Disk Drive 1 Disk Drive 2 Internal Connection SSA Subsystem Figure 62 Five Part Link in One ...

Page 152: ...t it has fibre optic cables and optical extender instead of normal SSA cables SSA Connector Card Disk Drive Internal Connection SSA Connector Card Disk Drive Internal Connection Cable SSA Subsystem SSA Subsystem Figure 63 Seven Part Link in One Subsystem Internal Connection SSA Connector Card Disk Drive Adapter Cable SSA Subsystem Figure 64 Five Part Link between Disk Drive Module and SSA Attachme...

Page 153: ...ngs of the lights are summarized here If you need more information about the lights see v Lights and Controls on page 5 for disk drive lights and bypass card lights of the 7133 v The user or maintenance information for your using system SSA attachment hardware for the lights of the SSA attachment Summary of Disk Drive and SSA Attachment Lights Link Status Ready Light Status of Light Meaning Off Bo...

Page 154: ...ass state Permanently on Green The bypass card is jumpered for Forced Inline mode Off The bypass card is switched to Inline state Optical Extender Lights Power light This light is on when the 5 volt input is present Receive light This light when on shows that light is being received at the input connector of the optical extender The received light might not be a valid SSA signal If you have proble...

Page 155: ...not specifically show the model that you are servicing Concurrent Maintenance Subject to the configuration of the 7133 most FRUs can be removed replaced and tested while the subsystem and using system are powered on and doing productive work This ability is called concurrent maintenance Unless you have a particular reason to do so do not remove the power unless these instructions tell you to do so...

Page 156: ...odel D40 has no back cover Note Unless you have a particular reason to do so do not switch off the using system or the 7133 when removing opening installing or closing the covers of the 7133 Operator Panel Flap Step 1 Refer to Figure 66 Step 2 Press and release the latch button 1 The flap pivots to the left 1 Figure 66 Opening the Operator Panel Flap 138 7133 Models D40 and T40 Service Guide ...

Page 157: ...ver Model D40 Step 1 Refer to Figure 67 Step 2 To open the front cover hold it at the sides and pivot it downward Figure 67 Opening the Front Cover of Model D40 Chapter 3 Removal and Replacement Procedures 139 ...

Page 158: ...emove the front cover assembly a Refer to Figure 68 b If a latch retainer 1 is present remove the two screws 2 and the latch retainer Figure 68 Removing the Latch Retainer 140 7133 Models D40 and T40 Service Guide ...

Page 159: ...ainline electrical power is present in the 7133 and the 7133 power switch is set to Standby the internal dc power switches on when the operator panel flexible circuit is disconnected from the controller card assembly The dc power remains switched on when the circuit is reconnected Figure 69 Removing the Front Cover Chapter 3 Removal and Replacement Procedures 141 ...

Page 160: ...e the two locknuts 4 and if present the plastic cable shield 5 Do not lose the plastic cable shield h Remove the front cover assembly Step 4 Replace parts in the reverse sequence Note Ensure that the latches of the operator panel flexible circuit and the disk drive status lights flexible circuit engage fully in the slots of the 7133 frame assembly 142 7133 Models D40 and T40 Service Guide ...

Page 161: ...the key into the lock 1 and turn the key counterclockwise Step 4 The cover is pivoted on its left hand side and is held closed by clips Pull strongly on the right hand side of the cover to release it from the clips 1 Figure 70 Opening the Front Cover of a Model T40 Chapter 3 Removal and Replacement Procedures 143 ...

Page 162: ...rt the key into the lock 1 and turn the key counterclockwise Step 4 The cover is pivoted on its left hand side and is held closed by clips Pull strongly on the right hand side of the cover to release it from the clips 1 Figure 71 Opening the Back Cover of a Model T40 144 7133 Models D40 and T40 Service Guide ...

Page 163: ... following tell you to do so do not remove power from the using system or from the 7133 This section has two parts v Power Model D40 on page 146 v Power Model T40 on page 148 Go to the part that is relevant to the Model of 7133 you are servicing Chapter 3 Removal and Replacement Procedures 145 ...

Page 164: ...rator panel flap 3 see Operator Panel Flap on page 138 Step 4 Press and release the Power switch 2 The 7133 Power light flashes Step 5 Switch off both power supply assemblies For each assembly push the PWR FAULT RESET switch 5 downward Note On early power supply assemblies pull the switch outward then push it downward 4 4 1 2 3 5 5 Figure 72 Removing the Power from a Model D40 146 7133 Models D40 ...

Page 165: ...see the 7133 Model D40 Serial Disk System Installation Guide for details b Switch on both power supply assemblies For each assembly push the PWR FAULT RESET switch 5 upward Note On early power supply assemblies pull the switch outward then push it upward Power is restored to the 7133 You do not need to press the power switch Note The 7133 Models D40 and T40 have no power sequencing All the disk dr...

Page 166: ...tor Panel Flap on page 138 Step 4 Press and release the Power switch 3 The 7133 Power light and the 7133 Check light might go off come on and go off a few times while the power goes down Step 5 Open the back cover if not already open see Covers on page 138 Step 6 Remove the power cables 4 from the electrical power outlet and from the back of the 7133 4 1 2 3 5 5 Figure 73 Removing Power from a Mod...

Page 167: ...s D40 and T40 have no power sequencing All the disk drive modules start their power sequence when the input voltages are inside the specified limits Their motors are started under control of the SSA attachments in the using system To prevent the need for excessive electrical current the disk drive module motors are not all started together Up to eight disk drive modules can be started together At ...

Page 168: ...Device on page 59 Step 2 If not already done v Open the front cover if you are removing a module from the front of the 7133 v Open the back cover if you are removing a module from the back of a Model T40 Step 3 If you are removing a dummy disk drive module go to step 9 on page 151 If you are removing a disk drive module go to step 4 Step 4 Observe the Check light on the disk drive module that you ...

Page 169: ...everal disk drive modules at the same time a Choose any one of the disk drive modules that you are going to remove b Put that disk drive module into Service mode c Remove the disk drive module as described in steps 9 through 17 d Reset Service mode e Attention When you remove the remainder of the disk drive modules remove each module only when the slot that is next to it becomes empty Repeat this ...

Page 170: ... step 14 on page 153 Step 11 Ask the customer for the key Insert the key 2 into the lock the turn the key counterclockwise Step 12 Refer to Figure 75 Step 13 Pull the lock forward then upward to remove it Figure 75 Removing the Lock from a Module 2 152 7133 Models D40 and T40 Service Guide ...

Page 171: ...ure 76 Step 15 Press the blue latch 1 and pull down the handle 2 fully This action pulls the module partially out of its slot 1 2 2 Figure 76 Opening the Handle of a Module Chapter 3 Removal and Replacement Procedures 153 ...

Page 172: ... Figure 77 Step 17 Grip the handle and carefully pull out the module As the module comes out put one hand under its base to prevent it from falling Figure 77 Removing a Module 154 7133 Models D40 and T40 Service Guide ...

Page 173: ...module installed must contain a dummy disk drive module The dummy module provides continuity of the SSA string and ensures that the correct airflow is maintained around the disk drive modules in the other slots Go to Installing a Module on page 156 and install a disk drive module or dummy disk drive module as required 1 1 Figure 78 Placing a Module into a Safe Position Chapter 3 Removal and Replac...

Page 174: ... dummy disk drive modules 2 The diagrams in these instructions show a 7133 Model D40 The procedure for a 7133 Model T40 is the same except that everything is turned through 90 degrees Step 1 If not already done v Open the front cover see Covers on page 138 if you are installing a module into the front of the 7133 v Open the back cover see Covers on page 138 if you are installing a module into the ...

Page 175: ... on the module that you are going to install Step 5 With one hand giving support to the base of the module insert the module and push it into the slot The module stops before it is fully home 1 Figure 79 Installing a Module Chapter 3 Removal and Replacement Procedures 157 ...

Page 176: ...o to step 9b b Check whether the Check light goes off after approximately two seconds v If the Check light goes off go to step 9c on page 159 v If the Check light remains on the disk drive module might be in Service mode If the disk drive module is in Service mode reset Service mode see the chapter about SSA service aids in the user or maintenance information for your using system SSA attachment h...

Page 177: ...MAP 2010 7133 Models D40 and T40 START on page 87 When you have solved the problem return to this section and go to step 10 Step 10 Refer to Figure 81 Step 11 If the module has a lock 1 go to step 12 If the module does not have a lock go to step 16 on page 160 Step 12 Insert the flange 2 of the lock into the slot in the front of the disk drive module 2 1 Figure 81 Installing the Lock onto a Module...

Page 178: ...ing a Disk Drive Module to the Using System in the Additional Information appendix in this book for your using system If you installed the disk drive module while the using system was switched off switch on the using system when you are ready to do so When you switch on the using system the disk drive module is automatically configured Step 19 Using the method that is provided on your using system...

Page 179: ...disk numbers If you want to change those numbers go to Configuring a Disk Drive Module to the Using System in the Additional Information appendix in this book for your using system Otherwise go to step 22 Step 22 If the disk drive module is a replacement module and if the customer created a backup of the data from the original disk drive module ask the customer to install that data onto the replac...

Page 180: ...the same except that everything is turned through 90 degrees 3 The diagrams in these instructions show 220 volt power supply assemblies The mainline power connector is different on 48 volt power supply assemblies You can use these instructions for both types of power supply assembly 4 Attention Both power supply assemblies in a 7133 must be of the same voltage rating Do not mix power supply assemb...

Page 181: ...at you are removing To do this push the PWR FAULT RESET switch 1 downward Notes a On early power supply assemblies pull the switch outward then push it downward b You might hear the speed of the fans increase 1 Figure 83 Switching Off a Power Supply Assembly Chapter 3 Removal and Replacement Procedures 163 ...

Page 182: ...ve Step 5 Unplug the 7133 power control cable 2 if present from the power supply assembly Note When present the 7133 power control cable is plugged into the power supply assembly that is in position 1 see Parts Locations on page 17 1 2 Figure 84 Removing the Power Cable and 7133 Power Control Cable 164 7133 Models D40 and T40 Service Guide ...

Page 183: ...Step 6 Refer to Figure 85 Step 7 Unscrew the two thumbscrews 1 on the power supply assembly 1 1 Figure 85 Unscrewing the Thumbscrews Chapter 3 Removal and Replacement Procedures 165 ...

Page 184: ...Press the latch 1 and pull the lever 2 fully upward These actions pull the power supply assembly partially out of its housing 1 2 Figure 86 Using the Lever to Release the Power Supply Assembly 166 7133 Models D40 and T40 Service Guide ...

Page 185: ...o repair or exchange any part of it Note For a translation of the following notice see the 7133 Serial Disk Systems and SSA Adapters Translated Safety Notices manual DANGER Do not try to open the covers of the power supply assembly Figure 87 Removing the Power Supply Assembly Chapter 3 Removal and Replacement Procedures 167 ...

Page 186: ... supply assemblies of different voltage ratings Ensure that you are installing a power supply assembly of the correct voltage rating Step 2 Refer to Figure 88 Step 3 Push the power supply assembly into its housing The assembly stops before it is fully home Figure 88 Inserting the Power Supply Assembly 168 7133 Models D40 and T40 Service Guide ...

Page 187: ...fer to Figure 89 Step 5 Push the lever 1 fully downward This action pushes the power supply assembly home 1 Figure 89 Pushing the Power Supply Assembly Fully Home Chapter 3 Removal and Replacement Procedures 169 ...

Page 188: ...Step 6 Refer to Figure 90 Step 7 Tighten the thumbscrews 1 1 1 Figure 90 Tightening the Thumbscrews 170 7133 Models D40 and T40 Service Guide ...

Page 189: ...pply assembly that is in position 1 see Parts Locations on page 17 b On a 48 volt 7133 Model D40 ensure that one power supply assembly is connected to power source A in the rack and that the other is connected to power source B see the 7133 Model D40 Serial Disk System Installation Guide for details 1 2 Figure 91 Installing the Cables Chapter 3 Removal and Replacement Procedures 171 ...

Page 190: ...To do this push PWR FAULT RESET switch 1 upward Notes a On early power supply assemblies pull the switch outward then push it upward b You might hear the speed of the fans decrease 1 Figure 92 Switching On the Power Supply Assembly 172 7133 Models D40 and T40 Service Guide ...

Page 191: ... 2 The diagrams in these instructions show a 7133 Model D40 The procedure for a 7133 Model T40 is the same except that everything is turned through 90 degrees Step 1 Refer to Figure 93 Step 2 At the front of the 7133 unscrew the thumbscrew 1 of the fan assembly that you are going to remove Step 3 Pull out the assembly Note You might hear the speed of the other fans increase The fan assembly is a c...

Page 192: ...Step 4 Replace parts in the reverse sequence Note When you insert the fan assembly you might hear the speed of the other fans decrease 174 7133 Models D40 and T40 Service Guide ...

Page 193: ... must remove the ESD cover to gain access to Operator panel assembly Model D40 Operator panel flexible circuit Model D40 Disk drive status light assembly Model D40 v Front Bezel Assembly Model T40 v Operator panel assembly Model T40 v Operator panel flexible circuit Model T40 v Disk drive status light assembly Model T40 Go to the appropriate subsection Chapter 3 Removal and Replacement Procedures ...

Page 194: ...ESD cover 3 forward until it disengages from the operator panel assembly Step 4 Carefully lift the ESD cover upward Note that the operator panel flexible circuit 2 and the disk drive status light flexible circuit 1 are engaged in the slots of the ESD cover Step 5 Carefully disengage the two flexible circuits from the slots in the ESD cover Step 6 Remove the ESD cover Step 7 Replace parts in the re...

Page 195: ...n to do so do not switch off the using system or the 7133 when removing or installing the operator panel assembly Step 1 If not already done open the front cover see Covers on page 138 Step 2 Remove the ESD cover see ESD Cover Model D40 on page 176 Step 3 Refer to Figure 95 1 1 2 3 Figure 95 Removing the Operator Panel from a Model D40 Chapter 3 Removal and Replacement Procedures 177 ...

Page 196: ... switch or by the remote power control unit the internal dc power switches on when the flexible circuit is disconnected from the operator panel The dc power remains switched on when the circuit is reconnected Step 5 Unscrew the screws 1 Step 6 Pull off the operator panel assembly 2 Step 7 Replace parts in the reverse sequence 178 7133 Models D40 and T40 Service Guide ...

Page 197: ...page 176 Step 3 Refer to Figure 96 Step 4 Unplug the flexible circuit 1 from the operator panel Note If mainline electrical power is present in the 7133 and the 7133 power is set to Standby by the power switch or by the remote power control unit the internal dc power switches on when the flexible circuit is disconnected from the operator panel The dc power remains switched on when the circuit is r...

Page 198: ...your left then pull it forward to unplug the operator panel flexible circuit from the controller card assembly Step 7 Replace parts in the reverse sequence Note Ensure that the latch of the operator panel flexible circuit engages fully in the slot of the 7133 frame assembly 180 7133 Models D40 and T40 Service Guide ...

Page 199: ...r to Figure 97 Step 4 If a latch retainer 3 is present remove the two screws 4 and the latch retainer Step 5 Move the latch 2 to your left then pull it forward to unplug the operator panel flexible circuit from the controller card assembly Note If mainline electrical power is present in the 7133 and the 7133 power is set to Standby by the power switch or by the remote power control unit the intern...

Page 200: ...ible circuit from the controller card assembly Step 7 Unscrew the screw 5 Step 8 Remove the LED cable cover 6 and the disk drive status lights assembly 7 Step 9 Replace parts in the reverse sequence Note Ensure that the latches of the operator panel flexible circuit and the disk drive status lights flexible circuit engage fully in the slots of the 7133 frame assembly 182 7133 Models D40 and T40 Se...

Page 201: ...e 98 Step 4 Remove the two front mounting screws 1 and the RFI bracket 2 Step 5 Move the latch 3 upward then pull it forward to unplug the operator panel flexible circuit from the controller card assembly Step 6 Do the same actions with the latch 4 to unplug the disk drive status lights flexible circuit from the controller card assembly Figure 98 Disconnecting the Flexible Circuits Chapter 3 Remov...

Page 202: ...ves with the bezel assembly that is whether the power switch is attached to the bezel assembly v If the switch moves with the bezel assembly you have an early type bezel assembly Clip the bezel assembly back into position then go to step 11 on page 185 Note Early type bezel assemblies are no longer available If you are going to exchange this early type bezel assembly for a new one Figure 99 Checki...

Page 203: ... 7133 Step 11 If not already done open the back cover see Covers on page 138 Step 12 Remove all power from the 7133 see Power Model T40 on page 148 Step 13 Refer to Figure 100 Step 14 Unplug the two power cables 2 from the power supply assemblies Step 15 Remove the screw 1 from the AC connector block Step 16 Lift the AC connector block and turn it counterclockwise to remove it from its mounting lu...

Page 204: ...el assembly slightly upward and lift it over the edge of the 7133 frame Carefully pull the bezel assembly approximately 15 cm 6 in away from the 7133 Step 24 Attention To prevent damage to the switch assembly and power cable ensure that you keep the power cable in line with the power switch assembly as you disconnect it Disconnect the power cable assembly 2 by pulling it away from the power switch...

Page 205: ... and the disk drive status lights flexible circuit to the controller card before you reinstall the RFI bracket b Ensure that the latches of the operator panel flexible circuit and the disk drive status lights flexible circuit engage fully in the slots of the 7133 frame assembly c Do not forget to reinstall the RFI bracket This bracket prevents radio frequency interference d When connecting the pow...

Page 206: ...lug the flexible circuit 1 from the operator panel Step 6 Unscrew the screws 3 and 5 Step 7 Remove the operator panel assembly 2 Step 8 Replace parts in the reverse sequence Note Ensure that the latches of the operator panel flexible circuit and the disk drive status lights flexible circuit engage fully in the slots of the 7133 frame assembly 1 2 3 4 5 Figure 102 Removing the Operator Panel Flexib...

Page 207: ... Step 4 Unscrew the screws 2 Step 5 Remove the disk drive status lights assembly 1 Step 6 Replace parts in the reverse sequence Note Ensure that the latches of the operator panel flexible circuit and the disk drive status lights flexible circuit engage fully in the slots of the 7133 frame assembly 1 2 2 Figure 103 Removing the Disk Drive Status Lights Assembly from a Model T40 Chapter 3 Removal an...

Page 208: ...over see Covers on page 138 Step 2 Remove the front bezel assembly see Front Bezel Assembly Model T40 on page 183 Step 3 If the bezel assembly that you have just removed is an early type see Front Bezel Assembly Model T40 on page 183 go to Early Type Power Switch and Cable Assembly on page 191 If the bezel assembly that you have just removed is a later type go to Later Type Power Switch and Cable ...

Page 209: ...ed therefore to exchange this early type power switch and cable assembly for a later type assembly Go to Converting from Early to Later Type Bezel Assembly and Power Switch and Cable Assembly on page 195 If you are reinstalling the original power switch and cable assembly or you are exchanging the power switch and cable assembly for one of the same type replace parts in the reverse sequence Notes ...

Page 210: ...sure that the latches of the operator panel flexible circuit and the disk drive status lights flexible circuit engage fully in the slots of the 7133 frame assembly 192 7133 Models D40 and T40 Service Guide ...

Page 211: ... the AC connector block Step 6 Lift the AC connector block and turn it counterclockwise to remove it from its mounting lug Step 7 Place the AC connector block and its attached power cables onto the flat surface inside the 7133 Step 8 Go to the front of the 7133 Step 9 If not already done open the front cover see Covers on page 138 Step 10 Remove the front bezel assembly see Front Bezel Assembly Mo...

Page 212: ...se sequence Notes a When installing the mounting bracket insert the lug of the bracket into the hole in the top support of the frame assembly Slide the bracket toward the back of the 7133 so that the lug goes under the top support and the horizontal legs of the bracket rest on top of the support b Ensure that the latches of the operator panel flexible circuit and the disk drive status lights flexi...

Page 213: ...ew power switch and cable assembly into the front of the 7133 Step 4 Insert the lug 1 of the mounting bracket into the hole 4 in the top support of the frame assembly Slide the bracket toward the back of the 7133 so that the lug goes under the top support and the horizontal legs 3 of the bracket rest on top of the support Step 5 Put the power cable into the clip 2 then close the clip Step 6 Instal...

Page 214: ...dge of the 7133 Step 9 Press the bottom surface of the bezel assembly upward to lift the latches 3 then push the assembly into the 7133 Step 10 Press on the front of the bezel assembly to ensure that the latches click into position Figure 108 Installing the Later Type Bezel 196 7133 Models D40 and T40 Service Guide ...

Page 215: ...Step 13 Ensure that the latches of the two flexible circuits engage fully in the slots of the 7133 frame assembly Step 14 Go to the back of the 7133 Step 15 If not already done open the back cover see Covers on page 138 1 2 3 4 Figure 109 Reconnecting the Flexible Circuits and RFI Bracket Chapter 3 Removal and Replacement Procedures 197 ...

Page 216: ...ector block into position on its mounting lug Step 18 Install the screw 1 Step 19 Plug the two power cables 2 into the power supply assemblies 1 2 2 Figure 110 Reinstalling the AC Connector Block and Power Cables 198 7133 Models D40 and T40 Service Guide ...

Page 217: ...tructions show a 7133 Model D40 The procedure for a 7133 Model T40 is the same except that everything is turned through 90 degrees Step 1 Open the front cover see Covers on page 138 Step 2 Refer to Figure 111 Step 3 If a latch retainer 4 is present remove the two screws 5 and the latch retainer Step 4 Move the latch 2 to your left Model D40 or upward Model T40 then pull it forward to unplug the op...

Page 218: ...led Step 8 Replace parts in the reverse sequence Notes a Ensure that the latches of the operator panel flexible circuit and the disk drive status lights flexible circuit engage fully in the slots of the 7133 frame assembly b If you have installed a replacement controller card assembly you might need to reconfigure the 7133 to the using system see Configuring a 7133 to the Using System in the Addit...

Page 219: ...ger available to the using system Note Unless you have a particular reason to do so do not switch off the using system or the 7133 when removing or installing a bypass card Step 1 Refer to Figure 112 Step 2 If you are removing more than one bypass card make a note of which SSA cables if present are connected to each particular bypass card Step 3 Disconnect the external SSA cables if present from t...

Page 220: ...w going to install a new bypass card or change the jumper settings on the card that you have just removed go to step 8 Otherwise go to step 14 on page 203 Step 8 Refer to 113 Step 9 Lay the card down with its electronic components upward and its SSA connectors 1 to your right Step 10 Note that in Figure 113 the jumpers are set for Automatic mode That is the jumpers 2 connect pins 2 and 3 Note The ...

Page 221: ...card Go to step 14 If it is not set for the same mode you must change the positions of the jumpers on the new card Go to step 13 Step 13 Remove the jumpers and install them into the required positions Step 14 Replace parts in the reverse sequence Ensure that you push the cards fully home Note When you reinstall the external SSA cables ensure that you use the special screwdriver SSA tool part 32H70...

Page 222: ...the positions of all the cables that are connected to the remote power on control unit Step 3 Remove all cables from the remote power on control unit 2 Note If the 7133 is still connected to the mainline power source and you have not set the 7133 Power switch to Off the internal dc power switches on if previously switched off by the using system power control when you remove the cables Step 4 Remo...

Page 223: ...power on control unit ensure that the power switch of the remote power on control unit that you are going to install is set to on before you reinstall any power control cables Otherwise when you install the cables the internal dc power of the 7133 might switch off Chapter 3 Removal and Replacement Procedures 205 ...

Page 224: ...er on control unit 3 Note If the 7133 is still connected to the mainline power source and you have not set the 7133 Power switch to Off the internal dc power switches on if previously switched off by the using system power control when you remove the cables Step 5 Remove the two screws 1 and remove the bracket 2 with the remote power on control unit 3 still attached from the 7133 1 2 3 Figure 116 ...

Page 225: ...ional while you removed the remote power on control unit ensure that the power switch of the remote power on control unit that you are going to install is set to on before you reinstall any power control cables Otherwise when you install the cables the internal dc power of the 7133 might switch off 2 1 1 Figure 117 Removing the Remote Power On Control Unit from its Bracket Chapter 3 Removal and Re...

Page 226: ...ve the 7133 from the rack otherwise the network might fail when you disconnect the 7133 Step 2 Verify with the customer that all operations between the 7133 and the using system have been stopped Step 3 Remove power from the 7133 see All Power on page 145 Step 4 For Model D40 remove the front cover see Covers on page 138 For Model T40 open the front cover see Covers on page 138 Step 5 For Model T4...

Page 227: ...o the correct positions Make a note of the positions of the bypass cards before you remove them Attach labels if necessary Step 14 Remove the four bypass cards see Bypass SNBC Cards on page 201 Step 15 If you are removing the frame assembly of a Model D40 that is in an RS 6000 rack go to Model D40 in an RS 6000 Rack on page 210 If you are removing the frame assembly of a Model D40 that is in a Net...

Page 228: ...ned to the floor as described in the rack installation instructions v If the 7133 is installed in a Model T00 or T42 rack you must also observe the safety notices for those racks before you start to remove the 7133 frame You can find the safety notices in the System Installation chapter of the 7014 Model T00 and T42 Rack Installation and Service Guide SA33 0577 or at web page http www rs6000 ibm c...

Page 229: ...tep 4 Loosen the two screws 1 and pivot the two clamp plates 2 away from the slots in the frame assembly Step 5 Go to step 10 on page 213 2 1 1 2 Figure 119 Moving the Clamp Plates Chapter 3 Removal and Replacement Procedures 211 ...

Page 230: ...upward as far as the holes in the rack allow then tighten the screws 1 finger tight This action removes the pressure of the brackets from the top of the frame assembly Step 9 Go to step 10 on page 213 Figure 120 Loosening the Back Brackets RS 6000 212 7133 Models D40 and T40 Service Guide ...

Page 231: ...a When you reinstall the frame assembly into the rack reinstall the front mounting screws before you reinstall the back clamp plates or brackets Reinstall the front mounting screws in the following sequence 1 Install lower left hand front mounting screw This screw locates the 7133 laterally Do not fully tighten the screw yet 2 Install the other three front mounting screws Do not fully tighten the ...

Page 232: ...al screwdriver SSA tool part 32H7059 to tighten the SSA connector screws f If you have installed a replacement frame assembly attach the blank self adhesive serial number label that is supplied with the frame assembly The new label must cover the original label see Labels on page 36 g Write the serial number of the original frame assembly onto the blank label h Destroy the serial number on the ori...

Page 233: ... from tipping forward while the 7133 is being installed into the rack Do not install or pull out any unit unless either the stabilizer is firmly attached to the rack or the rack is firmly fastened to the floor as described in the rack installation instructions Refer to Figure 123 Step 2 At the back of the rack remove the screws 1 and 6 and the washers 2 and 5 Step 3 Remove the two back brackets 3 ...

Page 234: ...it from the rack Step 7 Replace parts in the reverse sequence Note When you reinstall the back brackets a Refer to Figure 123 on page 215 b Place the back bracket 3 into position c Install the screws 1 and the washers 2 but do not tighten the screws fully d With a flat hand press and hold downward the bracket e Fully tighten the top screw You can now remove your hand from the bracket f Fully tight...

Page 235: ... label that is supplied with the frame assembly The new label must cover the original label see Labels on page 36 i Write the serial number of the original frame assembly onto the blank label j Destroy the serial number on the original frame assembly Chapter 3 Removal and Replacement Procedures 217 ...

Page 236: ...190 Step 3 Remove the remote power on control unit if present see Remote Power On Control Unit Model T40 on page 206 Step 4 Refer to Figure 125 Step 5 Remove the bottom two mounting screws 1 from the front of the frame assembly You removed the top two screws and RFI bracket when you removed the front bezel 1 1 Figure 125 Removing the Frame from a Model T40 1 218 7133 Models D40 and T40 Service Gui...

Page 237: ...s manual CAUTION Do not attempt to lift the 7133 by yourself Ask another service representative for aid With aid from another service representative pull the frame assembly forward and remove it from the deskside unit Step 12 Replace parts in the reverse sequence Notes a When you install the frame assembly 1 Ensure that you reinstall the RFI bracket at the front of the 7133 when you reinstall the ...

Page 238: ...t and the frame of the 7133 Locate the shim so that the top two screws that you have just installed enter the slot of the shim d Push the shim fully home e Fully tighten the two screws b When you reinstall the external SSA cables ensure that you use the special screwdriver SSA tool part 32H7059 to tighten the SSA connector screws c If you have installed a replacement frame assembly attach the blan...

Page 239: ... are installed correctly An example screen is shown in Displaying Link and Power Problems in the Additional Information appendix in this book for your using system If a loop is broken repair it before you start to remove the 7133 from the rack otherwise the network might fail when you disconnect the 7133 Step 2 If not already done a Verify with the customer that all operations between the 7133 and...

Page 240: ...as they are now carefully make a note of the locations of the disk drive modules and dummy disk drive modules before you start to remove them This action ensures that you reinstall the modules into their original slots They might not all be connected to the same SSA loop It is recommended that you attach identifying labels to the modules Step 4 Remove the all the disk drive modules see Disk Drive ...

Page 241: ...ed to the floor as described in the rack installation instructions v If the 7133 is installed in a Model T00 or T42 rack you must also observe the safety notices for those racks before you start to remove the 7133 You can find the safety notices in the System Installation chapter of the 7014 Model T00 and T42 Rack Installation and Service Guide SA33 0577 or at web page http www rs6000 ibm com reso...

Page 242: ...ure 128 Step 4 Loosen the two screws 1 and pivot the two clamp plates 2 away from the slots in the 7133 Step 5 Go to step 10 on page 226 2 1 2 1 Figure 128 Moving the Clamp Plates 224 7133 Models D40 and T40 Service Guide ...

Page 243: ...rd as far as the holes in the rack allow then tighten the screws 1 finger tight This action removes the pressure of the brackets from the top of the frame assembly Step 9 Go to step 10 on page 226 Figure 129 Loosening the Back Brackets RS 6000 Chapter 3 Removal and Replacement Procedures 225 ...

Page 244: ...ore you remove the front mounting screws If a latch retainer 3 is present remove the two screws 4 and the latch retainer Move the latch 2 to your left then pull it forward to unplug the operator panel flexible circuit from the controller card assembly Figure 130 Removing a Model D40 from an RS 6000 Rack 226 7133 Models D40 and T40 Service Guide ...

Page 245: ...rd and remove it from the rack Step 16 Reinstall the 7133 in the reverse sequence Notes a When you reinstall the 7133 into the rack reinstall the front mounting screws before you reinstall the back clamp plates or brackets Reinstall the front mounting screws in the following sequence 1 Install lower left hand front mounting screw This screw locates the 7133 laterally Do not fully tighten the screw...

Page 246: ...screws 1 If you have brackets 5 fully tighten the two screws 4 then fully tighten the four screws 3 e When you reinstall the external SSA cables ensure that you use the special screwdriver SSA tool part 32H7059 to tighten the SSA connector screws Figure 131 Fastening the Back of the Frame Assembly 228 7133 Models D40 and T40 Service Guide ...

Page 247: ...vent the rack from tipping forward while the 7133 is being installed into the rack Do not install or pull out any unit unless either the stabilizer is firmly attached to the rack or the rack is firmly fastened to the floor as described in the rack installation instructions Refer to Figure 132 Step 2 At the back of the rack remove the screws 1 and 6 and the washers 2 and 5 Step 3 Remove the two bac...

Page 248: ...ve the two screws 4 and the latch retainer Move the latch 2 to your left then pull it forward to unplug the operator panel flexible circuit from the controller card assembly Step 6 Do the same actions with the latch 1 to unplug the disk drive status lights flexible circuit from the controller card assembly Figure 133 Removing the Front Screws 230 7133 Models D40 and T40 Service Guide ...

Page 249: ... it from the rack Step 9 Replace parts in the reverse sequence Note When you reinstall the back brackets a Refer to Figure 132 on page 229 b Place the back bracket 3 into position c Install the screws 1 and the washers 2 but do not tighten the screws fully d With a flat hand press and hold downward the bracket e Fully tighten the top screw You can now remove your hand from the bracket f Fully tigh...

Page 250: ... to step 4 to remove the rails If the back of the 7133 is fastened with brackets go to step 2 Step 2 Refer to Figure 134 Step 3 Remove the screws 2 and the brackets 1 then go to step 4 Step 4 Remove the screws 3 then remove the rails Step 5 If you need to reinstall the support rails for example because you are relocating the 7133 or you need to install replacement rails go to step 6 on page 233 Fi...

Page 251: ... customer determine where you are going to locate the 7133 in the rack Step 7 Refer to the EIA markings on the rack and decide where you are going to install the support rails If appropriate allow for possible future installation of other subsystems 1 Electronics Industries Association Chapter 3 Removal and Replacement Procedures 233 ...

Page 252: ...is horizontal and push it forward so that the stud 1 enters the matching hole in the front of the rack d Check whether the support rail is horizontal a spirit level might be useful here If the rail is not horizontal remove it from the rack then repeat step 8c e Insert the rail screw 3 into the nut clip 4 and tighten it Figure 135 Installing the Support Rails into an RS 6000 Rack 234 7133 Models D4...

Page 253: ...have just installed Step 11 Count seven holes upward from each threaded hole and install a nut clip 2 Step 12 If the support rails have clamp plates go no further with these instructions If the rails require brackets go to step 13 on page 236 Figure 136 Installing the Nut Clips Chapter 3 Removal and Replacement Procedures 235 ...

Page 254: ...ew turns Step 16 Lift the bracket upward as far as the holes in the rack allow then tighten both screws finger tight Step 17 Install the screw 3 and tighten it finger tight Step 18 Place the other back bracket 5 into position as shown in Figure 137 Step 19 Using the screws 6 and 7 repeat steps 15 through 17 Figure 137 Installing the Back Brackets onto an RS 6000 Rack 236 7133 Models D40 and T40 Se...

Page 255: ...sition and remove the two hexagonal mounting screws 2 from the back of the rail Step 8 Remove the support rail from the rack Step 9 Repeat steps 3 through 8 for the right hand support rail Step 10 Remove the nut clips 8 from the rack if they are no longer needed Put them into a safe place for possible later use Step 11 If you need to reinstall the support rails for example because you are relocati...

Page 256: ...port rail must align with the EIA mark 8 on a narrow bar of the rack Step 14 Find the left hand support rail 1 Step 15 Loosen the eight adjustment screws 3 Step 16 Hold the support rail in position in the rack then install and fully tighten the two hexagonal M6 mounting screws 2 at the back of the rail 1 2 3 4 5 7 5 6 7 6 8 Back Front Figure 139 Installing Support Rails into a Netfinity Rack 238 7...

Page 257: ...e screw Step 22 Ensure that the rail retainer has fully engaged the hole in the rack If the retainer has not engaged the hole loosen the screw reengage the retainer then tighten the screw fully Step 23 Ensure that the locator pin 4 is flush with the front edge of the rack If the locator pin is not flush loosen the screw reengage the retainer then tighten the screw fully Step 24 Fully tighten the e...

Page 258: ...ack on the left hand side count six holes up from the retainer screw 1 Step 28 At the sixth hole install a nut clip 2 Step 29 Repeat for the right hand side of the rack 1 6 holes 2 Figure 140 Installing the Nut Clips 240 7133 Models D40 and T40 Service Guide ...

Page 259: ...SA Disk Subsystem For the correct book see Related Publications in the Additional Information appendix in this book for your using system This parts catalog gives part numbers for the parts and FRUs of the 7133 Models D40 and T40 Conventions AR in the units column of the parts list denotes that the quantity used is as required 241 ...

Page 260: ...Assembly 1 7133 Model D40 242 7133 Models D40 and T40 Service Guide ...

Page 261: ...7 34L8484 AR Optional alternative 9 1 GB 3 5 inch 10 000 rpm SSA disk drive module Name used by system SSA160 Physical Disk Drive 9100 MB 7 09L1849 AR 18 2 GB 3 5 inch 7200 rpm SSA disk drive module Name used by system SSA160 Physical Disk Drive 18200 MB 7 18P4047 AR 18 2 GB 3 5 inch 10 000 rpm SSA disk drive module Name used by system SSA160 Physical Disk Drive 18200 MB 7 18P4051 AR Optional alte...

Page 262: ...Assembly 1 continued 244 7133 Models D40 and T40 Service Guide ...

Page 263: ... rail left for RS 6000 rack for use with back bracket 09L4372 14 09L1821 1 Support rail kit for Netfinity rack includes right and left hand rails and back brackets and all required screws and nuts 15 77G0599 2 Back mounting screw Socket Head M5 x 14 mm long for back clamp plates 15A 54G2882 6 Back mounting screw Hex Head M5 x 10 mm long for back brackets 16 51H8804 2 Back clamp plate for RS 6000 r...

Page 264: ...Assembly 1 continued 246 7133 Models D40 and T40 Service Guide ...

Page 265: ...pper cable 25 0 m 82 0 ft 27 09L2120 AR Advanced SSA Optical Extender 27A 09L5564 AR Advanced Multi Mode 50 Conditioner for 50 micron fibre optic cables 27A 09L5565 AR Advanced Multi Mode 62 Conditioner for 62 5 micron fibre optic cables 28 32H7046 AR Wrap cable and adapter assembly for optical extender 29 09L1693 1 Cover ESD 30 08L7906 1 Cover LED cable 31 34L6453 1 Latch retainer 31A 05J7994 2 S...

Page 266: ...Assembly 2 7133 Model T40 1 1B 2 3 4 5 6 7 12 12 8 8 8 8 19 19A 20 22 21 9 10 10 11 11 17 17A 1A 18 23 16 13 14 15 25 24 248 7133 Models D40 and T40 Service Guide ...

Page 267: ...sher M5 12 09L4299 2 Power supply assembly 220 V ac dc 13 VARIOUS 2 Power cable See Country Power Cables on page 252 14 42F6839 4 Using system power control cable 15 05J7999 1 7133 power control cable 16 08L7908 AR External SSA copper cable 1 0 m 3 3 ft 16 08L7909 AR External SSA copper cable 2 5 m 8 2 ft 16 08L7910 AR External SSA copper cable 5 0 m 16 4 ft 16 08L7911 AR External SSA copper cable...

Page 268: ...1 1B 2 3 4 5 6 7 12 12 8 8 8 8 19 19A 20 22 21 9 10 10 11 11 17 17A 1A 18 23 16 13 14 15 25 24 Assembly 2 continued 250 7133 Models D40 and T40 Service Guide ...

Page 269: ...2 GB 3 5 inch 15 000 rpm SSA disk drive module Name used by system SSA160 Physical Disk Drive 18200 MB 19 34L7771 AR 36 4 GB 3 5 inch 7200 rpm SSA disk drive module Name used by system SSA160 Physical Disk Drive 36400 MB 19 18P4048 AR 36 4 GB 3 5 inch 10 000 rpm SSA disk drive module Name used by system SSA160 Physical Disk Drive 36400 MB 19 18P4052 AR Optional alternative 36 4 GB 3 5 inch 10 000 ...

Page 270: ...China 125 V 15 A 2 7 m 9 ft 12J5118 Denmark and Switzerland 250 V 16 A 2 7 m 9 ft 36L8822 France 250 V 16 A 2 7 m 9 ft 55H6643 Israel 250 V 16 A 2 7 m 9 ft 12J5122 Italy 250 V 16 A 2 7 m 9 ft 12J5126 Japan 125 V 15 A 2 7 m 9 ft 01K9853 Mexico 250 V 15 A 2 7 m 9 ft 12J5119 New Zealand 250 V 15 A 4 3 m 14 ft 14F1558 South Africa 250 V 16 A 2 7 m 9 ft 12J5124 United Kingdom 250 V 13 A 2 7 m 9 ft 12J5...

Page 271: ...59 Service Aids 260 Physical Link Configuration 260 Keys to Use 260 Legend for Screen Symbols 260 Enclosure Configuration 262 Keys to Use 262 Legend for Screen Symbols 262 Enclosure Environment 264 Keys to Use 264 Enclosure Settings 265 Keys to Use 265 Command Line Tools 266 ssaencl Command 266 Purpose 266 Syntax 266 Description 266 Flags 266 Examples 268 Disk Drive Modules in Use 269 Configuring ...

Page 272: ...servicing a 7133 Model 010 020 500 or 600 SSA Disk Subsystem For those models use the 7133 SSA Disk Subsystem Service Guide SY33 0185 Web Support Pages When you are installing an SSA device or subsystem upgrading your SSA subsystem or doing preventive maintenance on your SSA subsystem refer to the web pages that are listed here Refer to these pages also if you are upgrading your system hardware or...

Page 273: ...osure ID the four characters that appear in the display at the front of the 7133 Expansion drawer Adapter position number of the slot 1 through 8 containing the SSA adapter Pdisks Hdisks and Disk Drive Module Identification The physical disk drives pdisks in an SSA subsystem can be configured as logical units LUNs A LUN is also known as an hdisk and can consist of one or more physical disk drives ...

Page 274: ...figure 3 A pSeries RAID 0 volume group that uses 72 8 GB disk drives can contain no more than 15 of those disk drives 4 On all disk drives the adapter reserves 65 536 bytes for its own use 5 Disk drive modules for 7133 Models 010 020 500 and 600 cannot be installed in 7133 Models D40 and T40 Also disk drive modules for the 7133 Models D40 and T40 cannot be installed in 7133 Models 010 020 500 and ...

Page 275: ...ller microcode v The controller card microcode and the downloader ssa_sesdld are supplied with the disk drive microcode They are usually stored in the etc microcode directory v Use the downloader utility ssa_sesdld to download the microcode v If you run the downloader with no parameters it displays the required syntax Information about the latest levels of controller card microcode is given on the...

Page 276: ...e Guide if you are verifying a repair or an upgrade v Problem Determination mode see the using system Installation and Service Guide if you think that a problem exists Nonconcurrent Diagnostics When the instructions tell you to run nonconcurrent diagnostics run Advanced Diagnostics in v System Verification mode see the using system Installation and Service Guide if you are verifying a repair or an...

Page 277: ...k6 select the pdisk and press Enter The Check light on the selected pdisk flashes This action does not affect the customer s operations If the loop contains a 7133 Model D40 or Model T40 you can also use the Physical Link Configuration service aid to provide additional information see Physical Link Configuration on page 260 For more information about the SSA service aids see the chapter about SSA ...

Page 278: ...7 40 I pdisk17 R1E1 06 40 I 18 40 I pdisk18 R1E1 07 40 0 19 40 O A1 trent2 A2 40 C NONE OOOO FRED 09 40 I 40 I pdisk30 FRED 10 40 I 40 I pdisk19 FRED 13 40 I 40 I pdisk20 FRED 14 40 I pdisk21 FRED 15 40 C 40 C A2 severn ssa0 00 05 severn ssa0 00 05 B1 40 C pdisk22 R1E1 09 40 I 40 I pdisk23 R1E1 10 40 I 40 I pdisk24 R1E1 11 40 I 40 I pdisk25 R1E1 12 40 C 40 C B2 severn ssa0 00 05 23 24 F3 Cancel F1...

Page 279: ...mode OOOO Forced Open mode NONE No connection 20 C 20 MB per second copper cable 40 C 40 MB per second copper cable 40 I 40 MB per second internal link 40 O 40 MB per second optical link Break in the SSA loop Appendix A Additional Information for RISC Systems 261 ...

Page 280: ...1 12 12 OOOO BYPASS 40 O 13 BYPASS SSA Disk 13 SSA Disk 14 15 SSA Disk 16 40 O 16 BYPASS 23 24 F3 Cancel F10 Exit 25 Lines 7 through 22 are selectable and scrollable Keys to Use v Press Enter to display the legend as a popup menu v Press the Cancel key to return to the Enclosure Selection configuration menu v Press the Exit key to return to the Service Aid Selection menu Legend for Screen Symbols ...

Page 281: ...e Forced Bypass state OOOO Forced Open state 20 C 20 MB per second copper cable 40 C 40 MB per second copper cable 40 I 40 MB per second internal link 40 O 40 MB per second optical link SSA Disk Unconfigured disk drive Appendix A Additional Information for RISC Systems 263 ...

Page 282: ...Remote Power Off Module RPO Good 18 19 Ambient Temperature degrees Celsius 35 20 21 Controller Fault 22 23 24 F3 Cancel F10 Exit 25 Note In this screen the word exchanged indicates that the FRU has been removed and reinstalled or exchanged for a new FRU since the Exchanged flag was last reset Keys to Use v Press Enter to return v Press the Cancel key to return to the Enclosure Selection environmen...

Page 283: ...RIVE EXCHANGED FLAGS 1 10 2 11 3 12 4 13 5 14 6 15 7 16 8 17 9 18 0 19 1 20 2 21 3 22 4 23 5 24 F3 Cancel F10 Exit 6 25 Lines 6 through 22 are selectable Keys to Use v Press Enter to go to the selected menu v Press the Cancel key to return to the Enclosure Selection settings menu v Press the Exit key to return to the Service Aid Selection menu Appendix A Additional Information for RISC Systems 265...

Page 284: ...ing settings of an SSA SES disk enclosure subsystem or to modify the settings of that enclosure The command can be used only to observe or modify settings it cannot be used to observe and modify settings at the same time When the command displays enclosure settings it displays them in tables that the user can read easily If the s flag is specified however the command displays the settings in colon...

Page 285: ...splays the ambient temperature of the enclosure and temperature threshold statuses f fan Displays the status of all the fans or of only the specified fans Valid values for the fan parameter are 1 2 3 and so on d drive_bay Displays the status of all the disk drive bays slots or of only the specified disk drive bays Valid values for the drive_bay parameter are 1 2 3 and so on p PSU Displays the stat...

Page 286: ... the flag for the controller card S o Resets the flag for the operator panel T threshold value Modifies the specified temperature thresholds to the given values The valid values for the threshold parameter are lowarn The low temperature warning threshold hiwarn The high temperature warning threshold The value parameter is a temperature in degrees C Examples v To display the status of all bypass ca...

Page 287: ...ally a responsibility of system administration If the pdisk is not related to an hdisk go to step 6 on page 150 3 For fast path type smitty redssaraid and press Enter Otherwise a Select Change Member Disks in an SSA RAID Array from the SSA RAID Array menu b Select Remove a Disk from an SSA RAID Array 4 A list of arrays is displayed in a window Change Member Disks in an SSA RAID Array Move cursor t...

Page 288: ...s from the list then go to step 6 on page 150 If any disk drive module that you want to remove is not in the list a Run the Link Verification service aid see the chapter about service aids in the User s Guide and Maintenance Information manual for your SSA adapter b Check whether the SSA loop is broken c If the SSA loop is broken go to step 6d If the SSA loop is not broken go to step 9 on page 151...

Page 289: ...e next to the new pdisk number and next to the new hdisk number Make a note of the new pdisk and hdisk numbers d If the disk drive module that you are installing is a replacement for a module that was a member of an SSA RAID array go to step 3e Otherwise go to step 5 e Type smitty ssaraid and press Enter f Select Change Show Use of an SSA Physical Disk The pdisk that has been exchanged is listed u...

Page 290: ...you noted in step 6 and hdisknumber is the hdisk number you want for the new disk drive module for example hdisk7 10 If you want to remove from the system configuration pdisk numbers that are not used give the following command for pdisks that remain defined rmdev l pdisk d where pdisk is the number of the pdisk that you want to remove from the configuration Configuring a 7133 to the Using System ...

Page 291: ... User s Guide and Maintenance Information manual for your SSA adapter Step 3 from steps 1 and 2 Are you at this MAP because you have found an hdisk that has no associated pdisk NO Go to step 4 YES a Give the cfgmgr command b Run the Configuration Verification service aid again c If the problem remains a software error has probably occurred Call your support center for assistance Step 4 from step 3...

Page 292: ...274 7133 Models D40 and T40 Service Guide ...

Page 293: ...rovides information that is specific to 7133 Models D40 and T40 that are attached to PC servers Related Publications v IBM PC Servers IBM SSA RAID Cluster Adapter Hardware Maintenance Manual Supplement S96H 9840 v IBM PC Servers IBM SSA RAID Adapter for PC Servers Hardware Maintenance Manual Supplement S32H 3817 v IBM PC Servers IBM SerialRAID Adapter Hardware Maintenance Manual Supplement SY33 01...

Page 294: ... devices These web pages provide access to the latest SSA publications and support microcode for the using system SSA adapters and SSA subsystem http www hursley ibm com ssa This web page provides links to SSA publications and other web pages including the other web page in this list http www hursley ibm com ssa pcserver This web page contains a list of the latest levels of SSA support microcode a...

Page 295: ... Go to the using system service aids to display the VPD of the failing system Make a note of the VPD for all the SSA attachments SSA subsystems 7133s and disk drive modules 4 Report the problem to your support center The center can tell you whether you have a known problem and can if necessary provide you with a correction for the software or microcode Controller Card Microcode Maintenance v To ch...

Page 296: ...x button Displaying Link and Power Problems 1 Start the SSA Remote Systems Management function 2 Select SSA Adapter List 3 Select the adapter that you want to inspect 4 Select SSA Physical View 5 See whether the Break symbol is displayed This symbol indicates that the SSA loop is broken at that point Under this condition the SSA devices on each side of the break are flashing their status lights 6 ...

Page 297: ...apter v Service functions The service functions that the RSM configurator provides for a selected adapter are v Display a Logical View of the SSA network v Display a Physical View of the SSA network v View a selected 7133 Model D40 or Model T40 enclosure v Check all microcode levels The Enclosure View provides the following enclosure functions v Display ID name of the enclosure FRUs that are insta...

Page 298: ...or use in an AIX system Before the PC can use the disk drive the flag must be reset To reset the flag convert the new disk drive to a free resource see the service information for your SSA adapter When the flag has been reset the new disk drive becomes a free resource The disk drive is deleted from the list of new disk drives and added to the list of system resources Free resources can be managed ...

Page 299: ...41 lights 13 14 location Model D40 18 Model T40 20 removal and replacement 201 C cable configurations 47 catalog of parts 241 Caution notices rack stabilizer 210 215 223 229 weight of 7133 213 216 219 222 227 231 change enclosure settings information 63 changing disk drive numbers RISC systems 271 changing the setting of the bypass card jumpers 202 Check light disk drive module 16 Check light 7133...

Page 300: ...serial number location 36 disk drive modules acclimation 41 Check light 16 identification 255 installing 156 disk drive modules continued Model D40 location 18 locks 18 Model T40 location 20 locks 20 numbering Model D40 18 Model T40 20 physical location 59 POSTs power on self tests 73 power sequencing 41 Ready light 15 removing 150 sizes 40 disk drive modules in use PC servers 280 RISC systems 269...

Page 301: ...ut 40 humidity 38 I ID display 8 ID push buttons 11 identification of disk drive modules 255 IDs for disk drive module slots Model D40 18 Model T40 20 indicators 5 7133 Check 8 7133 Power 8 CHK PWR GOOD 13 Controller Card Check 12 disk drive module Check light 16 disk drive module Ready light 15 Fan Check 12 Fan Power 12 ID display 8 Link Status Ready 13 Mode 14 Power Advanced SSA Optical Extender...

Page 302: ...SSA Optical Extender Pair feature multi mode configuration Advanced Multi Mode Conditioner 24 N nonconcurrent diagnostics PC servers 278 nonconcurrent diagnostics continued RISC systems 258 numbering of disk drive modules Model D40 18 Model T40 20 O operator panel assembly Model D40 location 18 Model T40 location 20 removal and replacement 188 operator panel assembly Model D40 removal and replacem...

Page 303: ...U names used in table 76 SSA link 132 problems corrected PC servers 278 RISC systems 258 product characteristics 38 product information label 36 64 publications related PC servers 275 RISC systems 254 push buttons ID 11 PWR light 13 PWR FAULT RESET switch 13 R Ready light disk drive module 15 Receive light Advanced SSA Optical Extenders multi mode configuration 24 single mode configuration 22 refe...

Page 304: ...s disk drive module numbering IDs Model D40 18 Model T40 20 software and microcode errors PC servers 277 RISC systems 256 specification for fibre optic cables and connectors 26 specifications 38 SRNs service request numbers 75 FRU names used in table 76 SSA link error problem determination 132 SSA link errors 132 SSA loops disk drive module identification 255 physical location of a device 59 SSA l...

Page 305: ......

Page 306: ...Part Number 18P6104 Printed in the U S A GY33 0192 07 1P P N 18P6104 ...

Reviews: