


192 Chapter 12 Impression drum
ENWW
6
On a new impression paper, remove all the paper knock-outs.
7
Loosen the special low head screws two turns using a 3-mm Allen key (Figure 12-2),
and insert the impression paper with the L mark shown on the left side of the
impression paper, facing you.
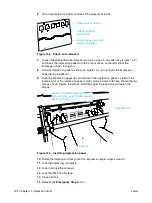
8
Hold the impression paper as shown in Figure 12-4. Do not bend the impression
paper during installation.
9
Push the impression paper up until the top of the impression paper is visible in the
indicator slot of the impression paper holder. Using a 3-mm Allen key, tighten the two
screws shown. Fasten the screws. Hold the paper in place while you fasten the
screws.
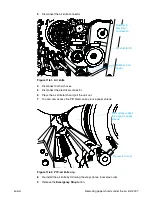
10
Rotate the impression drum so that the impression paper wraps around it.
11
Lock the duplex tray into place.
12
Lower and lock the conveyor.
13
Lock the ITM hood in place.
14
Close all doors.
15
Release the
Emergency Stop
button.
Figure 12-3. Knock-outs removed
Figure 12-4. Installing impression paper
Knock-outs removed
L mark faces user when
paper is installed
Gripper window
(lower side)
Indicator slot
Push up
Loosen low head screws by two
turns and then insert the impression
paper as shown
Summary of Contents for Indigo press 3050
Page 1: ...HP Indigo press 3050 User guide English version ...
Page 2: ...hp indigo press 3050 user guide ...
Page 13: ...12 Chapter 1 Preface ENWW ...
Page 23: ...22 Chapter 2 Getting started ENWW ...
Page 41: ...40 Chapter 4 HP Indigo press 3050 basics ENWW Figure 4 5 Related topics ...
Page 53: ...52 Chapter 5 The main windows ENWW ...
Page 83: ...82 Chapter 6 Operating the press ENWW ...
Page 91: ...90 Chapter 7 Operator routines ENWW Figure 7 7 Inner front wall O O O O ...
Page 99: ...98 Chapter 7 Operator routines ENWW ...
Page 136: ...ENWW 135 10PIP This chapter contains the following sections z Overview z Replacing the PIP ...
Page 189: ...188 Chapter 11 Paper transport ENWW ...
Page 219: ...218 Chapter 15 Scorotron ENWW ...
Page 257: ...256 Chapter 17 Pre transfer erase PTE ENWW ...
Page 271: ...270 Chapter 19 Chiller ENWW ...