


186 Chapter 11 Paper transport
ENWW
1
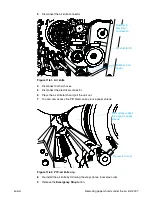
Insert the cleaning station. Slide the cleaning station studs into the cleaning station
grooves on the press inside walls.
2
Lock the cleaning station latch.
3
Replace the ITM hood. Insert the side facing the rear wall first. See ‘Removing the
ITM hood’ on page 131.
4
Lock the ITM Hood.
5
Replace the cleaning station blade (see Figure 11-57).
6
Release the
Emergency Stop
button and resume work.
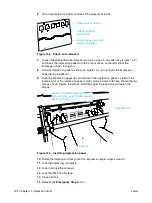
Removing paper shreds under the air knife
When a sheet is torn during a paper jam, you must take the paper shreds out of the press.
Loose paper shreds between the drums can cause unexpected problems.
When you suspect that you have not removed the whole sheet after a paper jam, check
the space between the air knife and the PIP using the following procedure:
1
Press an
Emergency Stop
button.
2
Open the front door.
Figure 11-60. Cleaning station (facing the PIP)
Cleaning station studs
Summary of Contents for Indigo press 3050
Page 1: ...HP Indigo press 3050 User guide English version ...
Page 2: ...hp indigo press 3050 user guide ...
Page 13: ...12 Chapter 1 Preface ENWW ...
Page 23: ...22 Chapter 2 Getting started ENWW ...
Page 41: ...40 Chapter 4 HP Indigo press 3050 basics ENWW Figure 4 5 Related topics ...
Page 53: ...52 Chapter 5 The main windows ENWW ...
Page 83: ...82 Chapter 6 Operating the press ENWW ...
Page 91: ...90 Chapter 7 Operator routines ENWW Figure 7 7 Inner front wall O O O O ...
Page 99: ...98 Chapter 7 Operator routines ENWW ...
Page 136: ...ENWW 135 10PIP This chapter contains the following sections z Overview z Replacing the PIP ...
Page 189: ...188 Chapter 11 Paper transport ENWW ...
Page 219: ...218 Chapter 15 Scorotron ENWW ...
Page 257: ...256 Chapter 17 Pre transfer erase PTE ENWW ...
Page 271: ...270 Chapter 19 Chiller ENWW ...