


ENWW
Replacing the PIP 141
4
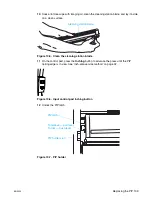
Gently pull the PIP out of its protective cover. Wipe the cartridge clean with a lint-free
wipe soaked in imaging oil. This prevents particles from being transferred from the
cartridge to the PIP. Pull out the leading edge about 10 cm (4 inches). Remove the
self-adhesive pull-tab.
CAUTION
Always protect the exposed PIP from direct light.
5
Insert the leading edge of the PIP into the slot all the way. Push it in until the edge is
felt against the inner wall when sliding it from side to side. Adjust the PIP inside the
holder so that the three black mark-lines in the PIP are parallel with the holder lip.
Center the PIP between the drum shoulders.
6
Lock the PIP latch (see Figure 10-7).
7
Press the PIP against the drum. Make sure the PIP’s edges are parallel with the drum
shoulders. If the shoulders are not parallel, remove the PIP and reinsert it properly.
8
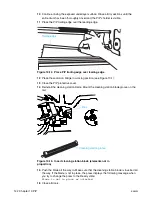
Hold the PIP away from the drum. Using the squeezer bottle, apply imaging oil
generously to cover the entire visible section of the PIP underlayer. Moving the nozzle
from side to side, squirt the imaging oil on the top section of the drum. Make sure that
a continuous layer of fluid forms. Apply imaging oil liberally. Drops dripping from the
sides are good for the drum. However, make sure no drops reach the blanket.
Note
Periodically clean the imaging oil squeezer bottle using imaging oil.
9
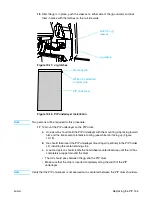
Hold the PIP cartridge with your right hand. Press the
Inching
button to advance the
PIP drum until the a new dry section of the PIP underlayer is in view. Make sure that
there is no contact between the PIP foil and the ITM drum.
Note
When the exit door is open, the
Inching
button on the feed door control pad is disabled.
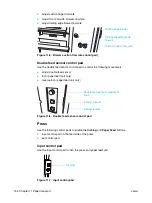
Figure 10-10. Pull the PIP out
Figure 10-11. Apply the imaging oil generously
PIP foil
Underlayer
Squeezer bottle
Summary of Contents for Indigo press 3050
Page 1: ...HP Indigo press 3050 User guide English version ...
Page 2: ...hp indigo press 3050 user guide ...
Page 13: ...12 Chapter 1 Preface ENWW ...
Page 23: ...22 Chapter 2 Getting started ENWW ...
Page 41: ...40 Chapter 4 HP Indigo press 3050 basics ENWW Figure 4 5 Related topics ...
Page 53: ...52 Chapter 5 The main windows ENWW ...
Page 83: ...82 Chapter 6 Operating the press ENWW ...
Page 91: ...90 Chapter 7 Operator routines ENWW Figure 7 7 Inner front wall O O O O ...
Page 99: ...98 Chapter 7 Operator routines ENWW ...
Page 136: ...ENWW 135 10PIP This chapter contains the following sections z Overview z Replacing the PIP ...
Page 189: ...188 Chapter 11 Paper transport ENWW ...
Page 219: ...218 Chapter 15 Scorotron ENWW ...
Page 257: ...256 Chapter 17 Pre transfer erase PTE ENWW ...
Page 271: ...270 Chapter 19 Chiller ENWW ...