


ENWW
Replacing the blanket 117
9
Gently pull the leading edge of the blanket.
10
Using the needlenose pliers, lift up the metal fastener bar.
WARNING!
The bar is extremely hot and can cause injury.
11
Press the
Inching
button to advance the machine slowly. Continue peeling off the
blanket.
12
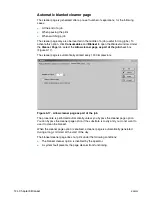
Use the following procedure to remove the adhesive residue from the ITM:
a
Roll the old blanket so that the adhesive side faces out. Press an
Emergency Stop
button.
b
Press the sticky side of the blanket to the bare ITM to pick up adhesive residue.
c
Clean the ITM drum surface that is accessible.
d
Release the
Emergency Stop
button. Press the
Inching
button to advance the
drum until a new section of the drum is accessible.
e
Repeat this procedure until the ITM drum is free of adhesive residue. See
‘Inch-safe-service method’ on page 32
Figure 9-6. Lift the leading edge with the needlenose pliers
BLANKET REMOVAL2A1
Figure 9-7. Clean the ITM drum
Old blanket
adhesive side up
Summary of Contents for Indigo press 3050
Page 1: ...HP Indigo press 3050 User guide English version ...
Page 2: ...hp indigo press 3050 user guide ...
Page 13: ...12 Chapter 1 Preface ENWW ...
Page 23: ...22 Chapter 2 Getting started ENWW ...
Page 41: ...40 Chapter 4 HP Indigo press 3050 basics ENWW Figure 4 5 Related topics ...
Page 53: ...52 Chapter 5 The main windows ENWW ...
Page 83: ...82 Chapter 6 Operating the press ENWW ...
Page 91: ...90 Chapter 7 Operator routines ENWW Figure 7 7 Inner front wall O O O O ...
Page 99: ...98 Chapter 7 Operator routines ENWW ...
Page 136: ...ENWW 135 10PIP This chapter contains the following sections z Overview z Replacing the PIP ...
Page 189: ...188 Chapter 11 Paper transport ENWW ...
Page 219: ...218 Chapter 15 Scorotron ENWW ...
Page 257: ...256 Chapter 17 Pre transfer erase PTE ENWW ...
Page 271: ...270 Chapter 19 Chiller ENWW ...