MDE-4771H Encore® S Enhanced FlexPay™ EMV® CRIND® Start-up/Service Manual · November 2019
Page 3-9
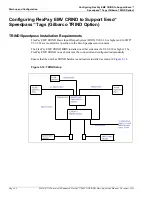
Configuring FlexPay EMV CRIND to Support Esso™ Speedpass™
Tags (Gilbarco TRIND Option)
Start-up and Configuration
Configuring FlexPay EMV CRIND BIOS to Enable TRIND
To configure the FlexPay EMV CRIND BIOS to enable TRIND, proceed as follows:
Note: The FlexPay EMV CRIND BIOS on each side must be configured independently.
1
Ensure that the CRIND BIOS is configured for Major Oil Companies (MOC) CRIND
operation. Also, ensure that the correct CRIND address has been programmed. For details,
refer to
“Configuring CRIND IDs and CRIND Mode (CRIND Diagnostic Mode)”
and
“Configuring Setup Menu and System Configuration Menu Parameters”
on
.
Note: When the CRIND BIOS is configured for MOC CRIND operation, the CRIND BIOS will
not start the application until the BIOS can poll the dispenser. If the unit is hung while
starting the application, ensure that the cable between the dispenser and FlexPay EMV
CRIND Hub Printed Circuit Board Assembly [PCBA (M07895)] is connected and the
Light Emitting Diodes (LEDs) are flashing to indicate that the pump is being polled.
Refer to
on
.
2
After pump polling is established and the dispenser displays the next screen after “Starting
Application”, swipe the CRIND diagnostic card. The Diagnostic Startup Menu opens.
3
Press
1
>
Enter
. The Main Menu opens.
4
Press
2
>
Enter
. The Device Config menu opens.
5
Press
4
>
Enter
. The TRIND Menu opens.
6
The option “1. Enable TRIND” is displayed on the screen if the TRIND is not presently
enabled or “1. Disable TRIND” is displayed if the TRIND is presently enabled. If “1. Enable
TRIND” is displayed on the screen, press
1
>
Enter
to enable TRIND/Speedpass
functionality.
7
Press
Cancel
until the Diagnostic Startup Menu opens. Press
2
>
Enter
to exit the CRIND
diagnostics.
8
to program the other side of the dispenser.

