

User’s manual maps + more
Car info
- 123 -
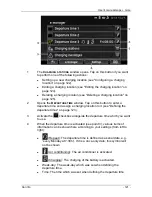
5. Tap on Save to save the settings for the charging location.
The
C
HARGING STATIONS
list opens. The new charging location will
be shown in the list.
6. Tap on Back to open the
E
-
MANAGER
window.
Defining the departure times
You can define 3 departure times for charging and air conditioning
operations. You can assign a charging location to each departure time.
You can also define whether it is a serial date.
1. In the
E
-
MANAGER
window tap on the
(Edit) button to the right of
the departure time which you want to edit.
The
D
EPARTURE TIME
window opens.
2. Use the
(Up) and
(Down) buttons to set the time at
which you want the charging or air conditioning operation to be
finished.
3. Set the week-day by tapping on the corresponding button.
4. If you want to define the entered date as a serial date, e.g. 'every
Monday at 7:30h', activate the
(Repeat) button at the top right
edge of the screen. You can also select several week-days, e.g. in
order to set a date for 'every Saturday and Sunday at 9:00h'.
5. If required, assign a different charging location to the departure time
(see the following section).
Assigning a charging location
A certain charging location is assigned to each departure time. You
can change this assignment.
1. In the
E
-
MANAGER
window tap on the
(Edit) button to the right of
the departure time to which you want to assign a charging location.
The
D
EPARTURE TIME
window opens.
2. Tap on the
(Assign charging station) button if you want to
assign a different location.
The
C
HARGING STATIONS
list opens.
3. Tap on the required charging location to select it.
The
D
EPARTURE TIME
window opens again.
4. Tap on Save.
The
E
-
MANAGER
window opens.


