background image

190-00592-00  Rev. A

Garmin G1000 Pilot’s Guide for the Diamond DA40

3-15

NAV/COM

To load a COM frequency into the COM 
tuning box:

1.  When the list of frequencies for the selected 

airport  is  displayed,  highlight  the  desired 
frequency by turning the large

 FMS

 knob.

2.  Press the 

ENT

 key.

The Pilot Controlled Lighting (PCL) frequency, located 

in the Runways box of the INFO portion of the Airport 
Information  Page,  may  also  be  highlighted  and  loaded 
into the COM tuning box.

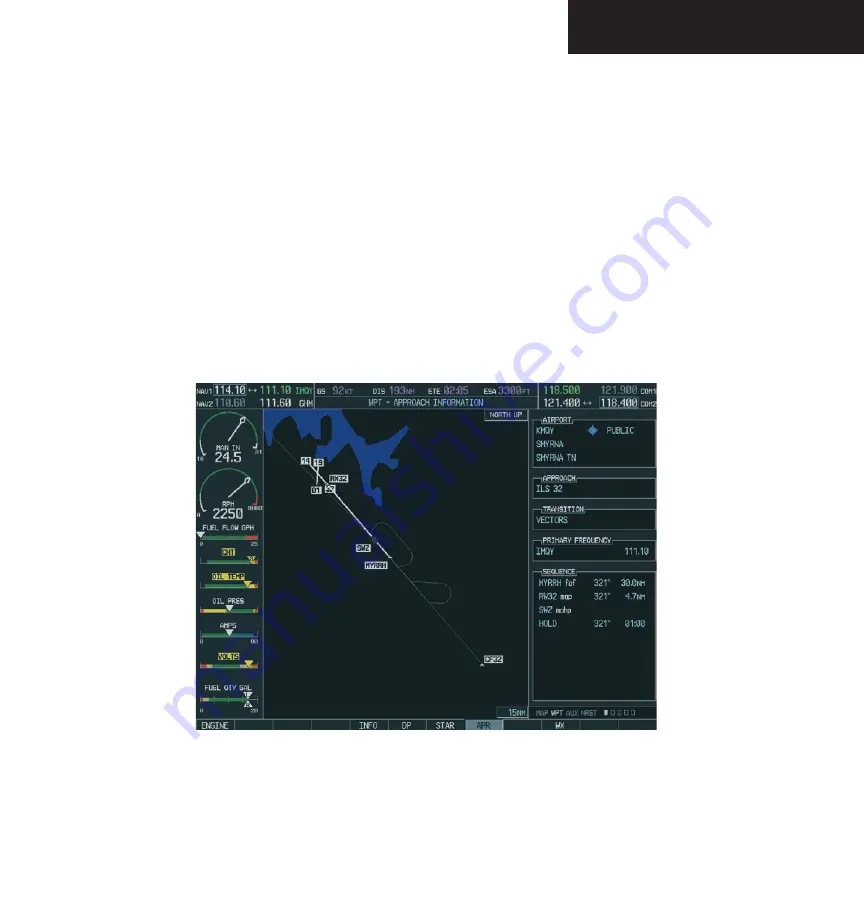
Figure 3-28  WPT – Airport Information Page (APR)

To load the primary approach NAV 
frequency into the NAV tuning box:

On the Airport Information Window, press the 

APR

 softkey to display approach information 

for a specific airport.

2.  Press the

 FMS

 knob to activate the selection 

cursor in the window.

3.  Turn  the  large

  FMS

  knob  to  highlight  the 

primary NAV frequency located in the Primary 
Frequency box.

4.  Press the 

ENT

 key.

Summary of Contents for G1000 Series

Page 1: ...G1000 TM Pilot s Guide for the Diamond DA40 ...

Page 2: ...mary 190 00592 00 Rev A Reformatted for single part number all previous part numbers incorpo rated into this part number Added optional fuel pressure indicator information Record of Revisions Revision Date of Revision Revision Page Range Description A 11 10 05 i through I 6 Initial release ...

Page 3: ...pied transmitted disseminated downloaded or stored in any storage medium for any purpose without the express written permission of Garmin Garmin hereby grants permission to download a single copy of this manual and of any revision to this manual onto a hard drive or other electronic storage medium to be viewed for personal use provided that such electronic or printed copy of this manual or revisio...

Page 4: ...dication shown by the G1000 It is thus the responsibility of the pilot to detect such an occurrence by means of cross checking with all redundant or correlated information available in the cockpit WARNING For safety reasons G1000 operational procedures must be learned on the ground WARNING The altitude calculated by G1000 GPS receivers is geometric height above Mean Sea Level and could vary signifi...

Page 5: ...ot s authority to operate this device under FAA FCC regulations CAUTION The GDU PFD and MFD displays use a lens coated with a special anti reflective coating that is very sensitive to skin oils waxes and abrasive cleaners CLEANERS CONTAININGAMMONIAWILL HARMTHEANTI REFLECTIVE COATING It is very important to clean the lens using a clean lint free cloth and an eyeglass lens cleaner that is specified as...

Page 6: ... UNDER ANY WARRANTY OF MERCHANTABILITY OR FITNESS FOR A PARTICULAR PURPOSE STATUTORY OR OTHERWISE THIS WARRANTY GIVES YOU SPECIFIC LEGAL RIGHTS WHICH MAY VARY FROM STATE TO STATE IN NO EVENT SHALL GARMIN BE LIABLE FOR ANY INCIDENTAL SPECIAL INDIRECT OR CONSEQUENTIAL DAMAGES WHETHER RESULTING FROM THE USE MISUSE OR INABILITY TO USE THIS PRODUCT OR FROM DEFECTS IN THE PRODUCT Some states do not allo...

Page 7: ...on Frequency Window 2 22 Navigation Status Bar 2 23 Transponder XPDR Status Bar 2 23 2 6 Supplemental Flight Data 2 24 Outside Air Temperature Box 2 24 System Time Box 2 24 Inset Map 2 24 Auxiliary Window Keys 2 27 Working with Menus 2 28 Auxiliary Windows 2 28 2 7 Reversionary Mode 2 43 2 8 Alerts and Annunciations 2 44 Alerts Window 2 44 Annunciation Window 2 44 Softkey Annunciations 2 44 Traffic...

Page 8: ...Beacon Receiver 5 5 Navigation Radios 5 6 Intercom System ICS Isolation 5 7 Intercom Volume and Squelch 5 8 Master Avionics Squelch MASQ 5 8 Digital Clearance Recorder with Playback Capability 5 9 Reversionary Mode 5 9 6 ENGINE INDICATION SYSTEM 6 1 Introduction 6 1 EIS Pages 6 1 EIS Indicators 6 1 6 2 DA40 DA40F 6 2 Engine Page 6 2 Lean Page 6 4 System Page 6 6 6 3 DA40D 6 8 Engine Page 6 8 Syste...

Page 9: ...Status Page 7 91 System Setup Page 7 95 System Status Page 7 104 7 10 Nearest Page Group 7 105 Nearest Airports Page 7 107 Nearest Intersections Page 7 109 Nearest NDB Page 7 110 Nearest VOR Page 7 111 Nearest User Waypoint Page 7 113 Nearest Frequencies Page 7 114 Nearest Airspaces Page 7 115 8 OPTIONAL EQUIPMENT 8 1 Introduction 8 1 8 2 Stormscope 8 2 Displaying Stormscope Lightning Data on the ...

Page 10: ...p Symbols F 1 Airport F 1 NAVAIDS F 1 Basemap F 1 Traffic F 2 Lightning Strike F 2 Impact Points TAWS Only F 2 Miscellaneous F 2 Line Symbols F 3 Obstacle database F 4 Terrain Color Chart F 4 Appendix G G1000 System Specifications G 1 GDU 1040 MFD PFD G 1 GMA 1347 Audio Panel G 1 GIA 63 Integrated Avionics Units G 1 GDC 74A Air Data Computer G 2 GTX 33 Mode S Transponder G 2 GEA 71 Engine Airframe U...

Page 11: ...G1000 TM System Overview ...

Page 12: ...190 00592 00 Rev A Garmin G1000 Pilot s Guide for the Diamond DA40 ...

Page 13: ... top level G1000 block diagram is given in Figure 1 1 Additional optional equipment are shown in Figure 1 2 NOTE Refer to the Appendices for G1000 LRU specifications 1 2 LRU DESCRIPTIONS GDU 1040 The GDU 1040s have 10 4 inch LCD displays with 1024 x 768 resolution The left display is configured as a PFD and the right display is configured as a MFD Both displays link and are used to show all functions...

Page 14: ...rmation to the G1000 The unit contains advanced sensors accelerometers andratesensorsandalsousesinputs from the Air Data Computer and Magnetometer and GPS signals from the IAUs AHRS operation is discussed in 1 7 System Operation GMU 44 The GMU 44 Magnetometer measures local magnetic field information Data is sent to the AHRS for processing to determine aircraft magnetic heading This unit receives p...

Page 15: ...rface GTX 33 The GTX 33 is a solid state Mode S tran sponder that provides Modes A C and S operation The transponder is controlled through the PFD and communicates with both IAUs through an RS 232 digital interface GDL 69 69A The GDL 69 69A is an XM satel lite radio receiver that provides real time weather information to the MFD and PFD Inset Map The Data Link also provides digital audio entertain...

Page 16: ...grated Avionics Unit System Integration Processors I O Processors VHF COM VHF NAV LOC GPS Glideslope GTX 33 Transponder High Speed Data Bus Ethernet Reversionary Control GEA 71 Engine Airframe Unit GDC 74A Air Data Computer OAT Airspeed Altitude Vertical Speed GRS 77 AHRS Attitude Rate of Turn Slip Skid GMU 44 Magnetometer Heading GPS Output GPS Output Reversionary Control GMA 1347 Audio Panel GDU...

Page 17: ...TEM OVERVIEW Figure 1 2 G1000 Optional Features NOTE For information on optional equipment shown in the above figure consult the applicable optional interface user s guide This document assumes that the reader is already familiar with the operation of this additional equipment ...

Page 18: ... 13 14 12 11 17 16 15 NAV Knob NAV VOL ID Knob NAV Frequency Transfer Key Heading Knob Course Baro Knob COM Frequency Transfer Key COM Knob SD Card Slots Range Joystick 8 9 5 6 7 4 3 2 1 COM VOL SQ Knob 8 10 7 11 12 13 14 15 16 17 10 18 Flight Plan Key Altitude Knob Enter Key Procedure Key Direct to Key Clear Key Menu Key Flight Management System Knob ...

Page 19: ...eading indicator and the heading bug synchronizes with the compass lubber line 5 Joystick Changes the map range when rotated activates the map pointer when pressed 6 CRS BARO Knob The large knob sets the altimeter barometric pressure and the small knob adjusts the course The course is only adjustable when the HSI is in VOR1 VOR2 or OBS SUSP mode Pressing this knob centers the CDI on the currently ...

Page 20: ...cess additional features or to make setting changes that relate to certain pages 16 PROC Key Selects approaches departures and arrivals from the flight plan When using a flight plan available procedures for the departure and or arrival airport are automatically suggested If a flight plan is not used the desired air port and the desired procedure may be selected This key selects IFR departure procedur...

Page 21: ...ithin the first minute of power up The Audio Panel also annunciates all bezel lights briefly upon power up On the PFD the AHRS system displays an AHRS ALIGN Keep Wings Level message and begins to initialize The AHRS should display valid attitude and heading fields within the first minute of power up The AHRS can align itself while the aircraft is taxiing or during level flight Figure 1 4 PFD Initializa...

Page 22: ...version and effective dates Figure 1 5 MFD Power up Page When this information has been reviewed for currency to ensure that no databases have expired the pilot is prompted to continue Current database information is displayed with valid operating dates cycle number and database type Press the ENT key to acknowledge this information and proceed to the Navigation Map Page When the system has acquir...

Page 23: ...on 1 7 SYSTEM OPERATION NORMAL OPERATION The PFD and MFD are connected together on a single Ethernet bus allowing for high speed communication between the two units Each IAU is connected to a single display as shown in Figure 1 1 This allows the units to share information enabling true system integration In normal operating mode the PFD displays graphical flight instrumentation in lieu of tradition...

Page 24: ...V and COM functions provided to the failed display by the IAU are flagged as invalid on the remaining display The system reverts to backup paths for the AHRS ADC Engine Airframe Unit and transponder as required The change to backup paths is completely automated for all LRUs and no pilot action is required Figure 1 7 G1000 Reversionary Mode Failed PFD NOTE The system alerts the pilot when backup pat...

Page 25: ... Normal Operation Airspeed Data a v a i l a b l e u n a v a i l a b l e AHRS no Mag Mode AHRS no Mag no Air Mode Heading Invalid a v a i l a b l e u n a v a i l a b l e a v a i l a b l e u n a v a i l a b l e a v a i l a b l e u n a v a i l a b l e GPS Magnetometer Figure 1 8 AHRS Operation GPS Input Failure Two GPS inputs are provided to the AHRS If GPS information from one of the inputs fails th...

Page 26: ... aircraft make and model to whichthechecklistapplies DA40 DIAMONDAIRCRAFT INDUSTRIES and copyright information If the SD card contains an invalid checklist file or no checklist the Checklist Page displays INVALID CHECKLIST or CHECKLIST NOT PRESENT Figure 1 9 Sample Checklist NOTE Checklistscannotbeeditedfromwithinthe system Refer to the Garmin Aviation Checklist Editor ACE User s Guide for informat...

Page 27: ...G1000 TM Primary Flight Display ...

Page 28: ...Garmin G1000 Pilot s Guide for the Diamond DA40 190 00592 00 Rev A ...

Page 29: ... these features is ex plained in other supporting sections The G1000 system controls were designed so that re gardless of which seat the pilot is flying from the aircraft can be flown with one hand and the controls manipulated with the other hand The PFD displays the following Flight Instruments 2 4 Airspeed Indicator with True Airspeed Box Attitude and Slip Skid Indicators Altimeter with Selected A...

Page 30: ... 6 4 2 5 17 7 3 1 NAV Frequency Window Airspeed Indicator True Airspeed Box Outside Air Temperature Box Altitude Reference Box Horizontal Situation Indicator Heading Box Softkeys System Time Box Barometric Setting Box Vertical Speed Indicator Altimeter COM Frequency Window Navigation Status Bar Attitude Indicator 11 8 Slip Skid Indicator 18 Turn Rate Indicator 9 Transponder Status Bar 10 ...

Page 31: ...7 9 1 3 6 2 12 5 11 Traffic Annunciation 2 4 3 1 7 6 9 8 Inset Map Selected Course Box Annunciation Window Auxiliary Window Radio Tuning Window Vertical Deviation Glideslope Indicator Vertical Speed Pointer Selected Heading Box 5 10 BRG2 Information Window BRG1 Information Window 11 DME Information Window 10 12 Marker Beacon Annunciation ...

Page 32: ...o select MANUAL then press the ENT key 3 With the intensity value now highlighted turn the small FMS knob to select the desired backlighting then press the ENT key 4 Turn the large FMS knob to highlight AUTO next to MFD DSPL and repeat steps 2 and 3 Press the CLR or MENU key to remove the window To manually adjust the backlighting for the PFD and MFD keys 1 Press the MENU key on the PFD to display...

Page 33: ...set Map STRMSCP optional Displays lightning data on Inset Map within 200 nm radius of aircraft NEXRAD optional Displays NEXRAD weather and coverage information XM LTNG optional Displays XM lightning information BACK Returns to previous level softkeys PFD Displays second level softkeys for addi tional PFD configurations METRIC Displays current and reference altitudes in meters in addition to feet al...

Page 34: ...ies to interrogations ALT Selects Mode C altitude reporting mode transponder replies to identification and altitude interrogations VFR Automatically enters the VFR code 1200 in the U S A only CODE Displays transponder code selection softkeys 0 7 0 through 7 Use numbers to enter code IDENT Provides special aircraft position identification to Air Traffic Control ATC BKSP Removes numbers entered one by ...

Page 35: ...Garmin G1000 Pilot s Guide for the Diamond DA40 190 00592 00 Rev A 2 7 PRIMARY FLIGHT DISPLAY Figure 2 5 Top Level PFD Softkeys Figure 2 6 INSET Softkeys ...

Page 36: ...Garmin G1000 Pilot s Guide for the Diamond DA40 190 00592 00 Rev A 2 8 PRIMARY FLIGHT DISPLAY Figure 2 7 PFD Configuration Softkeys Figure 2 8 XPDR Softkeys ...

Page 37: ...range is also present for low speed awareness Refer to the Aircraft Flight Manual Supplement AFMS for speed criteria Airspeed Trend Vector The Airspeed Trend Vector is a vertical magenta line extending up or down on the airspeed scale located right of the color coded speed range strip The end of the trend vector displays approximately what airspeed will be reached in six seconds if the current rat...

Page 38: ...ormation Pitch indication Roll indication Slip Skid indication Figure 2 11 Attitude Indicator 3 2 1 9 8 7 6 5 4 10 1 2 3 4 5 Roll Scale Horizon Line Aircraft Symbol Land Representation Roll Pointer 6 7 8 9 Aircraft Wing Tips Pitch Scale Sky Representation Slip Skid Indicator 10 Roll Scale Zero NOTE Supplemental flight data such as the Inset Map and the Alerts and Annunciation Windows disappear from...

Page 39: ...2 12 Pitch Attitude Warnings Nose Low Nose High Roll Indication Major tick marks at 30 and 60 degrees and minor tick marks at 10 20 and 45 degrees are shown to the left and right on the roll scale The inverted white triangle indi cates 0 on the roll scale Angle of bank is indicated by the position of the roll pointer on the roll scale Slip Skid Indication The Slip Skid indicator resides beneath th...

Page 40: ...ss This altitude also appears in the Selected Altitude Box above the Altimeter To set the Selected Altitude bug Turn the ALT knobs to set the SelectedAltitude bug The smallALT knob sets the hundreds and the large ALT knob sets the thousands Altitude Trend Vector The vertical magenta line extends up or down the al titude scale located left of the numeric labels The end of the trend vector displays ...

Page 41: ...ong with an aural tone After capturing the Selected Altitude the Altitude Alerting feature alerts the pilot whenever deviations of 200 ft from the Selected Altitude occur The Selected Altitude Box flashes yellow text on a black background for five seconds to indicate the deviation Within 1000 ft Within 200 ft Deviation of 200 ft Figure 2 15 Altitude Alerting Visual Annunciations Metric Display Selec...

Page 42: ...Beacon Annunciation Vertical Deviation Glideslope Indicator VERTICAL SPEED INDICATOR The Vertical Speed Indicator displays the aircraft verti cal speed with numeric labels and tick marks at 1 000 ft and 2 000 ft in each direction on the non moving tape Minor tick marks are at intervals of 500 ft Vertical Speed Pointer The Vertical Speed pointer displays the current vertical speed and points to tha...

Page 43: ...Format The HSI compass can be displayed as a 360 rose or a 140 arc by pressing the PFD softkey followed by the 360 HSI or the ARC HSI softkey 360 HSI The 360 HSI contains a course deviation indicator CDI with a course pointer arrow the TO FROM arrow a sliding deviation bar and scale The course pointer is a single line arrow GPS VOR1 and LOC1 or a double line arrow VOR2 and LOC2 which points in the...

Page 44: ... flag De pending on the navigation source the CDI on the Arc HSI can appear in two different ways GPS OBS VOR Arrowhead Localizer Diamond Lateral Deviation Scale Course Deviation and TO FROM Indicator Figure 2 20 Arc HSI Heading Indication A digital reading of the current magnetic heading ap pears on top of the HSI A rotatable heading bug on the compass rose or Arc marks the desired heading Figure ...

Page 45: ...e turn 3 deg sec is shown on the in dicator by the trend vector stopping at the standard turn rate tick mark corresponding to a predicted heading of 18 degrees from the current heading Figure 2 25 Standard Rate Turn Indication Turn Rate Trend Vector standard rate Course Deviation Indicator The Course Deviation Indicator CDI moves left or right from the course pointer along a deviation scale to dis...

Page 46: ...ormation Window is displayed to the lower right of the HSI and in cludes the bearing source NAV2 or GPS a pointer icon frequency NAV2 and distance to the bearing source If GPS is the bearing source the active waypoint identifier is displayed in lieu of a frequency If an active waypoint is not selected the bearing pointer is removed from the HSI and NO DATA is displayed in the informa tion window If...

Page 47: ...elected NAV frequency NOTE When navigating in GPS mode the dis tance displayed is the GPS derived great circle distance not the actual DME distance Figure 2 30 DME Information Window ADF Radio optional The ADF radio is a Becker RA3502 1 remote mount ed ADF radio receiver that operates in the frequency range 190 0 to 1799 5 kHz in 0 5 kHz increments The ADF bearing source is selected by pressing th...

Page 48: ...n to transfer the standby frequency to the active frequency field The ENT key is used to transfer the ADF standby and active frequency whenever the cursor is highlighting a standby frequency Any time the cursor is on the ADF standby frequency and the standby frequency is not in edit mode the ENT TO TRANSFER message is displayed at the bottom of the Radio Tuning window to assist the pilot in perform...

Page 49: ... the pilot cross es the MAP SUSP appears on the HSI in place of OBS and the OBS softkey now reads SUSP indicating that automatic sequencing of approach waypoints is suspend ed at the MAP The following yellow annunciations may appear on the HSI INTEG RAIM not available WARN GPS detects position error To change between navigation sources 1 Press the CDI softkey to change from GPS to VOR1 or LOC1 Thi...

Page 50: ...ion NAV Frequency Window located in the upper left corner of the PFD provides control and display of dual VOR ILS receivers NAV1 and NAV2 The NAV Frequency window displays the following informa tion NAV1 and NAV2 active and standby frequencies NAV1 and NAV2 identifier if the active NAV1 or NAV2 frequency is a valid identified frequency Color coded indication of the active NAV receiver NOTE Operating...

Page 51: ...ansponder section for infor mation regarding transponder operation The Transponder XPDR Status Bar is located in the lower right corner and displays the transponder code re ply symbol and mode of operation Figure 2 39 Transponder Status Bar Transponder code selection is performed with eight softkeys 0 7 providing 4 096 active identification codes Pressing one of these softkeys begins the code selec...

Page 52: ... MAP NOTE The Inset Map orientation is always the same as that for the MFD Navigation Map Page NOTE Map orientation and other map features are enabled on the MFD refer to the Multi Func tion Display section NOTE Refer to the Multi Function Display sec tion for a detailed explanation of the declutter levels The Inset Map is a smaller version of the MFD Naviga tion Map Page It appears in the lower l...

Page 53: ...ess the INSET softkey 2 Press the DCLTR softkey to remove background map details until the desired amount of detail is depicted The declutter level appears above the softkey i e DCLTR 1 Refer to the Multi Func tion Display Pilot s Guide for more detail To enable disable traffic data 1 Press the INSET softkey 2 Press the TRAFFIC softkey to display Traffic Information Service TIS traffic Traffic symbol ...

Page 54: ...ata is not displayed when the aircraft latitude is greater than 75 N or 60 S NOTE Refer to the Appendix for more details about terrain NOTE Refer to the Optional Equipment section for more details about weather options To enable disable Stormscope optional NEXRAD optional or XM lightning optional data 1 Press the INSET softkey Press the STRMSCP optional NEXRAD optional or XM LTNG optional softkey ...

Page 55: ...ext sensitive list of options This option list allows the user to access addi tional features or make setting changes which relate to certain pages The MENU key opens the PFD Setup Menu if no Auxiliary Window is open Figure 2 43 PFD Auxiliary Window Keys 1 2 3 4 5 6 5 PROC Selects approaches departures and arrivals for the flight plan When using a flight plan available procedures for departure and o...

Page 56: ...ough a list of available options a scroll bar always appears to the right of the window when the option list is longer than the window 2 Press the ENT key to select the desired option 3 The CLR key or the FMS knob may be pressed to remove the menu and cancel the operation AUXILIARY WINDOWS The lower right area of the PFD is a shared area that at any one time can present the following windows TIMER...

Page 57: ...key to remove the window Figure 2 46 Timer Status Prompts Flight ID Flight status automatic reporting of aircraft identifica tion ID is transmitted by the transponder to the ground stations and other aircraft The flight ID is set to fixed SAME AS TAIL and CONFIG ENTRY or variable PFD ENTRY at the time of installation The two fixed selections do not require any action from the pilot The variable PFD EN...

Page 58: ...ed simulta neously by pressing the MENU key and select All References ON or All References OFF then press the ENT key To restore all defaults 1 From the Timer References Window press the MENU key 2 Turn the FMS knob to highlight Restore Defaults and press the ENT key 3 Press the TMR REF softkey to remove the window Nearest Airports Window Pressing the NRST softkey enables disables the Near est Air...

Page 59: ...om the Nearest Airport window turn the large FMS knob to highlight the desired field 2 Turn the FMS knobs to select the desired loca tion then press the ENT key 3 Turn the large FMS knob to highlight BACK then press the ENT key To activate a Direct to from the Nearest Airports Window 1 From the Nearest Airports Window turn the large FMS knob to highlight the desired airport then press the Direct to...

Page 60: ...ifier must be entered for all waypoints To select a Direct to by identifier 1 Press the Direct to key then turn the FMS knobs to select the desired waypoint identifier Press the ENT key to confirm the selection 2 Press the ENT key again to activate the direct to To select a Direct to by city or facility name 1 Press the Direct to key then turn the large FMS knob to highlight the city line to the right...

Page 61: ... cancel a Direct to 1 Press the Direct to key then press the MENU key to display the Direct to Options Menu 2 Press the ENT key to cancel direct to navigation If a flight plan is still active the G1000 resumes flight plan navigation along the closest leg Figure 2 51 Cancel Direct To NAV Flight Plan Window NOTE COM frequency and stored flight plans cannot be loaded from the PFD Flight Plan Window The ...

Page 62: ...Activate Leg Activate leg selects the highlighted leg as the active leg the flight plan leg which is currently used for naviga tion guidance To activate a flight plan along a specific leg 1 From the active Flight Plan Window press the FMS knob to active the cursor and turn the large FMS knob to highlight the desired destination waypoint 2 Press the MENU key highlight Activate Leg and press the ENT ke...

Page 63: ...MS knob to highlight Invert Flight Plan then press the ENT key The flight plan is now reversed and activated Figure 2 55 Invert Flight Plan Confirmation Window Delete Flight Plan The entire flight plan or selected waypoints within the flight plan may be deleted To delete the entire flight plan 1 From the Flight Plan Window press the MENU key to display the page menu options 2 Turn the FMS knob to highl...

Page 64: ...key A window appears listing the available departures for the departure airport Figure 2 57 Departure 3 Turn the FMS knob to select the desired depar ture then press the ENT key 4 A window may appear listing runways for the departure Turn the FMS knob to select the desired runway then press the ENT key The transition window is now displayed Figure 2 58 Departure Runway NOTE The runway window is no...

Page 65: ...ith parallel runways B may appear at the end of the runway designa tion to indicate that the arrival procedure applies to both runways 6 With LOAD highlighted press the ENT key Load Approach Load Approach allows the pilot to select a published instrument approach for the destination airport or re place the current approach with a new selection To select an approach for a direct to or flight plan de...

Page 66: ...r waypoint along the flight plan at the location closest to a chosen reference waypoint Figure 2 61 Closest Point of FPL Window To determine the closest point along the active flight plan to a selected waypoint 1 From the Flight Plan Window press the MENU key to display the page menu options 2 Turn the FMS knob to highlight Closest Point of FPL then press the ENT key A window appears with the refere...

Page 67: ... for data fields on the Flight Plan Window 1 From the Flight Plan Window press the MENU key to display the page menu options 2 Turn the FMS knob to highlight Restore Defaults then press the ENT key Procedures Window The Procedures Window is enabled and disabled by pressing the PROC key The following options are avail able from the Procedures Window Activate Vector To Final Activate Approach Select ...

Page 68: ...ENT key NOTE LOAD adds the approach to the flight plan without immediately using the approach for navigation guidance This allows the pilot to continue navigating the original flight plan until cleared for the approach but keeps the approach available for quick activation when needed ACTIVATE adds the approach to the flight plan and begins navigating the approach course Select Arrival Select Arrival ...

Page 69: ...press the ENT key NOTE When adding an arrival to an active flight plan the pilot may need to remove a duplicate destination waypoint from the flight plan list Figure 2 70 Select Arrival Window Select Departure Select Departure allows the pilot to choose a published standard instrument departure SID for the departure airport or replace the current departure with a new selec tion When using a direct t...

Page 70: ...y to begin navigating the approach course cleared for the approach To activate the approach for a direct to or flight plan destination airport 1 From an active flight plan press the PROC key to display the Procedures options window 2 Turn the large FMS knob to highlight Activate Approach then press the ENT key Activate Vector To Final Activate Vector To Final allows the pilot to activate the final co...

Page 71: ...ssing a dedicated DISPLAY BACKUP button at the bottom of the Audio Panel refer to Audio Panel section Figure 2 71 PFD Reversionary Mode In reversionary mode the computer display units CDUs are re configured to present the PFD symbology together with the engine parameters engine parameters are incorporated on the left side of the display Rever sionary PFD parameters are presented in the same format ...

Page 72: ...e Alerts Window ANNUNCIATION WINDOW The Annunciation window appears to the right of the Vertical Speed Indicator when a WARNING or CAUTION alert is issued Warning alerts are displayed in red and caution alerts are displayed in yellow When new alerts appear they are displayed with a separate white line at the top of the Annunciation window regardless of priority Once they are acknowledged they are ...

Page 73: ...he flash ing ADVISORY annunciator continues to flash until acknowledged by the pilot by pressing the ADVISORY softkey TRAFFIC ANNUNCIATION NOTE Refer to the Appendix for more details about Traffic Information Service TIS The G1000 system displays Traffic Information Service TIS traffic on the PFD Inset Map and the MFD Naviga tion Map Page When a traffic advisory TA is detected the following automaticall...

Page 74: ...Garmin G1000 Pilot s Guide for the Diamond DA40 190 00592 00 Rev A 2 46 PRIMARY FLIGHT DISPLAY This page intentionally left blank ...

Page 75: ...G1000 TM NAV COM ...

Page 76: ...190 00592 00 Rev A Garmin G1000 Pilot s Guide for the Diamond DA40 ...

Page 77: ...nd COM frequency window are on the right The ADF DME Tuning window is located in the lower right corner on the PFD as shown in the figure below Figure 3 1 G1000 VHF NAV COM Interface PFD ADF DME Tuning Window NAV Controls COM Controls NAV Frequency Window COM Frequency Window The NAV COM interface includes Windows and fields Radio selection Tuning box Frequency Transfer Arrows Radio status indicatio...

Page 78: ...he right Standby NAV Frequency Field Active NAV Frequency Field Active COM Frequency Field Standby COM Frequency Field Figure 3 2 Frequency Fields Selected NAV Radio Navigation Status Bar Tuning Box Tuning Box Selected COM Radio RADIO SELECTION Frequencies in the active window are displayed in either green or white An active COM frequency is displayed in green indicating that the COM radio is sele...

Page 79: ...sfer the NAV tuning box between the NAV1 and NAV2 radios Figure 3 3 NAV COM Controls Frequency Transfer Keys Dual NAV Knob Dual COM Knob VOL PUSH ID Knob VOL PUSH SQ Knob NAV Controls COM Controls Turn to tune desired frequencies Press to change tuning box positions The COM controls VOL PUSH SQ knob Turn to adjust the COM radio volume Press to turn automatic squelch ON and OFF Frequency Transfer k...

Page 80: ... on the audio panel the COM frequency tuning box highlights the frequency on both the PFD and MFD When a different NAV radio is selected on the HSI the NAV frequency tuning box highlights the frequency on the PFD and MFD The NAV frequency tuning box does not change when GPS mode is selected Figure 3 5 Switching COM Radios Pushing the small COM knob switches the tuning box from one COM radio to the...

Page 81: ...creases volume counterclockwise decreases volume When adjusting the level is displayed in place of the standby frequencies Volume level indication remains for two seconds after the change Figure 3 9 COM and NAV Volume Levels FREQUENCY TRANSFER ARROW The Frequency Transfer Arrow is displayed between the COM and NAV active and standby frequencies for the active radio Pressing the Frequency Transfer ...

Page 82: ...reception is always on Continuous static noise is heard over the speaker and phones and an RX indication appears on the display Figure 3 11 Overriding Automatic Squelch To enable automatic squelch press the VOL PUSH SQ knob again SELECTING A COM RADIO The desired COM radio is selected using the COM MIC keys on the audio panel When the COM MIC key is annunciated the corresponding active COM frequen...

Page 83: ... Pressing and holding the COM Frequency Transfer key for two seconds automatically loads the emergency COM frequency 121 500 MHz in the active field of the active COM radio the one with the transfer arrow Press for two seconds to load 121 5 MHz Figure 3 14 Quickly Tuning 121 500 MHz STUCK MICROPHONE If the push to talk PTT switch becomes stuck the COM transmitter stops transmitting after 35 seconds...

Page 84: ...f NAV audio is available with the ID filtered out for listening to HIWAS and FSS transmissions on VOR stations NAV section of the audio panel NAV2 radio is selected on the audio panel The Morse code identifier for the GHM VOR can be heard Figure 3 16 Morse Code Identifier Audio NAV RADIO SELECTION FOR NAVIGATION The desired NAV radio is selected for navigation by pressing the CDI softkey located on t...

Page 85: ... upon the nature of the optional NAV radios installed the Radio Tuning window is entitled either ADF TUNING DME TUNING or ADF DMETUNING and its associated softkey is entitled either ADF DME or ADF DME respectively NOTE When anotherAuxiliary window is turned on theADF DMETuning window is removed from the PFD The following information is displayed in the ADF DME Tuning window Active and standby ADF ...

Page 86: ...small FMS knob both to activate data entry mode for the standby ADF frequency field and to change each digit Turn the large FMS knob to move the cursor to the next or previous character position NOTE The active ADF frequency field cannot be edited directly NOTE Pressing the CLR key while in data entry mode i e before having validated a standby frequency being entered causes the system to cancel the ...

Page 87: ...o identification of the interrupted carrier beacon stations that are used in various parts of the world In this mode the NDB Morse code identifiercanonlybeheardifthe ADFkeyisselected on the audio panel To select an ADF receiver mode 1 Turn the large FMS knob to place the selection cursor over the ADF mode field 2 Turn the small FMS knob to select the desired ADF receiver mode Figure 3 21 Selecting AD...

Page 88: ...s set to the last selected NAV frequency To select a DME transceiver tuning mode 1 Turn the large FMS knob to place the selection cursor over the DME tuning mode field 2 Turn the small FMS knob to select the desired DME tuning mode 3 Press the ENT key to validate the selection NOTE Pressing the CLR key while in the process of selecting DME tuning mode causes the system to cancel data entry and reve...

Page 89: ...ob to scroll through a list of frequencies Press the ENT key to load a highlighted frequency into the frequency window TurntheFMSknob to scroll through a list of frequencies Figure 3 24 Loading Frequencies AUTO TUNING ON THE PFD COM frequencies for the nearest airports may be viewedandautomaticallyloadedfromtheNearestAirports Window on the PFD To auto tune a COM frequency for a nearby airport 1 Pr...

Page 90: ...e appropriate NAV frequency is automatically loaded into the active field of NAV1 WPT Airport Information Window The Airport Information Window displays runway informationandalistoffrequenciesfortheselectedairport identifier as well as departure arrival and approach information To display the entire list of frequencies for an airport 1 On the Airport Information Window press the INFO softkey to disp...

Page 91: ...e Runways box of the INFO portion of the Airport Information Page may also be highlighted and loaded into the COM tuning box Figure 3 28 WPT Airport Information Page APR To load the primary approach NAV frequency into the NAV tuning box 1 On the Airport Information Window press the APR softkey to display approach information for a specific airport 2 Press the FMS knob to activate the selection curs...

Page 92: ...he VOR Information window 2 Turn the FMS knob as needed to select the desired VOR and press the ENT key to validate the selection 3 Turn the large FMS knob to highlight the VOR frequency and press the ENT key to load this frequency into the tuning box of the NAV Frequency window Figure 3 29 WPT VOR Information Page NOTE If the MENU key is pressed when in the VOR Information Page the View Recent VO...

Page 93: ... frequency from that list 1 On the Nearest Airports Page press the FMS knob to activate the selection cursor in the Nearest Airports window 2 Turn the FMS knob to scroll through the list of nearest airport identifiers until the desired nearest airport is highlighted 3 Press the FREQ softkey to activate the selection cursor in the Frequencies box 4 Turn the FMS knob to scroll through the list of fre...

Page 94: ...To load a VOR frequency into the NAV window 1 On the NearestVOR Page press the FMS knob to activate the Nearest VOR window 2 Turn the FMS knob to scroll through the list of nearest VORs until the desired nearest VOR is highlighted 3 Press the FREQ softkey to activate the selection cursor in the Frequency box and press the ENT key to load the frequency into the tuning box of the NAV Frequency windo...

Page 95: ...NOTE The Nearest ARTCC box contains a num bered list of ARTCC names as well as associated bearing and distance information To view a nearest FSS frequency and load it into the standby frequency field 1 Press the FSS softkey to activate the selection cursor in the Nearest FSS box 2 Turn the small FMS knob to scroll through the list of FSS names then the large FMS knob to highlight the desired FSS fr...

Page 96: ...y if the desired approach is not already loaded 1 Press the PROC key to open the Procedures window 2 Turn the large FMS knob to highlight the SELECT APPROACH menu option and press the ENT key 3 Use both the FMS knob and the ENT key as needed to select the desired airport VOR ILS approach and transition 4 Turn the large FMS knob to highlight either the LOAD or ACTIVATE prompt and press the ENT key ...

Page 97: ... Select Approach window using the FMS knob then pressing the ENT key If the system is in GPS mode when a VOR ILS approach is loaded or activated the approach primary NAV frequency is automatically loaded into the active field of NAV1 The NAV frequency is also automatically loaded upon vector to final activation An approach can also be activated with the MENU key when the Flight Plan window is open F...

Page 98: ...190 00592 00 Rev A Garmin G1000 Pilot s Guide for the Diamond DA40 3 22 NAV COM This page intentionally left blank ...

Page 99: ...G1000 TM Transponder ...

Page 100: ...Garmin G1000 Pilot s Guide for the Diamond DA40 190 00592 00 Rev A ...

Page 101: ...IDENT BKSP BACK The digits 8 and 9 are not used for code entry Pressing the BKSP softkey backs up code selection to the previous digit Pressing the BACK softkey during code selection reverts to the MODE Selection softkeys Figure 4 2 Pressing the BACK softkey during Mode Selection reverts to the Top level softkeys Figure 4 1 NOTE After 45 seconds of transponder softkey inactivity the system reverts...

Page 102: ...oves it upon completion of Flight ID entry See ICAO documents 8168 4444 and 8585 for further details If the Flight ID is set to SAME AS TAIL no entry is required In this configuration the transponder then reports the aircraft registration number to ATC Acquisition Squitter Acquisition squitter or short squitter is the transponder 24 bit identification address The transmission is sent periodically re...

Page 103: ...y addressed Mode S interrogations Figure 4 4 Ground Mode NOTE Ground mode can be overridden by pressing any one of the Mode Selection softkeys Standby Mode Manual The Standby mode can be selected at any time by pressing the STBY softkey In Standby mode the transponder does not reply to interrogations but new codes can be entered If the Standby mode is selected a white STBY indication appears in th...

Page 104: ... in the reply status field of the Transponder Status bar Figure 4 8 Reply Indication CODE SELECTION Entering a Code A total of 4 096 discrete identification codes can be selected with the Code Selection softkeys To enter a transponder code 1 PresstheXPDRsoftkeytodisplaythetransponder Mode Selection softkeys 2 Press the CODE softkey to display the transponder Code Selection softkeys for digit entry 3...

Page 105: ...FR code commonly used in Europe refer to ICAO standards 7500 Hijack code 7600 Loss of communication code 7700 Emergency code 7777 Military interceptor operations code NEVER SQUAWK THIS CODE 0000 Code for military use in the U S IDENT FUNCTION Pressing the IDENT softkey sends an ID indication to AirTrafficControl ATC TheIDreturndistinguishesyour transponder from all others on the air traffic controll...

Page 106: ...Garmin G1000 Pilot s Guide for the Diamond DA40 190 00592 00 Rev A 4 6 TRANSPONDER This page intentionally left blank ...

Page 107: ...G1000 TM Audio Panel ...

Page 108: ...Garmin G1000 Pilot s Guide for the Diamond DA40 190 00592 00 Rev A ...

Page 109: ... controls marker beacon receiver audio and features marker beacon audio muting As part of the G1000 Integrated Cockpit System the GMA 1347 also controls the display reversionary mode WARNING When the GMA 1347 audio panel is turned OFF or is inoperative certain autopilots are affected No warning tone is supplied when the autopilot disengages and the middle marker sense signal is not supplied The au...

Page 110: ...ed with four stereo head set jacks for the pilot copilot and two passengers UNMUTED UNSWITCHED INPUTS The audio panel provides four unmuted unswitched inputs that are always present on the headsets or speaker These inputs are the following aural warnings ALTITUDE WARNING UNSWITCHED 1 UNSWITCHED 2 UNSWITCHED 3 AUDIO PANEL CONTROLS Transceiver audio selector keys COM1 COM2 Transmitter audio mic sele...

Page 111: ...mond DA40 Aircraft Marker Beacon Mute Passenger Address Marker Beacon Signal Sensitivity Speaker VOL SQ Manual Squelch Reversionary Mode Control Digital Recording Playback Navigation Radio Audio Figure 5 1 Audio Panel Controls ICS Isolation VOL Annunciation SQ Annunciation Disabled on Diamond DA40 Aircraft Navigation Radio Audio ...

Page 112: ...tically by the PFD TRANSCEIVER KEYS The following four transceiver keys appear at the top of the audio panel front panel COM1 MIC COM2 MIC COM1 and COM2 Figure 5 2 COM audio can be selected by pressing either the desired COM key or by pressing a COM MIC key Figure 5 2 Transceiver Keys Disabled on Diamond DA40 Aircraft Annunciator COM MIC Keys Pressing the COM1 MIC key selects the COM1 radio as the...

Page 113: ...he audio panel marker beacon is used as part of the ILS system The marker beacon receiver is always ON and receives at 75 MHz The audio panel provides a marker audio muting capability The receiver detects the three marker tones outer middle andinner andilluminatestheappropriatemarker beacon indicators The marker indicators are located to the left of the altimeter on the PFD Figure 5 4 The outer ma...

Page 114: ... 1300 Hz 95 dot dash combinations per minute Amber Airway Inner Marker 3000 Hz 6 dots per second White Table 5 1 Marker Beacon Signal Characteristics Outer Marker Middle Marker Inner Marker Figure 5 4 Marker Beacon Signal Indicator Lights on the PFD NAVIGATION RADIOS Pressing DME ADF NAV1 or NAV2 selects deselects the radio source and the annunciator Selected audio can be heard over the headset an...

Page 115: ...each other Table 5 2 ICS Isolation Modes Mode PILOT KEY ANNUNCIATOR COPLT KEY ANNUNCIATOR Pilot Hears Copilot Hears Passenger Hears ALL OFF OFF Selected radios pilot copilot passengers Selected radios pilot copilot passengers Selected radios pilot copilot passengers PILOT ON OFF Selected radios pilot Copilot passengers Copilot passengers COPILOT OFF ON Selected radios pilot passengers Copilot Sele...

Page 116: ...m volume may be adjusted NOTE When the MAN SQ key is not lit auto squelch is active pressing the VOL SQ knob has no effect on the VOL SQ selection Intercom Manual Squelch Control The intercom squelch function has the ability to quiet the ambient cockpit noise when no person is talking Each microphone input has an automatic squelch threshold Manual squelch adjustment is also available if desired Pr...

Page 117: ...back function Pressing PLAY once plays back the latest recorded memory block then returns to normal operation Pressing PLAY during playback of a memory block halts the playback of this block and plays back the preceding recorded block The PLAY key can be used to backtrack through the recorded memory blocks to reach and play back any desired block NOTE Pressing the MKR MUTE key during playback halt...

Page 118: ...Garmin G1000 Pilot s Guide for the Diamond DA40 190 00592 00 Rev A 5 10 AUDIO PANEL This page intentionally left blank ...

Page 119: ...G1000 TM Engine Indication System ...

Page 120: ...Garmin G1000 Pilot s Guide for the Diamond DA40 190 00592 00 Rev A ...

Page 121: ...ays electrical additional engine and oil indicators Fuel Page This page displays numeric readouts for the fuel indicators and fuel calculations EIS INDICATORS The EIS Pages display engine information using round dial gauges horizontal bar indicators bar graphs see Lean Page and digital readouts Round Dial Gauges The gauges are color coded and have white pointers Digital readouts appear beneath the...

Page 122: ... in gallons per hour GPH The Fuel Flow indicator ranges from 0 to 25 Green Normal fuel flow Red Abnormal fuel flow CHT Indicator The CHT Cylinder Head Temperature indicator dis plays the temperature of the hottest cylinder in degrees Fahrenheit The number of the hottest cylinder appears in the triangular pointer Green Normal Yellow Caution Red Warning Oil Temperature Indicator The Oil Temperature in...

Page 123: ...gallons per side when full Long Range Tanks Optional The indicator ranges from 0 to 25 with tick marks at 5 10 15 and 20 gallons The Fuel Quantity Indicator only displays to 24 gallons per side when full Fuel Pressure Indicator Option DA40 only This optional indicator is located between the Fuel Flow and CHT Indicators and shows the fuel pressure in pounds per square inch psi Green Normal Red Warn...

Page 124: ...rticular cylinder turns yellow caution or red warning the temperature decreases and returns to normal which is indicated by white on the bar graph the ASSIST softkey is pressed The CYL SLCT softkey is available by pressing the LEAN softkey To monitor the desired cylinder s From the Lean Page press the CYL SLCT softkey to cycle through each cylinder and view the EGT and CHT NOTE The pilot should fo...

Page 125: ...STEM Figure 6 3 Lean Page Manifold Pressure Gauge Hollow Bar Representing Peak DA40F DA40 Cylinder Head Temperature Bar Graph with readout for selected cylinder Temperature Deviation from Peak Exhaust Gas Temperature Bar Graph with readout for selected cylinder Tachometer Fuel Flow Indicator ...

Page 126: ...icators and are calculated from the last time the fuel was reset If desired the pilot can utilize the DEC FUEL INC FUEL and RST FUEL softkeys from the System Page to adjust the amount of fuel remaining for totalizer calcula tions DEC FUEL Decreases totalizer based fuel quan tity remaining in one gallon increments INC FUEL Increases totalizer based fuel quan tity remaining in one gallon increments ...

Page 127: ...YSTEM Figure 6 5 System Page Oil Temperature Oil Pressure Voltmeter Ammeter Fuel Flow DA40 DA40F Manifold Pressure Gauge Tachometer Oil Temperature Oil Pressure Voltmeter Ammeter Fuel Flow Total Time in Service Fuel Remaining Fuel Used Endurance Range Fuel Remaining Fuel Used Endurance Range ...

Page 128: ...ed by the FADEC The overspeed warn ing is a visual annunciation which consists of the tachom eter digital reading and units flashing white text on a red background then red text on a white background White Below normal operating range Green Normal operating range Yellow Caution range Red Indicates engine overspeed Fuel Flow GPH Indicator The Fuel Flow indicator is a digital readout which dis plays ...

Page 129: ... with tick marks at 0 5 10 and 15 gallons Green Normal Red Warning NOTE The Fuel Quantity Indicator displays 14 gallons per side when full NOTE Pilots should refer to the Aircraft Flight Manual Supplement AFMS for limitations Figure 6 6 Engine Page DA40D Engine Load Indicator Tachometer Fuel Temperature Indicator Coolant Temperature Indicator Oil Pressure Indicator Fuel Quantity Indicator Oil Temp...

Page 130: ...re Pressure Voltmeter The Voltmeter displays the primary bus voltage for each side Green Normal Yellow Caution Low and High Red Warning Minimum and Maximum Ammeter The Ammeter displays each alternator load in amperes The ammeter ranges from 0 to 120 Green Normal Yellow Caution Red Warning Gearbox Temperature Indicator The Gearbox Temperature indicator displays the tem perature of each gearbox in d...

Page 131: ...ated from the last time the fuel was reset If desired the pilot can utilize the DEC FUEL INC FUEL and RST FUEL softkeys to adjust the amount of fuel remaining for totalizer calculations The second level softkeys are available by pressing the FUEL softkey DEC FUEL Decreases totalizer based fuel quan tity remaining in one gallon increments INC FUEL Increases totalizer based fuel quan tity remaining ...

Page 132: ...Garmin G1000 Pilot s Guide for the Diamond DA40 190 00592 00 Rev A 6 12 ENGINE INDICATION SYSTEM This page intentionally left blank ...

Page 133: ...G1000 TM G1000 TM Multi Function Display ...

Page 134: ...Garmin G1000 Pilot s Guide for the Diamond DA40 190 00592 00 Rev A ...

Page 135: ...ection This document only describes the baseline standard MFD configuration installed in the DA40 DA40F and DA40D Figure 7 1 MFD Splash Screen MFD POWER UP MFD power up is part of the system power up proce dure See the System Overview for details Splash Screen Information The MFD Splash Screen displays general system informationsuchassoftwareversionanddatabaseversions to the pilot upon power up of ...

Page 136: ...n to the default Engine Page TRAFFIC TOPO TERRAIN DCLTR 2 DCLTR 3 DCLTR 1 CHKLIST ASSIST CYL SLCT EXIT EMERGCY ENGINE DCLTR MAP ENGINE CHKLIST CLR DONE The DONE softkey changes to UNDO when the checklist item is already checked BACK Press to return to the top softkey level STRMSCP NEXRAD XM LTNG optional optional optional Press to return to the top softkey level Press to return to the top softkey ...

Page 137: ... any page press the CHKLIST softkey Selecting a Procedure Group Depending on the specific airframe there are a certain number of groups of procedures with their respective checklists available to the pilot To select a procedure group 1 Press the CHKLIST softkey 2 Turn the large FMS knob to select the GROUP field 3 Turn the small FMS knob to select the desired procedure and press the ENT key Selectin...

Page 138: ...klist Page Softkeys Checklist Number Checklist Page Indicator Figure 7 3 Checklist Page typical Emergency Softkey One Button Access to Emergency Procedures TheEMERGENCYsoftkeyisavailableatalltimeswhen the checklist page is displayed Press the EMERGENCY softkey at any time to immediately access the emergency procedures Exiting the Checklist Page The EXIT softkey is available as long as the Checklis...

Page 139: ...rest User Waypoints Page Nearest Frequencies Page Neatest Airspaces Page To select a specific page group Turn the large FMS knob until the desired page group is selected Active Page group is highlighted Currently selected page is highlighted Figure 7 4 Page Group Window To select a different page within the group Turn the small right FMS knob As the knob is turned the bottom right corner of each pa...

Page 140: ...played ENT accepts a menu selection or data entry Approves an operation or completes data entry Also confirms information BACK resets the MFD softkeys to their default settings ENGINE MAP DCLTR MODE VIEW etc DCLTR removes information from the moving map in a progressive manner with each key press MENU displays a context sensitive list of options that allows access to additional features or that all...

Page 141: ...display capability Map display showing airports navaids airspaces land data highways cities lakes rivers borders etc with names labels Figure 7 8 Navigation Map Page not all features shown Own Aircraft Map Scale Legend Course Line Map Orientation Terrain Scale Page Groups Airspace Boundries Interstate Highways Map pointer information distance and bearing to pointer location of pointer name and oth...

Page 142: ... Displaying Terrain Information on the Navigation Map Page Displaying Traffic on the Navigation Map Page MFD Navigation Status Window Navigation Map Page Options Menu Changing the Map Orientation See the map setup section of this document for instruc tions on how to change the map orientation Selecting a Map Range The Navigation Map Page can be set to 23 different range settings from 500 feet to 20...

Page 143: ...thin the heliport symbol Soft surface public airports displayed with a hollow circle in the center of the airport symbol Airspace The Navigation Map Page displays airspace as one of the following colors Blue ICAO control area Class B Alert area Caution area Danger area Prohibited area Restricted area Training area Unknown area Warning area Terminal Zone Airspace ATZ Class D Purple Class C ICAO ter...

Page 144: ... Only User waypoints Large Airports Flight plan route waypoints Land Country Text Latitude Longitude Grid Medium Airports Rivers Lakes Large City VORs Small Airports Topography data Medium City NDBs SUA Group 3 Terrain Proximity data Small City Intersections SUA Group 4 Map Borders SUA Group 0 Runway Labels Bearing Line Freeways SUA Group 1 Lightning Strike data when Stormscope installed National ...

Page 145: ...ghlighted for approximately four seconds before returning to normal shading Panning Arrow Latitude and longitude position of pointer Distance bearing and elevation Figure 7 10 Map Panning To pan the map 1 Push in the joystick to display the panning arrow 2 Push in and move the joystick in the general direction of the desired destination to place the panning arrow at the destination loca tion When ...

Page 146: ...PO softkey Topo data can also be displayed on the Navigation Map Page by using the On Off topo data map setup feature See the Navigation Map Page setup menu sec tion NOTE Press the TOPO softkey again to remove topo data from the Navigation Map Page When topo data is removed from the page the Jeppesen Nav data is presented on a black background Displaying Terrain Information on the Navigation Map P...

Page 147: ...1 Press the MAP softkey 2 Press the TRAFFIC softkey Press the TRAFFIC softkeyagaintoremovetrafficfromthe Navigation Map Page NOTE Traffic and terrain data can also be displayed by using the On Off Navigation Map Page option See the Navigation Map Page setup section for details MFD Data Bar The MFD Navigation Status Window displays four user configurable fields which can display the following data Bea...

Page 148: ...y to the current ground track Desired Track Up DTK up fixes the top of the map display to the desired course Heading Up HDG up fixes the top of the map display to the current aircraft heading NOTE The Navigation Map Page orientation default setting is North Up To change the map orientation 1 With the Navigation Map Page displayed press the MENU key to display the Navigation Map Page Menu The cursor ...

Page 149: ...b to highlight the AUTO ZOOM field 5 Turn the small FMS knob to select On or Off and press the ENT key 6 Press the FMS knob to return to the Navigation Map Page Land Data The Navigation Map Page can display background land data roads lakes borders etc The background land data can also be removed from the display turned off To enable disable land data 1 With the Navigation Map Page displayed press t...

Page 150: ...hlight the TRACK VECTOR field 5 Turn the small FMS knob to select On or Off Press the ENT key to accept the selected option 6 Press the FMS knob to return to the Navigation Map Page Wind Vector The wind vector box is displayed in the upper right corner of the Navigation Map Page and displays wind direction and speed in knots Wind direction is indicated by a 360 degree pointing arrow To enable disab...

Page 151: ...ed on the Navigation Map Page using the TOPO DATA setting The topo data range is the maximum map range that topo data is displayed To enable disable topo data and to select a topo data range 1 With the Navigation Map Page displayed press the MENU key to display the Navigation Map Page Menu The cursor flashes on the Map Setup option 2 Press the ENT key The Map Setup Menu is displayed 3 Turn the smal...

Page 152: ... be enabled or disabled on the Navigation Map Page using the TERRAIN DATA setting A data range can also be selected The data range is the maximum map range that terrain data is displayed To enable disable terrain data and to select a terrain data range 1 With the Navigation Map Page displayed press the MENU key to display the Navigation Map Page Menu The cursor flashes on the Map Setup option 2 Pre...

Page 153: ...ob to return to the Navigation Map Page Fuel Range Ring Fuel RNG RSV The Navigation Map Page can display a fuel range ring which shows the flight distance that the aircraft has remaining A dashed green circle indicates the transition range to reserve fuel A solid green circle indicates the range of all fuel including the reserve fuel If only reserve fuel remains the range is indicated by a solid ye...

Page 154: ...enu The cursor flashes on the Map Setup option 2 Press the ENT key The Map Setup Menu is displayed 3 Turn the small FMS knob to select the Traffic group Press the ENT key The cursor flashes on the TRAFFIC field 4 Turn the small FMS knob to select On or Off 5 Press the ENT key to accept the selected option 6 Press the FMS knob to return to the Navigation Map Page The Traffic mode selects which traffic is...

Page 155: ...ed option 6 Press the ENT key to accept the selected option 7 Press the FMS knob to return to the Navigation Map Page To select a traffic symbol zoom range 1 With the Navigation Map Page displayed press the MENU key to display the Navigation Map Page Menu The cursor flashes on the Map Setup option 2 Press the ENT key The Map Setup Menu is displayed 3 Turn the small FMS knob to select the Traffic grou...

Page 156: ... Plan ACTIVE FPL the active flight plan zoom range sets the maximum range at which the active flight plan magenta line is displayed on the display off 2000 nm Active Flight Plan Waypoint ACTIVE FPL WPT the active flight plan waypoint label size sets the size at which the active flight plan names appear on the display none small medium and large The zoom range sets the maximum range at which active flig...

Page 157: ...ining caution danger warning and alert areas air space boundaries are displayed RESTRICTED off 500 nm MOA MILITARY off 500 nm OTHER AIRSPACE off 500 nm TFR only present when GDL 69 is installed off 2000 nm Figure 7 15 Aviation Group Options To select an aviation group item range 1 With the Navigation Map Page displayed press the MENU key to display the Navigation Map Page Menu The cursor flashes on...

Page 158: ... appear on the display off 2000 nm Highways Roads and Railroads FREEWAY LOCAL HWY LOCAL ROAD RAILROAD The highway and road zoom range sets the maximum range at which high ways roads and railroads appear on the display FREEWAY off 800 nm NATIONAL HWY off 80 nm LOCAL HWY off 30 nm LOCAL ROAD off 15 nm RAILROAD off 30 nm Cities and Towns LARGE CITY MEDIUM CITY SMALL CITY The cities and town label siz...

Page 159: ...5 Turn the small FMS knob to select the desired range Press the ENT key to accept the selected option 6 Press the FMS knob to return to the Navigation Map Page To select a land group item text size 1 With the Navigation Map Page displayed press the MENU key to display the Navigation Map Page Menu The cursor flashes on the Map Setup option 2 Press the ENT key The Map Setup Menu is displayed 3 Turn t...

Page 160: ...n Information Pointer Latitude and Longitude Figure 7 17 Measuring Bearing and Distance To measure bearing and distance between two points 1 Press the MENU key with the Navigation Map Page displayed 2 Turn the small FMS knob to highlight the Measure Bearing Distance field and press the ENT key An on screen reference pointer is displayed on the map display at the aircraft s present position 3 Move t...

Page 161: ...y banner AGE 00 TRFC COAST TA OFF Range TRFC RMVD TRFC FAIL NO TRFC DATA TRFC UNAVAIL TRAFFIC Traffic Out of Range Proximate Known Altitude Map Range Own Aircraft Traffic Mode Traffic Figure 7 18 Traffic Map Page CAUTION Use of the Traffic Map to maneuver the airplane to avoid traffic is prohibited The Traffic Information System TIS is intended for advisory use only TIS is intended only to help the pilo...

Page 162: ...y to represent the current track of the traffic advisory data NOTE Traffic Information Service TIS is not available in all areas NOTE SeeAppendix F for traffic symbol descrip tions TRAFFIC MAP PAGE OPERATIONS Power Up Test The TIS interface performs an automatic test during power up If the system passes the power up test the standby screen is displayed on the Traffic Map Page If the system passes the ...

Page 163: ...sfromoperatingmodetostandbymode The Traffic Map Page displays STANDBY STANDBY when the Traffic Map Page displays STANDBY in the status box located in the upper left corner of the Traffic Map Page the TIS system is in standby mode and cannot display traffic data OPERATE when the Traffic Map Page displays OPERATE in the status box located in the left corner of the Traffic Map Page the TIS system is in ope...

Page 164: ...raffic data is not refreshed within 6 seconds an age indicator i e AGE 00 06 is displayed in the lower left corner of the display when displaying traffic After another 6 seconds if data is still not received the traffic is removed from the display The pilot should be aware that the quality of displayed traffic is reduced in this condition TRFC COAST the TRFC COAST traffic coasting banner located above ...

Page 165: ...ollowing Current aircraft location Range marking rings 25 nm 25 50 nm 50 100 nm and 100 200 nm Heading Box North Up Track Up DTK Up HDG Up Heading on the Terrain Proximity Page displays HDG Up map data unless there is no valid heading Obstacles Range Marking Ring Current Aircraft Location Terrain Range Figure 7 19 Terrain Proximity Page Page Orientation View Selection Terrain Terrain Range Indicat...

Page 166: ...the Terrain Proximity Page 2 Press the VIEW softkey Press the ARC softkey 3 To return to the 360 degree viewing display press the 360 softkey OR 4 Press the MENU key The page menu is displayed with View Arc or View 360º highlighted Press the ENT key on the desired selection 1000 AGL Aircraft Altitude 100 Threshold Figure 7 20 Terrain Scale To change the map range on the Terrain Proximity Page Turn...

Page 167: ...e RED Critical Obstacle data is displayed in red when the obstacle height is at or above 100 feet Mean Sea Level MSL below the current aircraft altitude Obstacle Shapes Obstacle shapes and defining criteria are found in Appendix F Navigation Map Display Conditions The Map Setup Page Menu has OBSTACLE and TERRAIN feature On Off options The Terrain Proximity Page displays or does not display obstacle...

Page 168: ... Figure 7 21 Direct to Page To select a Direct to destination 1 Press the Direct to key The Direct to page is displayed with the destination field high lighted 2 Turn the small FMS knob to enter the first letter of the destination waypoint identifier The destination waypoint may be an airport VOR NDB intersection or user waypoint as long as it is in the database or stored in memory as a user waypoin...

Page 169: ...y or city name additional entries can be viewed by continuing to turn the small FMS knob during the selection process To select a Direct to destination by facility name or city 1 Press the Direct to key The Direct to Page is displayed with the waypoint identifier field highlighted 2 Turn the large FMS knob to highlight the facility or city name field 3 Turn the small and large FMS knob to enter the f...

Page 170: ...Waypoint Direct to To select a Direct to destination from the active flight plan 1 Press the Direct to key The Direct toWaypoint Page is displayed with the waypoint identifier field highlighted 2 Turn the large FMS knob to highlight the flight plan FPL field 3 Turn the small FMS knob to display a window showing all waypoints in the active flight plan 4 Continue turning the small FMS knob to scroll thro...

Page 171: ...ENT key to confirm the selected waypoint and again to activate a Direct to Figure 7 23 Nearest Airport Direct to Shortcuts Shortcuts are available when using the Direct to key allowing the pilot to bypass the use of the small and large FMS knobs Any time a waypoint field is highlighted and then the Direct to key is pressed the highlighted waypoint will be the direct to waypoint The following are can...

Page 172: ...esumes navigating the flight plan along the closest leg Figure 7 24 Canceling Direct to Navigation Specifying a Course to a Waypoint During a Direct to the G1000 sets a direct great circle course to the selected destination The course to the destination using the course field on the Direct to Page can be manually defined To manually define the Direct to course 1 Press the Direct to key 2 Turn the smal...

Page 173: ...r flight plan has been activated the Active Flight Plan Page shows the following Each waypoint for the flight plan or a single waypoint for a Direct to along with the desired track DTK and distance of each leg DIS Active leg information with enroute safe altitude ESA for the specified leg Active FPL information with enroute safe altitude ESA Flight plan information showing remaining leg and remaining...

Page 174: ...ht plan To create a new flight plan 1 Press the FPL key and turn the small FMS knob to display the Flight Plan Catalog Page 2 Press the MENU key to display the Flight Plan Catalog Page options 3 Turn the large FMS knob to highlight Create New Flight Plan and press the ENT key 4 A blank flight plan page appears for the first empty storage location Turn the small and large FMS knobs to enter the identi...

Page 175: ...oint to delete and press the CLR key to display a remove waypoint confirmation window With OK highlighted press the ENT key to remove the waypoint To cancel turn the large FMS knob to highlight CANCEL and press the ENT key 6 Once all changes have been made press the FMS knob to return to the Flight Plan Catalog Page Activate Leg Activate Leg selects the highlighted leg as the active leg the flight p...

Page 176: ...flight plans with an approach departure or arrival the G1000 uses the waypoint information from the current database to define the waypoints If the da tabase is changed or updated the G1000 automatically updates the information if the procedure has not been modified If an approach departure or arrival procedure is no longer available the procedure is deleted from the flight plan and an alert is displa...

Page 177: ...an catalog storage location 4 With OK highlighted press the ENT key to invert the flight plan Figure 7 30 Invert Flight Plan Figure 7 31 Invert Flight Plan Confirmation Delete a Waypoint To delete a waypoint from an existing flight plan 1 Press the FPL key and turn the small FMS knob to display the Flight Plan Catalog Page 2 Press the FMS knob to activate the cursor 3 Turn the large FMS knob to highl...

Page 178: ...to display theActive Flight Plan Page options 2 Highlight Load Departure from the list and press the ENT key 3 A window is displayed listing the available departures for the departure airport Turn either the small or large FMS knob to select the desired departure and press the ENT key 4 A window may appear listing runways for the departure Turn the small or large FMS knob to select the desired run...

Page 179: ...ghlight the Load Arrival option and press the ENT key 3 A window is displayed listing the available arrivals for the destination airport Turn either the small or large FMS knob to select the desired arrival and press the ENT key 4 A second window is displayed listing available transitions for the arrival Turn either the small or large FMS knob to highlight the desired transition waypoint and press...

Page 180: ... the small or large FMS knob to highlight the desired approach and press the ENT key 4 A second window is displayed listing avail able transitions for the approach Turn either the small or large FMS knob to highlight the desired transition waypoint and press the ENT key The vectors option assumes the pilot will receive vectors to the final course segment of the approach and will provide navigation ...

Page 181: ...of Flight Plan Feature Closest Point of FPL calculates the bearing and closest distance at which a flight plan passes from a reference waypoint It can also be used to create a new user waypoint along the flight plan at the location closest to a chosen reference waypoint To determine the closest point along the active flight plan to a selected waypoint 1 From the Active Flight Plan Page press the MENU...

Page 182: ...nob to highlight Restore Defaults and press the ENT key Shortcuts A number of shortcuts are available to save time when using the Active Flight Plan Page These shortcuts speed the process of removing approaches departures and arrivals and aid in selecting a specific flight plan leg for navigation guidance On the preceding page options to remove approaches departures and arrivals were introduced This...

Page 183: ...and estimated safe altitude information To display the Flight Plan Catalog Page Press the FPL key and turn the small FMS knob to display the Flight Plan Catalog Page Flight Plans in Memory Flight Plan List Flight Plan Information Figure 7 37 Flight Plan Catalog Page FLIGHT PLAN CATALOG PAGE OPERATIONS The following operations can be performed from the Flight Plan Catalog Page Activate a Flight Pla...

Page 184: ...e stored flight plan confirmation window is displayed With OK highlighted press the ENT key to activate the flight plan To cancel the flight plan activation turn the large FMS knob to highlight CANCEL and press the ENT key Figure 7 39 Activate Stored Flight Plan Confirmation Stop Navigating a Flight Plan To stop navigating a flight plan 1 Press the FPL key and turn the small FMS knob to display the Flig...

Page 185: ...s displayed With OK highlighted press the ENT key to inverts and activate the flight plan To cancel the operation turn the large FMS knob to highlight CANCEL and press the ENT key Create a New Flight Plan Create New Flight Plan creates a new flight plan To create a new flight plan 1 Press the FPL key and turn the small FMS knob to display the Flight Plan Catalog Page 2 Press the MENU key to display t...

Page 186: ...waypoints contained in the flight plan from the database or user waypoint memory Once the pilot is finished with a flight plan it can easily be deleted from the Flight Plan Catalog Page or the Active Flight Plan Page To delete a flight plan from the Active Flight Plan Page 1 From the Active Flight Plan Page press the MENU key to display the Active Flight Plan options window 2 Turn the large FMS knob t...

Page 187: ...e FMS knob to highlight Sort List By Number or Sort List By Comment and press the ENT key This will change flight plan ordering 3 A Proceed confirmation window is displayed With OK highlighted press the ENT key to change flight plan ordering To cancel turn the large FMS knob to highlight CANCEL and press the ENT key To edit a flight plan 1 Press the FPL key and turn the small FMS knob to display the F...

Page 188: ...sor is on Waypoints are inserted at the END of the flight plan if the cursor is off 3 To insert waypoints use the map cursor to point at the desired waypoint it will become visually enhanced when it is properly pointed to and press the LDWPT softkey Existing user waypoints are inserted in the same manner 4 If the selected waypoint is not a Jeppesen waypoint Airport or Navaid or user waypoint the G1...

Page 189: ...ct to waypoint Once the profile is defined message alerts and additional data on the Navigation Map Page keep the pilot informed of progress NOTE VNAV has no effect on KAP140Autopilot operation Figure 7 41 Vertical Navigation VNAV Page NOTE An active flight plan or Direct to must be entered in order to utilize VNAV NOTE To display terrain or topo data on theVerti cal Navigation Map Page press the MAP...

Page 190: ...nt and press the ENT key 8 The default profile utilizes a 400 foot per minute descent rate To change the rate turn the large FMS knob to highlight the Target Vertical Speed field and use the small and large FMS knobs to enter a new rate Press the ENT key when finished With the profile set the vertical speed required VSR is displayed Expect the following to occur when using the vertical navigation feat...

Page 191: ...eparture airport Turn either the small or large FMS knobs to enter the desired departure Press the ENT key 3 Load is highlighted Press the ENT key The departure becomes part of the flight plan To select an arrival 1 Press the PROC key to display the Procedures Page Turn the large FMS knob to highlight Select Arrival and press the ENT key 2 The procedures page is displayed Turn the small and large F...

Page 192: ...se AF DME arc to a fix CF Course to a fix DF Direct to a fix FA Course from fix to an altitude FC Course from fix to distance FD Course from fix to DME distance FM Course from fix to manual termination HA Hold terminating at altitude HF Hold terminating at a fix HM Hold with manual termination IF Initial fix PI Procedure turn to course intercept RF Constant radius turn to fix TF Track between two fixes Each ...

Page 193: ...l course segment of the approach and will provide navi gation guidance on the final approach segment and extension only 3 Turn the FMS knob to select the desired transi tion and press the ENT key LOAD is now highlighted Press the ENT key Activate the approach once the approach clearance is received NOTE LOAD will add the procedure to the flight plan without immediately using it for navigation guida...

Page 194: ...ach progresses In many cases it can be easiest to Load the full approach while still some distance away enroute to the destination airport Later if vectored to final use the following steps to select Activate Vector To Final which makes the inbound course to the FAF waypoint active Otherwise activate the full approach using the Activate Approach option To activate an approach procedure 1 With an ap...

Page 195: ...nformation Page NDB Information Page VOR Information Page User Waypoint Information Page Waypoint Identifier Airport Runway Information Field Airport Frequency Information Field Figure 7 48 Airport Information Page Page Selection The Airport Information Page can be selected by pressing the INFO softkey or by the procedure given below The Departure Arrival and Approach pages must be selected from th...

Page 196: ...1 Select the Airport Information Page 2 Press the FMS knob to activate the cursor 3 Turn the large FMS knob to select the facility name or location city field 4 Turn the small FMS knob to select the desired character 5 Turn the large FMS knob to select the next character field 6 Repeat steps 4 and 5 until the facility name or location is selected then press the ENT key 7 To remove the flashing cursor...

Page 197: ...u have entered up to that point 3 Continue turning the small FMS knob to scroll through any additional database listings for the selected facility name or location You can scroll backwards with the smallFMS knob if you scroll past the desired facility name or location 4 Press the ENT key to select the desired facility name or location 5 To remove the flashing cursor press the FMS knob To select a w...

Page 198: ...FMS knob to activate the cursor 2 Turn the large FMS knob to place the cursor on the Runway designation field 3 Turn the small FMS knob to display the next runways for the selected airport 4 Continue turning the small FMS knob to select the desired runway 5 To remove the flashing cursor press the FMS knob Rotate the joystick counterclockwise to select a lower range and rotate it clockwise to select ...

Page 199: ...he cursor on the desired frequency If there are more frequen cies in the list than can be displayed on the screen a scroll bar along the right hand side of the screen indicates where you are within the list 3 Press the ENT key to place the selected fre quency in the standby field of the COM or NAV window 4 To remove the flashing cursor press the FMS knob Some listed frequencies may include designati...

Page 200: ...ntrol Ground Helicopter Multicom Pre taxi Radar Ramp Other Tower Unicom Navigation Frequencies ILS LOC AIRPORT INFORMATION PAGE OPTIONS The following Airport Information Page options are available by pressing the MENU key with the Airport In formation Page displayed Load Approach View Departure Airport View Destination Airport View Recent Airport List View Info View Departure View Arrival View App...

Page 201: ...b to display a window of available runways Continue turning the small FMS knob to select the desired runway 6 Press the ENT key The cursor moves to the Transitions field 7 Turn the small FMS knob to display a window of available transitions Continue turning the small or large FMS knob to select the desired transition 8 Press the ENT key To remove the flashing cursor press the FMS knob NOTE ALL may a...

Page 202: ...ll FMS knob to display a window of available arrivals for the selected airport Continue turning the small or large FMS knob to select the desired arrival 4 Press the ENT key The cursor moves to the TRANSITION field 5 Turn the small FMS knob to display a window of available transitions Continue turning the small or large FMS knob to select the desired transition 6 Press the ENT key The cursor moves ...

Page 203: ...highlighted press the Direct to key then press ENT to highlight the Activate prompt note that any loaded arrival waypoint may be selected 3 Press ENT again to confirm activate APPROACH INFORMATION PAGE The Approach Information page shows the available approach procedures for a selected airport Where multiple initial approach fixes IAFs and feeder routes are available that information may also be dis...

Page 204: ...HSI located on the PFD Figure 7 55 Approach Page Menu An approach can be loaded from the Airport Informa tion Page To load an approach from the Airport Approach Information Page 1 Select the desired approach and transition 2 Press MENU to display the Approach Informa tion Page Options 3 Turn the large FMS knob to highlight LOAD APPROACH and press the ENT key 4 The Active Flight Plan Page is displa...

Page 205: ...mbol Name General location Latitude longitude degrees minutes or degrees minutes seconds MGRS or UTM UPS Nearest VOR VORTAC VOR DME identifier symbol bearing distance NOTE The VOR displayed on the Intersection Information Page is the nearest VOR not neces sarily the VOR used to define the intersection Figure 7 56 Intersection Information Page Intersection Lat Lon Intersection Name and Symbol General...

Page 206: ...select the Navigation Map Page You may skip this step if you are already viewing any of the Map Group pages 2 Turn the large FMS knob to select the WPT page group WPT is displayed in the page group icon located in the lower right corner of the display 3 Turn the small FMS knob to select the Intersec tion Information Page To select an Intersection by using an Identi fier 1 With the Intersection Info...

Page 207: ...on in degrees Frequency in kilohertz kHz Nearest airport identifier symbol bearing dis tance NDB Frequency Name Magnetic Variation NDB Identifier General Location NDB Symbol Closest City Nearest Airport identifier symbol bearing distance NDB Symbol Figure 7 57 NDB Information Page Map of Surrounding Area NDB Information Page Operations The NDB Information Page allows the following operations NDB sele...

Page 208: ...e the cursor 2 Turn the large FMS knobs to highlight the name field 3 Turn the large and small FMS knobs to enter a name and press the ENT key 4 Press the FMS knob to remove the flashing cursor To select a NDB by using the closest city 1 With the NDB Information Page displayed press the FMS knob to activate the cursor 2 Turn the large FMS knobs to highlight the clos est city field 3 Turn the large an...

Page 209: ...identifier symbol bearing dis tance Figure 7 59 VOR Information Page VOR Frequency Name Magnetic Variation VOR Identifier General Location VOR Symbol Closest City Nearest Airport identifier symbol bearing distance VOR Symbol Map of Surrounding Area VOR Type Latitude Longitude VOR Information Page Operations The VOR information page allows the following operations VOR selection by identifier VOR select...

Page 210: ...te the cursor 2 Turn the large FMS knobs to highlight the name field 3 Turn the large and small FMS knobs to enter a name and press the ENT key 4 Press the FMS knob to remove the flashing cursor To select a VOR by using the closest city 1 With theVOR Information Page displayed press the FMS knob to activate the cursor 2 Turn the large FMS knobs to highlight the clos est city field 3 Turn the large an...

Page 211: ... latitude longitude position The following data is displayed on the User Waypoint Information Page Map of surrounding area Identifier Comment General location Latitude longitude A reference waypoint with identifier radial and distance A second reference waypoint with identifier and radial A list of all user waypoints Statistics of the number of user waypoint slots used and available Reference Waypoin...

Page 212: ...int from the User Waypoint Information Page enter its name identifier and position or reference another waypoint by radial and distance To create a new user waypoint by entering its latitude longitude position 1 With the User Waypoint Information Page displayed press the FMS knob to activate the cursor 2 Turn the small and large FMS knobs to enter a name for the new waypoint and press the ENT key T...

Page 213: ...or Creating User Waypoints from the Navigation Map Page The Navigation Map Page and panning target pointer provide a quick means of saving your present position as a user defined waypoint To capture and save your present position as a user waypoint 1 With the Navigation Map Page displayed push the joystick to activate the panning function The target pointer is displayed at your present position 2 P...

Page 214: ... reference waypoint information 1 With the User Waypoint Information Page displayed press the FMS knob to activate the cursor 2 Turn the small and large FMS knobs to enter a name for the new waypoint and press the ENT key The message Are you sure you want to create the new user waypoint is displayed Press YES to create the new waypoint The first reference waypoint REFERENCE WAYPOINT field is highlig...

Page 215: ...n the large FMS knob to select Delete All UserWaypoints and press the ENT key A con firmation windows is displayed Press the ENT key to accept YES or turn the large FMS knob to highlight NO and press the ENT key View Recent User WPT List allows you to view the most recent user waypoint list To view the most recent user waypoint list 1 Select the User Waypoint Information Page and press MENU to disp...

Page 216: ...rite the currently selected user waypoints comment with an automatically generated comment 1 Select the desired waypoint on the User Waypoint Information Page and press MENU to display the UserWaypoint Information Page options 2 Turn the large FMS knob to select Auto Com ment and press the ENT key Create New Waypoint allows the pilot to create a new user waypoint To create a new waypoint 1 From th...

Page 217: ... you like to delete the user waypoint is displayed Press YES to delete the waypoint Rename User Waypoint allows the pilot to rename a user waypoint To rename a user waypoint 1 Select the User Waypoint Information Page and press MENU to display the User Waypoint Information Page Options or press the RENAME softkey 2 Turn the large FMS knob to select Rename UserWaypoint and press the ENT key The use...

Page 218: ...M prediction system settings LRU status and database information The AUX Group page names are as follows Trip Planning Utility GPS Status System Setup System Status Figure 7 63 Trip Planning Page To quickly select an Aux page 1 From any page press and hold the CLR key to select the Navigation Map Page 2 Turn the large FMS knob to select the AUX page group 3 Turn the small FMS knob to select the de...

Page 219: ...ecessary go to the Page Menu and select Set WPT to Present Position to display P POS Press the ENT key and the flashing cursor moves to the to waypoint field Turn the small and large FMS knobs to enter the identifier of the to waypoint and press the ENT key to accept the waypoint OR 4 For point to point planning turn the small and large FMS knobs to enter the identifier of the from waypoint Once the ...

Page 220: ...ess the ENT key to accept the waypoint OR 4 For point to point fuel planning turn the small and large FMS knobs to enter the identifier of the from waypoint Once the waypoints identifier is entered press the ENT key to accept the waypoint The flashing cursor moves to the to waypoint Again turn the small and large FMS knobs to enter the identifier of the to waypoint and press the ENT key to accept the ...

Page 221: ...cated on your altimeter Press the ENT key when finished 3 The flashing cursor moves to the PRESSURE field Turn the small and large FMS knobs to enter the barometric pressure altimeter set ting Press the ENT key when finished 4 The flashing cursor moves to the total air tem perature TAT field TAT is the temperature including the compressibility error heating of speed read on the outside air temperature g...

Page 222: ...90 00592 00 Rev A 7 88 MULTI FUNCTION DISPLAY Utility Page The Utility Page displays timers trip statistics and scheduler information for flight planning purposes Figure 7 65 Utility Page Figure 7 66 Utility Page Menu This page intentionally left blank ...

Page 223: ...o set the flight timer starting criteria ground speed more then 30 knots power on 1 Select the AUX UTILITY Page 2 Press the FMS knob Turn the large FMS knob to select the FLIGHT field 3 Turn the smallFMS knob to display the selection window 4 Turn the smallorlargeFMS knob to select either PWR ON or GS 30KT and press the ENT key To set the departure timer starting criteria ground speed more then 30 k...

Page 224: ...imer value once the message is displayed Event based messages do not use a timer but rather a specific date and time Name Type event one time periodic Date Time REM remainder To enter a name 1 Select the AUX UTILITY Page 2 Press the FMS knob Turn the large FMS knob to select the flight scheduler name field 3 Turn the small or large FMS knobs to enter the desired name and press the ENT key To enter a ...

Page 225: ...uide for the Diamond DA40 190 00592 00 Rev A 7 91 MULTI FUNCTION DISPLAY GPS STATUS PAGE The GPS Status Page provides a visual reference of GPS receiver functions Figure 7 67 GPS Status Page Figure 7 68 GPS Status Page Menu ...

Page 226: ...that must be collected hollow signal strength bar before the satellite may be used for navigation solid signal strength bar Once the GPS receiver has determined your position the G1000 indicates your position altitude track and ground speed The GPS receiver status field also displays the following messages under the appropriate conditions Acquiring Sat The GPS receiver is acquiring satellites for n...

Page 227: ... for the final approach course the approach does not become active as indicated by an Approach is not active message and a RAIM not available from FAF to MAP message To predict RAIM availability 1 Select the GPS Status Page 2 Press the FMS knob Turn the small and large FMS knobs to select the WAYPOINT field 3 Turn the small FMS knob to display the Waypoint Information Page 4 Turn the small and large...

Page 228: ...each satellite in view with the appropriate satellite number 01 32 underneath each bar The progress of satellite acquisition is shown in three stages No signal strength bars the receiver is looking for the satellites indicated Hollow signal strength bars the receiver has found the satellites and is collecting data Solid signal strength bars the receiver has collected the necessary data and the sat...

Page 229: ...and provides access via a list of menu options to manage the following system parameters Local or UTC time display Units of measure settings display units Position Formats Map Datums Airspace Alerts Arrival Alert Audio Alerts MFD Data Bar Fields GPS CDI Range Adjustments COM Transceiver Channel Spacing Nearest Airport Parameters Figure 7 71 System Setup Page ...

Page 230: ...ys the system settings for the selected profile NOTE Pilot profile names cannot start with a blank as the first letter in the name Creating a Profile To create a Profile 1 Select the System Setup Page 2 Press the FMS knob momentarily to activate the flashing cursor 3 Turn the large FMS knob to highlight the CREATE field in the Pilot Profile box 4 Press the ENT key 5 Turn the small and large FMS knobs to e...

Page 231: ... the option of canceling the renaming request by highlighting CANCEL and pressing the ENT key Date Time The Date Time box provides settings for time format local or UTC 12 or 24 hour and time offset The time offset is used to define current local time UTC also called GMT or Zulu date and time are calculated directly from the GPS satellites signals and cannot be changed If you prefer to use local ti...

Page 232: ...atum you should set the G1000 to use the same datum Using a map datum that does not match the charts you are using can result in significant differences in position information If you are using the paper charts for reference only the G1000 still provides correct navigation guidance to the waypoints contained in the database regardless of the da tum selected The Display Units section of the System S...

Page 233: ... the airspace boundaries depicted on the Navigation Map Page It simply turns on off the warning provided when the aircraft is approaching or near an airspace An altitude buffer is also provided which expands the vertical range above or below an airspace For example if the buffer is set at 500 feet and you are more than 500 feet above or below an airspace you will not be notified with an alert messa...

Page 234: ...int or the last waypoint in a flight plan Once you have reached the set distance up to 99 9 units an Arrival at waypoint message is displayed on the PFD Navigation Status Bar The Arrival Alerts section of the System Setup Page displays the arrival alert setting and trigger distance for arrival alerts The following operations are allowed from the Arrival Alerts section of the System Setup Page Enabl...

Page 235: ...tion of the Nav data MFD bar fields The Nav Data Bar Fields section of the System Setup Page allows you to configure the four Nav data bar fields to the following values Bearing BRG Distance DIS Desired Track DTK Enroute Safe Altitude ESA Estimated Time of Arrival ETA Estimated Time Enroute ETE Ground Speed GS Minimum Safe Altitude MSA Track Angle Error TKE Track TRK Vertical Speed Required VSR Cross...

Page 236: ...terminal phases and ramp down to 0 3 nm during an approach Note that the Receiver Autonomous Integrity Monitoring RAIM protection limits listed below follow the selected CDI range and corresponding flight phases The CDI Section of the System Setup page displays the following data Selected CDI range auto 5 nm 1 nm 0 3 nm The current system CDI range 5 nm 1 nm 0 3 nm The ILS CDI capture mode setting ...

Page 237: ... from being displayed The default settings are 0 feet or meters for runway length and any for runway surface type The Nearest Airport section of the System Setup page displays the following data Nearest airport surface matching criteria any hard only hard soft water Nearest airport minimum length matching criteria To select Nearest airport surface matching criteria any hard only hard soft water 1 ...

Page 238: ...he status and soft ware version numbers for all detected system LRUs Pertinent information of all databases in the system is also displayed Active LRUs are indicated by a green check mark and failed LRUs are indicated by a red X The Pilot should note the failed LRU and inform a Diamond service center or Garmin dealer Figure 7 72 System Status Page ...

Page 239: ... small FMS knob to select the desired NRST Page Not all 25 nearest airports VORs NDBs intersections or user waypoints can be displayed on the corresponding NRST page at one time The Nearest Airports Page displays detailed information for five nearest airports with a scroll bar along the right hand side of the page indicating the part of the list that is currently being viewed The Nearest Airspaces ...

Page 240: ... Use the flashing cursor to scroll through a NRST page list and highlight the desired nearest waypoint 2 Press the Direct to key to display the Direct to Page 3 Press the ENT key to accept the selected waypoints identifier and press the ENT key a second time with Activate highlighted to begin navigating to the selected waypoint Figure 7 73 Direct to from Nearest Airports Page Direct To Page ...

Page 241: ...rt COM frequencies Approaches Nearest Airport Airport Identifier Symbol Bearing Distance Airport Name Closest City Elevation Runway Information Airport COM frequencies Approaches Figure 7 74 Nearest Airports Page Figure 7 75 APT RNWY FREQ and APR Softkeys To select the Nearest Airports Page 1 From any page press and hold the CLR key to select the Navigation Map Page 2 Turn the large FMS knob to sel...

Page 242: ...uency Toggle key to place the frequency in the active field To select and load an approach from the Nearest Airports Page 1 Select the desired nearest airport 2 Press the APR softkey located at the bottom of the display The LD APR load approach softkey becomes available 3 Turn either the small or large FMS knob to select the desired approach Press the LD APR softkey 4 The Approach Loading Page is d...

Page 243: ...tude VOR Name Symbol Frequency Bearing Distance Figure 7 76 Nearest Intersections Page To select the Nearest Intersections Page 1 From any page press and hold the CLR key to select the Navigation Map Page 2 Turn the large FMS knob to select the NRST page group NRST is displayed in the page group icon located in the lower right corner of the display 3 Turn the small FMS knob to select the Nearest I...

Page 244: ...nd Longitude Frequency NDB Name Figure 7 77 Nearest NDB Page NDB Location To select the Nearest NDB Page 1 From any page press and hold the CLR key to select the Navigation Map Page 2 Turn the large FMS knob to select the NRST page group NRST is displayed in the page group icon located in the lower right corner of the display 3 Turn the small FMS knob to select the Nearest NDB Page To select an ND...

Page 245: ...tic Variation in degrees Frequency in megahertz MHz Nearest VOR Map Symbology VOR Identifier Symbol Bearing Distance Latitude and Longitude VOR Frequency VOR Name Figure 7 78 Nearest VOR Page VOR Location VOR Type and Magnetic Deviation To select the Nearest VOR Page 1 From any page press and hold the CLR key to select the Navigation Map Page 2 Turn the large FMS knob to select the NRST page group ...

Page 246: ...ll or large FMS knob to select a VOR The remaining information on the Nearest VOR Page pertains to the selected VOR To select and load a VOR frequency from the Nearest VOR Page 1 Select the Nearest VOR Page 2 Press the FREQ softkey to highlight the VOR frequency for the selected VOR Press the ENT key The selected VOR frequency is placed in the NAV standby frequency field OR Press the MENU key Selec...

Page 247: ...nce Waypoint Bearing and Distance Figure 7 79 Nearest User Waypoints Page To select the Nearest User Waypoint Page 1 From any page press and hold the CLR key to select the Navigation Map Page 2 Turn the large FMS knob to select the NRST page group NRST is displayed in the page group icon located in the lower right corner of the display 3 Turn the small FMS knob to select the Nearest User Waypoint ...

Page 248: ...quencies Page To select a Nearest ARTCC from the Nearest Frequencies Page 1 Select the Nearest Frequencies Page 2 Press the ARTCC softkey and turn the small FMS knob to select a Nearest ARTCC To select and load the Nearest ARTCC Fre quency from the Nearest Frequencies Page 1 Select the Nearest Frequencies Page 2 Press the ARTCC softkey and turn the large FMS knob to select the center frequency Pre...

Page 249: ...Time to Entry Airspace and Agency Vertical Limits floor ceiling Airspace Frequencies Airspace Alerts Box Airspace and Agency Vertical Limits Airspace Frequencies Figure 7 80 Nearest Airspaces Page To select the Nearest Airspaces Page 1 From any page press and hold the CLR key to select the Navigation Map Page 2 Turn the large FMS knob to select the NRST page group NRST is displayed in the page grou...

Page 250: ... to provide complete information on any nearby airspace Once the described conditions exists the status and time of entry is shown if the airspace alert messages are enabled on the System Setup Page Auxiliary Page Group By selecting any airspace name listed on the Nearest Airspaces Page additional details are provided including controlling agency communication frequencies and floor ceiling limits T...

Page 251: ...o displays the floor and ceiling limits of the airspace The following are examples of what may appear as vertical limits for an airspace 5 000 ft msl 5 000 feet mean sea level 5 000 ft agl 5 000 feet above ground level MSL at mean sea level Notam see Notice to Airmen Unknown Unlimited See Chart Surface All airspace messages except for prohibited areas may be turned on or off from the System Setup P...

Page 252: ...Garmin G1000 Pilot s Guide for the Diamond DA40 190 00592 00 Rev A 7 118 MULTI FUNCTION DISPLAY This page intentionally left blank ...

Page 253: ...G1000 TM Optional Equipment ...

Page 254: ...190 00592 00 Rev A Garmin G1000 Pilot s Guide for the Diamond DA40 ...

Page 255: ...ystem Model SKY497 or SKY899 Honeywell KTA 870 TAS KMH 880 Multi Hazard Awareness System Ryan TCAD 9900B and 9900BX GDL 69 69A Data Link WARNING Do not use any G1000Weather Data for thunderstorm penetration Weather Data is approved only for weather avoidance not pen etration CAUTION NEXRAD weather data is to be used for long range planning purposes only Due to inherent delays and relative age of t...

Page 256: ...yed on the G1000 NOTE If the heading is lost strikes and or cells must be cleared manually after the execution of each turn This is to ensure that the strike and or cell positions are displayed accurately in relation to the aircraft Surrounding Lightning Strikes Lightning Mode and Rate Figure 8 1 Navigation Map Page Displaying Stormscope Lightning Data Stormscope Softkey Lightning Indication The N...

Page 257: ...y Range Stormscope lightning data can be displayed on the Navigation Map Page at up to 2000 nm zoom range north up In the track up mode there is a portion of Stormscope lightning data that could be behind the aircraft which cannot be seen at this range Since the range of the Stormscope is 200 nm in front in addition to another 200 nm behind the aircraft 400 nm diameter total the 500 nm range in no...

Page 258: ...MS knob to select STRMSCP MODE 3 Turn the FMS knob to display the Cell Strike window 4 Turn the FMS knob to select Cell or Strike Press the ENT key 5 Push the FMS knob to return to the Navigation Map Page To select a Stormscope lightning symbol zoom range 1 With the Weather Group selected press the ENT key The cursor flashes on STRMSCP LTNG 2 Turn the large FMS knob to select STRMSCP SMBL 3 Turn t...

Page 259: ...is selected 2 Turn the small FMS knob until the Stormscope Page is selected Figure 8 5 Surrounding Lightning Strikes Current Strike Rate Figure 8 5 Stormscope Page Stormscope Control Softkeys Weather Map Ranges Current Lightning Mode Map Orientation Active Flight Plan or Direct To Navigation North Arrow Indicator Stormscope Page Operations The following Stormscope Page operations are avail able us...

Page 260: ...e or Cell Mode highlighted Figure 8 6 Press the ENT key on the desired selection Figure 8 6 Stormscope Page Options Menu To change the viewing mode between 360 and 120 1 Select the Stormscope Page 2 Press the VIEW softkey The 360 and ARC softkeys are displayed Press the 360 softkey to display a 360 viewing area or press the ARC softkey to display a 120 viewing area OR 3 Press the MENU key The page...

Page 261: ... on the Navigation Map Page SelecttheNavigationMapPage presstheMAP softkey then press the TRAFFIC softkey To configure TAS traffic on the Navigation Map Page 1 Select the Navigation Map Page 2 Press MENU to display the Page Menu Turn the small right knob to select Map Setup and press the ENT key 3 The flashing cursor highlights the GROUP field Turn the small FMS knob to selectTraffic and press ENT 4 Tu...

Page 262: ...ll FMS knob until the Traffic Map page is selected Operating Mode Indicator Figure 8 7 Traffic Map Page Traffic Altitude Display Mode Indicator Traffic Display Range Heading Indicator Monitoring Traffic See the information in the SKYWATCH Pilot s Guide regarding monitoring traffic on the display and the cor responding actions to take Failure Response Errors indicated by a FAILED screen prevent contin ue...

Page 263: ...ERATE softkey Switching Between Standby and Various Operating Modes The unit must be in operating mode for traffic to be displayed The ability to switch out of standby into oper ating mode on the ground is especially useful for scanning the airspace around the airport before takeoff To switch into Operating Mode from Standby Mode 1 Press the OPERATE softkey or menu Operating Mode 2 If Operating Mod...

Page 264: ...ck range of 2 miles 200 feet below and climbing Proximity Traffic solid white diamond appears at 1 o clock range 3 6 miles 1000 feet below descending Non Threat traffic open white diamond appears at 11 o clock range of 3 6 miles flying level 1000 feet above If the KTA 870 KMH 880 successfully completes self test a synthesized voice announces TAS SYSTEM OK The unit should switch to OPERATE mode at th...

Page 265: ...d by the KTA 870 KMH 880 Pilot s Guide Refer to the KTA 870 KMH 880 Pilot s Guide for information regarding altitude dis play ranges Note that confirmation is not required The mode is changed immediately when selected Figure 8 8 Traffic Map Page KTA 870 Test Mode Traffic Map Page Display Range The pilot can change the display range on the Traffic Map Page at any time To change the display range on the...

Page 266: ...M Lightning only Flight Planning Maps NEXRAD and XM Lightning only AUX Trip Planning Map NEXRAD and XM Lightning only Weather Information Page part of the Waypoint Airport Information Page METAR and TAF information only XM weather information is also displayed on the Primary Flight Display Inset Map See the G1000 PFD section for more information NOTE Temporary Flight Restrictions TFRs are displaye...

Page 267: ...TER RAIN and STORMSCOPE options that is when NEXRAD is activated TOPO and or TERRAIN and or STORMSCOPE are turned off XM LTNG Press to display XM lightning informa tion XM Lightning is mutually exclusive with the STORMSCOPE option Figure 8 9 Navigation Map Page Displaying NEXRAD Weather NEXRAD Softkey NEXRAD Weather NEXRAD Storms Legend To display weather data on the Navigation Map Page 1 Press th...

Page 268: ...eather Group and press the ENT key 4 While the Map Setup menu is displayed turn the large FMS knob to highlight and move between the product selections When an item is highlighted turn the small FMS knob to select the desired option and press the ENT key Displaying Weather Data on the Nearest Pages In addition to the Navigation Map Page the Nearest Pages display Stormscope NEXRAD and XM Lightning ...

Page 269: ...t METAR and TAF information is updated every 12 minutes Figure 8 11 Weather Data Link Page Displaying Weather Data on the AUX Trip Planning Page Map NEXRAD and XM Lightning Data can be displayed on the AUX Trip Planning Page Map by pressing the NEXRAD and XM LTNG softkeys Displaying Weather Data on the Flight Plan Page Maps NEXRAD and XM Lightning Data can be displayed on the Flight Plan Page Maps...

Page 270: ...ages Some but not all of those include Ground Clutter Strobes and spurious radar data Sun strobes when the radar antenna points directly at the sun Interference from buildings or mountains which may cause shadows Military aircraft deploy metallic dust which can cause alterations in radar scans NEXRAD Limitations Certain limitations exist regarding the NEXRAD radar displays Some but not all are lis...

Page 271: ...OVERAGE The display of Radar Coverage is always active when NEXRAD and ECHO TOPS are selected and indicates the cur rently available NEXRAD Radar coverage and ECHO TOPS areas by showing the area in a gray ish purple color where information is not being collected Areas where radar capability exists but is not active or is off line will not be shown as available Areas where radar coverage is not ava...

Page 272: ...ficant weather condition occurring at a localized geographical position NOTE AIRMETs are broadcast for weather phenomena that potentially affects all aircraft For pilots of light aircraft AIRMET acronym for AIRman s METeorological information gives valuable information about the following con ditions moderate icing moderate turbulence sustained winds 30 knots or greater at the sur face widespread a...

Page 273: ...e and remove the legend window press the LEGEND ENT CLR key or the FMS knob OR 4 On the Weather Data Link Page press the LEGEND softkey which displays the Page Menu Options Turn either the large or small FMS knob to select Weather Legend and press the ENT key MORE WX Press to display the following group of softkeys for additional weather control NOTE City Forecast and METAR information is only dis...

Page 274: ...cation of cyclones hurricanes and their projected track at various time intervals The update rate is every 12 minutes Weather Data Link Page Setup The pilot can customize the display of XM Weather data on the Weather Data Link Page Figure 8 9 using the Weather Page Options Menu To customize the display of weather data on the Weather Data Link Page 1 Press the Menu key on theWeather Data Link Page ...

Page 275: ...METAR information does not display more information but allows the user to press the ENT key and select that Airport s Information Page and displays the actual text Pressing the ENT key when panning over aTFR displaysTFR specific information for the panned TFR Figure 8 12 Weather Product Symbols Echo Top Cloud Top and Echo Top Mutually Exclusive WEATHER PRODUCT SYMBOLS When a weather product is act...

Page 276: ... is not connected UPDATING XM Radio Page the active channel is replaced with this message Updating encryption code NO SIGNAL XM Radio Page the active channel is replaced with this message also displayed on the Weather Data Link Page when the signal strength is too low for the receiver Loss of signal LOADING XM Radio Page the active channel is replaced with this message Acquiring channel audio or i...

Page 277: ...oftkey Figure 8 13 XM Information Page Audio Radio ID INFO Softkey Weather Products Window Data Radio ID DONE Softkey XM Information Page The XM Information Page provides XM Radio identi fication numbers service level and weather products To select the XM Information Page Figure 8 13 1 Turn the large FMS knob to select theAuxiliary Page Group 2 Turn the small FMS knob to select the Aux XM Page Radi...

Page 278: ...subscription The boxes for active weather products are filled Before activation all boxes are clear Figure 8 14 XM Radio Page Volume Field Categories Field Channel List Active Channels XM RADIO PAGE The XM Radio Page Figure 8 14 provides informa tion and control of the audio entertainment features of the XM Satellite Radio XM Radio Softkeys The following XM Radio softkeys are located below the disp...

Page 279: ...nel directly 1 While on the XM Radio Page press the CHNL softkey 2 Press the DIR CH softkey The channel number in the Active Channel window will be high lighted Figure 8 14 3 Press the numbered softkeys located on the bottom of the display to directly select the desired channel number 4 Press the ENT key to activate the selected channel Category The Category field of the XM Radio Page displays the ...

Page 280: ...he small FMS knob Pressing the MUTE softkey toggles the muting of the radio audio volume Presets Up to 15 channels from any category can be assigned a preset number The preset channel can then be selected directly and added to the Active Channel list for listening To set a preset channel number 1 On the Radio Page while listening to theActive Channel that you want to assign as a preset press PRESE...

Page 281: ...s review the mes sages listed in Table 8 3 The advisory messages may pro vide insight to a possible failure Weather Product Expires After n minutes SIGMETs AIRMETs 60 City Forecasts 60 County Warnings 60 Cyclone Warnings 60 Echo Tops 30 Freezing Levels 60 METARs 90 Lightning 30 NEXRAD 30 Radar Coverage 30 Cell Movement 30 Surface Analysis 60 TFRs 60 Winds Aloft 90 TAFs 60 Clouds Tops 60 Table 8 3 ...

Page 282: ...Garmin G1000 Pilot s Guide for the Diamond DA40 190 00592 00 Rev A 8 28 OPTIONAL EQUIPMENT This page intentionally left blank ...

Page 283: ...G1000 TM Annunciations and Alerts ...

Page 284: ...190 00592 00 Rev A Garmin G1000 Pilot s Guide for the Diamond DA40 ...

Page 285: ...played in the Alerts window Pressing the ALERTS softkey displays the Alerts window Press ing the ALERTS softkey a second time removes the Alerts window from the display When the alerts window is displayed the pilot can use the large FMS knob to scroll through the alert message list Softkey Annunciations During certain alerts the ALERTS softkey may appear as a flashing annuncia tion to accompany an ...

Page 286: ...ngle aural tone Caution alert text is YELLOW A caution alert is also accompanied by a flashing CAUTION softkey annunciation Pressing the CAUTION softkey acknowledges the presence of the caution alert Pressing the ALERTS softkey displays the related alert message in the Alerts window ANNUNCIATION ADVISORY This level of alert provides general information to the pilot An annunciation advisory alert is...

Page 287: ... Alternator failed Battery is only electrical source Continuous Aural Tone STARTER ENGD Starter is engaged Continuous Aural Tone DOOR OPEN Canopy and or rear door is not closed and locked Continuous Aural Tone TRIM FAIL Autopilot automatic trim is inoperative Continuous Aural Tone Values differ for the DA40F refer to the Aircraft Flight Manual Supplement AFMS for more information CAUTION Alerts An...

Page 288: ...GIA FAN FAIL The cooling fan for the GIAs is inoperative None Voice Alerts The following voice alerts can be configured for Male or Female gender by using the AUX System Setup Page on the MFD Voice Alert Alert Trigger Traffic Played when a Traffic Advisory TA is issued Traffic Not Available Played when the traffic system fails or cannot communicate NOTE Voice alerts are provided to the G1000 by the GIA...

Page 289: ... than 1 2 bar GBOX TEMP Engine gearbox temp is 120 deg C ALTN AMPS Engine alternator output is 90 amps ALTN FAIL Engine alternator has failed STARTER Engine starter is engaged L R FUEL TEMP Left right fuel temp is greater than 75 deg C DOOR OPEN Front rear or baggage door is not closed AP TRIM FAIL Autopilot automatic trim is inoperative No Tone CAUTION Alerts Annunciation Window Text Alerts Windo...

Page 290: ...e PFD is inoperative No Tone MFD FAN FAIL The cooling fan for the MFD is inoperative GIA FAN FAIL The cooling fan for the GIAs is inoperative Voice Alerts The following voice alerts can be configured for Male or Female gender by using the Aux System Setup Page on the MFD Voice Alert Alert Trigger Traffic Played when a Traffic Advisory TA is issued Traffic Not Available Played when the traffic system fa...

Page 291: ... to these annunciations System Annunciation Comment Attitude and Heading Reference System is aligning Display system is not receiving attitude information from the AHRS Display system is not receiving airspeed input from the air data computer Display system is not receiving altitude input from the air data computer NOTE Upon power up of the G1000 system certain windows remain invalid as G1000 equi...

Page 292: ...data computer Display system is not receiving valid true airspeed information from the air data computer GPS information is either not present or is invalid for navigation use Note that the AHRS utilizes GPS inputs during normal operation AHRS operation may be degraded if GPS signals are not present see the AFMS Display system is not receiving valid transponder information Other Various Red X Indi...

Page 293: ...ags and the responsible LRUs GTX 33 Transponder or GIA 63 Integrated Avionics Units GIA 63s or ADF DME Source GIA 63 Integrated Avionics Units GRS 77 AHRS or GMU 44 Magnetometer GDC 74A Air Data Computer GIA 63 Integrated Avionics Units GDC 74A Air Data Computer GIA 63 Integrated Avionics Units GEA 71 Engine Airframe Unit GIA 63 Integrated Avionics Unit or ECU Figure 9 3 G1000 System Failure Annun...

Page 294: ...with preferred settings if desired XTALK ERROR A flight display crosstalk error has occurred The MFD and PFD are not communicating with each other The G1000 system should be serviced PFD1 SERVICE PFD1 needs service Return unit for repair The PFD and or MFD self test has detected a problem The G1000 system should be serviced MFD1 SERVICE MFD1 needs service Return unit for repair PFD1 CONFIG PFD1 con...

Page 295: ...place terrain card If problem persists the G1000 system should be serviced PFD1 DB ERR PFD1 terrain database error exists DB MISMATCH Aviation database version mismatch Xtalk is off The PFD and MFD have different aviation database versions installed Crossfill is off Install correct aviation database version in both displays DB MISMATCH Aviation database type mismatch Xtalk is off The PFD and MFD ha...

Page 296: ...erviced when possible BACKUP PATH Audio panel using backup data path The audio panel is using a backup communication path The G1000 system should be serviced when possible GIA 63 Message Advisories Alerts Window Message Comments GIA1 CONFIG GIA1 configuration error Config service req d The GIA1 and or GIA2 configuration settings do not match backup configuration memory The G1000 system should be servi...

Page 297: ...h again to cycle its operation If the problem persists the G1000 system should be serviced COM2 PTT COM2 push to talk key is stuck COM1 RMT XFR COM1 remote transfer key is stuck The COM1 and or COM2 transfer switch is stuck in the enabled or pressed position Press the transfer switch again to cycle its operation If the problem persists the G1000 system should be serviced COM2 RMT XFR COM2 remote t...

Page 298: ...tem should be serviced NAV2 RMTXFR NAV2 remote transfer key is stuck GIA 63 Message Advisories Cont Alerts Window Message Comments G S1 FAIL G S1 is inoperative A failure has been detected in glideslope receiver 1 and or receiver 2 The G1000 system should be serviced G S2 FAIL G S2 is inoperative G S1 SERVICE G S1 needs service Return unit for repair A failure has been detected in glideslope recei...

Page 299: ...he AHRS is using the backup GPS path Primary GPS path has failed The G1000 system should be serviced when possible AHRS GPS AHRS not receiving any GPS information The AHRS is not receiving any GPS information and not operating in its normal mode The G1000 system should be serviced AHRS GPS AHRS not receiving backup GPS information The AHRS is not receiving backup GPS information The G1000 system s...

Page 300: ...power up the G1000 system detected that a stored flight plan waypoint was locked This occurs when an aviation database update eliminates an obsolete waypoint The flight plan cannot find the specified waypoint and flags this message This can also occur with flight plan user waypoints that are deleted Remove the waypoint from the flight plan if it no longer exists in any database OR update the waypoint nam...

Page 301: ...al use airspace is near and ahead of the aircraft position ARSPC NEAR Airspace near less than 2 nm Special use airspace is within 2 nm of the aircraft position LEG UNSMOOTH Flight plan leg will not be smooth The approaching flight plan waypoints are too close to make smooth turns Prepare for steep turns ahead and expect noticeable course deviations APPR INACTV Approach is not active The loaded appr...

Page 302: ...190 00592 00 Rev A Garmin G1000 Pilot s Guide for the Diamond DA40 9 18 ANNUNCIATIONS ALERTS This page intentionally left blank ...

Page 303: ...G1000 TM Appendices ...

Page 304: ......

Page 305: ...PFD starts in normal mode Remove the aviation database update SD card from the PFD 5 Turn the G1000 system OFF 6 Repeat steps 1 through 4 for the MFD The MFD and PFD aviation databases are now updated 7 Verify that the correct update cycle is loaded during startup of the MFD TERRAIN AND OBSTACLE DATABASES NOTE The data contained in the terrain and obstacle databases comes from government agencies ...

Page 306: ...quivalent card reader Updated database obtained from the Garmin website Existing 010 00330 41 Supplemental Database SD Cards from both PFD and MFD Figure A 1 MFD Power up Screen After the data has been copied to both data cards perform the following steps 1 Insert one card in the bottom card slot of the MFD and one in the bottom card slot of the PFD 2 Apply power to the G1000 system View the MFD P...

Page 307: ...o pilot CR Course to Radial CRG Cockpit Reference Guide CRNT Current CRS Course CRSR Cursor CTRL Control CVR Cockpit Voice Recorder CVRG Coverage CYL Cylinder D ALT Density Altitude DB Database DBASE Database DBZ Decibels Z Radar Return DEC FUEL Decrease Fuel DECLTR Declutter DEP Departure DF Direct to Fix DFLT Default DFLTS Defaults DIS Distance DME Distance Measuring Equipment DOP Dilution of Pr...

Page 308: ...orse Code Identifier IDENT IDNT Identification IF Initial Fix IFR Instrument Flight Rules IG Imperial Gallon ILS Instrument Landing System IMC Instrument Meteorological Conditions INACTV Inactive INC FUEL Increase Fuel IND Indicated INT Intersection s IrDA IRDA Infrared Data Association KEYSTK Key Stuck KG Kilogram KHz Kilohertz KM Kilometer KT Knot L Left LAT Latitude LBL Label LB Pound LCD Liquid ...

Page 309: ...cking SD Secure Digital SEC Second s SEL Select SFC Surface SIAP Standard Instrument Approach Procedures SID Standard Instrument Departure SIGMET Significant Meteorological Information Sim Simulator SLCT Select SLP SKD Slip skid SMBL Symbol SPD Speed SPI Special Position Identification SPKR Speaker SQ Squelch STAR Standard Terminal Arrival Route STATS Statistics STBY Standby STD Standard SUA Special...

Page 310: ...Heading Vector to Manual Termination VMC Visual Meteorological Conditions VNAV Vertical Navigation VOL Volume VOR VHF Omnidirectional Range VPROF VNAV Profile VR Heading Vector to Radial VS Vertical Speed Vspeed Airspeed WAAS Wide Area Augmentation System WGS 84 World Geodetic System 1984 WPT Waypoint s WPTS Waypoints WW World Wide WX Weather XFER Transfer XPDR Transponder XTALK Cross talk XTK Cros...

Page 311: ...based upon current speed and track Estimated Time Enroute The estimeated time it takes to reach the destination waypoint from the present posi tion based upon current groundspeed Fuel Flow The fuel flow rate expressed in units of fuel per hour Fuel On Board The total amount of usable fuel on board the aircraft Groundspeed The velocity that the aircraft is travelling relative to a ground position He...

Page 312: ...Garmin G1000 Pilot s Guide for the Diamond DA40 190 00592 00 Rev A B 6 APPENDIX B This page intentionally left blank ...

Page 313: ...he G1000 system monitors RAIM and issues an alert mes sage when RAIM is not available see Annunciation and Alerts Pilot s Guide Without RAIM GPS position accu racy cannot be monitored If RAIM is not available when crossing the FAF the pilot must fly the missed approach procedure NOTE If RAIM is not predicted to be available for the final approach course the approach does not become active as indica...

Page 314: ...approach course OBS Manual sequencing holds on selected waypoint Manually select course to waypoint from HSI Indicates TO or FROM waypoint Cannot be set for final approach course or pub lished holding patterns When OBS mode is active the G1000 allows the pilot to set a desired course to from a waypoint using the CRS BARO knob and HSI much like a VOR One application for the OBS softkey is holding pa...

Page 315: ...lue 3 The To From indicator on the HSI flips momen tarily to indicate that the midpoint of the turn has been crossed When does the CDI scale change When 30 nm from the destination the G1000 begins a smooth CDI scale transition from 5 0 nm en route mode to 1 0 nm terminal mode When 2 nm from the FAF during an active approach the CDI scale transitions to 0 3 nm approach mode When executing a missed a...

Page 316: ... the Procedures Page press the PROC key and rotate the large FMS knob to highlight Select Approach Select the desired approach from the list shown and press the ENT key Select the desired transition then activate the approach using the ENT key To activate a new approach to a different airport press the Direct to key and select the desired airport using the small and large FMS knobs Press the ENT k...

Page 317: ...uay CORREGO ALEGRE Brazil DANISH GI 1934 Denmark DJAKARTA BATAVIA Sumatra Island Indonesia DOS 1968 Gizo Island New Georgia Islands EASTER ISLAND 1967 Easter Island EUROPEAN 1950 Austria Belgium Denmark Finland France Germany Gibraltar Greece Italy Luxembourg Netherlands Norway Portugal Spain Sweden Switzerland EUROPEAN 1979 Austria Finland Netherlands Norway Spain Sweden Switzerland FINLAND HAYFO...

Page 318: ...i OLD HAWAIIAN MEAN Mean Value OLD HAWAIIAN OAHU Oahu OMAN Oman ORD SRV GRT BRITAIN England Isle of Man Scotland Shetland Islands Wales PICO DE LAS NIEVAS Canary Islands PITCAIRN ASTRO 1967 Pitcairn Island PORTUGUESE 1973 Portugal POTSDAM Germany PROV SO AMERICA 56 Bolivia Chile Colombia Ecuador Guyana Peru Venezuala PROV SO CHILEAN 1963 South Chile PUERTO RICO Puerto Rico and Virgin Islands QATAR...

Page 319: ...ld review the TIS Limi tations section of the Aeronautical Information Manual AIM Section 1 2 5 NOTE TIS is NOT intended to be used as a collision avoidance system and does not relieve the pilot of the responsibility to see and avoid other aircraft TIS shall not be used for avoidance maneuvers during IMC or when there is no visual contact with the intruder aircraft TIS is intended only to assist i...

Page 320: ...essively or abruptly the tracking algorithm may report incorrect horizontal position until the maneuvering aircraft stabilizes When a rapidly closing intruder is on a course that intercepts the client aircraft course at a shal low angle either overtaking or head on and either aircraft abruptly changes course within 0 25 nautical miles TIS may display the intruder aircraft on the incorrect side of ...

Page 321: ...on directional Radio Beacon VOR VOR DME VOR ILS VORTAC TACAN BASEMAP Item Symbol Interstate Highway 2 digit drawn inside Interstate Highway 3 digit drawn inside State Highway 2 digit drawn inside State Highway 3 digit drawn inside State Highway 4 digit drawn inside State Highway 5 digit drawn inside US Highway 2 digit drawn inside US Highway 3 digit drawn inside National Highway 2 digit drawn insi...

Page 322: ...nds Lightning Strike Age is 20 60 Seconds Lightning Strike Age is 60 120 Seconds IMPACT POINTS TAWS ONLY Item Symbol Potential impact point at present direction and altitude Imminent impact point at present direction and altitude MISCELLANEOUS Item Symbol ARTCC Frequency or FSS Frequency Default Map Cursor Elevation Pointer Cursor Measuring Cursor Overzoom Indicator map toolbar Terrain Proximity E...

Page 323: ... Control Area Class B Airspace Mode C Tower Area Warning Area Alert Area Caution Area Danger Area Prohibited Area Restricted Area Training Area Unknown Area Class C Terminal Radar Service Area Mode C Area Military Operations Area MOA State or Province Border International Border Road Railroad Lattitude Longitude ...

Page 324: ...etween 100 ft and 1000 ft below the current aircraft altitude GRAY SAFE Obstacle height is lower than 1000 ft below the current aircraft altitude Unlighted Obstacle Height is less than 1000 ft AGL Lighted Obstacle Height is less than 1000 ft AGL Unlighted Obstacle Height is greater than 1000 ft AGL Lighted Obstacle Height is greater than 1000 ft AGL TERRAIN COLOR CHART 1000 ft AGL Aircraft Altitud...

Page 325: ...5 non condensing Altitude Range 1 500 feet to 55 000 feet GIA 63 INTEGRATED AVIONICS UNITS Physical Specifications Height 7 26 inches 18 44 cm Width 3 83 inches 9 73 cm Depth 9 73 inches 24 71 cm Weight 4 9 lb 2 22 kg Voltage Range 22 33 Vdc Environmental Specifications Temperature Range 40º C to 65º C Altitude Range 1 500 feet to 55 000 feet GPS Specifications Receiver 12 parallel channel PhaseTrac1...

Page 326: ... 72 inches 4 4 cm Depth 11 05 inches 28 1 cm Weight 3 0 lb 1 36 kg Voltage Range 11 33 Vdc Environmental Specifications Temperature Range 45º C to 70º C Altitude Range 1 500 feet to 55 000 feet GEA 71 ENGINE AIRFRAME UNIT Physical Specifications Height 6 30 inches 16 0 cm Width 1 23 inches 3 12 cm Depth 8 73 inches 22 17 cm Weight 1 75 lb 0 712 kg Voltage Range 9 33 Vdc Environmental Specifications T...

Page 327: ... Range 55º C to 70º C Altitude Range 1 500 feet to 55 000 feet AHRS Performance Bank Pitch Error 1 25º within 30º roll left or right and 15º pitch nose up or down Maneuvers Range 360º pitch and roll Rotation Rate 200º per second Heading 2º straight and level flight Initialization Limitations For successful in flight initialization of the GRS 77 the fol lowing attitude limitations must be met Primary...

Page 328: ...Garmin G1000 Pilot s Guide for the Diamond DA40 190 00592 00 Rev A G 4 APPENDIX G This page intentionally left blank ...

Page 329: ...G1000 TM Index ...

Page 330: ......

Page 331: ... Arrival Page Menu 7 68 Arrow Double green 3 8 Single green 3 8 Single magenta 3 8 ARTCC 3 19 7 114 ARTCC softkey 3 19 ASSIST softkey 6 4 Attitude Heading and Reference System AHRS 1 2 1 9 1 13 Attitude indicator 2 10 Audio Alerts 7 101 Audio Panel 3 6 Audio panel controls ADF 5 6 COM1 COM1 MIC 5 2 5 4 COM2 COM2 MIC 5 2 5 4 COPLT key 5 7 DME 5 6 NAV1 5 6 NAV2 5 6 SPKR 5 5 Auto tuning 3 13 3 20 Aut...

Page 332: ...lan 2 33 Activate 7 41 7 50 Active 7 22 7 36 Copy 7 51 Create new 2 34 7 51 Delete 2 35 7 52 7 53 Edit 7 41 7 53 Invert 2 35 7 43 7 51 Remove 2 38 Stop navigating 7 50 Store 2 35 7 42 Flight planning 7 39 Flight Plan Catalog Page 7 49 Flight timer 7 89 FMS FMS PUSH CRSR knob 1 8 FPL key 1 7 2 27 Freezing Levels 8 12 Frequency list 7 65 Frequency spacing 3 6 3 8 Frequency transfer arrow 3 5 Frequen...

Page 333: ...softkeys 4 1 4 3 4 4 Morse code identifier 3 3 3 5 3 8 3 11 N NAV1 5 6 NAV2 5 6 Navigation frequency window 2 22 Navigation Map Page 7 7 Navigation Map Page options menu 7 13 Navigation mode selection 3 8 Navigation source 2 21 Navigation Status Bar 2 23 3 2 NAV frequencies 3 8 3 15 3 20 3 21 NAV Frequency Transfer key 1 7 NAV frequency window 3 1 NAV range ring 7 17 NAV station identifiers 3 8 NAV ...

Page 334: ...t 7 97 T Tachometer 6 2 6 8 TCAS 4 2 TCAS symbology 7 28 Temporary Flight Restrictions TFRs 8 12 Terminal Aerodrome Forecasts TAF 8 15 Terrain 2 26 A 1 F 4 Terrain data 7 18 7 19 Terrain information 7 12 Terrain Proximity Page 7 31 7 33 TERRAIN softkey 2 5 Timer References 2 28 Time offset 7 97 TIS symbology 7 28 TIS Traffic Advisory 7 29 TIS Ttraffic status 7 30 Toggling ADF frequencies 3 10 Topo 2...

Page 335: ...softkey 2 44 Waypoint Create new 7 82 Delete 7 43 Waypoint User Delete 7 83 Delete all 7 81 Rename 7 83 Waypoint Facility or City Location 7 63 Waypoint identifier 7 62 Waypoint Page group 7 61 Weather Data Link Page 8 12 8 15 8 19 8 20 Weather Group Options Menu 8 3 Weather information 2 5 2 26 Weather Legends Window 8 19 Weather product Age 8 22 Symbols 8 21 Wind vector 7 16 WX 3 19 WX softkey 3 ...

Page 336: ...Garmin G1000 Pilot s Guide for the Diamond DA40 190 00592 00 Rev A I 6 INDEX This page intentionally left blank ...

Page 337: ......

Page 338: ...R 97302 U S A p 503 391 3411 f 503 364 2138 Garmin Europe Ltd Unit 5 The Quadrangle Abbey Park Industrial Estate Romsey SO51 9DL U K p 44 0870 8501241 f 44 0870 8501251 Garmin Corporation No 68 Jangshu 2nd Road Shijr Taipei County Taiwan p 886 2 2642 9199 f 886 2 2642 9099 www garmin com 190 00592 00 Rev A 2005 Garmin Ltd or its subsidiaries ...

Reviews: