


Wire Replacement I/O (900 MHz): User Manual and Reference Guide
Map I/O Master Outputs to I/O Slave Inputs in
Tool Suite
1. With the I/O Master in Setup mode and connected to
Tool Suite
, click the
IO Settings
tab.
2. Using the
Analog Out 1
to
Digital Out 4
fields, select the outputs and inputs to the
appropriate I/O Slave input or output.
Slaves are labeled in the drop-down list by their serial numbers, as they are entered in the
I/O Master's
Call Book
.
Map I/O Master Outputs to I/O Slave Inputs in the Terminal Interface
1. Verify the I/O Master is in Setup mode and connected to a terminal interface.
2. On the main
Setup
menu, click
(2) Call Book
.
3. Determine which I/O Slave to map to the I/O Master and the
I/O Master's Call Book Entry
number that lists that I/O Slave’s serial number.
4. Determine which analog or digital input from the I/O Slave to map to the I/O Master.
Note
: This input could be Analog Input (AI) #1, AI #2, AI #3, AI #4, or Digital Input (DI) #1, or DI
#2; depending on which sensor(s) the I/O Slave is connected.
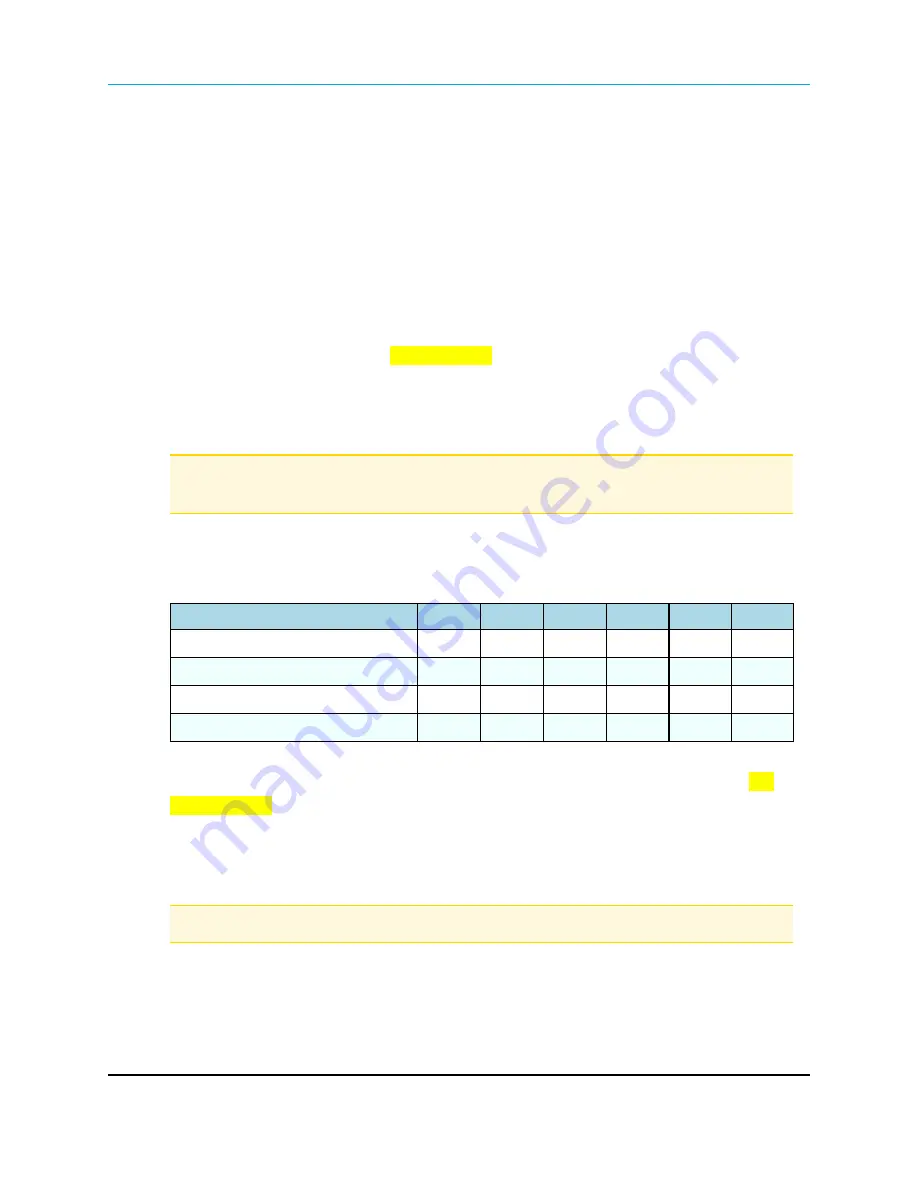
5. Using this table, find the number listed at this intersection:
the intersection between the
I/O Master’s Call Book Entry
number found in Step 3 and
the selected input from the
I/O Slave
found in Step 4.
AI#1
AI#2
AI#3
AI#4
DI#1
DI#2
I/O Master Call Book Entry #0
1
2
9
10
1
2
I/O Master Call Book Entry #1
3
4
11
12
3
4
I/O Master Call Book Entry #2
5
6
13
14
5
6
I/O Master Call Book Entry #3
7
8
15
16
7
8
6. In the terminal interface, press <Esc> to return to the main
Setup
menu and select
(9)
FGRIO Setup
.
7. Select the output from the I/O Master to connect to the input from the I/O Slave and enter
the number to the left of the selected output.
8. Enter the number found in Step 5.
Note
: This number should display to the right of the selected output.
9. Press <Esc> and repeat Steps 5 to 8 for additional connections.
10. Press <Esc> to return to the main
Setup
menu.
11. Press <Esc> again to exit
Setup
mode.
LUM0008AG Rev Sep-2015
Page 43 of 131
This document is the property of FreeWave Technologies, Inc. and contains proprietary information owned by
FreeWave®. This document cannot be reproduced in whole or in part by any means without written permission from
FreeWave Technologies, Inc.
Summary of Contents for FGR2-IO-IOE
Page 131: ......


