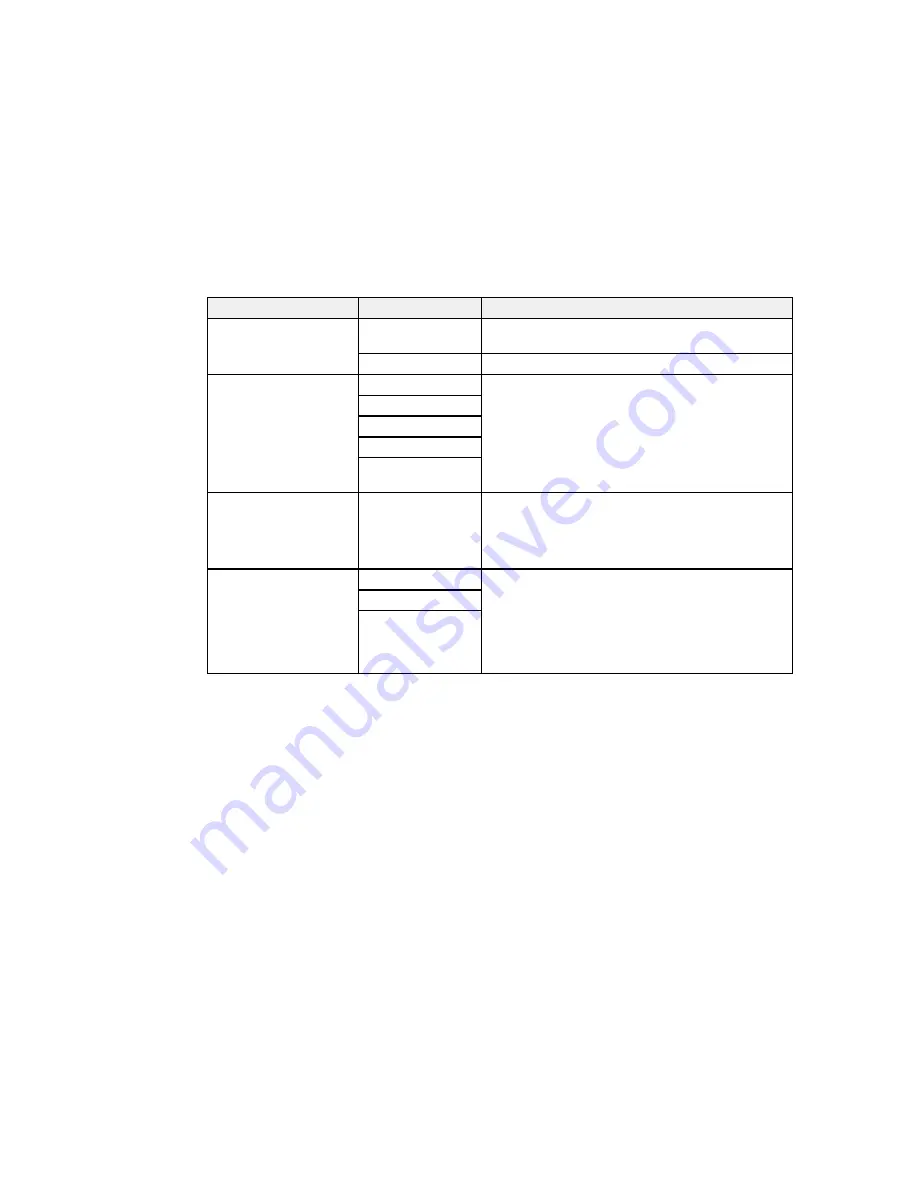
Setting
Options
Description
Receive Mode
Manual
Lets you confirm whether an incoming fax should be
printed; a telephone must be connected to the product
Auto
Automatically receives and prints faxes.
Distinctive Ring
All
If you are using a Distinctive Ring Service on your
phone line, your telephone company can assign two
Single
or more phone numbers to the same line and assign
Double
different ring patterns to each. If you use this service,
select the number of rings for your fax number so your
Triple
product can receive faxes on the correct number of
Double&Triple
rings. Select
All
for phones lines that do not use this
service.
Rings to Answer
1 to 9
Sets the number of rings before your product receives
a fax. If Receive Mode is set to
Auto
and an
answering machine is connected to the product, make
sure this setting is set higher than the number of rings
your answering machine is set to answer a call.
Remote Receive
Off
Lets you start receiving faxes using your phone
instead of operating the product (if the Receive Mode
On
is set to
Auto
). When you select
On
, you must also
Start Code
set a
Start Code
. If you are using a cordless handset
with its base connected to the product, you can start
receiving the fax by entering the code using the
handset.
Parent topic:
Selecting Advanced Fax Settings
Output Settings - Fax
Set the output options you want to use for incoming faxes.
Note:
If you select
Save to Inbox
, faxes are saved in the product's memory. Delete faxes after viewing
or printing them to prevent the memory from filling up. Even if you select other options for saving faxes,
they may be saved temporarily in the product's memory.
263
Summary of Contents for WF-8590
Page 1: ...WF 8590 User s Guide ...
Page 2: ......
Page 70: ...1 Open the feeder guard and pull up the paper support 2 Slide the edge guides outward 70 ...
Page 92: ...Note Secure the optional cassette to the cabinet as shown here 92 ...
Page 219: ...You see this window 219 ...
Page 242: ...4 Click OK Parent topic Scanning 242 ...
Page 245: ...DSL connection 1 Telephone wall jack 2 DSL filter 3 DSL modem 245 ...
Page 246: ...ISDN connection 1 ISDN wall jack 2 Terminal adapter or ISDN router 246 ...
Page 278: ...You see this window 3 Select Fax Settings for Printer Select your product if prompted 278 ...
Page 279: ...You see this window 4 Select Speed Dial Group Dial List 279 ...
Page 373: ...2 Open rear cover 1 D1 3 Carefully remove any jammed paper 373 ...
Page 378: ...4 Carefully remove any jammed pages 5 Close the ADF cover then raise the document cover 378 ...
Page 379: ...6 Carefully remove any jammed pages 7 Lower the document cover 379 ...


