185
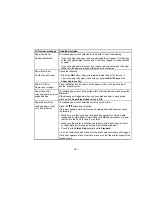
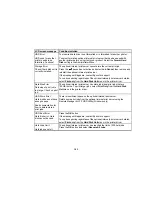
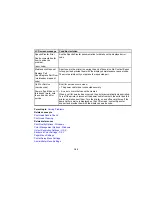
LCD screen message
Condition/solution
SpectroProofer Error
See documentation for
how to solve the
problem.
(error code)
See the SpectroProofer documentation for details on the displayed error
code.
Maintenance Request
Replace Part
Soon/Replace Part Now
(maintenance request
code)
A part used in the printer is nearing the end of its service life. Contact Epson
for support and provide them with the displayed maintenance request code.
The error persists until you replace the requested part.
Call For Service
(service code)
Power off and then on. If
this doesn't work, note
the code and call for
service.
A call for service occurs when:
• The power cable is not connected securely
• An error occurs that cannot be cleared
When a call for service has occurred, the printer automatically stops printing.
Turn off the printer, disconnect the power cable from both the outlet and the
printer, and reconnect them. Turn the printer on and off several times. If the
same call for service is displayed on the LCD screen, contact Epson for
support and provide them with the displayed service code.
Parent topic:
Solving Problems
Related concepts
Print Head Nozzle Check
Print Head Cleaning
Related references
Print Quality Options - Windows
Color Management Options - Windows
Output Resolution Settings - OS X
Advanced Color Settings - OS X
Paper Menu Settings
Printer Setup Menu Settings
Administrator Menu Settings
Summary of Contents for SureColor P8000
Page 1: ...Epson SureColor P6000 P7000 P8000 P9000 User s Guide ...
Page 2: ......
Page 8: ......
Page 21: ...21 5 Release the tension levers on both roll media adapters ...
Page 31: ...31 If you are using the optional Auto Take Up Reel rewind the paper using the Manual switch ...
Page 42: ...42 1 Raise the paper guides ...
Page 43: ...43 2 Lower the front of the paper basket ...
Page 45: ...45 4 Raise the front of the basket one level ...
Page 46: ...46 5 Fasten the front of the basket with the tabs ...
Page 50: ...50 1 Unfasten the tabs at the front of the paper basket ...
Page 51: ...51 2 Raise the paper guides ...
Page 52: ...52 3 Raise the front of the basket so that the cloth is pulled taut ...
Page 54: ...54 1 Raise the paper guides ...
Page 55: ...55 2 Raise the front of the basket and lower the paper guides ...
Page 92: ...92 You can also place the same print data multiple times as shown here ...
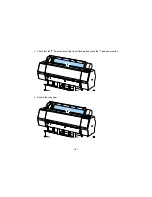
Page 190: ...190 2 Cut the paper above the paper feed slot ...


