EPSON Stylus Pro 4400/4450/4800/4880/4880C
Revision C
Adjustment
Basic Adjustment
418
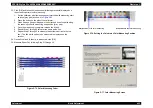
13. Make sure there is no missing dots in the nozzle check pattern at the
bottom of the calibration chart.
If there are missing dots, click [Print Calibration Chart Again]. The
calibration chart will be printed again after performing cleaning.
If there are no missing dots, let the chart stand for five minutes until it dries
out paying attention not to touch the chart.
14. When the calibration chart dries out (after five minutes), click [Next].
15. Connect a calibrator to the computer, and click [Measure].
16. Place the calibrator on the calibration base plate, and click [Calibrate]
17. Keep the calibrator remain set on the base plate, hold down the button on
the side of the calibrator until it beeps.
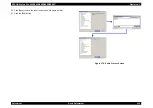
Once the calibration completed normally, following screen appears.
Figure 5-63. i1Calibrator
Figure 5-64. Entire process screen
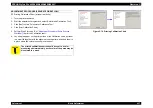
18. Make sure that the date and time printed in the second line on the upper
left of the chart (measurable time and date) is within the range displayed
under the heading "GMT" on the lower screen. (If the date and time is not
within the range, it is necessary to print the cart again.)
19. Refer to
, lay the chart on the black paper (or sheet) with the
upper part of the chart facing left side, and set the scanning ruller onto the
bottom most patch line.
C A U T I O N
Do not contaminate the white plate of the calibration base
plate. If tainted, use alcohol to clean the plate.
Button
Calibration plate
i1 calibrator
White plate
Summary of Contents for Stylus Pro 4800 Portrait Edition
Page 9: ...C H A P T E R 1 PRODUCTDESCRIPTION ...
Page 113: ...C H A P T E R 2 OPERATINGPRINCIPLES ...
Page 156: ...C H A P T E R 3 TROUBLESHOOTING ...
Page 200: ...C H A P T E R 4 DISASSEMBLY ASSEMBLY ...
Page 366: ...C H A P T E R 5 ADJUSTMENT ...
Page 448: ...C H A P T E R 6 MAINTENANCE ...
Page 457: ...C H A P T E R 7 APPENDIX ...


