EPSON Stylus Pro 4400/4450/4800/4880/4880C
Revision C
Disassembly & Assembly
Disassembly Procedures
268
5.
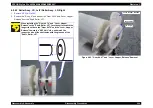
Remove the "Tension Spring, 3.81" from the hooks of both the "Head Unit"
and the "Lever, Inclination".
6.
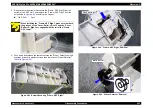
Remove the three screws and the washer that secure the "Lever,
Inclination" to the "Carriage Unit to remove the "Lever, Inclination".
C.B.P. (P2) 3x12:
2 pcs.
C.B.P. 3x8 (+washer 3.0x0.5x8):1 pc.
7.
Remove the screw securing the "Head Unit" to the "Carriage Unit".
C.B.P. (P2) 3x12:
1 pc.
8.
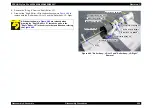
Release the harness from the tab shown in
, and move the
"Carriage Unit" toward you.
9.
Lift the "Head Unit" together with the "Ink Tube Unit" to remove from
the"CarriageUnit".
Figure 4-79. "Lever, Inclination" Removal
Figure 4-80. Removal of Screw Securing Head Unit
Figure 4-81. Head Unit Removal
C.B.P. (P2) 3x12
Extension Spring, 3.81
C.B.P. 3x8
+washer 3.0x0.5x8
A
B
C
Lever, Inclination
When installing the "Lever, Inclination", follow the steps
below.
1.
Tighten the Screw A.
2.
Attach the "Extension Spring, 3.81".
3.
Tighten the Screw C first and then the Screw B.
C.B.P. (P2) 3x12
Tab
Head Unit
Summary of Contents for Stylus Pro 4800 Portrait Edition
Page 9: ...C H A P T E R 1 PRODUCTDESCRIPTION ...
Page 113: ...C H A P T E R 2 OPERATINGPRINCIPLES ...
Page 156: ...C H A P T E R 3 TROUBLESHOOTING ...
Page 200: ...C H A P T E R 4 DISASSEMBLY ASSEMBLY ...
Page 366: ...C H A P T E R 5 ADJUSTMENT ...
Page 448: ...C H A P T E R 6 MAINTENANCE ...
Page 457: ...C H A P T E R 7 APPENDIX ...

