background image

Setting Procedures for Printing

Making Settings in Windows

A

Display the printer driver's Printer Settings tab
and adjust the following settings.

U


“Basic Printing Methods(Windows)” on

page 56

B

Select 

Borderless

 in the 

Size Settings

 area.

To fit output to the roll width, choose 

Fit to Roll

Paper Width

 before selecting Borderless.

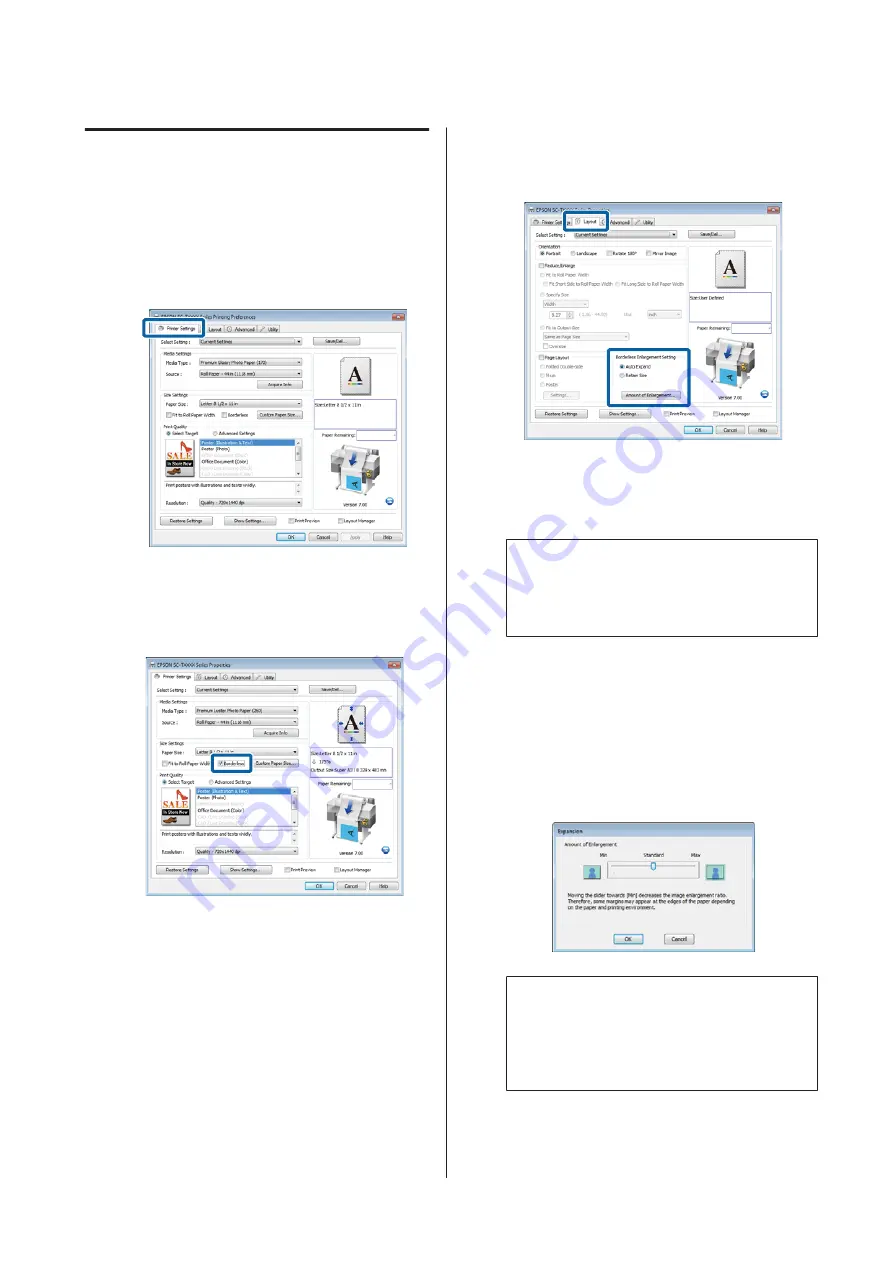
C

In the Layout tab 

Borderless Enlargement

Setting

 area, select either 

Auto Expand

 or

Retain Size

.

If 

Auto Expand

 is selected, click 

Amount of

Enlargement

 and choose the amount cut off at

the edges.

Note:
Retain Size

 is not available when 

Fit to Roll Paper

Width

 is selected in the Printer Settings tab or

Reduce/Enlarge

 is selected in the Layout tab.

Max

: 3 mm for left and 5 mm for right

(the image shifts 1 mm to the
right)

Standard

: 3 mm for left and right

Min

: 1.5 mm for left and right

Note:

Moving the slider towards 

Min

 decreases the image

enlargement ratio. Therefore, some margins may
appear at the edges of the paper depending on the
paper and printing environment.

SC-T7200 Series/SC-T5200 Series/SC-T3200 Series/SC-T7200D Series/SC-T5200D Series     User's Guide

More Ways to Print

99

Summary of Contents for SC-T3200 Series

Page 1: ...User s Guide CMP0015 00 EN ...

Page 2: ... SeikoEpsonCorporationshallnotbeheldliableforanydamageresultingfromelectromagneticinterferencethatoccursfromtheuseofanyinterfacecables other than those designated as Epson Approved Products by Seiko Epson Corporation EPSON Epson UltraChrome EPSON EXCEED YOUR VISION EXCEED YOUR VISION and their logos are registered trademarks or trademarks of Seiko Epson Corporation Microsoft Windows Windows Vista ...

Page 3: ...5 Loading and Removing Cut Sheets 37 Loading Cut Sheets 37 Removing Cut Sheets 38 Loading and Removing Poster Board 39 Loading Poster Board 39 Removing Poster Board 42 Viewing and Changing Media Settings 43 Replacing Paper 44 Using the Paper Basket SC T7200 Series SC T5200 Series SC T3200 Series 45 Storing and Opening 46 Adjusting the Position 47 Using the Large Capacity Paper Basket SC T7200D Ser...

Page 4: ...es for Printing 112 Saving and Recalling Settings 112 Color Management Printing About Color Management 114 Color Management Print Settings 114 Setting profiles 115 Setting color management with the applications 115 Setting color management with the printer driver 116 Color management printing by Host ICM Windows 116 Color management printing by ColorSync Mac OS X 117 Color management printing by D...

Page 5: ...ially Available Paper Size 205 Before printing on non Epson media 206 Notes When Moving or Transporting the Printer 207 Notes When Moving the Printer 207 Notes on Transporting 208 Notes when reusing the printer 209 System Requirements 210 System Requirements of the Printer Driver 210 System Requirements for CopyCenter 210 Specifications Table 211 Standards and Approvals 213 Where To Get Help Techn...

Page 6: ...ype of power source indicated on the product s label Use only the power cord that comes with this product Use of another cord may result in fire or electric shock Do not use a damaged or frayed power cord If you use an extension cord with this product make sure the total ampere rating of the devices plugged into theextension cord doesnot exceed the cord s ampere rating Also make sure the total amp...

Page 7: ...er use protect theinksupplyareafromdirtanddust andstoreitin the same environment as this product Note that thereisavalveintheinksupplyport makingcovers or plugs unnecessary but care is needed to prevent the ink from staining items that the cartridge touches Do not touch the ink supply port or surrounding area Note on this Guide Meaning of Symbols Warning Warnings must be followed to avoid serious ...

Page 8: ...x64 Standard Edition Windows Server 2008 x64 Enterprise Edition Windows Server 2008 R2 Standard Edition and Windows Server 2008 R2 Enterprise Edition Windows Server 2003 refers to Windows Server 2003 Standard Edition and Windows Server 2003 Enterprise Edition WindowsServer2003x64referstoWindowsServer 2003 x64 Standard Edition and Windows Server 2003 x64 Enterprise Edition Macintosh refers to Mac O...

Page 9: ...over when cleaning the printer or clearing jams B Poster board support Raise this support so that you can place the media on it when printing on poster board The support ensures that poster board feeds smoothly U Loading and Removing Poster Board on page 39 SC T7200 Series SC T5200 Series SC T3200 Series SC T7200D Series SC T5200D Series User s Guide Introduction 9 ...

Page 10: ...200 Series only Select a guide according to the size of the media output to the paper basket U Using the Paper Basket SC T7200 Series SC T5200 Series SC T3200 Series on page 45 G Stack guide switch lever SC T7200 Series SC T5200 Series SC T3200 Series only Use to choose a stack guide H Cartridge cover Open when replacing ink cartridges U Replacing Ink Cartridges on page 170 I Ink cartridges Instal...

Page 11: ...to the adapter holder U Attaching the Roll Paper Adapter on page 27 T Roll lock lever A lever that locks roll paper in place after the roll is attached to the adapter holder U Adapter holder The roll paper adapter is placed in this holder after the roll paper is attached V Paper slot The slot through which roll paper and single sheets are fed during printing Feed single sheets one at a time W Prin...

Page 12: ...connection cable of the Roll 2 unit Normally the cable is connected when using the printer C Rear cover SC T7200D Series SC T5200D Series only When roll paper loaded to the Roll 2 unit is jammed open the cover and then remove the jammed paper Normally closed when using the printer U Roll paper jam on page 188 SC T7200 Series SC T5200 Series SC T3200 Series SC T7200D Series SC T5200D Series User s ...

Page 13: ...ing Roll 2 SC T7200D Series SC T5200D Series only on page 31 D Adapter holder The roll paper adapter is placed in this holder after the roll paper is attached E Roll lock lever A lever that locks roll paper in place after the roll is attached to the adapter holder Roll paper adapter Use the supplied roll paper adapter when loading roll paper onto the printer U Attaching the Roll Paper Adapter on p...

Page 14: ...the menu hierarchy U Menu Operations on page 130 G l rbuttons left and right arrow buttons Use these buttons to select tabs The selected tab is highlighted and the content of the info display area is updated for the selected tab U Screen View on page 15 If menus are displayed these buttons can be used to positionthecursorordeletecharacterswhenentering text for items such as Setting Name or IP Addr...

Page 15: ... the d button Press the u button to rewind Keep the d button pressed to feedthepaperupto3m Keepthedbuttonpressedto rewind the paper up to 20 cm When the u button is used to rewind roll paper the paper will pause when the end of the roll reaches the starting print position Release the button and then press it again to resume Screen View A Message Displays the printer s status operation and error me...

Page 16: ...aper is loaded on Roll 1 Roll 2 of the SC T7200D Series SC T5200D Series you can check which is selected in use by looking at the icon Indicates a roll that is selected in use The numberindicates eitherRoll1 or Roll 2 Indicates a roll in a standby state If there is an automatic switching command this roll is selected for printing Automatic switching of roll paperU Switching Roll Paper Automaticall...

Page 17: ...a new one The Setup Tab Shows the specified IP address in the info display area When you press the Menu button the Setup menu appears U Setup menu on page 146 The Large Copy Tab This tab is displayed only when the optional MFP Scanner is connected Inthistab selectajobyouwanttodo andthen press the Z button When the optional hard disk unit or Adobe PostScript 3 Expansion Unit is installed you can al...

Page 18: ...asted time when printing has stopped due to running out of ink or paper Loading two roll papers and increasing productivity SC T7200D Series SC T5200D Series You can load roll paper at two locations Roll 1 upper section and Roll 2 lower section This feature increases productivity in the following manner Because you can load different types of roll paper in Roll 1 and Roll 2 specify the media type ...

Page 19: ...g the Roll Paper Adapter on page 27 Ease of Maintenance Roll paper and all replacements including ink cartridges Maintenance Boxes and cutters are installed from the front allowing the printer to be placed against a wall The printer does not have to be moved to allow rear access Choosefromthreesizesofcartridgeaccordingtothe task Choose from 110 350 and 700 ml cartridges according to the frequency ...

Page 20: ...Board on page 39 SC T7200 Series SC T5200 Series SC T3200 Series SC T7200D Series SC T5200D Series When the MFP Scanner is installed The following illustration shows the installation space when the dedicated stand is used to attach the MFP Scanner When the thickness of the document to be loaded is 0 25 mm or larger ensure that there is sufficient space both in front of and behind the printer U How...

Page 21: ... the following points when storing the printer If it is not stored correctly you may not be able to print properly the next time it is used If you do not print for a long time the print head nozzles may become clogged We recommend that you print once a week to prevent the print head from clogging The roller may leave an impression on paper that is leftintheprinter Thiscanalsocausewavyorcurled pape...

Page 22: ...ondition print quality may decline Check the documentation supplied with each paper Notes on Handling Use Epson special media under normal room conditions temperature 15 to 25 C humidity 40 to 60 Do not fold the paper or scratch the surface of the paper Avoid touching the printable surface of the paper with your bare hands Moisture and oils from your hands can affect print quality Handle paper by ...

Page 23: ...n special media However with the correct storage method the degree of color distortion can be minimized See the documentation supplied with Epson special media for detailed information on handling the paper after printing The colors of photos posters and other printed materials appear different under different lighting conditions light sources The colors of print outs from this printer may also ap...

Page 24: ...t Config With this software you can configure various network settings for the printer from your computer Thisisusefulasitallowsyoutoenteraddressesandnamesusingthekeyboard The manual is also installed along with the software LFP Print Plug In for Office This is a plug in for Microsoft Office applications Word Excel and PowerPoint Installing this plug in displays a ribbon in Office applications tha...

Page 25: ...e process of setting the addresses needed for network connections EpsonNet Config With this software you can configure various network settings for the printer from your computer Thisisusefulasitallowsyoutoenteraddressesandnamesusingthekeyboard The manual is also installed along with the software SC T7200 Series SC T5200 Series SC T3200 Series SC T7200D Series SC T5200D Series User s Guide Introdu...

Page 26: ...ows You can save these settings and easily import or export these saved settings U Customizing the Printer Driver on page 122 Mac OS X Allows you to execute printer maintenance functions to maintain print quality check the printer s status and so on Windows You can easily import or export printer driver settings U Overview of the Utility Tab on page 124 Mac OS X SC T7200 Series SC T5200 Series SC ...

Page 27: ...g the roll paper adapter see the following sections Loading on Roll 1U Loading Roll Paper or Roll 1 on page 28 Loading on Roll 2U Loading Roll 2 SC T7200D Series SC T5200D Series only on page 31 AttachingtheRollPaperAdapter A Turn on the printer by pressing the P button Note Closing the paper basket makes the work easier SC T7200 Series SC T5200 Series SC T3200 Series U Storing and Opening on page...

Page 28: ... of the two roll paper adapters E Attach an adapter to each end of the roll Press the adapters in until they are fully inserted in the roll with no gaps F Lower the lock levers to lock the adapters in place Loading Roll Paper or Roll 1 Buttons that are used in the following settings SC T7200 Series SC T5200 Series SC T3200 Series SC T7200D Series SC T5200D Series User s Guide Basic Operations 28 ...

Page 29: ... T7200D Series SC T5200D Series When roll paper is being inserted a beep tone sounds If you hear the sound proceed to Step 6 SC T7200 Series SC T5200 Series SC T3200 Series When the Auto Loading is set to Off on the SC T7200D Series SC T5200D Series Pull the edge of the paper straight outside the printer as shown If the edge of the paper is not a horizontal or not cut cleanly you can use the built...

Page 30: ...ing information on the paper is printed on the roll When the paper is loaded the barcode is read automatically and the Media Type and Roll Paper Remaining settings are configured automatically After Ready is displayed you can print If a barcode giving information on the paper is not printed on the roll The display shows the Media Type currently selected with the printer To print with the displayed...

Page 31: ...nit out cImportant Do not pull out the Roll 2 unit unless you are instructed to do so by the control panel screen If the unit is carelessly pulled out while paper is loaded paper jams or paper damage may occur D Confirm that the roll paper lock lever is raised E Place the roll paper adapters on the adapter guides so the flatsurfacesof the adapters is facing down Next following the adapter guides s...

Page 32: ...ith the printer To print with the displayed settings use the d u buttons to select Keep Settings Above and press the Z button To change the settings select Change Settings and press the Z button U Viewing and Changing Media Settings on page 43 Cutting the roll paper The printer is equipped with a built in cutter You can cutrollpaperafterprintingbyusingoneofthefollowing methods Auto Cut The cutter ...

Page 33: ... when the printer driver is used Note Disable printer driver Auto Cut and printer Auto Cut options when using the optional auto take up reel unit It may take a while to cut the roll paper If the cutting noise is bothersome set Cutting Mode to Silent U Setup menu on page 146 Setting on the computer Set Auto Cut from the Advanced tab Roll Paper Option in the printer driver s Properties or Printing p...

Page 34: ...left in the printer Buttons that are used in the following settings A Confirm that the printer is ready and press the button TheLoad Remove Paper menu will be displayed B Press the d u buttons to highlight Remove Paper and press the Z button If you are using the SC T7200D Series SC T5200D Series and roll paper is also loaded on Roll 2 select Roll 1 and then press the Z button If On is selected for...

Page 35: ...he roll paper adapters H Remove the roll paper adapters After rewinding the roll paper carefully store it in the original package Close the roll paper cover Removing Roll 2 SC T7200D Series SC T5200D Series only This section describes how to remove and store roll paper of Roll 2 after printing The pressure rollers may leave impressions on paper that is left in the printer SC T7200 Series SC T5200 ...

Page 36: ...int a barcode C The paper will automatically be rewound After the paper is rewound a beep tone sounds D Lower the paper basket to the horizontal position U Adjusting the Position on page 49 E Hold the drawer handles of Roll 2 unit and then pull the unit out Note When removing the roll paper you can use the optional roll paper belt to prevent the roll paper from unwinding F Raise the roll lock leve...

Page 37: ... before loading it in the printer or use new paper If wavyor curledpaperisloaded thisprinter maynot beabletorecognizethepapersize feedthepaper or print correctly We recommend that you return the paper to its original package and store it flat and take it out of the package just before you use it Loading Cut Sheets cImportant Insert the paper just before printing The pressure rollersmayleaveimpress...

Page 38: ...r slot keeping its right edge aligned with the loading mark on the roll paper cover Slide the paper in until it stops cImportant Insert all paper in portrait orientation Inserting paper in landscape orientation may cause a decline in print quality D ConfirmthatPressZ isdisplayedandpressthe Z button The paper will be fed into the printer E Check the media type The display shows the type of paper cu...

Page 39: ...nter can be used with board of the following sizes A2 A1 B2 B1 B1 landscape 24 30 inch 30 40 inch Not supported by the SC T3200 Series Loading Poster Board Poster board requires space both behind and in front of the printer The approximate amount of space required is shown below If the printer is set up near a wall make sure there is enough space at the rear Paper Size Front a Back b A2 444 mm 135...

Page 40: ...and Opening on page 46 SC T7200D Series SC T5200D Series U Storing on page 49 B Press the button on the control panel Press the d u button to highlight Poster Board and press the Z button C Raise all the poster board supports Press the supports diagonally downwards and then lift them straight up D Place the side to printable face up with its edge in front of the projecting supports as shown SC T72...

Page 41: ...lose the printer cover I Position the trailing and right edges of the board as shown by the loading indicators Center the right edge over the groove to the right ofthepaperejectguideandalignthetrailingedge withtheendsofposterboardsupports asshown SC T7200 Series SC T5200 Series SC T3200 Series SC T7200D Series SC T5200D Series User s Guide Basic Operations 41 ...

Page 42: ...loaded but not used press the button and select Remove Paper Buttons that are used in the following settings A Confirm that Paper Eject is displayed in the control panel Keeping a hand on the poster board to prevent it falling from the printer press the Z button B Pull the poster board forward as shown in the on screen instructions After removing the poster board press the Z button cImportant If p...

Page 43: ... can set in 0 5 m increments If you press the r button you can change Roll Paper Remaining to Off To change the setting back to On use Roll Paper Remaining in the Paper menu U Paper menu on page 141 The printer will display Ready after a brief pause showing that it is ready to print Send the data to be printed from the computer Roll Paper Remaining When On is selected for Roll Paper Remaining the ...

Page 44: ... 94 Replacing Paper Thissectiondescribeshowtoreplacepaper Theprocess for removing the current paper differs with the type of paper loaded follow the instructions displayed in the control panel Buttons that are used in the following settings A Confirm that the printer is ready and press the button TheLoad Remove Paper menu will be displayed B Press the d u buttons to select the type of paper used t...

Page 45: ...sizes can be collected regardless of the paper type Maximum size when one sheet is collected Paper Width Paper Length SC T7200 Series About 1 118 mm 44 inches Approx 1 189 mm SC T5200 Series About 914 mm 36 inches SC T3200 Series About 610 mm 24 inches When collecting one sheet use the paper basket in the standard position Adjusting the PositionU Adjusting the Position on page 47 Note Close the pa...

Page 46: ...zes above collecting consecutive sheets in the paper basket may result in stains folds or other damage totheprintedsheets Whenyouprintcontinuously remove the sheet in the printer before the next sheet is collected Storing and Opening Storing Close the paper basket before loading paper or moving the printer Press the paper basket to the opposite side A paper basket in the horizontal position cannot...

Page 47: ...ntsfailtoholdthepapercorrectly resultingin the paper wrinkling or folding Standard position A Pull the basket toward you slightly and lower it B Use the top stack guide switching lever to lower the top stack guide As shown in the following illustrations adjust the lower stackguideto matchthe size ofthe papertobe collected Guide positioned for continual collection of A1 Portrait US D Portrait 22 34...

Page 48: ...op stack guide B Lift the guide up and then lower it lightly Note If the standard position is erroneouslyset instead of the horizontal position lift the guide up and then lower it while pushing lightly SC T7200 Series SC T5200 Series SC T3200 Series SC T7200D Series SC T5200D Series User s Guide Basic Operations 48 ...

Page 49: ...rint in line drawing mode on a plain paper roll this basket can collect various sizes of sheets up to A1 Landscape When collectingmultiple sheets use the paper basket in the large capacity position Adjusting the PositionU Adjusting the Position on page 49 Up to 20 sheets under normal temperatures Note that the number of sheets that can be collected is reduced by work environment images to be print...

Page 50: ...trusions of the left and right frames Horizontal position Pull the basket toward you slightly and then lower it Next push it in straight To change the basket from the horizontal position to another position reverse the procedure above SC T7200 Series SC T5200 Series SC T3200 Series SC T7200D Series SC T5200D Series User s Guide Basic Operations 50 ...

Page 51: ...n Dropping the roll core could cause injury Be careful that your hands hair or other objectsdonotgetcaughtinthe movingpartsof the auto take up reel unit Failure to observe this precaution could result in injury cImportant Confirm that the end of the roll is cut straight across The unit will not function as expected if the end of the roll is wavy or curved U Manual cut method on page 33 Note For in...

Page 52: ...reel unit roll core The procedure varies with the take up direction cImportant Before proceeding select Off for Auto Cut Using the auto take up reel unit when On is selected will cause errors U Cutting the roll paper on page 32 Taking Up the Paper Printable Side Out For information on installing the roll core see the Setup Guide for the optional auto take up reel unit Buttons that are used in the ...

Page 53: ...the core is sufficiently loose Note The tensioner supplied with the auto take up reel unit is used with some types of paper Slacken the paper and insert the tensioner near thecenter of the paper as shown See the following section for information on paper that requires the tensioner U Epson Special Media Table on page 196 H Set the Auto switch to Forward Taking Up the Paper Printable Side In For in...

Page 54: ... d button pressed until the end of the roll reaches the roll core E Tape the end to the roll core Place tape available from third party suppliers at the center and then at the left and right ends F Keep the d button in the control panel pressed until you have fed enough paper for about three wraps around the roll core G Keep the Manual switch pressed to Backward to wrap the paper three times aroun...

Page 55: ...alone could drop the roll resulting in injury Buttons that are used in the following settings A Set the Auto switch to Off B Cut the paper and take it up until it is all on the auto take up reel unit roll core U Manual cut method on page 33 After cutting the paper support the end to prevent the printed surface touching the floor continue to support the paper until it is all taken up Keep the Manua...

Page 56: ...ting is performed from the application used to create the document you wish to print The basic procedure is described below A Turn on the printer and load the paper U Attaching the Roll Paper Adapter on page 27 U Loading Cut Sheets on page 37 U Loading Poster Board on page 39 B When you have created the data click Print in the File menu SC T7200 Series SC T5200 Series SC T3200 Series SC T7200D Ser...

Page 57: ...it switches to the roll paper to be printed in accordance with the Roll Switch Condition setting in the Setup menu of the printer U Switching Roll Paper Automatically before Printing SC T7200D Series SC T5200D Series Only on page 91 If the desired settings are not displayed replace the media in the printer with the desired paper type and click the Acquire Info button The driver will reacquire data...

Page 58: ...options Advancedfitandborderlesssettingsareavailable in the Layout tab U Enlargements and Horizontal and Vertical Banners on page 83 U Borderless Printing on page 96 G In the Print Quality area choose an option for Select Target Choose an option according to the type of document and how it will be used To choose a color correction method or adjust colors select Advanced Settings U Correct color an...

Page 59: ... the progress bar the computer s processing status is displayed On this screen you can check the remaining ink level product numbers for the ink cartridges and so on Anerrormessageisdisplayedifanerroroccursoranink cartridge needs replacing while printing SC T7200 Series SC T5200 Series SC T3200 Series SC T7200D Series SC T5200D Series User s Guide Basic Operations 59 ...

Page 60: ...MacOSX10 6and10 5 clickthearrow to make settings on the Page Setup screen Note Ifpagesettingsarenotdisplayed intheprintdialog click the page settings option e g Page Setup in the File menu D Check that this printer is selected and then set the paper size Select one of the following options for Paper Size XXXX is the actual paper size such as A4 XXXX Print with margins on roll paper Print using the...

Page 61: ...th of the roll paper currently in use on the printer When the printer starts printing itswitchestotherollpapertobeprinted in accordance with the Roll Switch Condition setting in the Setup menu of the printer U Switching Roll Paper Automatically before Printing SC T7200D Series SC T5200D Series Only on page 91 Mac OS X 10 5 Choose Page Setup and Media Type according to the type of paper loaded in t...

Page 62: ...in the Dock while printing Click the printer icon to display the status You can check the progress of the current print job and the printer status information You can also cancel a print job Also if an error occurs while printing a notification message is displayed SC T7200 Series SC T5200 Series SC T3200 Series SC T7200D Series SC T5200D Series User s Guide Basic Operations 62 ...

Page 63: ...driver Advanced tab the top and bottom margins are 0 mm Marginsfor rollpaper depend onthe option selected for Roll Paper Margin in the menus as shown in the table below Roll Paper Margin SettingsU Setup menu on page 146 indicates factory default settings Roll Paper Margin Parameter Margin Values Normal A C 15 mm B D 3 mm Top15mm Bottom15mm A C 15 mm B D 3 mm Top35mm Bottom15mm A 35 mm C 15 mm B D ...

Page 64: ...d 210 minutes At default settings the printer enters sleep mode if no operations are performed for 15 minutes The delay can be changed from the Setup menu U Setup menu on page 146 Note When the printer enters sleep mode the control panel s screen goes blank as if the power has been turned off but the P light remains lit Power Off Timer The printer is equipped with a Power Off Timer option that aut...

Page 65: ...el the print job from the computer Cancel on the printer Canceling from the computer Windows When the Progress Bar is displayed Click Cancel When the Progress Bar is not displayed A Click the printer icon in the task bar while printing is in progress Whether or not an icon is displayed depends on the settings selected for Windows B Rightclickthenameofthejobyou wantto cancel and select Cancel from ...

Page 66: ...n the screen and then press the Z button The print job is canceled even in the middle of printing It may take a while before the printer returns to ready status after canceling a job Note You cannot delete print jobs which are in the print queue on the computer using the above operation See Canceling from the computer to delete print jobs in the print queue SC T7200 Series SC T5200 Series SC T3200...

Page 67: ...nting cannot be restarted until the printer has been readied by for example replacing the paper However thefollowingtypesofprintjobcanbeheld temporarily on the hard disk Therefore after printing all the jobs that can be printed with the current paper you can replace the paper with the media specified in the held print jobs and resume printing making your work more efficient Print jobs that specify...

Page 68: ...jobs individually Note If the printer s IP address is entered in a web browser when the optional MFP Scanner has been connected the following screen appears To start the Remote Manager click Remote Manager For more information see the online help for Remote Manager For information on launching Remote Manager see U the Network Guide pdf From LFP HDD Utility Windows only The LFP HDD Utility can be u...

Page 69: ... In the Advanced tab click the Settings button in the Hard Disk Unit area and select Print and Save or Save only D Next print the document normally If Save only is selected the print job will be saved to the optional hard disk unit but not printed Viewing and Printing Saved Print Jobs This section describes how to view and print saved jobs from the control panel Buttons that are used in the follow...

Page 70: ...lected jobwillbedisplayed To exit without printing the job press the W button after viewing job data To print the job proceed to Step 4 D Press the Z button You will be prompted to enter the number of copies E Press the d u buttons to choose the number of copies and press the Z button SC T7200 Series SC T5200 Series SC T3200 Series SC T7200D Series SC T5200D Series User s Guide Saving to and Repri...

Page 71: ... the network Scan To Shared Folder Saved to a hard disk installed to a printer connected to the MFP Scanner that performed the scan Scan To HDD The destination printer must have a MFP Scanner and a hard disk installed To confirm whether this function is supported see the manual included with the printer Operation You can perform large copy scan operations or manage scanned image files in the follo...

Page 72: ...le resolution Starting Copy Center Copy Center is included on the network interface of the printer and it functions when the MFP Scanner is connected to the printer The following procedure describes how to start Copy Center A Start a web browser on a tablet terminal or computer connected to the printer via the network B Enter the IP address specified on the printer in the address bar and then pres...

Page 73: ...ress bar and then press the Enter key or the return key C In the displayed screen click Remote Manager D Select the Step tab screen and then click Mail in the menu on the left of the screen See the help for more details on Remote Manager Creating and Editing the Address Book Use Copy Center to create and edit the address book A Start Copy Center B In the upper part of the screen click the Settings...

Page 74: ...ng three actions Remove the paper eject guides when document thickness is 0 25 mm or more Remove all paper eject guides of the scanner If the paper eject guides are left attached the document will strike them and not be ejected Set the document eject direction to forward when document thickness is 0 25 mm or more Make sure the document eject direction is forward If the document is ejected backward...

Page 75: ... the side of the document to be read facing up align the right edge of the document with the loading guide C Insert the document horizontally so that the entire edge touches all inner rollers If the edge touches the roller the document is fed to the read start position automatically After automatic loading starts release your hand and do not obstruct the loading of the document SC T7200 Series SC ...

Page 76: ...n the model you are using SC T7200Series SC T5200Series SC T3200Series Loaded roll paper or cut sheet SC T7200D Series SC T5200D Series Select Roll 1 2 and then print The procedure to select Roll 1 2 is described in Step 6 below Buttons that are used in the following settings A Turn on the printer by pressing the P button When the printer is turned on the scanner is also turned on B Load paper sui...

Page 77: ... Changing the eject directionU Changing the document eject direction on page 78 Large Scan This section describes the procedure to scan on the control panel of the printer Buttons that are used in the following settings A Turn on the printer by pressing the P button If the printer is turned on the scanner is also turned on B Load paper suitable for the large scan function of the printer U Epson Sp...

Page 78: ...henthedocumenteject operation is performed The default setting is forward ejection When the direction has been changed to backward attach the paper eject guidesbefore use If the document is ejected backward with the paper eject guides removed the document will fall to the rear side and be damaged by folding or dirt Buttons that are used in the following settings A At Large copy Large scan screen u...

Page 79: ... a file that cannot be printed directly Indicates an image file that was sent to a shared folder Indicates a JPEG file with a resolution that supports direct printing Indicatesanimagefilethatwassavedtoa hard disk Indicates a file that cannot be printed directly Indicatesanimagefilethatwassavedtoa hard disk Indicates a JPEG file with a resolution that supports direct printing Indicates an image fil...

Page 80: ...document size 4x6 A3 1 Copy size Up to 36 inches approximately 914 mm 2 1 Varies with the model of scanner connected 2 Up to 24 inches approximately 610 mm with the SC T3200 Series Connecting the Scanner A Ready both the printer and the scanner For information on setting up the scanner see the documentation supplied with the device B Turn the printer and scanner off C Connect the scanner to the pr...

Page 81: ... the l r buttons to highlight the tab and press the Z button The enlarged copy dialog box is displayed E In the enlarged copy dialog box press the u d buttonstochoosethenumberofcopiesandpress the Z button to start copying Tochangecopysettingsortheenlargementratio press the Menu button The Enlarged Copy menu is displayed The scanner button can be used in place of the Z button to start copying Using...

Page 82: ... is printed on thick stock e g postcards or photographs When multiple copies are made from an original placed on the glass the original may be scanned once for each copy Wait until all the copies have been printed before opening the scanner cover Use the ADF to scan multi page documents Because the copies are printed as the originals are scanned the printer can not collate multiple copies of multi...

Page 83: ... size to fit the roll paper width Specify Size You can specify the enlargement or reduction ratio Use this method for a non standard paper size A4 1000mm Fit to Output Size Automatically enlarges or reduces the image size to fit the paper size Note Whenprintingfromapplicationsdesignedexpressly for horizontal or vertical banners adjust printer driver settings as described in the application documen...

Page 84: ...whether to fit the short or long edge of the document to the roll paper width Note Output can also be fitted to the roll width by selecting Fit to Roll Paper Width in the Printer Settings tab D Check other settings and then start printing Making Settings for Mac OS X A Choose Page Layout Settings from the list in the print dialog and select Reduce Enlarge U Basic Printing Methods Mac OS X on page ...

Page 85: ...thods Windows on page 56 B In the Layout tab select Reduce Enlarge and click Specify Size C Choose an input method and select a size Enter a value directly or click the arrows to the right of the scale box to set the value D Check other settings and then start printing Making Settings for Mac OS X A Choose Page Layout Settings from the list in the print dialog and select Reduce Enlarge U Basic Pri...

Page 86: ...nlarge and click Fit to Output Size C Select the size of the paper used for printing To print the document margins excluded at precisely the selected output size select Oversize Note WhenprintingusingOversize loadpaperthatisas large as the selected Output Size plus the margins needed by the printer Printer marginsU Printable area on page 63 D Check other settings and then start printing Making Set...

Page 87: ... 914 mm SC T3200 Series 89 to 620 mm 1 Length 2 Windows 127 to 15 000 mm Mac OS X 127 to 15 240 mm 1 The maximum printable width is 610 mm 2 The paper length can be longer if using applications that support banner printing However the actual print size depends on the application the paper size loaded in the printer and the computer environment cImportant The smallest size supported by the printer ...

Page 88: ...either the Paper Width or Paper Height Note To change the paper size you saved select the paper size name from the list on the left Todeletetheuser definedsizeyousaved select the paper size name from the list on the left and then click Delete You can save up to 100 paper sizes C Click OK The saved sizes are now available in the Paper Size menu of the Printer Settings tab You can now print as norma...

Page 89: ...sed in plotters You can use one of the following methods to print CAD drawings with this printer Print in the CAD Line Drawing mode of the included printer driver Print while emulating HP GL 2 and HP RTL which are used in plotters Whether the printer prints normally or prints while emulating HP GL 2 and HP RTL is determined and selected automatically by the print data sent If operation mode switch...

Page 90: ...as shown below according to your model SC T7200 Series SC T7200D Series SC T5200 Series SC T5200D Series HP Designjet 750C C3195A SC T3200 Series HP Designjet 750C C3196A Not all functions are supported If you will use an untested application test its output in advance For a list of applications that have been tested visit the Epson website at http www epson com cImportant The printer may not perf...

Page 91: ...atte Paper Settings on Windows A Using the control panel of the printer confirm TypeMatchissetinSetupmenu PrinterSetup Roll Paper Setup Roll Switch Condition Paper Type The default Paper Type setting is Type Match If the setting has not been changed the setting is Type Match U Setup menu on page 146 B OpenthePrinterSettingstaboftheprinterdriver and confirm that Source is Roll Auto XXXXX XXXXX indi...

Page 92: ...is selected depending on the purpose of its use E Set Print Quality and other necessary settings and then print If a message The Media Type differs to the setting on the printer is appears click Ignore Switching to Roll 1 Roll 2 by Document Size For example when you use the following method often if you use the settings described below the printer can switch between Roll 1 and Roll 2 automatically...

Page 93: ...tion In this example select A1 594 x 841 mm D Set Print Quality and other necessary settings and then print The printer prints to the roll paper of Roll 2 A0 Width If A3 or A2 is selected in Step 3 the printer prints to the roll paper of Roll 1 A2 Width Making Settings for Mac OS X A Using the control panel of the printer confirm Best Fit is set in Setup menu Printer Setup Roll Paper Setup Roll Sw...

Page 94: ...le the paper is loaded as follows Roll 1 Plain Paper A1 Width Roll 2 Plain Paper A1 Width Settings on Windows A Use the control panel of the printer to open the Paper menu and set Roll Paper Remaining to On and then set the Roll Paper length loaded into both Roll 1 and Roll 2 When you set the roll paper if roll paper length has been set or a barcode with roll data is printed on the current roll pr...

Page 95: ...nel of the printer confirm Print Length is set in Setup menu Printer Setup Roll Paper Setup Roll Switch Condition Paper Length The default Paper Length setting is Print Length If the setting has not been changed the setting is Print Length U Setup menu on page 146 C On the computer open the Print screen confirm that Paper Size is Roll Paper and then select Printer Settings from the list D Check th...

Page 96: ... in the applications to set the size of the image data as follows Match the paper size and page setting for the print data If the application has margin settings set the margins to 0 mm Make the image data as large as the paper size Retain Size Create the print data larger than the paper size in the applications to produce borderless output The printer driver does not enlarge the image data Use se...

Page 97: ...B2 515 mm A1 594mm 24 inch B1 728 mm A0 841 mm 36 inch B0 1030 mm 44 inch Depending on the media type the print quality may decline or borderless printing cannot be selected U Epson Special Media Table on page 196 SC T7200 Series SC T5200 Series SC T3200 Series SC T7200D Series SC T5200D Series User s Guide More Ways to Print 97 ...

Page 98: ...he Maintenance Menu on page 145 When you print one page only or print one page multiple times the operation is the same as that for Double Cut When continuously printing multiple sheets the printer cuts1mminside onthetop edge of the first page and the bottom edge of the subsequent pages to avoid showing margins The top area may become slightly uneven depending ontheimagesincetheprint operation sto...

Page 99: ...click Amount of Enlargement and choose the amount cut off at the edges Note Retain Size is not available when Fit to Roll Paper Width is selected in the Printer Settings tab or Reduce Enlarge is selected in the Layout tab Max 3 mm for left and 5 mm for right the image shifts 1 mm to the right Standard 3 mm for left and right Min 1 5 mm for left and right Note Movingthe slider towards Min decreases...

Page 100: ...ions are not available in the application s print dialog display the page settings dialog B If Auto Expand is selected for paper size select Page Layout Settings from the list and click Expansion The following section shows how much the image will be larger than the paper edges Max 3 mm for left and 5 mm for right the image shifts 1 mm to the right Standard 3 mm for left and right Min 1 5 mm for l...

Page 101: ...htness Contrast Saturation and color balance Use this option when the application in use does not have a color correction function Note The color correction options available vary with the operating system and the type of paper used Making Settings in Windows A When using applications featuring a color management function specify how to adjust colors from these applications When using applications...

Page 102: ...the sample image on the left side of the screen Color balance can also be adjusted by selecting Color Circle or Slide Bar for Color Adjustment Method D Check other settings and then start printing Making Settings for Mac OS X A When using applications featuring a color management function specify how to adjust colors from these applications When using applications without a color management functi...

Page 103: ...is omitted Adobe Photoshop CS3 or later Adobe Photoshop Lightroom 1 or later Adobe Photoshop Elements 6 or later D Choose Printer Settings from the list and select Advanced Settings for Mode E Choose a color correction option from the Color Mode list Additional adjustments can be made by clicking Settings Note When using the following applications with Mac OS X 10 5 clear the Use Generic RGB check...

Page 104: ... three multi page poster printing methods are available Folded Double Side Windows only Two consecutive pages are printed on a single sheet Thesecondpageisflipped180 andprintedadjacent to the first page allowing the paper to be folded to make a double sided document N up Two or four consecutive pages can be printed on a single sheet SC T7200 Series SC T5200 Series SC T3200 Series SC T7200D Series ...

Page 105: ...inting Methods Windows on page 56 B In the Folded Double Side Setting dialog box set Binding Edge and Binding Margin C Check other settings and then start printing N up Note In Windows you cannot use the N up printing function when performing borderless printing In Windows you can use the Reduce Enlarge function Fit to Page to print the data on different sizes of paper U Printing at Non Standard S...

Page 106: ...f pages per sheet and so on U Basic Printing Methods Mac OS X on page 60 Note You can print frames around arranged pages using the Border function B Check other settings and then start printing Poster Windows only A In the printer driver s Layout tab select Page Layout Next selectPosterandclicktheSettings button U Basic Printing Methods Windows on page 56 B In the Poster Settings dialog box select...

Page 107: ...ess Poster Print is not selected a Print Cutting Guides option will be displayed The finished size is the same whether or not Trim Lines is selected However if Overlapping Alignment Marks is selected the finished size is smaller with an overlap D Check other settings and then start printing Joining Poster Sheets with Printed Borders If Overlapping Alignment Marks is selected join guides indicated ...

Page 108: ...e line joining the two join guides the centers of the X marks B Lay the upper left sheet on top of upper right sheet Lineup the X marks as shown in the illustration below and temporarily fasten them using an adhesive tape on the back SC T7200 Series SC T5200 Series SC T3200 Series SC T7200D Series SC T5200D Series User s Guide More Ways to Print 108 ...

Page 109: ...t Steps 1 to 4 for the lower sheets F Trim the bottom from the upper sheets by cutting along the line joining the two guides the lines above the X marks G Lay the upper sheet on top of the lower sheet Lineup the X marks as shown in the illustration below and temporarily fasten them using an adhesive tape on the back SC T7200 Series SC T5200 Series SC T3200 Series SC T7200D Series SC T5200D Series ...

Page 110: ...joining the two cut guides the lines above the X marks I Join the upper and lower sheets together Use an adhesive tape to stick the backs of the sheets together SC T7200 Series SC T5200 Series SC T3200 Series SC T7200D Series SC T5200D Series User s Guide More Ways to Print 110 ...

Page 111: ...nly Documents created in different applications can be printed together in your choice of layout The Layout Manager can be used to improve efficiency and conserve paper Sample Multi Document Layout Sample Free Vertical Horizontal Layout SC T7200 Series SC T5200 Series SC T3200 Series SC T7200D Series SC T5200D Series User s Guide More Ways to Print 111 ...

Page 112: ...screen E Arrange the objects on the Layout Manager screen Objects can be dragged to new positions and resized in addition they can be rearranged or rotated using the options in the Object menu The overall size and placement of the objects can be changed using the Preferences and Arrangement options in the File menu See the Layout Manager screen help for more details on each function F Click Proper...

Page 113: ...ows Taskbar and then click Layout Manager on the menu displayed The Layout Manager screen is displayed If the Utility shortcut icon is not displayed on the Windows TaskbarU Overview of the Utility Tab on page 124 B On the Layout Manager screen click File menu and then Open C Select the location and open the required file SC T7200 Series SC T5200 Series SC T3200 Series SC T7200D Series SC T5200D Se...

Page 114: ... You cannot match the colors on the printed results and display by color management between the input device and the printer To match both colors you need to perform color management between the input device and the display as well Color Management Print Settings You can perform color management printing using this printer s printer driver in the following two ways Choose the best method according...

Page 115: ... Color management printing by Driver ICM Windows Only on page 118 U Color management printing by Host ICM Windows on page 116 U Color management printing by ColorSync Mac OS X on page 117 U Setting color management with the applications on page 115 Setting color management with the applications Print using applications with a color management function Make the color management settings in the appl...

Page 116: ...ettings for color adjustment using the application Depending on the type of the application make the settings following the table below Adobe Photoshop CS3 or later Adobe Photoshop Elements 6 or later Adobe Photoshop Lightroom 1 or later OS Color Management Settings Windows 8 1 Windows 8 Windows 7 Windows Vista Printer Manages Colors Windows XP Service Pack 2 or later and NET 3 0 or later Windows ...

Page 117: ...tically selected and displayed in the Printer Profile Description box To change the profile select Show all profiles at the bottom D Check other settings and then start printing Color management printing by ColorSync Mac OS X Use image data in which an input profile has been embedded Also the application must support ColorSync Note Depending on the application color management printing by ColorSyn...

Page 118: ...for color processing using the application before making printer driver settings Depending on the type of the application make the settings following the table below Adobe Photoshop CS3 or later Adobe Photoshop Elements 6 or later Adobe Photoshop Lightroom 1 or later OS Color Management Settings Windows 8 1 Windows 8 Windows 7 Windows Vista Printer Manages Colors Windows XP Service Pack 2 or later...

Page 119: ...d when a wider gamut of color is used for image data Relative Colorimetric Converts the data so that a set of color gamut and white point or color temperature coordinates in the original data match their corresponding printcoordinates Thisfeatureis used for many types of color matching Intent Explanation Absolute Colorimetric Assigns absolute color gamut coordinates to the original and print data ...

Page 120: ...art orSettings Control Panel Hardware and Sound or Hardware Devices and Printers For Windows Vista Click Control Panel Hardware and Sound and then Printer For Windows XP Click Start Control Panel Printers and Other Hardware and then Printers and Faxes Note If your Windows XP Control Panel is in Classic View click Start Control Panel and then Printers and Faxes B Right click your printer icon and c...

Page 121: ...elp you can use the contents page or keyword search to read the help Right click on the item you want to check and display Right click the item and then click Help Note In Windows XP click on the title bar and then click the help item you want to view SC T7200 Series SC T5200 Series SC T3200 Series SC T7200D Series SC T5200D Series User s Guide Tips for Using the Printer Driver Windows 121 ...

Page 122: ...seasetting you have registered from the Select Setting list box Note You can save the settings as a file by clicking Export You can share the settings by clicking Import to import the saved file on another computer Adding Media Types Select Print Quality and Media Settings for the type of media you wish to add and save it as a custom media type The custom media type will be added to the Media Type...

Page 123: ...her computer Rearranging display items To display frequently used items right away you can arrange Select Setting Media Type and Paper Size as follows Hide unnecessary items Rearrange in an order of most frequent use Arrange in groups folders A Go to the Utility tab and click Menu Arrangement B Select Edit Item C Order or group items in the List box You can move and order items by dragging and dro...

Page 124: ...ng or gaps in the print outs perform head cleaning Cleans the surface of the print head to improve the print quality U Cleaning the print head on page 166 Print Head Alignment Iftheprintresultsappeargrainyoroutoffocus perform Print Head Alignment The Print Head Alignment function corrects print head gaps U Minimizing Print Misalignments Head Alignment on page 167 EPSON Status Monitor 3 Youcancheck...

Page 125: ...lete and reprint these jobs Speed and Progress You can set various functions for printer driver basic operations Menu Arrangement You can arrange the display items of Select Setting Media Type and Paper Size For example you can reorder them by frequency of access U Rearranging display items on page 123 Export or Import You can export or import the printer driver settings This function is useful wh...

Page 126: ...ry C Select the software you want to remove and then click Uninstall Change or Change Remove Add or remove You can remove EPSON Status Monitor 3 and the printer driver by selecting EPSON SC XXXXX Printer Uninstall Select EPSON LFP Remote Panel 2 to remove EPSON LFP Remote Panel 2 D Select the target printer icon and then click OK E Follow the on screen instructions to continue When the delete conf...

Page 127: ... is installed automatically when you install the printer driver Starting Epson Printer Utility 4 Mac OS X 10 6 x or later A Select System Preferences Print Scan or Print Fax from the Apple menu B Selecttheprinter andclickOptions Supplies Utility Open Printer Utility Mac OS X 10 5 8 A Select System Preferences Print Fax from the Apple menu B Select the printer and click Open Print Queue Utility Eps...

Page 128: ...ny clogged nozzles U Cleaning the print head on page 166 Head Cleaning If you see banding or gaps in the print outs perform head cleaning This function cleans the surface of the print head to improve the print quality U Cleaning the print head on page 166 Print Head Alignment Iftheprintresultsappeargrainyoroutoffocus perform Print Head Alignment The Print Head Alignment function corrects print hea...

Page 129: ... Uninstaller Download the Uninstaller from the Epson website http www epson com Using the Uninstaller Follow the instructions on the Epson website Removing EPSON LFP Remote Panel 2 Drag and drop the EPSON Remote Panel 2 folder from the Applications folder into the Trash SC T7200 Series SC T5200 Series SC T3200 Series SC T7200D Series SC T5200D Series User s Guide Tips for Using the Printer Driver ...

Page 130: ...as been connected 2 Standard menu when the hard disk unit or Adobe PostScript 3 Expansion Unit has not been connected 3 After pressing the Z button to select the highlighted option press the y button to return to the previous menu Press the W button to exit Displayed only when an A3 or A4 scanner is connected Start copying SC T7200 Series SC T5200 Series SC T3200 Series SC T7200D Series SC T5200D ...

Page 131: ...When the optional MFP Scanner is connected Start copying SC T7200 Series SC T5200 Series SC T3200 Series SC T7200D Series SC T5200D Series User s Guide Using the Control Panel Menu 131 ...

Page 132: ...used job Lists the Paused Job Name User Paper Type Source Size and Reason For Hold Resume All Jobs Press Z to start printing Savd Job Queue 3 XXXXXXXXXXX name of stored print job Lists the Stored Job Name User Length Pages Paper Type Copies Source Size and Estimated Print Time Press Z to resume printing Print Job Log Sheet Press Z to start printing Paper menu U Paper menu on page 141 Menu item Des...

Page 133: ... Tension Normal High Extra High Remove Skew On Off Setting Name 22 characters or less letters numbers and symbols Restore Settings Yes No Print Paper List Press Z to start printing Roll Paper Remaining On Off Remaining Alert 1 to 15 m Maintenance menu U The Maintenance Menu on page 145 Menu item Description Nozzle Check Press Z to start printing Head Cleaning Head Alignment Auto Uni D Press Z to s...

Page 134: ...Stop Printing Reprint 3 Auto Loading 1 On Off Roll Switch Setting 1 Auto Roll 1 Roll 2 Roll Switch Conditio n 1 Paper Type Type Match Disable Paper Length Print Length Remaining Amount Disable Paper Width Best Fit Width Match Disable PrintJob Priority 3 Roll In Use In Order Advanced Settings Roll Paper Tension 1 to 5 Less Head Scuffing On Off Drying Time Per Page Off to 60 min Paper Size Check On ...

Page 135: ...s Photo Series Others User Defined Quality Speed Normal Fine Color Mode Color Grayscale Dot Correction On Off CMYK Simulation SWOP v2 US Web Uncoated v2 US Sheetfed Coated v2 US SheetfedUncoated v2 CoatedGRACoL2006 SWOPGrade3 Paper SWOP Grade 5 Paper Coated FOGRA27 Web Coated FOGRA28 UncoatedFOGRA29 CoatedFOGRA39 Euroscale Coated v2 Euroscale Uncoated v2 JapanWebCoated Ad JapanColor2001Coated Japa...

Page 136: ...tting Set key at 20 characters or less half size characters or sym bols IEEE802 1x Setting Enable Disable HTTPS Redirect Setting Enable Disable Print Status Sheet Press Z to start printing Restore Settings Yes No Power Settings Sleep Mode 5 to 210 minutes Power Off Timer Off 1 to 24 hours Restore Settings Yes No Preference Language Lists the supported languages Unit Length m ft in Alert Lamp Setti...

Page 137: ... Enlarged Copy menu on page 161 Menu item Description Color Grayscale Color Grayscale Auto A3 Auto B4 Auto A4 Auto B5 Au to A5 Auto LTR Auto 4x6 Auto A4 2 Banner Auto With Border Borderless Other Size Document Size A3 B4 A4 B5 A5 LTR 4x6 Output Size A0 US E B1 A1 US D B2 US C A2 A0 2Sheets Border With Border Borderless Quality Speed Fine Density Five options from Light to Dark Large Copy Large Sca...

Page 138: ... Sharpness Level 3 to 3 Scan Setting 3 Color Grayscale Color Grayscale Document type Text Line Drawing Tracing Paper Recycled Paper Blueprint Poster Width Auto ISO A US ANSI US ARCH JIS B ISO B cm inch Save Image type JPEG PDF Resolution Direct Print 360dpi 200dpi 300dpi 400dpi 600dpi File Size Compression High Normal Low Density Level 3 to 3 Contrast Level 3 to 3 Background Level 3 to 3 Sharpness...

Page 139: ... and allow you to hold or cancel the job U Function Summary on page 67 Printing availability bypaperremaining cannotbe performed correctly if Roll Paper Remaining is Off Theprinterwill notpredictavailability onthebasis of the amount of ink remaining when documents are printed using LFP Print Plug In for Office or EPSON CopyFactory5 When the printer printed using the PS driver included with the opt...

Page 140: ...on This is a simple tool for estimating ink consumption for a given print job EPSON DOES NOT WARRANT ACCURACY Actual ink consumption varies considerably depending on such factors as software used firmware ver sion image printed print settings substrate types frequency of use temperature and variations in printer performance and user preferences and practices Estimates do not account for ink used o...

Page 141: ... PostScript 3 Expansion Unit has been connected only 4 When the optional Adobe PostScript 3 Expansion Unit has been connected only Default setting Item Description Load Remove Paper Remove Paper Instructionsarenotdisplayedifnopaperisloaded Roll Paper 2 HighlightthepapertobeloadedandpresstheZ button Follow the on screen instructions to load the paper If paper is already loaded in the printer the in...

Page 142: ... distance between the print head and the paper Normally select Standard Select a wider setting if printed images are smeared If upon performing head alignment you feel that it is still not completely aligned select Narrow Standard Wide Wider Detect Paper Thickness Press the Z button to print a pattern to determine the thickness of the current paper Select the pattern number with the least misalign...

Page 143: ...ountupward Similarly choosingtoo large a value causes white bands adjust the amount downward Value Paper Suction 4 to 0 0 It is important to choose the appropriate amount of suction for the paper used in order to maintain the correct distance between the paper and the print head Choosing too high a value for thin or soft paper will increase the distance between the paper and the print head causing...

Page 144: ...l replacement When the roll is removed a barcode will automatically be printed on the roll stating the length remaining the value selected for the roll remaining alert and the paper type The barcode is automatically read and settings adjusted the next time the paper is used improving efficiency when multiple rolls of paper are used Printing Availability The printer will estimate printing availabil...

Page 145: ...and realign the head automatically If Manual is selected a pattern will be printed inspect the pattern visually and enter the value you think appropriate U Minimizing Print Misalignments Head Alignment on page 167 Auto Bi D Manual Uni D Manual Bi D Cutter Maintenance Adjust Cut Position 3 to 3 mm Youcanfinetunethecutpositionwhenprintingto rollpaper with no marginsinalldirections Thecut position ca...

Page 146: ...lent Refresh Margin On If On is selected during borderless printing the printer will automatically trim the leading edge to remove any ink stains that may have been left by the previous copy to disable this feature choose Off Off Page Line On IfAutoCutisOff youcanchoosetoprint On ornotprint Off cut lines on roll paper Cut lines are not printed if Auto Cut is On or when cut sheets or poster board i...

Page 147: ...hanged While the setting is Off the Roll 2 unit cannot be used Off Roll Switch Setting 1 Auto Select the action to take when the roll currently inuse is under the followingconditions automaticallyswitchbetweenRoll1andRoll 2 and print Auto print fixed to Roll 1 Roll1 print fixed to Roll 2 Roll 2 The roll is finished and there is data still to be printed The printer predicts that there is not enough...

Page 148: ...amount regardless of the print length Disable Print using the roll currently in use regardless of the remaining amount or print length Remaining Amount Disable Paper Width Best Fit From the following options select the conditions when you want tousetherollpaperthatreducesprintmarginsinconsiderationof roll paperwidthandprintjob length thevalueofDocumentSize of the printer driver Best Fit Compare th...

Page 149: ...t the printer may print outside the paper when Off is selected If it prints beyond the edges ofthepaper theinsideoftheprinterbecomesdirtywithink Wegenerally recommend to operate with this setting set to On Off Paper Skew Check On IfOnisselected anerrorwillbedisplayedinthecontrolpanelandprinting will stop if the paper is skewed select Off to disable this feature On is recommended in most circumstan...

Page 150: ...contain a PS command If the data contains a command this setting is not available and the hard clip area of the PS command becomes the base output size User Defined Select this option when outputting at non standard sizes After selecting this setting set Paper Width and Paper Height You can set in 0 1 mm increments Paper Width SC T7200 Series SC T7200D Series 89 1 to 1 118 mm SC T5200 Series SC T5...

Page 151: ...top bottom left and right margin values For a cut sheet the bottom margin is 14 mm regardless of the settings 5mm SC T7200 Series SC T5200 Series SC T3200 Series SC T7200D Series SC T5200D Series User s Guide Using the Control Panel Menu 151 ...

Page 152: ... of the PS command of the data area of in the following illustration When set to a standard size or User Defined Adds the value selected for Margin area of in the following illustration insidethesizeselectedforOutputSize areaof inthe following illustration and prints only the section within the area excluding the margins SC T7200 Series SC T5200 Series SC T3200 Series SC T7200D Series SC T5200D Se...

Page 153: ... User Defined Adds the value selected for Margin area of in the following illustration outside the size selected for Output Size area of in the following illustration With the actual Output Size the margin section becomes larger than the selected size the area of in the following illustration SC T7200 Series SC T5200 Series SC T3200 Series SC T7200D Series SC T5200D Series User s Guide Using the C...

Page 154: ...nits of 90 before printing Note that objects drawn by RTL are not rotated When both this setting and the RO command specify rotation rotation is performedusingthecombinedamountofbothvalues Notethatrotation by the RO command is for objects only the arrow section in the following illustration and rotation is not performed for the drawn area the square section in the following illustration As a resul...

Page 155: ... B The printer prints according to the settings of the built in palette that you specified for Define Palette If Define Palette setting is not set the results are the same as when Default is selected WhenDefault PaletteA PaletteBisset thepenconfigurationssetinthe application are ignored Default Palette A Palette B Define Palette Palette A You can define a unique built in palette by specifying the ...

Page 156: ...n print data is created with the paper size set to A4 the fol lowing settings have the described results Auto data is printed with margins added outside the A4 size A4 data is printed with the A4 data reduced to the printable area of the A4 size A Series A4 US ANSI US ARCH B Series Photo Series Others User Defined Quality Speed Choose Print Quality in view of image quality and print speed Normal F...

Page 157: ...ativeColorimetric Convertsthedatasothatasetofcolor gamut and white point or color temperature coordinates in the original data match their corresponding print coordinates This feature is used for many types of color matching Perceptual Converts the data so that a more visually natural image is produced This setting is appropriate for photo images Saturation Convertfocusingonthevividnessofcolorrath...

Page 158: ...ddress manually Panel Choose Panel to enter the IP address Subnet Mask and Default Gateway Contact your system administrator for detailed information Panel IPv6 Setting Enable Select whether to enable or disable the IPv6 function Disable IPsec Setting Enable Select whether to enable or disable the IPsec function Disable PSK Setting Enter a Pre Shared Key of up to 20 characters half width alphanume...

Page 159: ...an German Portuguese Spanish Dutch Russian Korean Chinese Select the language used on the control panel s screen Unit Length m Select the unit of length which is displayed on the control panel s screen or printed on the patterns ft in Alert Lamp Setting On Choose whether the large alert lamp lights On or does not light Off when an error occurs Off Administrator Menu Item Description Change Passwor...

Page 160: ...ly If operation mode switching is not performed correctly andprintingis notperformedcorrectly setto theoperationmodetobe used PostScript 4 HP GL 2 Date And Time MM DD YY HH MM Set the printer s built in clock The time provided by the clock is used when printing logs and status sheets Time Zone Enter the difference between the current time zone and GMT The selected time zone is used in e mail notif...

Page 161: ...ain paper roll is loaded because Borderless is not supported The sizes available vary with the scanner Borderless Other Size Document Size A3 B4 A4 B5 A5 LTR 4x6 Select the size of the original document when copying at other sizes The sizes available vary with the scanner Output Size A0 USE B1 A1 US D B2 US C A2 A0 2Sheets Choose the output size when copying at other sizes A0 2Sheets is available ...

Page 162: ...Color Choose whether to copy a color document and print it with colors or in black and white Grayscale Document Type Text Line Drawing Select the type in accordance with the loaded document Tracing Paper Recycled Paper Blueprint Poster Width Auto The default setting of Auto is recommended in most situations Note that depending on the document it may not be possible to detect the width correctly ev...

Page 163: ...f Auto is recommended in most situations Note that depending on the document it may not be possible to detect the width correctly even when the setting is Auto In such cases change from the standard size and specify a width of your choosing ISO A US ANSI US ARCH JIS B ISO B The supported sizes are displayed cm 20 to 90 cm 20 inch 8 to 36 in 8 Save Image Type JPEG Select the file format for scanned...

Page 164: ...Set the adjustment value for the background Configure thissettingwhenyouarescanningdocumentswithcolors or documents that are thin or when removing unwanted backgrounds Negative values are weaker and positive values are stronger Sharpness Level 3 to 3 0 Set the sharpness Negative values are weaker and positive values are stronger SC T7200 Series SC T5200 Series SC T3200 Series SC T7200D Series SC T...

Page 165: ...erformed several times Adjusting the print head position Print Head Alignment PerformHeadAlignmentiflinesaremisalignedorprint results are grainy The Head Alignment function corrects print misalignments U Minimizing Print Misalignments Head Alignment on page 167 Checking for clogged nozzles Nozzle checks can be performing from a computer or using printer s control panel From the computer Explanatio...

Page 166: ...lowing points when performing head cleaning Clean the print head only if print quality declines for example if the printout is blurry or the color is incorrect or missing Ink is consumed when head cleaning is performed Cleaningallnozzlesconsumessomeofeachcolorof ink Even if you are using only black inks for black and white printing color inks are also consumed When repeating head cleaning in a sho...

Page 167: ...ays a confirmation message Press the Z button to start head cleaning A confirmation message is displayed when cleaning is complete E To print a check pattern and check the status of the clog press the d u buttons to highlight Nozzle Check and press the Z button To exit without performing a nozzle check highlight Exit and press the Z button Minimizing Print Misalignments Head Alignment Because ther...

Page 168: ...ther paper that does not supportauto alignment orifautoalignmentdoesto fix the problem completely Note Head Alignment is adjusted according to the paper currently loaded in the printer Load the paper for which head alignment is required Note however that auto head alignment is not available with the paper or in the circumstances listed below Transparent or colored media is loaded in the printer Th...

Page 169: ...e d u buttons to highlight a head alignment option E Press the Z button to print an adjustment pattern If Auto is selected the printer will automatically align the head as it prints the head alignment pattern The Maintenance menu will be displayed when head alignment is complete If Manual is selected proceed to Step 6 to enter adjustment based on a visual inspection of the pattern F Note the numbe...

Page 170: ...uine ink may cause damage that is not covered by Epson s warranties and under certain circumstances may cause erratic printer behavior Information about non genuine ink levels may not bedisplayed anduseofnon genuineinkisrecorded for possible use in service support A Make sure the printer is on B Open the cartridge cover C Hook a finger into the indentation on the top of the cartridge and pull it s...

Page 171: ...Maintenance Boxes U Options and Consumable Products on page 194 cImportant Do not reuse maintenance boxes that have been removed and left out in the open for a long period of time The ink on the inside will be dry and hard and will be unable to absorb enough ink How to replace Some models of printer have Maintenance Boxes on both the left and right sides but the procedure for replacing the boxes i...

Page 172: ...in the following settings A Remove any paper from the printer U Removing Roll paper or Roll 1 on page 34 U Removing Cut Sheets on page 38 U Removing Poster Board on page 42 B Confirm that the printer is ready to print Press thel rbuttonstohighlight andpresstheZ button The Maintenance menu will be displayed C Press the d u buttons to select Cutter Maintenance and then press the Z button D Press the...

Page 173: ...er in place cImportant Screw up the cutter firmly otherwise the cut position may be slightly shifted or skewed H After replacing the cutter press the Z button The cutter will return to its original position Ready is displayed in the control panel when the process is complete SC T7200 Series SC T5200 Series SC T3200 Series SC T7200D Series SC T5200D Series User s Guide Maintenance 173 ...

Page 174: ... the pressure rollers if prints are smudged or soiled Ink and particles of paper adhering to the platen should be removed as they may otherwise soil the paper cImportant Failure to remove dust and particles of paper from theplatencouldresultincloggednozzlesordamage to the print head Cleaning the roller Follow the steps below to clean the roller by feeding plain paper A Turn on the printer and load...

Page 175: ...of the printer with a dry soft cloth cImportant Be sure not to touch the roller or the ink absorbing areas b shown in gray during cleaning otherwise prints may be soiled Be careful not to touch the ink tubes inside the printer otherwise the printer may be damaged D If any paper particles that looks like white powder accumulates on the platen use something like a cocktail stick to push it in E When...

Page 176: ...ers on both ends of the cover to release the locks and open the cover C Clean the glass surface 1 Prepare two lint free clean cloths Apply glasscleanertoonecloth andthenuseit to wipe the glass surface Use a neutral glass cleaner that does not leave streaks 2 Usetheotherclothtowipeawayanyremaining glass cleaner D Clean the roller directly under the glass surface Applyoffice useliquidcleanertoalint ...

Page 177: ...tomatic paper load error will occur Paper Load Error Paper from Roll 2 cannot be detected F W Install Error Firmware update failed Restart the printer Turn the printer off wait for a few minutes and then turn on the printer again Update the firmware again If this message appears on the LCD panel again contact your dealer or Epson Support Command Error Check driver settings PresstheWbuttonandselect...

Page 178: ...er straight outside the printer Data Size Error Data size of print job is too large Check on print job TheoptionalharddiskunitorAdobePostScript3ExpansionUnitcanstoreprintjobsupto 100 GB in size To print larger jobs select the Advanced tab in the printer driver open the Settings dialog box of Hard Disk Unit and select Print only alternatively ensure that print jobs are less than 100 GB in size HDD ...

Page 179: ... is exposed to direct sunlight or another light source that causes optical interference shade the printer from these sources Are the default values selected for both Platen Gap and Less Head Scuffing Restore both items to their default values Are some print head nozzles clogged Perform head cleaning U Head Cleaning on page 166 If this error is displayed in circumstances other than those listed abo...

Page 180: ...button is pressed the printer prints to the roll paper currently in use If the button is pressed paper can be replaced To enable automatic switching of roll paper change both settings above to On U Setup menu on page 146 Firmware Error Firmware mismatch between PS3 Expansion Unit and printer Refer to manual for details Operation is not possible because the versions of firmware of the optional Adob...

Page 181: ...doesn t work note the code and call for service A call for service occurs when The power cable is not connected securely An error that cannot be cleared occurs Whenacallforservicehasoccurred theprinterautomaticallystopsprinting Turn off the printer disconnect the power cable from the outlet and from the AC inlet on the printer and then reconnect Turn on the printer again multiple times If the same...

Page 182: ...If it is not indicated the printer driver is not installed correctly Delete and reinstall the printer driver U Uninstalling the printer driver on page 126 The printer driver is not installed properly Mac OS X o Is the printer added to the printer list SelectSystemPreferences Print Scan orPrint Fax from the Apple menu If the printer name is not displayed add the printer The printer is not communica...

Page 183: ... Pause check box o DoesthecurrentprinterstatusshowPrinting Paused Mac OS X Open the status dialog for your printer and check whether printing is paused 1 Select System Preferences Print Scan or Print Fax Open Print Queue from the Apple menu 2 Double click the icon for any printer that is Paused 3 Click Resume Printer Your problem is not listed here o Decide whether the trouble is caused by the pri...

Page 184: ...o AreyouusingagenuineEpsoninkcartridge This printer is developed for use with Epson ink cartridges If you use non Epson ink cartridges printouts may be faint or the color of the printed image may be changed because the remaining ink level is not correctly detected Be sure to use the correct ink cartridge o Are you using an old ink cartridge The print quality declines when an old ink cartridge is u...

Page 185: ...ected for Media Skew Check in the Setup menu printing will continue even if the paper is skewed resulting in data being printed off the paper Select On for Media Skew Check in the Setup menu U Setup menu on page 146 o Does the print data fit within the paper width Although under normal circumstances printing stops if the print image is wider than the paper the printer mayprintoutsidetheboundsofthe...

Page 186: ...bout paper such as thin paper from other manufacturers that requires special handling see the documentation supplied with the paper o When using non Epson special media have you made the paper configuration When using non Epson special media configure the paper characteristics custom paper before printing U Before printing on non Epson media on page 206 The reverse side of the printed paper is soi...

Page 187: ...s appear even when borderless is set We recommend using paper that is designed to support borderless printing o Try adjusting the cutter Whenthere aremargins onthe top andbottom of the roll paper while performing borderless printing try performing Adjust Cut Position It may reduce the margins U The Maintenance Menu on page 145 Feeding or ejecting problems Unable to feed or eject paper o Is the pap...

Page 188: ... not collect in the paper basket Use your hands to lightly press the paper into the paper basket as it is ejected from the printer The paper folds after it has been cut automatically Select manual cutting and take the paper in both hands after it is cut Thepapercreasesanddoesnotcollectwellinthe paper basket Resume printing after closing the paper basket Before the paper ejected from the printer to...

Page 189: ...de open the rear cover and then remove the jammed paper 3 Close the rear cover and then tighten the three fixing screws G After removing the paper press the Z button Reload the paper and resume printing U Attaching the Roll Paper Adapter on page 27 cImportant Before you reload the roll paper cut the edge straight horizontally Cut any wavy or creased sections If there is a problem at the edge decre...

Page 190: ...lay keeps turning off o Is the printer in sleep mode Sleep mode is exited if a print job is received or the P button on the control panel is pressed The delay before the printer enters sleep mode can be selected in the Setup menu U Setup menu on page 146 Color ink runs out quickly even when printing in the Black White mode or when printing black data o Color ink is consumed during the head cleanin...

Page 191: ...rs and glass surface U Cleaning the MFP Scanner option on page 176 If document width cannot be recognized correctly after cleaning open the Copy Settings menu and then set the width of the document under Width U Large Copy Large Scan menu on page 162 A document cannot be pulled out A document is jammed Open the cover of the MFP Scanner and then remove the document The following procedure shows how...

Page 192: ...ou cleaned the glass surface and rollers inside the MFP Scanner but horizontal lines are shifted or there are uneven colors in the copy results or scanned images use the following procedure to calibrate the scanner Use the calibration sheet included with the MFP Scanner for calibration A Aligntheloadingguidewiththecalibrationsheet set position B Align the right edge with the loading guide so that ...

Page 193: ...use the following procedure to adjust document feeding Differences in length may occur due to the paper type used for printing A At Large copy Large scan screen use the d u buttons to select Scanner Maintenance and press the Z button B Use the d u buttons to select Feed Adjust and press the Z button C An adjustment setting screen will be displayed Press the d u button to display the target adjustm...

Page 194: ...for possible use in service support U Replacing Ink Cartridges on page 170 Cyan T6942 T6932 T6922 Magenta T6943 T6933 T6923 Yellow T6944 T6934 T6924 Matte Black T6945 T6935 T6925 SC T7280D SC T7280 SC T5280D SC T5280 SC T3280 Color Capacity 700 ml 350 ml 110 ml Photo Black T7081 T7071 T7061 Cyan T7082 T7072 T7062 Magenta T7083 T7073 T7063 Yellow T7084 T7074 T7064 Matte Black T7085 T7075 T7065 Othe...

Page 195: ... connected to models other than the SC T7200 Series This item is required when installing the auto take up reel unit MFP Scanner C12C891071 Canscanandcopydocumentsupto914 2 438mm Whenusedwith theoptionalharddiskunitorAdobePostScript3ExpansionUnit itcan save scanned data send it by e mail and transfer it to shared folders MFP Scanner stand 44 C12C844161 This dedicated stand is used to connect the M...

Page 196: ...Auto Bi D or Auto Uni D Take up DescribesavailabletakingupdirectionwhenusingoptionalAutoTake upReelUnit F meansForwardand B means Backward Enlarged Describes availability of Enlarged Copy when connecting an A4 A3 size scanner to the printer Large copy Large scan Describes availability of the Large copy Large scan function when connecting the optional MFP Scanner Roll Paper Premium Glossy Photo Pap...

Page 197: ...um Luster Photo Paper 260 Paper thickness 0 27 mm Roll core size 3 inches ICC profile EPSON SCT3000_5000_7000_Series Premium Luster Photo Paper 260 icc Size Borderless Head Alignment Take up Enlarged Large Copy Large Scan F B 254mm 10 300mm 11 8 406mm 16 508mm 20 610mm 24 914mm 36 1 1118mm 44 2 1 SC T3200 Series is not supported 2 SC T7200 Series SC T7200D Series only are supported Premium Semimat...

Page 198: ... 3 inches ICC profile EPSON SCT3000_5000_7000_Series Photo Paper Gloss 250 icc Size Borderless Head Alignment Take up Enlarged Large Copy Large Scan F B 432mm 17 610mm 24 914mm 36 1 1118mm 44 2 1 SC T3200 Series is not supported 2 SC T7200 Series SC T7200D Series only are supported Premium Glossy Photo Paper 170 Paper thickness 0 18 mm Roll core size 2 inches ICC profile EPSON SCT3000_5000_7000_Se...

Page 199: ...000_7000_Series Premium Semigloss Photo Paper 170 icc Size Borderless Head Alignment Take up Enlarged Large Copy Large Scan F B 420mm A2 610mm 24 914mm 36 1 1118mm 44 2 1 SC T3200 Series is not supported 2 SC T7200 Series SC T7200D Series only are supported Enhanced Matte Paper Paper thickness 0 25 mm Roll core size 3 inches ICC profile EPSON SCT3000_5000_7000_Series Enhanced and Archival Matte Pa...

Page 200: ...hes ICC profile EPSON SCT3000_5000_7000_Series Doubleweight Matte Paper icc Size Borderless Head Alignment Take up Enlarged Large Copy Large Scan F B 610mm 24 3 914mm 36 1 1118mm 44 2 1 SC T3200 Series is not supported 2 SC T7200 Series SC T7200D Series only are supported 3 Use the tensioner supplied with the optional auto take up reel unit Singleweight Matte Paper Paper thickness 0 15 mm Roll cor...

Page 201: ...e up Enlarged Large Copy Large Scan F B 610mm 24 2 1118mm 44 1 1 SC T7200 Series SC T7200D Series only are supported 2 Borderless printing available but borders may appear or print quality decline due to paper expanding or contracting Enhanced Adhesive Synthetic Paper Paper thickness 0 18 mm Roll core size 2 inches ICC profile EPSON SCT3000_5000_7000_Series Enhanced Adhensive Synthetic Paper icc S...

Page 202: ...2 Load the cut sheet and then perform a copy operation 3 When MFP Scanner is connected to the SC T7200 Series SC T5200 Series SC T3200 Series only When the MFP Scanner is connected to the SC T7200D Series SC T5200D Series cut sheets are not supported Premium Semigloss Photo Paper Thickness 0 27mm ICC Profile EPSON SC T3000_5000_7000_Series Premium Semigloss Photo Paper icc Size Borderless Head Ali...

Page 203: ...tion 3 When MFP Scanner is connected to the SC T7200 Series SC T5200 Series SC T3200 Series only When the MFP Scanner is connected to the SC T7200D Series SC T5200D Series cut sheets are not supported Archival Matte Paper Enhanced Matte Paper Thickness 0 26mm ICC Profile EPSON SC T3000_5000_7000_Series Enhanced and Archival Matte Paper icc Size Borderless Head Alignment Enlarged Large Copy Large S...

Page 204: ...panding or contracting Enhanced Matte Posterboard Thickness 1 30mm ICC Profile EPSON SC T3000_5000_7000_Series Enhanced Matte Poster Board icc Size Borderless Head Alignment Enlarged Large Copy Large Scan 610 762 mm 24 30 762 1016 mm 30 40 1 1 SC T3200 Series not supported SC T7200 Series SC T5200 Series SC T3200 Series SC T7200D Series SC T5200D Series User s Guide Appendix 204 ...

Page 205: ...mm 44 inches SC T5200 Series SC T5200D Series 254 mm 10 inches to 914mm 36 inches SC T3200 Series 254 mm 10 inches to 610mm 24 inches Thickness 0 08 to 0 5 mm Available width for borderless printing 254mm 10inch 300mm 11 8inch Super A3 B 329 mm 406mm 16inch 17 inch B2 515 mm A1 594mm 610mm 24inch 728 mm A0 841 mm 914mm 36inch 1030 mm 1118mm 44inch Cut sheet Paper Type Plain paper and recycled pape...

Page 206: ...tom Paper Setting option in the printer Paper menu Note Be sure to check the paper characteristics such as papertension inkfixating orpaperthicknessbefore setting the custom paper For the paper s characteristics check the paper s documentation or with your local dealer Test the print quality with this printer before purchasing a large amount of paper If colors in printed images on the custom paper...

Page 207: ...t in the printer falling over causing accidents cImportant Donotremovetheinkcartridges Failuretoobserve this precaution could cause the print head nozzles to dry out Getting Ready A Confirm that the printer is off B Disconnect the power cords and all other cables C Close the paper basket When the optional auto take up reel unit is installed remove any paper from it D When the optional MFP stand is...

Page 208: ...e optional components see the Setup guide included with each of them and then reverse the attachment procedure cImportant When removing the MFP Scanner and stand first attach the metal fittings and scratch prevention sheet shown in the following illustration to the stand Afterattachingthemetalfittings removethe MFP Scanner from the stand If the order is incorrect the stand will be damaged Furtherm...

Page 209: ...ter while packaging it place your hands at the positions in the illustration and then lift SC T7200 Series SC T7200D Series SC T5200 Series SC T5200D Series B A C A D B C D SC T3200 Series A B A B cImportant Only hold the required area otherwise the printer may be damaged Failure to observe this precaution could damage the printer Move and transport the printer with ink cartridges installed Do not...

Page 210: ...S X Operating system Mac OS X 10 5 8 or later CPU Core 2 Duo 3 05 GHz or better Memory 1 GB or more available memory Available hard disk space 32 GB or more Display resolution WXGA 1280 x 800 or higher resolution Interface Hi Speed USB Compatible with the USB 2 0 Specification Ethernet 10BASE T 100BASE TX 1000BASE T Use a shielded twisted pair cable Category 5 or higher System Requirements for Cop...

Page 211: ...ies Approximately 60 W SC T3200 Series Approximately 52 W SC T7200D Series Approximately 65 W SC T5200D Series Approximately 61 W Ready mode SC T7200 Series SC T5200 Series SC T3200 Series Approximately 16 W SC T7200D Series SC T5200D Series Approximately 17 W Sleep mode 3 0 W or less Power off 0 5 W or less Printer Specifications Temperature Operating 10 to 35 C 50 to 95oF Storage before unpackin...

Page 212: ...y 67 kg SC T7200D Series Approximately 133 kg SC T5200D Series Approximately 118 kg 1 For information on HP GL 2 and HP RTL see the Epson website 2 Paper basket Large capacity paper basket closed 3 Excluding ink cartridges Ink Specifications Type Special ink cartridges Pigment ink Black Photo Black Matte Black Color Yellow Magenta Cyan Use by date See the date printed on the package at normal temp...

Page 213: ...f contin uous copies 1 to 99 sheets Sensor CIS Light source Dual LED RGB Rated voltage 100 240V Rated frequency 50 to 60 Rated current 2 5A MFP Scanner specifications Power consumption In use Approximately 50 W Ready mode Approximately 25 W Sleep mode power off 0 5 W or less The actual width becomes smaller by the size of the Image margin width Standards and Approvals SC T7200D Series SC T5200D Se...

Page 214: ... CSA CEI IEC CISPR 22 Class B AS NZS CISPR 22 Class B EMC Directive 2004 108 EC EN 55022 Class B EN 55024 EN 61000 3 2 EN 61000 3 3 SC T7200 Series SC T5200 Series SC T3200 Series SC T7200D Series SC T5200D Series User s Guide Appendix 214 ...

Page 215: ... the problem using the troubleshooting information in your product documentation contact Epson support services for assistance If Epson support foryourareaisnotlistedbelow contactthedealerwhere you purchased your product Epson support will be able to help you much more quickly if you give them the following information Product serial number Theserialnumberlabelisusuallyonthebackofthe product Produ...

Page 216: ...66 Or you can purchase online at http www epsonstore com U S sales or http www epson ca Canadian sales Help for Users in Europe Check your Pan European Warranty Document for information on how to contact Epson support Help for Users in Taiwan Contacts for information support and services are World Wide Web http www epson com tw Information on product specifications drivers for download and product...

Page 217: ...th taking your modem here for the occasional surf The site provides a download area for drivers Epson contact points new product information and technical support e mail Epson Helpdesk Epson Helpdesk is provided as a final backup to make sure our clients have access to advice Operators on the Helpdesk can aid you in installing configuring and operating your Epson product Our Pre sales Helpdesk sta...

Page 218: ...ation support and services are World Wide Web http www epson co id Information on product specifications drivers for download Frequently Asked Questions FAQ Sales Enquiries questions through e mail Epson Hotline Sales enquiries and product information Technical support Phone 62 21 572 4350 Fax 62 21 572 4357 Epson Service Center Jakarta Mangga Dua Mall 3rd floor No 3A B Jl Arteri Mangga Dua Jakart...

Page 219: ... Asked Questions FAQ Sales Enquiries questions through e mail Epson Trading M Sdn Bhd Head Office Phone 603 56288288 Fax 603 56288388 399 Epson Helpdesk Sales enquiries and product information Infoline Phone 603 56288222 Enquiries on repair services warranty product usage and technical support Techline Phone 603 56288333 Help for Users in India Contacts for information support and services are Wor...

Page 220: ...t the telephone and fax numbers and e mail address below Trunk Line 63 2 706 2609 Fax 63 2 706 2665 Helpdesk Direct Line 63 2 706 2625 E mail epchelpdesk epc epson com ph World Wide Web http www epson com ph Information on product specifications drivers for download Frequently Asked Questions FAQ and E mail Enquiries are available Toll Free No 1800 1069 EPSON 37766 Our Hotline team can help you wi...

Page 221: ...d on Manual Data oss pdf in the Printer Software Disc 4 The license terms of each open source software program are described on Manual Data oss pdf in the Printer Software Disc 5 The list of open source software programs which this printer product includes are as follows GNU GPL ThisprinterproductincludestheopensourcesoftwareprogramswhichapplytheGNUGeneralPublicLicense Version 2 or later version G...

Page 222: ...rogram e2fsprogs 1 41 14 which applies the terms and conditions provided by owner of the copyright to the e2fsprogs MIT license This printer product includes the open source software program jQuery v1 8 2 which apply the MIT License Bonjour This printer product includes the open source software programs which apply the Apple Public Source License Version1 2 or its latest version Bonjour Programs W...

Page 223: ...to deletion from and or change to the substance and or structure of the Original Code any previous Modifications the combination of Original Code and any previous Modifications and or any respective portions thereof When code is released as a series of files a Modification is a any addition to or deletion from the contents of a file containing Covered Code and or b any new file or other representa...

Page 224: ...ons electronically e g download from a web site 2 3 Distribution of Executable Versions In addition if You Externally Deploy Covered Code Original Code and or Modifications in object code executable form only You must include a prominent notice in the code itself as well as in related documentation stating that Source Code of the Covered Code is available under the terms of this License with infor...

Page 225: ... OF ACCURACY OF QUIET ENJOYMENT AND NONINFRINGEMENT OF THIRD PARTY RIGHTS APPLE AND EACH CONTRIBUTOR DOES NOT WARRANT AGAINST INTERFERENCE WITH YOUR ENJOYMENT OF THE COVERED CODE THAT THE FUNCTIONS CONTAINED IN THE COVERED CODE WILL MEET YOUR REQUIREMENTS THAT THE OPERATION OF THE COVERED CODE WILL BE UNINTERRUPTED OR ERROR FREE OR THAT DEFECTS IN THE COVERED CODE WILL BE CORRECTED NO ORAL OR WRIT...

Page 226: ...mages of any sort solely as a result of terminating this License in accordance with its terms and termination of this License will be without prejudice to any other right or remedy of any party 13 Miscellaneous 13 1GovernmentEndUsers TheCoveredCodeisa commercialitem asdefinedinFAR2 101 Governmentsoftware and technical data rights in the Covered Code include only those rights customarily provided t...

Page 227: ...onnexes soient rédigés en anglais EXHIBIT A Portions Copyright c 1999 2003 Apple Computer Inc All Rights Reserved This file contains Original Code and orModifications of Original Code as defined in and that are subject to the Apple Public Source License Version 2 0 the License You may not use this file except in compliance with the License Please obtain a copy of the License at http www opensource...

Page 228: ...rating systems existing ports with new graphical interfaces versions with modified or added functionality and dynamic shared or static library versions not from Info ZIP must be plainly marked as such and must not be misrepresented as being the original source or if binaries compiled from the original source Such altered versions also must not be misrepresented as being Info ZIP releases including...

Reviews: