background image

Disassembly and Assembly

Removing the Cooling Fan and C117 Power Supply Board Assembly

1.

2.

3.

4.

Remove the bottom panel assembly. (See page 3-17.)

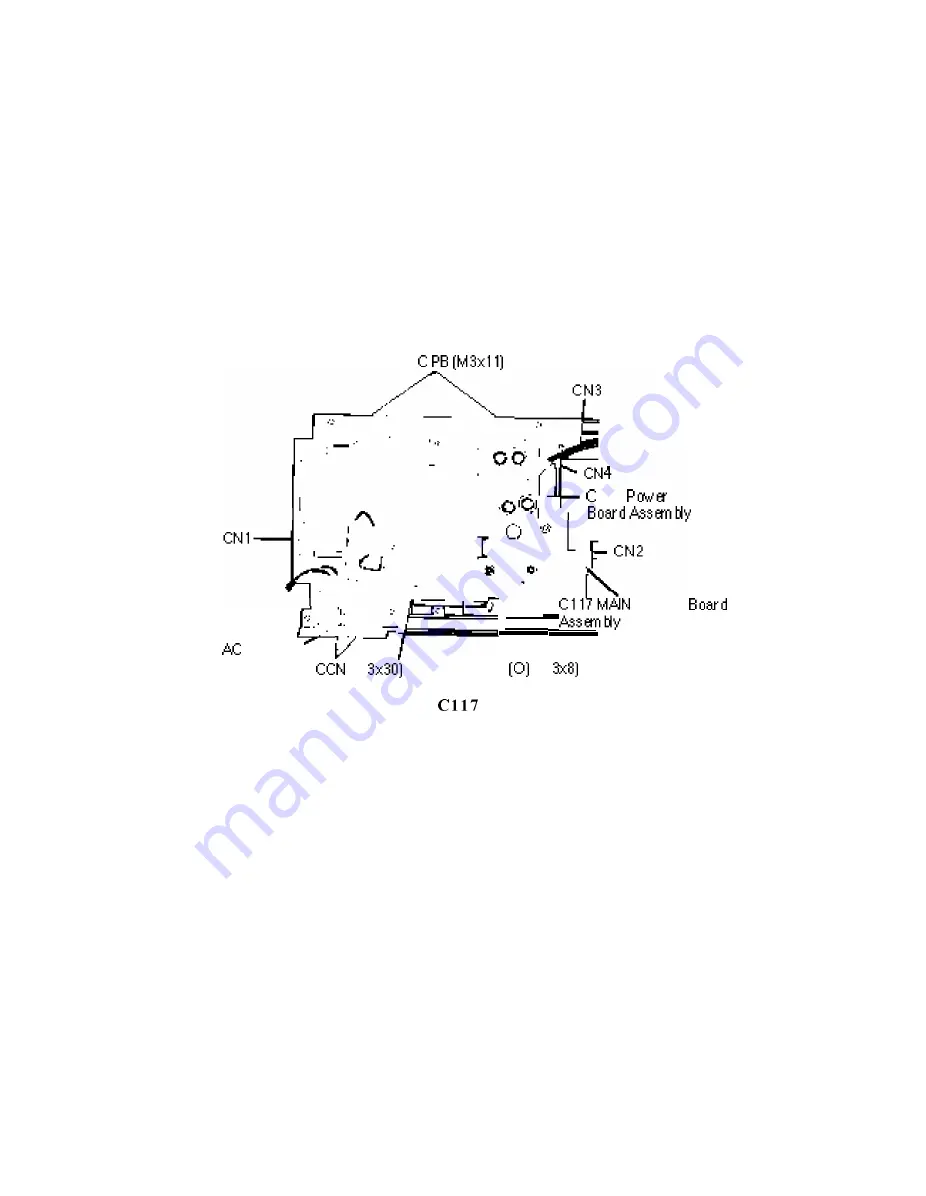
If you need to remove the cooling fan, remove the 4 CCN (M3 x 30) screws
securing it and remove the fan.

Disconnect connectors CN2, CN3, and CN4.

Remove the 6 CPB (M3 x 11) screws and CPN (0) (M3 x 8) screw securing the
Cl 17 power supply board assembly and remove the board.


 117 

 Supply

I


 Inlet Set


 [M 

CPN 

 [M 

Figure 3-22. Removing the 

 Power Supply Board Assembly

EPSON DFX-5000+ Service Manual

3-21

Summary of Contents for DFX-5000+

Page 1: ...EPSON Service Manual Epson America Inc TM DFX5K ...

Page 2: ...Service Manual Revision Level Revision Date 1st printing 4129194 I EPSON Printed on Recycled Paper ...

Page 3: ...utlet on a circuit different from the one connected to the receiver For Canadian Users This digital apparatus does not exceed the Class B limits for radio noise emissions from digital apparatus as set out in the radio interference regulations of the Canadian Department of Communications Le present appareil numerique n emet pas de bruits radioelectrique depassant les limites applicables aux apparei...

Page 4: ...the purchaser of this product or third parties for damages losses costs or expenses incurred by purchaser or third parties as a result of accident misuse or abuse of this product or unauthorized modifications repairs or alterations to this product Epson America Inc shall not be liable against any damages or problems arising from the use of any options or any consumable products other than those de...

Page 5: ...e unit to a power source until instructed to do so When thepower supply cable must be connected use extreme caution in working on thepower supply and other electronic components Caution 1 Repairs on EPSONproducts should beperformed only by an EPSON certified repair technician 2 Make certain that the source voltage is the same us the rated voltage listed on the serial numbedrutingplute If the EPSON...

Page 6: ...6 498 4574 Fax 305 265 0097 Epson Do Brazil Sao Paulo Brazil Phone 55 11 813 3044 Fax 55 11 210 9290 Epson Chile S A Providencia Santiago Chile Phone 562 232 8966 Fax 562 233 3 197 Epson Argentina S A Buenos Aires Argentina Phone 541 394 2439 Fax 54 1 322 4637 Epson Costa Rica San Jose Costa Rica Phone 506 34 6666 Fax 506 25 5709 Epson Mexico S A De C V Mexico D F Phone 525 395 9897 Fax 525 395 94...

Page 7: ...over Open Detection 1 24 Paper Width Detection 1 24 Automatic Paper Thickness Adjustment 1 24 Paper Memory Function 1 25 Automatic Tear Off Function 1 28 Paper Jam Detection 1 28 Automatic Interface Selection 1 28 Thermal Protection 1 28 Skip Binding Function 1 28 Printer Initialization 1 29 Buzzer Operation 1 29 DIP Switch Settings 1 31 Main Components 1 34 M 3C11 Printer Mechanism 1 35 Main Cont...

Page 8: ...nel 1 22 Figure 1 24 Multi part Forms with a Label 1 25 Figure 1 25 Overlapping Multi part Forms 1 25 Figure 1 26 Main Components 1 34 Figure 1 27 M 3C11 Printer Mechanism 1 35 Figure 1 28 C117 MAIN Board Assembly 1 36 Figure 1 29 C117 PSB Board Assembly 1 37 Figure 1 30 C117 PNL Board Assembly 1 37 Figure 1 31 Housing 1 38 List of Tables Table 1 1 Options and Consumables Table l 2 Character Size ...

Page 9: ...Driver Circuit PG Motor Driver Circuit Plunger Driver Circuit Printhead Driver Circuit List of Figures 2 1 2 4 2 4 2 5 2 6 2 9 2 12 2 13 2 13 2 16 2 17 2 20 2 2 1 2 2 1 2 25 2 27 2 30 2 3 8 2 39 2 40 2 42 2 43 Figure 2 1 Model 3C11 Printer Mechanism 2 1 Figure 2 2 Printer Mechanism Operation 1 2 2 Figure 2 3 Printer Mechanism Operation 2 2 3 Figure 2 4 Printhead Operation 2 4 Figure 2 5 Carriage M...

Page 10: ...8 Figure 2 28 RF Motor Driver Circuit 2 39 Figure 2 29 PG Motor Driver Circuit 2 41 Figure 2 30 Plunger Driver Circuit 2 42 Figure 2 31 Printhead Driver Circuit 2 43 List of Tables T a b l e 2 1 P o w e r S u p p l y B o a r d 2 13 T a b l e 2 2 D C V o l t a g e s 2 15 T a b l e 2 3 M a i n I C F u n c t i o n s 2 25 Table 2 4 CR Motor Drive Modes 2 32 Table 2 5 CR Motor Drive Sequence 2 33 Table...

Page 11: ...the Connector and Earth Cable 3 19 Figure 3 21 Removing the Bottom Panel Assembly 2 3 20 Figure 3 22 Removing the Cl 17 Power Supply Board Assembly 3 21 Figure 3 23 Removing the C117 MAIN Board Assembly 3 22 Figure 3 24 Removing the Earth Plate 3 23 Figure 3 25 Removing the AC Inlet 3 23 Figure 3 26 Removing the Cl 17 PNL Board Assembly 3 24 Figure 3 27 Removing the Interlock Switch Assembly 3 25 ...

Page 12: ...3 59 Removing the Right Side Frame 3 54 List of Tables Table 3 1 Tools Table 3 2 Abbreviations for Small Parts Table 3 3 Screw Names and Illustrations Chapter 4 Adjustments 3 3 3 5 3 6 Printer Mechanism Adjustments 4 1 PG Motor Backlash Adjustment 4 1 Carriage Timing Belt Tension Adjustment 4 2 Tractor Wire Spring Tension Adjustment 4 4 Pull Tractor Sensor Position Adjustment 4 5 Carriage Guide Sh...

Page 13: ...ck Switch 5 3 Figure 5 3 Bypassing the Cover Open Sensor 5 3 Figure 5 4 Printhead Coil Resistance 5 4 5 1 5 3 5 4 5 7 5 16 5 20 5 20 5 24 List of Tables Table 5 1 Error Codes 5 1 Table 5 2 Motor Fan Plunger and Printhead Coil Resistance 5 4 Table 5 3 Checking the Power Supply 5 5 Table 5 4 Checking the Sensors 5 5 Table 5 5 Checking the Drivers 5 6 Table 5 6 Symptoms and Reference Pages 5 7 Table ...

Page 14: ...t Diagram A 1 A 12 A 13 A 14 A 15 A 16 A 17 A 19 List of Tables Table A l Connector Summary Table A 2 CN1 C117 MAIN Board Assembly Table A 3 CN2 C117 MAIN Board Assembly Table A 4 CN3 C117 MAIN Board Assembly Table A 5 CN4 C117 MAIN Board Assembly Table A 6 CN5 C117 MAIN Board Assembly Table A 7 CN6 C117 MAIN Board Assembly Table A 8 CN7 C117 MAIN Board Assembly Table A 9 CN8 C117 MAIN Board Assem...

Page 15: ...feeding Paper jam detection Paper width detection Front and rear two way push tractors Automatic paper back out and loading from another paper path and paper park Automatic platen gap adjustment for paper thickness Automatic tear off Paper memory function Ll Eight bit parallel interface and RS 232C serial interface standard Ll Epson ESC P 83 ESC P version 83 printer driver compatible with the FX 8...

Page 16: ...I 8309 1P u l l tractor unit Description 8766 Ribbon cartridge I 8767 I Ribbon Dack C823051 Serial I F card simple serial interface SSI inch screw C823071 32KB intelligent serial I F card inch screw C823101 32KB intelligent parallel I F card I C823141 I Coax I F card I C823151 I Twinax I F card I C823241 I Ethernet I F card IV A simple serial interface card has no CPU the printer processes the dat...

Page 17: ...diameter 9 wires 0 29 mm 0 01 inches I mm I 17 2 Figure l 2 Pin Configuration Dot matrix 9 x 7 high speed draft mode 9 x 9 draft mode 18 x 23 NLQ mode Printing direction Text mode Bit image mode Bidirectional with logic seeking Unidirectional mode can be selected using the ESC U command Unidirectional Built in fonts Draft NLQ Roman NLQ Sans Serif EPSON DFX 5000 Service Manual 1 3 ...

Page 18: ...hes inches Printable mm mm mm Columns Pica 10 cpi 0 08 2 12 0 12 3 1 0 10 2 54 136 Elite 12 cpi 0 07 1 69 0 12 3 1 0 08 2 12 163 15 cpi 0 06 1 41 0 12 3 1 0 07 1 69 204 Condensed 17 1 cpi 0 04 1 06 0 12 3 1 0 06 1 48 233 Condensed elite 20 cpi 0 03 0 85 0 12 3 1 0 05 1 27 272 1 4 EPSON DFX 5000 Service Manual ...

Page 19: ...h per line Continuous Intermittent 10 inches per second 17 ms line 26 ms line Note The 10 ips feeding speed is reduced to 6 ips when the optional pull tractor is installed Paper Specifications Fanfold Paper Quality Standard paper Width Copy capability Front Rear Total thickness Front Rear Weight Single Multi part 4 16 inches 101 406 mm 6 sheets 1 original 5 carbonless copies 4 sheets 1 original 3 ...

Page 20: ...ignment may be irregular in the top 3 inches 75 mm of the first page t 2 When using the optional pull tractor the top 4 8 inches 120 mm of the firs page are unprintable t 3 Use clean paper with no folds creases or tears especially for multi par paper Figure l 4 shows paper you should not use 1 6 EPSON DFX 5000 Service Manual ...

Page 21: ...lines after the paper end The paper feeding pitch is not guaranteed The end of the printable area is 0 60 inches 15 mm above the bottom edge ofthe paper END OF PAPER Lo Form Override Area Figure l 5 Form Override Area 5 Weak horizontal and vertical perforations cause paper jams EPSON DFX 5000 Service Manual 1 7 ...

Page 22: ...zontal perfor ations must have uncut parts on both edges of the paper I Uncut Figure l 7 Paper Edge at a Horizontal Perforation 8 At the intersection of a horizontal and vertical perforation the perforation cuts must not cross each other Figure 1 8 shows examples of correct perforation intersections 1 I I Figure l 8 Perforation Intersections 1 8 EPSON DFX 5000 Service Manual ...

Page 23: ...et holes must be circular and may have teeth 0 0 Figure l 10 Sprocket Holes 11 The sprocket holes of each paper layer must be properly aligned 0 Incorrect 3 ui 0 m Figure l 11 Aligned Sprocket Holes 12 Any pieces ofpaper remaining in the sprocket holes must be removed 13 The paper should be fanfolded at the horizontal perforations Never use incorrectly folded paper such as the paper shown below EP...

Page 24: ...ly Quality Plain paper Width 4 16 inches 101 406 mm Copy capability 5 sheets 1 original 4 carbonless copies excluding the bottom carrier Overlap length 0 394 inches 10 mm maximum Total thickness Print area Overlap area 0 018 inches 0 46 mm maximum 0 028 inches 0 70 mm maximum including the bottom carrier Weight Multi part Carrier 11 15 lb 35 48 kg up to the total thickness 14 22lb 45 7 0 k g 1 10 ...

Page 25: ... Area Overlapping Multi part Forms CAUTION II II When using overlapping multi part forms do not use thepuper select change tractors or tear offfunction to avoid a paper jam it is important not to feed overlapping multi part forms buckw urd EPSON DFX 5000 Service Manual 1 11 ...

Page 26: ...For multi part forms joined with dotted paste the form sheets can be joined on either a single side or both sides Figure 1 14 shows the recommended paste positions Paste Figure 1 14 Dotted Paste Positions 4 The pasted areas must be pressed flat There must be no creases in the paper 5 Paper stapling must be applied from the front and the paper must be flat Figure 1 15 shows a cross section of the s...

Page 27: ... metal staples 9 The binding dots of paste or paper staples must be outside the printable area 10 Overlapping multi part forms must be bound at the top side by spot gluing The binding must be secure and there should be no spilled glue Figure 1 18 shows the correct multi part form binding method 11 Multi part form sheets should be securely bound to each other and the binding area must not be too la...

Page 28: ...018 inches maximum Weight Single Multi part 45 70kg 14 2 2 1 b 35 48 kg 11 15 lb x yil n I S up to the total thickness NO PRINTING AREA 10 0 10 WXYZ1 0 0 Figure 1 19 Printable Area for Fanfold Paper with a Label Labels Paper path Label size W x H Front only 2l 2 x 15 16 inches 4 x 15 16 inches 4 x 17 16 inches 1 14 EPSON DFX 5000 Service Manual ...

Page 29: ...e tractors or tear offfunction to avoid a paper jam it is important not to feed label forms buckw urd Notes 1 Load label forms only onto the front tractor The paper select function must not be used 2 Feed label forms only in the forward direction using the forward feeding MICRO FEED button A Do not feed label forms in the reverse direction Feeding label forms backward may cause a paper jam or the ...

Page 30: ...hould have no folds or creases 7 Labels must be on carrier paper and there should be carrier paper between the labels The labels should not touch each other 8 The label surface must be flat c 4 16 0 P F la i Tab7 Tabeli I I I Figure 1 21 Label and Carrier 1 16 EPSON DFX 5000 Service Manual ...

Page 31: ...ss 15 million characters 14 dots character Environmental Conditions Table l 5 Acceptable Environmental Conditions Condition Operating Storage 1Temperature 41 95 F 5 35 C 22 140 F 30 60 C 1 Humidity lo 80 RH 2 1 5 85 RH 1 2 Shock resistance 1 G within 1 msec 2 G within 2 msec I Vibration resistance I 0 25 G 55 Hz maximum I 0 50 G 55 Hz maximum 1 2 These conditions are acceptable when the printer is...

Page 32: ...nd chassis Dielectric strength 1000 VAC rms 1 minute or 1200 VAC rms 1 second between AC line and chassis Reliability MTBF MCBF 24 million lines excluding the printhead and ribbon Printhead life 8000 power on hours POH at a duty cycle of 25 300 million characters 14 dots character Safety Approvals Safety standards U S version UL1950 with D3 CSA22 2 950 with D3 Radio frequency interference RFI U S ...

Page 33: ... signal must be less than 0 2 ps The BUSY signal is active HIGH under the following conditions During data reception See Figure l 22 When the input buffer is full When the INIT input signal is active During initialization When the ERROR or PE signal is active During the self test In paper memory setting mode In pause mode When a fatal error occurs The ERROR signal is active LOW under the following...

Page 34: ...us Input data hed after the falling edge of this indicates paper out This signal is ive only when the ERROR signal is erformed when a CR code is input auto LOW indicates that some error has Signal ground 36 S L C T I N I If the signal is LOW when the printer is initialized DCl DC3 control is disabled The I O column indicates the direction ofthe signal as viewed from the printer 1 20 EPSON DFX 5000...

Page 35: ... 1 bit 8 bits Odd even or no parity 1 bit or more 300 1200 9600 or 19200 bps selectable by DIP switches 2 7 and 2 8 Logic level MARK logical 1 SPACE logical 0 3 to 27 V 3 to 27 V Connector EIA standard 25 pin connector Table 1 8 shows the signal functions and connector pin assignments for the serial interface The I O column indicates the data flow as viewed from the printer EPSON DFX 5000 Service ...

Page 36: ... selected paper path when the printer is in the paper out state TEAR OFF Enables tear off mode and advances the paper to the tear off position This button functions only when the printer is in pause mode The tear off position can be adjusted using the MICRO FEED buttons The adjusted value is stored in the EEPROM on the main board when the printer is turned off MICRO FEED Adjusts the paper position...

Page 37: ...en there is a paper jam Lit when the printer is in pause mode Lit when the printer is in tear off mode Lit when the printer is in TOF mode The lit PITCH LED indicates the selected pitch Lit when the front paper path is selected with paper loaded onto the front tractor Lit when the front paper path is selected with no paper loaded onto the front tractor Lit when the rear paper path is selected with...

Page 38: ...essing the PAUSE button To cancel hexadecimal dump mode turn off the printer Paper Out Detection Function When the paper out sensor detects the printer is out ofpaper the printer automatically enters pause mode Load new paper properly and then press the PAUSE button to turn off pause mode so the printer is ready to print Cover Open Detection When the printer cover is opened the printer stops print...

Page 39: ...r forms loaded on the front tractor Ll Forms with a label Multi part forms that vary in thickness include forms with a label the label area is thicker than the rest ofthe form Figure l 24 Multi part Forms with a Label Ll Multi part forms that partly overlap the next page Multi part forms that vary in thickness include forms that overlap slightly where they are glued together the overlap area is tw...

Page 40: ... when using the paper memory function Q ESC N set skip over perforation is valid when using the paper memory function however ifthe skip length is less than 1 inch the setting is ignored when using overlapping forms Q ESC 0 reset skip over perforation is valid when using the paper memory function with overlapping forms Q When using overlapping forms the loading position must be adjusted each time ...

Page 41: ... pointer on the ribbon mask with one ofthe label s corners To feed the paper up or down press the appropriate MICRO FEED button To move the pointer right or left move the printhead by hand 3 Press the TOP OF FORM button 4 Move the pointer to the corner ofthe label diagonally opposite the first corner 5 Press the TOP OF FORM button 6 Close the printer cover Use the printer beeps to confirm that the...

Page 42: ...nter is ready to print Automatic Interface Selection When the printer does not receive any data for the set time over the currently selected interface it checks the parallel interface serial interface and optional interface and selects the interface that receives data first The standby time can be set to 10 seconds or 30 seconds using DIP switches 2 4 2 5 and 2 6 Note The built in serial interface...

Page 43: ...IP switch settings and non volatile memory The top of form TOF position is reset by the following Q Printer initialization Q ESC P software reset command ESC tl Page length command ESC C Q IBM top of form setting command ESC 4 Buzzer Operation The buzzer sounds for approximately 0 1 second when a BEL code 07H is input Buzzer beeps indicate printer status as shown below Each asterisk represents one...

Page 44: ...pen 5 sets of 2 beeps 4 beeps A short circuited printhead is detected The head driver FETs are bad 10 beeps with a pause between each beep A short circuited printhead fan is detected _ 8 sets of 2 beeps An illegal paper memory setting is detected 10 beeps A micro adjust limit is detected continuous beeps A platen gap adjust error is detected 3 sets of3 beeps Note 0 1 second interval 0 3 second int...

Page 45: ...racter aualitv IBM mode ESC P mode See Table l l 3 See Table l l 4 1 OFF Shape of zero Input buffer Automatic LF bv CR Slashed I Not slashed I OFF 1 OFF 1 bvm 1 OFF Inter face See Table 1 15 OFF OFF OFF Serial bit rate See Table l l 6 OFF OFF Page length See Table l l 7 OFF OFF Skip over perforation Paper memory area Overlapping forms Forms with a label Skip binding Automatic tear off Valid 1 1 In...

Page 46: ... Selection Function Automatic CR by LF ESC J Reserved Codes 80 9FH Reserved Character table ON Invalid Characters OFF Valid Commands PC437 Factory Setting OFF OFF OFF OFF OFF Table 1 14 ESC P Mode Selection 1 32 EPSON DFX 5000 Service Manual ...

Page 47: ...ON OFF Automatic selection serial interface no parity 10 seconds OFF ON ON Parallel interface ON OFF OFF Serial interface odd parity ON OFF ON Serial interface even parity ON ON OFF Serial interface no parity ON ON ON This is the standby time See Automatic hterface Selection Table 1 16 Baud Rate Selection Bit Rate bps Table 1 17 Page Length Selection Page Length 11 inches 1 OFF 1 OFF 12 inches 1 O...

Page 48: ...Cl 17 MAIN board assembly Q Power supply board Cl 17 PSB board assembly Q Control panel Cl 17 PNL board assembly Q H o u s i n g Printhead Connector Junction Board _ L 5 __ _ Head Cable Board __ _ __ __ _ Cl 17 PNL Board Assembly __ __ __ _ q _ Cl 17 Power Supply Board Assembly Connector Junction Board Cl 17 MAIN Board Assembly Figure l 26 Main Components 1 34 EPSON DFX 5000 Service Manual ...

Page 49: ...tor isolation resistance sensor The DFX 5000 includes a paper jam sensor To prevent paper jams the DFX 5000 includes a tractor wire at the front and rear tractors The DFX 5000 does not include a carriage home position sensor The detection method of the carriage encoder sensor has been changed In the DFX 5000 the encoder plate was attached to the rotor of the CR motor while the DFX 5000 uses a belt...

Page 50: ...OM an SLA7026M for the paper feed motor an SLA5007 for the CR motor each driver s IC and the parallel and serial interface control circuits r ICll d w for PF m Ator rQMl driver for CR mdor CNa r Fuse for eaoh motet ICl CPU TMP96C14 IC2 EEPROt n 93C46 ICB M51955 for t35 V system IC9 PST5910 for logI system L U28 Q31 dkers for RF motor Figure 1 28 Cl17 MAIN Board Assembly 1 36 EPSON DFX 5000 Service...

Page 51: ...rature in the lower case constant and cools the CR motor The printer s power supply board has an input voltage rating of loo 120 VAC and a fuse rating of 12 A Figure l 29 Cl17 PSB Board Assembly Control Panel Board C117 PNL Board Assembly The Cl 17 PNL board assembly is the operator control panel It contains the buttons indicator LEDs and buzzer LED1 CN2 LED6 RAl Figure l 30 Cl17 PNL Board Assembl...

Page 52: ...hese components are covered by the upper case bottom plate and two side covers each of which has various covers The housing has large openings in the front and rear for the paper entrances and exits It also has a cover on the bottom plate to provide easy access to the PROM on the main board 1 38 Figure 1 31 Housing EPSON DFX 5000 Service Manual ...

Page 53: ...ical line against the surface ofthe paper and the ribbon A character is printed by repeating this printing operation in the horizontal direction as the printhead moves The printhead includes a head fan and temperature sensor The head fan also has a thermistor When the printhead or fan is too hot printing stops until it cools See Thermal Protection in Chapter 1 LI Carriage mechanism The carriage me...

Page 54: ...ng the carriage and printhead either forward or backward Because the front and rear carriage guide shafts which hold the carriage are purposely mounted off center the carriage moves as the PG motor rotates the shafts The PG sensor transmits the amount of movement gap to the control circuit Ll Ribbon feed mechanism The printer s ribbon cartridge contains an endless ribbon The ribbon feed mechanism ...

Page 55: ...at the rear tractor By controlling the RF motor the tractor select mechanism chooses which tractor to use and power from the PF motor is conveyed via a series of gears The tractor select sensor detects the selected tractor and signals that information to the control circuit LI Plunger mechanism During printing the paper bail assembly holds the paper under tension so that it is fed smoothly When pa...

Page 56: ...e 2 5 shows the carriage mechanism The front and rear carriage guide shafts support the carriage The rotation ofthe CR motor is transmitted to the carriage timing belt through the carriage belt pulleys at the right and left sides The printhead is mounted on the carriage which is attached to the carriage timing belt and moves horizontally The printer does not have a carriage home position sensor th...

Page 57: ... Adjustment Mechanism Figure 2 6 shows the platen gap adjustment mechanism The front and rear carriage guide shafts supporting the carriage have a vertical section The rotation ofthe PG motor is transmitted to the rear carriage guide shaft through the gears Counterclockwise rotation ofthe motor expands the platen gap and clockwise rotation reduces it The encoder plate with equally pitched slits is...

Page 58: ...ment ofthe rear tractor assembly gear train and front tractor assembly gear train Refer to Ribbon Feed and Tractor Select A4echanisms later in the chapter for more information The front and rear PE sensors are incorporated in the tractor sprocket When paper is loaded the paper pushes the leaf spring and blocks the photo interrupter When no paper is loaded the photo interrupter is not blocked The t...

Page 59: ...r PE Seraor Tractor Sdect Tmnumissiwl Gsar _ Papw FwdMota Piri u7 Gear Figure 2 7 Tension Roller and PF Roller Operation Tmnsmissi WI G ew Paper Feed Mdor Pini on G w Figure 2 8 Front Tractor Assembly Operation EPSON DFX 5000 Service Manual 2 7 ...

Page 60: ...xed in position by the shape of the bottom frame of the printer mechanism while the other sprocket the front right sprocket or rear left sprocket can move along the tractor shafts When the tractor release lever is released the sprocket can move smoothly from side to side along the tractor shafts When the tractor release lever is engaged the sprocket can move along the tractor shafts but it cannot ...

Page 61: ... motor supplies power to both the ribbon feed and tractor select mechanisms The rotation of the RF motor pinion swings the ribbon feed select gear like a pendulum using the lever axis as a support point The rotation of the RF motor is transmitted after the gears are engaged When the RF motor pinion gear rotates counterclockwise the motor rotates the ribbon feed mechanism when it rotates clockwise ...

Page 62: ...Feed Drive Gear Ribbwl FeedTrw smissionGesr Ribbwl FeedMotor Figure 2 11 Ribbon Feed Mechanism Figure 2 12 shows the operation of the tractor select mechanism Clockwise rotation of the RF motor is transmitted to the tractor select cam through the ribbon feed select gear and tractor select transmission gear and rotates the tractor select cam clockwise The tractor select lever contacts the inside cu...

Page 63: ... the tractor select lever is set to the right the tractor select gear engages the front tractor assembly The tractor select sensor contacts the cam and closes when it reaches the convex portion Trxtor Select Gear Hd der Ribb UI FeedMotw Ribbon Feed Select G w Transmission G ear Upper Tmctw Sel Leer r T or Select C hi Figure 2 12 Tractor Select Me chanism EPSON DFX 5000 Service Manual 2 11 ...

Page 64: ...bly is attached to the end of the plunger s iron core The paper bail assembly axis is connected to the frame When the plunger coil is energized the force of the paper bail spring returns the paper bail assembly to its original position Figure 2 13 Plunger Mechanism 2 12 EPSON DFX 5000 Service Manual ...

Page 65: ...uits and printer drive mechanism Table 2 l shows the input voltages and tise ratings ofthe board Table 2 l Power Supply Board Board Input Voltage Cl 17 PSB board assembly 100 l 20 VAC Fuse Ratings 12 All25 VAC Power Supply Overview Figure 2 14 shows a block diagram ofthe power supply board Figure 2 14 Power Supply Board Block Diagram EPSON DFX 5000 Service Manual 2 13 ...

Page 66: ...g regulator circuits perform voltage control and over current limiting for each voltage They supply or cut the DC voltage based on the DRERR Driver Error signal from the Cl 17 MAIN board assembly and output the CLIMIT Power Down signal when the printer has exceeded its duty cycle the printhead temperature is too high The Cl 17 power supply board assembly includes a cooling fan that is driven by th...

Page 67: ...board assembly operating voltages Q CR motor hold voltage Q Plunger hold voltage Q PG motor hold voltage Q Power for all the sensors 12 V CN3 0 1 A Q Cl 17 MAIN board assembly operating voltage serial interface conversion and Type B optional interface voltage supply 12 V CN3 0 1 A Q FET trigger for printhead firing Note Before the power supply board outputs 35 VDC it outputs 13 VDC to the printhea...

Page 68: ...outputs 13 VDC for 140 ms The first rising voltage 13 VDC is used to check the printhead drivers on the Cl 17 MAIN board assembly If a printhead driver is damaged the control board outputs the error signal HIGH DRERR signal to the power supply board When the power supply board receives this signal the photo coupler is turned on and it cuts offthe voltage of the primary side This prevents printhead...

Page 69: ...procedure monitors the Cl and C2 ports These switching waveforms are controlled by PWM Pulse Width Modulation which changes the level of the inverse terminal of comparator 1 and comparator 2 m Printhead driver detection circuit This circuit prevents printhead damage when a printhead driver is damaged When the printer is turned on the Cl 17 MAIN board assembly tells the Cl 17 power supply board ass...

Page 70: ...ndings T7 4 and T2 3 When QlOl is turned off the current flows to the secondary side ofthe transformer coil c c Figure 2 16 35 VDC Line Regulator Circuit The 35 VDC regulator circuit includes the following Ll Input voltage line over current protection circuit primary side IClOl and IC201 detect the input voltage ofthe primary circuit When the input voltage is normal the current does not flow into ...

Page 71: ... duty cycle and the printhead temperature is too high the voltage ofPClO1 approaches 0 VDC Ifthe voltage drops to 1 3 VDC IC152 outputs a HIGH CLIMIT signal to the base oftransistor Q187 IC152 monitors the two 35 VDC line creation circuits m 13 VDC creation circuit When the printer is turned on the Cl 17 power supply board assembly creates 13 VDC to check the printhead drivers on the Cl 17 MAIN bo...

Page 72: ...ed to the RS 232C interface on the standard or optional board and uses the printhead fire trigger Both the 12 VDC and 12 VDC lines have a half wave rectifier circuit This smoothing circuit consists ofcapacitors Cl82 and C181 TwoZener diodes stabilize the f12 VDC line Figure 2 17 Half wave Rectifier Circuit 2 20 EPSON DFX 5000 Service Manual ...

Page 73: ... CPU controls the E05A87 gate array IC7 via the address bus MMIO Memory Mapped Input Output The main functions of the E05A87 gate array are CS Chip Select signal creation address decoding printhead driver control carriage driver control encoder pulse circuit control PG and fan motor phase signal creation interface control CR and PF motor driver abnormal sensor circuit control reset signal creation...

Page 74: ...Width Fan T e m p e r a t u r e C R M o t o r lsolatlon 12 H e a d T e m p e r a t u r e 13 PF M o t o r W a t c h D o g Timer 14 Drop E r r o r Slgnal DetectIon f r o m Ci i7PS B o a r d A s s e m b l y Q5 QS p F a n SDC03 QMZ P G M o t o r PrInthead Figure 2 18 Control Circuit Block Diagram S e n s o r Clrcults 1 PG e n c o d e r s e n s o r 2 CR e n c o d e r s e n s o r 3 Prlnthead thermistor ...

Page 75: ...t the ACKNLG signal via the MM10 accesses When either a CR code is received or the input data buffer becomes till the CPU sets the BUSY signal to HIGH and executes printing Plintat Mlachanlam Chfir wtar Genudar L lmsge Buffer Figure 2 19 Data Flow from the Parallel Interface 4 The CPU reads the data from the input data buffer analyzes each byte to determine whether it is a character or a command a...

Page 76: ...ata in the line buffer When a paper feed command is sent after one line is printed the CPU executes paper feeding For NLQ characters printing one line consists oftwo passes the printer performs steps 6 through 8 twice When the CPU expands the data from the CG in the image buffer it uses the 24 bit shift register in IC7 The CPU is always ready to fetch data so printing can be viewed as an interrupt...

Page 77: ... Q Abnormal CR and PF motor detection Q RESET signal creation Q Control signal creation for the power supply board PROM Contains the program that runs the CPU Holds the CPU working area and buffers input line and image buffers Drives the RF motor and controls the constant current Drives the PG motor Detects the current in the CR motor driver and feeds it back to the gate array Drives the CR motor ...

Page 78: ... C72 and controls the reset timing for the CPU and Type B interface card Q 35 VDC reset circuit Reset IC M51955 monitors the 35 VDC line Normally the dividing resistors R27 and R28 input approximately 1 7 VDC to pin 2 When the detection level is 1 7 VDC the 35 VDC line drops into the 22 9 V to 30 0 V range Ifthis voltage level drops to 1 25 VDC the RESET signal LOW level is output to the CPU s NM1...

Page 79: ... select sensor uses a micro mechanical switch Pull tractor sensor uses a micro mechanical switch Cover open sensor uses a micro mechanical switch CR encoder sensor uses an LED and photo diode PG sensor uses a photo interrupter PG home sensor uses a micro mechanical switch 35 VDC voltage drop sensor signal interface Head temperature sensor uses a thermistor Fan temperature sensor uses a thermistor ...

Page 80: ...per end sensors Q Detection form Photo interrupter Q Output form Open collector pulled up to 10 KR resistance Q Input circuit CR filter circuit 10 KR and 39 pF tl Logical Paper present LOW Paper out HIGH 2 Top paper end sensor to detect the TOF position Q Detection form Photo reflector Q Output form Open collector Q Input circuit CR filter circuit 10 KR and 39 pF tl Logical Paper present LOW Paper...

Page 81: ...icro mechanical switch Q Input circuit CR filter circuit 10 KR and 0 01 pF Pulled up to 390 R resistance tl Logical Cover closed LOW Cover open HIGH 7 Carriage encoder sensor Q Detection form LED and photo diode Q Input circuit Rectangle wave 2 phase TTL level CR filter circuit 10 KR and 390 pF Pulled up to 10 KR resistance Q Transaction The carriage encoder outputs two pulses A or B to the gate a...

Page 82: ...r driver circuit An SLA5007 bipolar driver IC drives the CR motor It has built in bipolar switching transistors and a current limiter A comparator IC NJM 2903 monitors the current in the CR motor driver IC SLA5007 Ifthe current exceeds the set value it is fed back to the gate array E05A87 and then the gate array outputs the signal for the current setting transistors Q4 Q7 and QS When the printer i...

Page 83: ...Operating Principles Figure 2 22 CR Motor Internal Circuit Figure 2 23 CR Motor Driver Block Diagram EPSON DFX 5000 Service Manual 2 31 ...

Page 84: ...Bit image 3 HD NLQ NLQ HD Bit image 4 Bit image 44HD Home position seek Paper width detection seek Logical seek 1 Logical seek 2 CR Motor Speed Pm 1680 1600 1260 1200 1050 1000 945 900 840 800 630 600 525 500 315 630 630 1260 Acceleration Constant Deceleration Speed Control Curve Control Acceleration or deceleration control curve Acceleration control curve only Deceleration mode 3 controls deceler...

Page 85: ...age motor internal coil resistance 6 2 R f 0 45 R Table 2 5 CR Motor Drive Sequence Ll PI control PI control keeps the carriage motor speed constant using the following steps 1 CNlO outputs two encoder pulses ENC A and ENCB to the gate array 2 The gate array selects one ofthe two pulses and sends the signal to the CPU INIT port 3 The CPU outputs the PWM pulse width modulation signal according to t...

Page 86: ...on curve is labeled A and the driving modes are labeled B Speed0 SP 1 1 It causes the carriage to accelerate 2 Because the control circuit measures time periods with the encoder signal when the carriage speed reaches SPl it changes to the next sequence SP 1 SP2 SPl SP2 1 The DFX 5000 printer has a table programmed into its main program ROM to determine the duration of the acceleration pulses This ...

Page 87: ...hes SP2 Then when the carriage speed reaches SP2 the next sequence SP2 takes effect Ll When the carriage speed reaches SP2 before duty data becomes Dutymin the next sequence SP2 takes effect SP2 When the carriage speed reaches SP2 PI control oversees the carriage speed Ll Deceleration control Deceleration control provides smooth deceleration and prevents rapid vibration Figure 2 25 Deceleration Co...

Page 88: ...inuity break method 2 During this time the control circuit measures time periods using the encoder signal When the rising edge of next pulse is not detected after 1 5 seconds Deceleration driving mode 1 takes effect and the control circuit controls short break LI High temperature detection sequence The software supports a high temperature detection sequence which consists of the following steps 1 ...

Page 89: ...until the carriage speed reaches SP2 See Figure 2 24 Acceleration Control Curve for SP2 The printer saves the values for each ofthe items listed above and uses it for every column This procedure compensates for individual variations in the printer mechanism Therefore carriage operation control for column n is determined by the data in column n l Figure 2 26 illustrates the measurement sequence Fig...

Page 90: ... excitation When the PF motor is held the phase driving method is 2 phase excitation The CPU selects the most suitable driving mode from the modes below according to conditions such as the paper feed step number and the pull tractor condition Q Micro feed adjust mode Q Normal speed mode Q Middle speed mode Each phase switching FET in driver ICll is an open collector When the phase switching data i...

Page 91: ...average HB Hybrid pps pulses per second ips inches per second RF Motor Driver Circuit Figure 2 28 shows a block diagram ofthe RF motor driver circuit and Table 2 7 provides the RF motor specifications The RF motor is a stepping motor The control circuit performs open loop phase switching control according to the timing data for acceleration constant speed and deceleration CPU ports PGlO to PG13 ou...

Page 92: ...or phase switching signals are output from the PGA port and input to the PGBN port ofthe gate array The motor common voltage PGCOM alternates between drive mode 35 VDC and hold mode 5 VDC using the pulses from port PGI ofthe gate array The phase driver IC QM2 is turned on when the motor pulse switching data is LOW The phase A output pulse from the platen gap encoder ENCA is input to general purpos...

Page 93: ...upply voltage Internal coil resistance Current consumption Frequency Driving method 1 Description 4 phase 48 pole PM pulse motor 35 VDC f 6 applied to the driver circuit 250 R f 18 R per phase at 25 C 77 F Driving 0 20 A average Holding 0 02 A f 0 5 mA 333 pps Constant voltage driving 2 2 phase drive only EPSON DFX 5000 Service Manual 2 41 ...

Page 94: ...te array When the PNP port ofthe gate array turns off switching transistor Q19 transistor Q17 is turned on and the supply voltage VP flows into the plunger coil When switching transistor Q19 is turned on transistor Q17 is turned offand the hold voltage 5 V flows into the plunger coil using general purpose port PLN of the gate array Figure 2 30 Plunger Driver Circuit Table 2 10 Plunger Switching Pa...

Page 95: ... This prevents a large current from suddenly flowing into the head driving coil Two 35 VDC lines VH and VP assign the common voltage for the printhead coil Pins HDl HD3 HD5 HD7 HDS and HD9 are supplied by the VH HDCOM2 line CN6 pins 5 6 7 8 and 10 Pins HD2 HD4 and HD6 are supplied by the VP HDCOMl line CN6 pins 11 12 and 14 The CPU monitors the head temperature and head fan temperature When the te...

Page 96: ...Operating Principles m 0 FANA In m FANAN 0 I 0 H E A D t h e r m stor d a t a Figure 2 31 Printhead Driver Circuit 2 44 EPSON DFX 5000 Service Manual ...

Page 97: ...s to be moved two or morepersons must curry it supporting it from the bottom Never lift theprinter by holding thefront cover because it may come of Before transporting the printer remove the paper and ribbon cartridge Then attach the following packing materials as shown in Figure 3 1 0 Transport locking bracket o Carriage guide shaft support bar 0 Printhead protector o Foam packing for paper bail ...

Page 98: ...d the wall outlet Disconnect the printer from the computer and then remove the paper and ribbon cartridge 0 Because you may need to turn the printer while you disassemble or assemble it place it on a clean thick cloth such as a towel or blanket before starting 0 Before assembling the printer lubricate it as described in Chapter 6 hfaintenance and Lubrication A substantial amount ofoil may be remov...

Page 99: ... adjustment Note Refer to Chapter 4 for adjustment tools Chapter 5 for troubleshooting tools and Chapter 6 for tools for maintenance lubrication and adhesives Table 3 l Tools Box driver Tweezers 0 Commercially available A Mandatory E EPSON exclusive B Recommended EPSON DFX 5000 Service Manual 3 3 ...

Page 100: ...g number Dial gauges F610 Figure 3 3 Dial Gauges Part number 1019467 Catalog number Dial gauge base F611 Figure 3 4 Dial Gauge Base Part number 1019468 Catalog number Dial gauge master F612 Figure 3 5 Dial Gauge Master 3 4 EPSON DFX 5000 Service Manual ...

Page 101: ...head with Spring lock washer Plain washer CP PS Cross Pan head with Plain washer Spring lock washer CPB Cross Pan head B tight screw CPB 0 Cross Pan head B tight screw with Outside toothed lock washer CPS Cross Pan head S tight screw CPS P Cross Pan head S tight screw with Plain washer CPS SP Cross Pan head S tight screw with Spring lock washer Plain washer CPN Cross Pan head screw CPN 0 Cross Pan...

Page 102: ...ead Body Washer assembled Top Side I Cross recessed head 1 Bind 1 ljormal 1 _Plain washer 0 D O cNll 2 S tight 2 Slotted head with Notch cl 2 Qutside toothed lock washer 8 2 Pan 3 B tight a 00 3 QIp a 4 lapping 3 Spring washer 4 Iruss 3 6 EPSON DFX 5000 Service Manual ...

Page 103: ...abeled Assembly Note Adjustments required before assembly are described in notes labeled Adjustment Required Be sure to follow the instructions in these notes Replacing the Printhead You can replace the printhead without disassembling the printer Caution LI When you remove the connector cover be careful not to break the tubs LI When you remove theprintheud cable holder be careful not to break thep...

Page 104: ...k Printhead Connector Junction Board for Fan Drive Signal and Thermistor CP SP M3X6 for Carriage Encoder Signal Signal Figure 3 7 Removing the FPC Cover and the Connectors 5 Remove the 2 CPN M3 x 8 screws securing the FPC cover to the bottom plate of the printer mechanism 3 8 EPSON DFX 5000 Service Manual ...

Page 105: ... the printhead to the carriage Disengage the printhead with the PW sensor and the maskless holder Right HmdDamper Figure 3 8 Removing the Printhead Assembly Notes LI When you install the print head torque the screws to 44 lb inch 8 kg cm LI Tighten the screws whilepulling the print head backward to secure the print head firmly EPSON DFX 5000 Service Manual 3 9 ...

Page 106: ...ul not to put too much weight on the top cover or any other printer components Q Spread a thick soft cloth under theprinter before you follow the steps below Q Remove the ROM carefully to avoid damaging the board Q Beforeyou install a new ROM check the index murk on the socket to be sure the ROM is oriented correctly Insert the ROM carefully to avoid damaging the ROM pins and the board 1 Tilt back...

Page 107: ...d the top cover while the other person removes the screws If the top cover is not supported while the screws are removed the weight of the top cover may damage the rear hinges 1 Open the top cover 2 While someone supports the top cover remove the 4 screws 2 on the right and 2 on the left securing the top cover to the hinges and remove the cover Figure 3 10 Removing the Top Cover EPSON DFX 5000 Ser...

Page 108: ... as you removed the left side cover Also remove the 4 cables from the main switch on the right side cover Figure 3 11 Removing the Left and Right Side Covers Assembly Note When you attach the right side cover connect the cablefrom connector CNl on the Cl1 7 power supply board assembly and the cablefrom theAC inlet to the main switch on the right side cover us shown on the next page 3 12 EPSON DFX ...

Page 109: ...ure 3 12 Connecting the Cables to the Main Switch 3 After you remove the right side cover you can replace the input tise for the Cl 17 power supply board assembly Warning Make sure the new fuse meets the printer s ACpower specifications 12 A EPSON DFX 5000 Service Manual 3 13 ...

Page 110: ...igure 3 13 Removing the Fuse 4 Remove the 3 CBB M4 x 10 screws securing the left side ofthe front cover to the lower cover Then remove the 3 screws on the right side and remove the front cover with the 2 hinges Figure 3 14 Removing the Front Cover 3 14 EPSON DFX 5000 Service Manual ...

Page 111: ... to the previous section 2 Open the top cover and disconnect connector CN8 the control panel connector 3 Remove the 2 CBB M4 x 16 screws from the front panel and remove the panel with the C117 PNL board assembly and its cable Figure 3 15 Removing the Front Panel EPSON DFX 5000 Service Manual 3 15 ...

Page 112: ...ct connector CN7 the cover open sensor connector from the Cl 17 MAIN board assembly Remove the 6 CBB M4 x 16 screws and 2 CPS M3 x 8 screws from the upper case and then remove the upper case with the cover open sensor CEE M4x16 C PS M3x _ Figure 3 16 Removing the Upper Case 3 16 EPSON DFX 5000 Service Manual ...

Page 113: ... Cover for instructions tl Ifyou tilt buck theprinter with the top cover attached be careful not to put too much weight on the top cover or any other printer components Q Spread a thick soft cloth under the printer before you follow the steps below Q When you attach the bottom panel make sure theparallel interface cable latch is not caught between the lower case and bottom panel 1 Remove the left ...

Page 114: ...erface Cover 4 While supporting the top cover to protect it from scratches tilt back the printer and lay it on its back 5 Remove the 8 CPB M4 x 16 screws securing the bottom panel assembly Slowly return the printer to its upright position before you remove the screws for the bottom panel assembly Then remove the rear cover 3 18 EPSON DFX 5000 Service Manual ...

Page 115: ...nel assembly 7 Disconnect connectors CNlO CN6 CN7 and CNS 8 Since connector CN9 is fixed to the Cl 17 MAIN board assembly remove the junction connector not labeled with a CN number between the interlock switch and connector CN9 on the Cl 17 MAIN board assembly CNS Cwltrol Panel CN 6 M ec hsnism Drive C 117MPIN Ecardtis mbly CNlo CR SWISW Open SWISW CN9 Itietiock Witch LEFT Side Figure 3 20 Removin...

Page 116: ...ow earth cable from the earth plate on the bottom panel assembly Then slowly lift up the bottom panel assembly Remove the CBS 0 M4 x 8 screw securing earth plate E h Cable C 117 Power Supfly Bard ksembly RIGHT Side Figure 3 21 Removing the Bottom Panel Assembly 2 3 20 EPSON DFX 5000 Service Manual ...

Page 117: ... 30 screws securing it and remove the fan Disconnect connectors CN2 CN3 and CN4 Remove the 6 CPB M3 x 11 screws and CPN 0 M3 x 8 screw securing the Cl 17 power supply board assembly and remove the board c PB M3xl l C 117 Pww Supply I Eoard Qsemblv II L 4 AC Inlet Set f prjy 7 iN Board CCN M 3x301 CPN O M 3x81 Figure 3 22 Removing the Cl17 Power Supply Board Assembly EPSON DFX 5000 Service Manual 3...

Page 118: ...y Board Adjustment Required When you install the C117MAIN board assembly perform thefollowing adjustments described in Chapter 4 tl Platen gap motor value platen gap adjustment Ll Bidirectional printing adjustment Removing the AC Inlet 1 Remove the C117 power supply board assembly See Removing the Cooling Fun and C117 Power Supply Assembly on the previous page 2 Remove the C117 MAIN board assembly...

Page 119: ...Panel Assembly Figure 3 24 Removing the Earth Plate 4 Remove the 2 CFS M3 x 12 screws securing the AC inlet to the earth plate and remove the AC inlet Earth Plate 5 Figure 3 25 Removing the AC Inlet EPSON DFX 5000 Service Manual 3 23 ...

Page 120: ...nt Panel on page 3 15 2 Disconnect connectors CNl and CN2 on the Cl17 PNL board assembly 3 Remove the CPB M4 x 9 screw securing the Cl 17 PNL board assembly to the front cover and remove the board C PE M4x9 l Cl 17 FNL Ewdhsernbly Figure 3 26 Removing the Cl17 PNL Board Assembly 3 24 EPSON DFX 5000 Service Manual ...

Page 121: ...ge 3 16 2 Disconnect the interlock assembly cable from junction connector CN9 on the Cl 17 MAIN board assembly 3 Remove the CBB M4 x 10 screw securing the interlock switch assembly to the lower case and remove the interlock switch assembly Figure 3 27 Removing the Interlock Switch Assembly he EPSON DFX 5000 Service Manual 3 25 ...

Page 122: ...ter mechanism when you remove or install it LI To avoid strainingyour waist hands orfeet place theprinter on a low table before following the steps below 1 Remove the interlock switch assembly Refer to the previous page 2 Remove the 3 CBS 0 M4 x 8 screws securing the green and yellow earth cables to the earth plate There are 2 screws on the left and 1 on the right 3 Disconnect the cables from conn...

Page 123: ...mechanism Then slowly lift the printer mechanism using the handles and remove it from the lower case mdle E656 sm Figure 3 29 Lifting the Printer Mechanism Assembly Note When you install theprinter mechanism route the cables us shown in Figure 3 30 Make sure the cables do not get caught between theprinter mechanism and lower case EPSON DFX 5000 Service Manual 3 27 ...

Page 124: ...en gap adjustment Ll Bidirectional printing adjustment Printer Mechanism Disassembly This section describes how to disassemble the printer mechanism Before following the steps in this section remove the printer mechanism from the printer See page 3 26 Removing the Front Rear Tractor Select Lever Assembly 1 Remove the head damper from the left side frame 2 Remove the CPN M3 x 6 screw securing the f...

Page 125: ...FeedGwCover On the connector junction board assembly disconnect the white 6 pin connector for RF motor control and the yellow 2 pin connector for the tractor select sensor Remove the CPN M3 x 6 screw securing the front rear tractor select lever assembly to the left side frame Remove the RF motor drive gear from the front rear tractor select lever assembly Then remove the lever assembly from the le...

Page 126: ...ctor select lever assembly including how to remove the RF motor and tractor select sensor 1 Remove the front rear tractor select lever assembly See page 3 28 2 Remove the 2 CP PS M3 x 6 screws securing the RF motor to the front rear tractor select lever assembly and remove the motor Disconnect the cable from the black connector on the RF motor 3 Remove the E ring 3 securing the front rear tractor ...

Page 127: ...nd securing the RF motor and tractor select sensor cables to the front rear tractor select lever assembly Assembly Note Attach thefront reur tractor select lever to the tractor select cum us shown in figure 3 34 Ribbwl FeedMotw Frame Trxtw Sel CPM W pp er and Lower Figure 3 34 Tractor Select Lever Mounting Position EPSON DFX 5000 Service Manual 3 31 ...

Page 128: ...d assembly Remove the front rear tractor select lever assembly Refer to Removing the Front Rear Tractor Select Lever Assembly on page 3 30 Disconnect the connector for the CR sensor encoder from the FPC board assembly Remove the 2 CPN M3 x 8 screws securing the FPC cover and remove the cover Then remove the CPB M3 x 6 screw securing the FPC board assembly to the printer mechanism and remove the FP...

Page 129: ...he motor CP Ps M3x6 7 Platen Gap Wjustment Mota Pinion G w Figure 3 36 Removing the PG Sensor and PG Motor Assembly Notes Ll When you install the PG motor be sure the backlash between the PG motor and motor transmission gear is between 0 05 and 0 15 mm almost no backlash LI When you install the PG sensor join portion A in Figure 3 36 correctly and match the screw at portion B to thefrume hole so t...

Page 130: ...ion board assembly and remove the plunger cable from the connector junction board assembly Refer to the Appendix for more information on connector junction board cable connections 2 Remove the 2 CPS SP M3 x 6 screws securing the plunger to the left side frame and remove the plunger 3 Remove the iron core ofthe plunger from the paper bail shaft Iron Core connector Figure 3 37 Removing the Plunger 3...

Page 131: ... its washer 7 While lifting the paper bail assembly on the right side remove the paper bail gear you can remove it easily by gently lifting the clip with tweezers 8 Remove the E ring at the right side of the paper bail shaft Then remove the paper bail lever paper bail balance lever leaf spring and shaft holder 9 Remove the paper bail assembly Parser Bail Lever I Tension Roller Figure 3 38 Removing...

Page 132: ...r Upper Ps per End Semor Wpper PaperGuide C PS M4 S M4xGj Figure 3 39 Removing the Top PE Sensor Removing the Tension Roller Shaft This section describes how to remove the tension roller shaft It is easiest to remove the tension roller shaft when the paper bail assembly is removed however removing it is not required See Removing the Plunger and Paper Bail Assembly on page 3 34 for instructions on ...

Page 133: ...on with tweezers Platm Rdlw Sh t Hdder Figure 3 40 Removing the Tension Roller Gear 5 Remove the E ring on the right side ofthe tension roller shaft and pull out the platen roller shaft holder with its leaf spring and washer PlatenRoller Skft pssmidY Platen Roller Skft Holder Figure 3 41 Removing the Shaft Holder EPSON DFX 5000 Service Manual 3 37 ...

Page 134: ... 3 42 Removing the Tension Roller Shaft Removing the Platen 1 Remove the paper bail assembly See page 3 34 2 Remove the upper paper guide Refer to Removing the Upper Paper Guide and Top PE Sensor on page 3 36 3 Using a 3 mm hex driver remove the 4 hexagon screws securing the platen to both holders Then remove the platen with the lower paper guide 3 38 EPSON DFX 5000 Service Manual ...

Page 135: ...the Platen II Assembly Note II When you attach the lowerpuperguide to theplaten start with the left most part of the paper guide and w ark toward the right Adjustment Required When you install theplaten perform thefollowing adjustments us described in Chapter 4 LI Carriage guide shaft parallelism adjustment LI Platen gap motor value Gpluten gap adjustment tl Platen angle right angle adjustment EPS...

Page 136: ... left part ofthe lower paper guide The lower paper guide consists ofthree parts 3 Remove the CPN SP M4 x 7 screw securing the left part ofthe lower paper guide to the platen Figure 3 44 Removing the Left Part of Lower Paper Guide 4 Unhook the paper jam sensor magnetic transistor cover and remove the cover 3 40 EPSON DFX 5000 Service Manual ...

Page 137: ...make sure it is oriented correctly front to buck Removing the Pull Tractor Sensor 1 Remove the upper paper guide Refer to Removing the Upper Paper Guide and Top PE Sensor on page 3 36 2 Disconnect the red 2 pin pull tractor sensor connector from the connector junction board assembly 3 Remove the CPN SP M2 x 14 screw securing the pull tractor sensor a micro switch type sensor to the left side frame...

Page 138: ...or Sensor Removing the Paper Width PW Sensor 1 Remove the printhead Refer to Replacing the Printhead on page 3 7 2 Remove the CPN SP M2 x 6 screw securing the PW sensor to the maskless holder Figure 3 47 Removing the PW Sensor 3 42 EPSON DFX 5000 Service Manual ...

Page 139: ...ge 3 28 2 Remove the E ring securing the carriage guide shaft gear to the rear carriage guide shaft Carriage Guide Shalt Gear E ting Figure 3 48 Removing the Carriage Guide Shaft Gear 3 Disconnect the white 2 pin PG home sensor connector from the connector junction board assembly EPSON DFX 5000 Service Manual 3 43 ...

Page 140: ...sensor and remove the sensor Figure 3 49 Removing the PG Home Sensor Removing the PF Motor 1 Remove the connector junction board assembly See page 3 32 2 Remove the 3 CP PS M4 x 8 screws securing the PF motor to the left side frame 3 44 EPSON DFX 5000 Service Manual ...

Page 141: ...ame Gears 1 Remove the front rear tractor select lever assembly See Removing the Front Rear Tractor Sensor Lever Assembly on page 3 28 2 Remove the connector junction board assembly See Removing Connector Junction Board Assembly and FPC Board Assembly on page 3 32 3 Remove the PG motor See Removing the PG Sensor and PG Motor on page 3 33 EPSON DFX 5000 Service Manual 3 45 ...

Page 142: ...sembly before removing the white 3 pin front PE sensor connector from the connector junction board assembly 1 Remove the connector junction board assembly See Removing Connector Junction Board and FPC Board Assembly on page 3 32 2 Loosen the hexagonal nuts securing the shaft at the front of the front tractor assembly to the left and right side frames 3 After loosening the hexagonal nut on the righ...

Page 143: ...e frame 6 To remove the front tractor assembly first move it to the left Remove the right side ofthe shaft by pulling it forward and then remove the left side of the shaft Lbt Tractor WreHddw Front Tractor Assembly Washer Figure 3 52 Removing the Front Tractor Assembly Adjustment Required Caniage Motw IIWhen you install thefront tractor assembly perform the tractor wire spring adjustment us descri...

Page 144: ...n the right side remove the right tractor wire holder To release the tractor wire remove the CPN M4 x 8 screw securing the left tractor wire spring wire set to the left side frame See the description in the previous section Remove the 2 E rings securing the shaft at the back ofthe rear tractor assembly to the both sides frame To remove the rear tractor assembly first move it to the left Remove the...

Page 145: ...m on page 3 26 3 Remove the CP PS M3 x 6 screw securing the timing belt holder and timing belt Figure 3 54 Removing the Timing Belt Holder 4 Disconnect the CR motor cable from the white 2 pin connector on the connector junction board assembly and unhook the CR motor cables at the base frame ofthe printer mechanism EPSON DFX 5000 Service Manual 3 49 ...

Page 146: ...l the CR motor perform the carriage timing belt tension adjustment us described in Chapter 4 When you install theprintheud perform theplaten gap motor value platen gap adjustment us described in Chapter 4 Removing the CR Carriage Encoder Sensor 1 Remove the printhead See page 3 7 2 Disconnect the red 4 pin CR sensor connector from the connector junction board assembly 3 50 EPSON DFX 5000 Service M...

Page 147: ...gure 3 56 Removing the CR Sensor Disassembling the Carriage Mechanism This section describes how to disassemble the carriage mechanism including removing the carriage CR timing belt and front and rear carriage guide shafts 1 Remove the CR motor See Removing the CR hfotor on page 3 49 EPSON DFX 5000 Service Manual 3 51 ...

Page 148: ...carriage guide shaft to the left and right side frames Remove the front carriage guide shaft by pulling it through the hole in the right side frame When you remove the front carriage guide shaft move the carriage to the left side On the left side frame remove the E ring securing the carriage guide shaft gear to the rear carriage guide shaft then remove the carriage guide shaft gear and paper thick...

Page 149: ... Carriage Guide Shaft 7 Remove the carriage damper from the right side frame and remove the 3 CBS 0 M4 x 8 screws securing the carriage motor holder to the right side frame 8 Remove the right guide shaft holder lever 9 Remove the 2 CP PS M4 x 6 screws securing the rear carriage guide parallelism adjustment lever and remove the lever EPSON DFX 5000 Service Manual 3 53 ...

Page 150: ...mbly Note When you install thefront carriage de shaft tighten the screws whilepushing the shaft toward theplaten Adjustment Required When you assemble the carriage mechanism perform thefollowing adjustments described in Chapter I LI Carriage timing belt tension adjustment Cl Curriuge guide shaft parallelism adjustment tl Platen gap motor value luten gap adjustment LI Bidirectional printing adjustm...

Page 151: ...t tl Platen gap motor value Gpluten gap adjustment LI Bidirectional printing adjustment Removing the Platen Roller 1 Remove the platen as described earlier in this chapter 2 Remove the CR motor See Removing the CR hfotor on page 3 49 3 Remove the left side frame gears 4 Referring to the exploded diagram in the Appendix remove the platen roller Adjustment Required When you install theplaten roller ...

Page 152: ...ion gear must mesh smoothly with the carriage guide shaft gear cog If the pinion gear is poorly aligned or the pinion gear and cog are too tight printer operation is noisy or the character density is incorrect 1 Loosen the 2 screws securing the PG motor to the left side 3 33 frame See page 2 Make sure the PG motor pinion gear is properly aligned with the carriage guide shaft gear cog Move the PG m...

Page 153: ...ction 1 Refer to Figure 4 2 and loosen the 3 tension adjustment screws on the CR motor Loosen the screws but do not remove them 2 Confirm that the carriage timing belt is attached properly and that no load is applied to it 3 Insert the tension gauge hook through the hole in the tension lever See Figure 4 2 4 5 Pull the tension gauge horizontally to apply an 8 8 lb 4 kg force Move the belt left and...

Page 154: ......

Page 155: ...form this adjustment 1 Remove the printer mechanism See page 3 26 2 Release the release lever for the tractor sprocket 3 At the right side frame loosen the hexagonal nuts securing the shaft holder of the front or rear tractor assembly See pages 3 46 through 3 49 4 Pull the tractor wire right When the tractor wire spring tension is correct the shaft holder frame and the tip of the gold seal are 0 2...

Page 156: ...l tractor sensor perform this adjustment Figure 4 4 illustrates the pull tractor sensor position adjustment When you assemble the pull tractor sensor or rear paper guide check the following items Ll Verify that the pull tractor sensor lever is touching the rear paper guide frame but the sensor is off Ll Make sure the distance between the sensor lever and sensor switch is approximately 08 inches 2 ...

Page 157: ...st use the 2 dial gauges dial gauge base and dial gauge muster supplied by EPSON Do not adjust theparallelism using any other method LI Dial gauge F610 part no 1019466 LI Dial gauge base F611 part no 1019467 LI Dial gauge muster F612 part no 1019468 Before performing the carriage guide shaft parallelism adjustment you must assemble the 2 dial gauges dial gauge base and dial gauge master to form on...

Page 158: ...e pull the tie band forward and secure the thumb screws to hold the tool securely 4 At the right side frame loosen but do not remove the 2 screws securing the parallelism adjust lever Refer to Figure 4 6 5 Loosen the 2 thumb screws and remove the dial gauge base along with the 2 dial gauges from the dial gauge master 6 Using the carriage guide shaft gear adjust the gauge mounting position so that ...

Page 159: ...ide Then measure the distance between the platen and carriage guide shaft on the right side and compare the values Figure 4 7 shows the measurement position and the parallelism adjust lever operation Note When you shift the carriage manually do not touch either dial gauge Rotate the carriage motor pulley Figure 4 7 Carriage Guide Shaft Parallelism Adjustment 4 8 EPSON DFX 5000 Service Manual ...

Page 160: ...rection of the black arrow the distance between the right side of the platen and printhead nose narrows a little bit 9 Repeat steps 7 and 8 until the difference between the distances measured at the two positions is less than 0 01 mm The F610 dial gauge matches the 10 notches 10 When the difference is within the specified range tighten the 2 screws securing the parallelism adjust lever Then measur...

Page 161: ...r sensor See page 3 41 Loosen but do not remove the 2 hexagonal screws securing the platen stay to both side frames Remove the printhead with the maskless holder See page 3 7 Then attach the dial gauge base with the 2 dial gauges in the same way as you attach the printhead When you attach the dial gauge base to the carriage pull the tie band forward and secure the thumb screws to hold the tool sec...

Page 162: ...Adjustments Approx 40 mm Measurement Pmition Figure 4 8 Platen Angle Adjustment EPSON DFX 5000 Service Manual 4 11 ...

Page 163: ...default setting value is parameter 1 but you may change this if necessary Caution Q This measurement is important because it determines theplaten gap so be sure to use the exclusive thickness gauge set and tension gauge supplied by EPSON Thickness gauge set 0 39 mm F616 Part No 1020471 Tension gauge 200 g F54 5 Part No B76 5114601 Q Do not turn theprinter off during the adjustment When adjusting t...

Page 164: ...value by 1 Confirm the ALPHA value you have written to memory by pressing the LF FF button The buzzer beeps once for each time the MICRO FEED button has been pressed Ifthe value is incorrect return to step 5 After writing the ALPHA value into memory press the PAUSE button and mount the ribbon cartridge The adjustment state then changes to allow you to adjust the BETA value Reset the BETA value pre...

Page 165: ... when the tension gauge indicates 150 gf and the tension gauge can move right by a degree 13 After completing this adjustment turn the printer off and rotate the PG drive gear manually toward you to remove the thickness gauge Caution When you remove the thickness gaugeforcibly without using the PG drivegear the muskless holder will be damaged Therefore after adjusting theBETA value always perform ...

Page 166: ...Bi D Adjust Note The GAMMA value is decided by the default setting Do not change this 1 2 3 4 5 6 value during service Mount the ribbon cartridge Load continuous paper into the front tractor and turn the printer on while pressing the LF FF MICRO FEED v and FRONT REAR buttons At this time the printer changes into standby mode and the no paper state Press the LF FF button to feed the continuous pape...

Page 167: ... the left Press the MICRO FEED v button to shift the even numbered rows toward the right 11 Press the PAUSE button and then press the LF FF button to print the current Bi D value automatically in Super Draft mode 12 Write the Bi D value into memory Press the MICRO FEED v button to shift the even numbered rows toward the left Press the MICRO FEED A button to shift the even numbered rows toward the ...

Page 168: ... 00 8 sets of 2 beeps II c l ooooooooo 10 beeps I L ti c Error BEL code 07H Zarriage trouble Paper out or jammed Other paper error Abnormal voltage Incorrect RAM Cover open Head driver shot l lead fan driver shot l Illegal paper nemory setting Cause Q Printer received a BEL command Q Carriage locked Q Isolation resistance in the carriage motor too low See Table 5 2 Q Printer out of paper during pr...

Page 169: ...0 0 0 0 Platen gap adjustment Q The PG home sensor is broken 3 sets of 3 beeps trouble Q The PG motor is broken Q The parallelism adjustment is incorrect Note 00 indicates a 0 1 second interval 0 0 indicates a 0 3 second interval Figure 5 1 Layout of Connector Junction Board Pin 1 is on the right side of each connector above except for the PF connector 5 2 EPSON DFX 5000 Service Manual ...

Page 170: ...n To bypass the interlock switch remove the top cover and close the left cover hinge Interlock Switch Cover Open Sensor r T I I I i 1 I Shield Plate CN i Assembly Figure 5 2 Bypassing the Interlock Switch To bypass the cover open sensor remove the left side cover disconnect the cable from connector CN7 on the Cl 17 MAIN board assembly and jumper pins 1 and 2 of connector CN7 Figure 5 3 Bypassing t...

Page 171: ...k each phase against commons 2 85 R f 0 3 R at 77 F 25 C RF motor At CN12 check each phase against 150 R f 10 R at 77 F 25 C commons PG motor At CNl 1 check each phase against 250 R f 18 R at 77 F 25 C commons Head fan At CN6 on main board check pins 1 and 4 61 R f 4 3 R at 77 F 25 C against pin 2 Plunger At CN6 on main board check pins 53 and 54 9 R f 0 45 R at 77 F 25 C Printhead See Figure 5 4 ...

Page 172: ...ween white voltage at pins 1 and 2 while 0 and 5 V toggling the sensor switch on the tractor sprocket on and off manually Top PE I in Figure 5 l With power on check the Toggles between red voltage level from pin 1 GND 0 and 5 V to 2 TPE when paper is covering the sensor and not Jam F in Figure 5 l gray With power on check the Toggles between voltage level from pin 1 GND 0 and 5 V to 2 paper jam si...

Page 173: ...Q14 Q18 Q20 readings within f 20 not open and Q21 and not shorted the drivers are bad If shorted also replace the printhead PF Motor Check pins 56 58 60 and 62 of If any output pin is shorted CN6 on the main board against replace the main board and the ground to see if any are shorted motor RF Motor Check transistors Q28 Q29 If you do not get consistent Q30 and Q31 readings within f 20 not open an...

Page 174: ...s Q When the LF button is pressed no paper is fed abnormal Data sent by the host Q The carriage operates normally at power on and the computer is printed self test is printed correctly but print data from the host incorrectly computer is not printed correctly Note Be sure to perform the appropriate adjustments below 1 When you replace the Cl 17 MAIN board assembly perform these adjustments Ll Bidi...

Page 175: ... Rsplaos ths TM and dlsconnsct CNI and CN3 on the CI 17 h4AIN bard GN3 and turn fin power and drlvsrs using 9 multlmster Replace bad motor sokntsld ISI b printhtiad If driver also is bad ratARc st ths sams tlms 1 RwlaoB the El17 MAIN baarcl 1 EPSON DFX 5000 Service Manual ...

Page 176: ...f drivers ark bdd rrplace at ths aarng time Replaoe the 1Yll7 MAIN bwvd END NOTE I Check thr Toll g oannisotors CN9 6117 MAIN board to Ihtfirlook switch CN8 cl 17 MAIN bawd ta FPc ta uhdl h baard CNI 0 Gil7 MAIN bGard b ta CR enmd dUh lCtlGh bGQrd Cahh6CtGr t0 CR mGtGr EPSON DFX 5000 Service Manual 5 9 ...

Page 177: ...e Check printhead cable mntlnulty Visually check printhead pins Replace any bad part Perform the biditwtional ptlntlng adlustment 1 NOTE 1 Check the folIowIng connectors 1 cN6 cl 17 MAIt kard 2 Fout cnnnectots an the conndat IunctIon board In the prlntar m zhenlsm 5 10 EPSON DFX 5000 Service Manual ...

Page 178: ... the prlnthsad dtlusts Check th4 printhead drivera are OK replac s thg Rgplacr the printhead and Cl 17 MAIN board Re dce thr Cl17 MAIt buard I I I YSS Prlht 03 NOTE1 Gha th6 followlng mnheztotss 1 GN6 cl 17 MAIN boewd 2 Faur oohh o S oh th whheotor uhztlah boeril Ih the prlhtsr mschdhlsm EPSON DFX 5000 Service Manual 5 11 ...

Page 179: ...Troubleshooting 3 Carriage operation is normal but the self test is printed incorrectly continued Psrfcrm biditsctiwal I END ad ustmrnt 1 5 12 EPSON DFX 5000 Service Manual ...

Page 180: ... MIIS and ch6d C ths PF motor drlusrs YWS See Priillsr Mscirani3m Repdr b flx fh6 printer mechanism YBS A Replace the Cl 17 MAIN tosrd R lac th PF mmr n and Lhn PF molar Perform final printing of self teat No 7 R6fgr tn Chapter d and perform the PG rn tir baoklash djuSLm6nl EPSON DFX 5000 Service Manual 5 13 ...

Page 181: ...Troubleshooting 5 Control panel operation is abnormal S T A R T r ths cl 17 hiAIN Using a multlmda check the switches oh the Cl 17 PNL boatd Da fh6 END END 5 14 EPSON DFX 5000 Service Manual ...

Page 182: ...ow assumes the host computer is operating normally Run the self test VW Troubleshoot prmtsr usmg the Tmublsshoot printsr using the ssrial WF is your NE b Replacr cabI R BE Cl 17 MAIN board I 1 Not usina s4rial 1 Replace Cl 17 MAIN board 1 R4placr Typ B IntetQcs EPSON DFX 5000 Service Manual 5 15 ...

Page 183: ...ee if the objects carriage encoder the motor rotates belt are in the gears or elsewhere in the mechanism The CR motor is defective Measure the coil Replace the CR resistance of the CR motor motor It should be approximately 6 2 ohms The carriage timing belt is defective Manually check the carriage timing belt tension Perform the carriage timing belt tension adjustment as described in Chapter 4 The ...

Page 184: ...e right and left parallelism sides of the page adjustment as darker on one side described in than the other Chapter 4 Printing is Foreign objects are Visually check the Remove any foreign performed but the lodged in the paper paper path substances printer does not feed path paper or does not feed it correctly The PF motor is not Check whether the Check backlash driving the gear PF motor pinion gea...

Page 185: ...hat foreign Chapter 4 objects are not lodged in the printer mechanism The RF motor is defective Check the coil Replace the RF resistance of the RF motor motor It should be about 150 ohms The PG motor does not operate The backlash value is incorrect Check whether the Loosen the 2 screws carriage guide shaft securing the PG rotates smoothly motor to the left side when rotated frame Then adjust manua...

Page 186: ... is defective Check the PW sensor Replace the PW sensor The paper bail assembly does not work The plunger is defective Check the coil resistance of the plunger It should be about 9 ohms Replace the plunger Continuous paper becomes crumpled at the front or rear tractor assembly The tension value of The distance Perform the tractor the tractor wire between the frame wire spring tension spring is inc...

Page 187: ...roblems Ll C a u s e This column identifies possible causes of this symptom tl Checkpoint Troubleshooting checks in this column isolate the problem LI Solution Repair the printer using the instructions in this column Table 5 8 Major Components of the C117 PSB Board Assembly Table 5 9 C117 PSB Board Assembly Component Repair Symptom No DC voltage present at the output Cause VPC signal HIGH level no...

Page 188: ... immediately element after replace ment The 35 The main switching Check the voltage waveform Replace VDC line is FETs Ql 01 or Q201 between the drain side and GND QlOl or dead are defective Q201 Q102 or Q202 is defective Observe voltage waveform Replace between the collector side and QlOl or GND Q201 Q103 or Q203 is defective Check the voltage waveform between the collector side and Replace Q103 o...

Page 189: ...IC151 is defective Q151 is defective Checkpoint Observe the drive waveform for IC151 at pin 4 or 5 Look at the PWM control waveform for IC151 at pin 8 or 11 and Q152 Check the voltage waveform between the collector side and GND Solution Replace IC151 Replace IC151 or Q152 Replace Q151 5 22 EPSON DFX 5000 Service Manual ...

Page 190: ... 35 VDC lines and signal printing or motor operation becomes abnormal 35 VDC line Q153 or Q253 and Observe the voltage waveform Replace is abnormal Q154 are defective between the collector side and IC152 constant voltage GND control transistors eel2 VDC The rectifier circuit is Verify that approximately fl2 V is Replace the line is dead defective output at the terminal of Cl 60 and abnormal Cl 61 ...

Page 191: ...voltage level of the Replace the does not signal was sent to the DRERR signal at CNl or check head driver operate at all Cl 17 power supply the head driver IC s voltage board turning it off waveform VPC signal HIGH Check voltage waveform for VPC Replace the level was not sent to signal when power is turned on head driver Cl 17 power supply and verify voltage waveform for or gate array board If VPC...

Page 192: ...The PS RAM is Observe pin 21 of IC3 for a change Replace defective in the signal HIGH or LOW Refer IC3 to the figure showing IC4 The control ROM is Check pin 24 of IC4 for a change Replace defective in the signal HIGH or LOW IC4 The gate array is defective Check pin 46 of IC7 for a change in the signal HIGH or LOW Refer to the figure above Replace IC7 The CPU is defective Look at the oscillator at...

Page 193: ...IC7 is defective Check the signals for the carriage Replace IC7 operates motor phases at pins 108 109 abnormally 110 and 111 of IC7 QMl is defective Measure the voltage level at pins 9 Replace and 11 of IC QMl when the QMl carriage is operating The normal voltage is approximately 35 VDC Measure voltage level at pins 9 and 11 of IC QMl when the carriage is operating The normal voltage is approximat...

Page 194: ...operation is unstable due to a lack of motor torque Checkpoint Observe the switching waveform between the base side and the collector side of Q3 or Q6 Observe the carriage encoder sensor output signal at pins 3 and 4 of CNl 0 Check the switching waveform for Q4 Q7 and Q8 ontinued Solution Replace Q3 or Q6 Replace the carriage encoder sensor Replace the abnormal transistor EPSON DFX 5000 Service Ma...

Page 195: ...place operates unstable due to a 1 of IClO that detects the current ICl 0 abnormally lack of motor torque in the carriage motor Measure the voltage level at pin 3 Replace of ICl 0 The normal voltage is D52 approximately 4 7 VDC Paper feeding is abnormal The CPU is defective Check the paper feed motor phase Replace drive signals at pins l 4 of ICl ICl 5 28 EPSON DFX 5000 Service Manual ...

Page 196: ...gnals Replace for pins 1 8 11 and 18 ICll Ribbon feeding is abnormal The CPU is defective For transistors Q28 Q31 observe If there is no the input signal from the CPU input signal base and the output signal replace ICl collector if there is no output signal replace the abnormal transistor Fuse F3 is defective Check if fuse F3 is defective Replace F3 EPSON DFX 5000 Service Manual 5 29 ...

Page 197: ...1 and 10 QM2 Fuse F2 is defective Check if fuse F2 is defective Replace F2 The PG sensor is Observe the PG sensor output Replace the defective signal at pins 44 and 45 of CN6 PG sensor Refer to the PG sensor figure The plunger Fuse Fl is defective Check if fuse Fl is defective Replace Fl is defective IC7 is defective When paper is loaded into the If this signal printer look at the switching signal...

Page 198: ...ad driver FETs are defective The CPU is defective Checkpoint Observe the output signal at pins 129 l 37 of IC7 Observe the voltage waveform at the drain side I I I I I I I I Observe the PTS signal at pin 15 of the CPU SV PEA DET caalu I ontinued Solution Replace IC7 Replace the abnormal F E T Replace the CPU EPSON DFX 5000 Service Manual 5 31 ...

Page 199: ...EPSON recommends that the printer be lubricated at the points illustrated in Figures 6 2 6 3 and 6 4 using EPSON lubricants 02 and G26 These lubricants have been extensively tested and found to comply with needs ofthe printer Refer to Table 6 l for information on lubricants 02 and G26 Table 6 2 lists the appropriate lubricant for each point Make sure the parts to be lubricated are clean before app...

Page 200: ...19 6 3 20 6 4 Tension pulley pulley shaft and hook for the tension pulley spring Platen roller holder contact point with the platen roller Paper bail gear Fulcrum point for the paper bail shaft and plunger Platen gap motor pinion Carriage guide shaft gear Ribbon feed gears Tractor select cam Tension unit drive gear G26 G26 G26 G26 G26 G26 G26 G26 G26 6 2 EPSON DFX 5000 Service Manual ...

Page 201: ...ming belt holder fixing screw 2 G 23 6 3 Parallelism adjustment lever fixing screws 2 screws 24 6 4 Platen roller holder fixing screw fixing the holder to the platen 25 6 4 Lower paper guide assembly fixing screws 3 screws 26 6 4 Connector junction board fixing screws 2 screws 27 6 4 Platen gap motor fixing screws 2 screws 28 6 3 Tractor tension wire EPSON DFX 5000 Service Manual 6 3 ...

Page 202: ...Maintenance and Lubrication Figure 6 l Correct Adhesive Application Figure 6 2 Lubrication and Adhesive Diagram 1 6 4 EPSON DFX 5000 Service Manual ...

Page 203: ...Maintenance and Lubrication Figure 6 3 Lubrication and Adhesive Diagram 2 EPSON DFX 5000 Service Manual 6 5 ...

Page 204: ...Maintenance and Lubrication 6 6 Figure 6 4 Lubrication and Adhesive Diagram 3 EPSON DFX 5000 Service Manual ...

Page 205: ...e A l summarizes the tinctions and sizes ofthe connectors 2 plh3 2 plh3 m 2 plh3 2 t d 22 PlbS cl 17 MAIN bard Assssmbly CM 36 I3 6d Plh3 Cfil6 s0rl3 l IhtSrtaSC6 Prlhter Machahldm Cohtrol Central far ths motors ptlnthsad and sen u S Figure A l DFX 5000 Cable Connections J EPSON DFX 5000 Service Manual A 1 ...

Page 206: ...e external computer 36 A 5 CN5 Standard parallel interface receives 8 bit parallel data from the external computer 36 A 6 CN6 Q RF PF CR and PG motor and fan driver signals Q Plunger driver signals Q Head fan temperature Q PG sensor Q PW sensor Q Front rear or top PE sensor Q Paper jam sensor Q PG home sensor Q Tractor select sensor Q Pull tractor sensor Q Printhead temperature sensor Q Printhead ...

Page 207: ...rs plunger and printhead coils 8 CN3 Supplies the DC voltages 5 V and 12 V to the C1 17 MAIN board assembly Receives the control signal DRERR from the C1 17 MAIN board assembly 9 CN4 Supplies the DC voltage 35 V to the C1 17 MAIN board assembly for the fan drivers 2 Unit Table A 2 CN1 C117 MAIN Board Assembly Reference Table A 12 A 13 A 14 A 15 EPSON DFX 5000 Service Manual A 3 ...

Page 208: ...Appendix Table A 3 CN2 C117 MAIN Board Assembly Table A 4 CN3 C117 MAIN Board Assembly A 4 EPSON DFX 5000 Service Manual ...

Page 209: ...Appendix Table A 5 CN4 C117 MAIN Board Assembly ower source Not connected 29 36 I O D7 DO Data bus EPSON DFX 5000 Service Manual A 5 ...

Page 210: ...Appendix Table A 6 CN5 Cl17 MAIN Board Assembly Data 1 Data 8 35 36 5 SLIN Not connected 5 VDC pull up Printer select signal input A 6 EPSON DFX 5000 Service Manual ...

Page 211: ...Appendix Table A 7 CN6 Cl17 MAIN Board Assembly Head fan motor driver tor phase B signal Pull tractor sensor status EPSON DFX 5000 Service Manual A 7 ...

Page 212: ...Appendix Table A S CN7 C117 MAIN Board Assembly A 8 EPSON DFX 5000 Service Manual ...

Page 213: ... 18 I 19 I 20 I 21 22 0 MFFSW PITCH T E A R S W T O F S W PAUSE GND 5 Forward MICRO FEED button input PITCH button input TEAR OFF button input TOP OF FORM button input PAUSE button input Ground Power source for control panel EPSON DFX 5000 Service Manual A 9 ...

Page 214: ...hase B input Table A 12 CNl Cl17 PSB Power Supply Board Assembly Pin No l O Name Description 1 I L Line 2 N N Table A 13 CN2 Cl17 PSB Power Supply Board Assembly Pin No l O Name Description 1 0 35V 2A 35 VDC for the main board for six of the nine printhead pins 1 3 5 7 8 and 9 2 0 35V 2A 35 VDC for the main board for six of the nine printhead pins 1 3 5 7 8 and 9 3 4 5 6 GP GP GP GP Ground for 35 ...

Page 215: ...Appendix Table A 13 CN2 C117 PSB Power Supply Board Assembly continued Table A 15 CN4 C117 PSB Power Supply Board Assembly EPSON DFX 5000 Service Manual A 11 ...

Page 216: ...Appendix El I t I e Figure A 2 C117 PSB Power Supply Board Circuit Diagram A 12 EPSON DFX 5000 Service Manual ...

Page 217: ...Appendix q z r f l Figure l 3 Cl17 MAIN Board Assembly Component Layout EPSON DFX 5000 Service Manual A 13 ...

Page 218: ......

Page 219: ...Appendix DFX 5000 Exploded Diagram 1 EPSON DFX 5000 Service Manual A 15 ...

Page 220: ...Appendix Figure A 5 Exploded Diagram 2 A 16 EPSON DFX 5000 Service Manual ...

Page 221: ...597 J86 ...

Page 222: ...Appendix A 18 EPSON DFX 5000 Service Manual ...

Page 223: ...Appendix Figure A 7 C117 MAIN Board Circuit Diagram EPSON DFX 5000 Service Manual A 19 ...

Reviews: