background image

66 


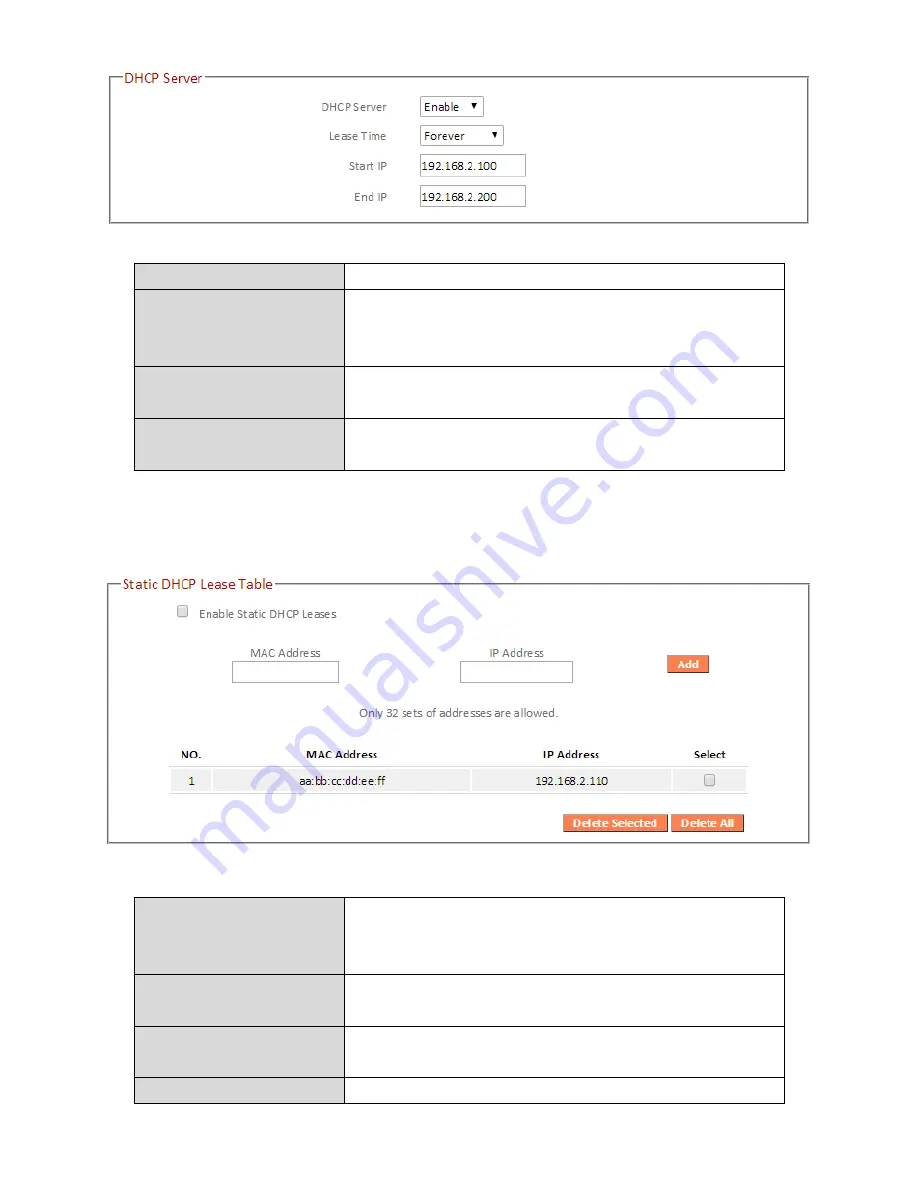
DHCP Server 

Enable or disable the DHCP server. 

Lease Time 

Select a lease time for the DHCP leases here. 
The DHCP client will obtain a new IP address 
after the period expires. 

Start IP 

Enter the start IP address for the DHCP 
server’s IP address leases. 

End IP 

Enter the end IP address for the DHCP 
server’s IP address leases. 


Your device’s DHCP server can be configured to assign static (fixed) IP addresses to 
specified network devices, identified by their unique MAC address. 


Enable Static DHCP 
Leases 

Enable/disable static DHCP leases. This must 
be enabled in order to assign any network 
device a static IP address.   

MAC Address 

Enter the specified network device’s MAC 
address here. 

IP Address 

Assign a fixed IP address for the specified 
network device here. 

Add 

Add the information to the “Static DHCP 

Summary of Contents for BR-6478 AC V2

Page 1: ...BR 6478 AC V2 User Manual 08 2015 v1 0 ...

Page 2: ...on Interface 41 III 1 Login 41 III 2 Save Settings 43 III 3 Main Menu 44 III 3 1 Status 45 III 3 2 Setup Wizard 46 III 3 3 Internet WISP 48 III 3 3 1 WAN Setup 50 III 3 3 1 1 Dynamic IP 50 III 3 3 1 2 Static IP 52 III 3 3 1 3 PPPoE 54 III 3 3 1 4 PPTP 56 III 3 3 1 5 L2TP 58 III 3 3 2 DDNS 60 III 3 3 3 DNS Proxy 62 III 3 3 4 VPN Server 63 III 3 4 LAN 65 III 3 5 2 4GHz Wireless 5GHz Wireless 68 III ...

Page 3: ...ireless 109 III 3 9 6 IGMP 111 III 3 9 7 UPnP 112 III 3 9 8 Fast NAT 112 III 3 10 Administration 113 III 3 10 1 Time Zone 113 III 3 10 2 Password 114 III 3 10 3 Remote Access 115 III 3 10 4 Backup Restore 116 III 3 10 5 Upgrade 116 III 3 10 6 Restart 117 III 3 10 7 Logs 117 III 3 10 8 Active DHCP Client 119 III 3 10 9 Statistics 119 IV Appendix 120 IV 1 Configuring your IP address 120 IV 1 1 How t...

Page 4: ...IV 1 2 5 Mac 144 IV 1 3 How to Find Your Network Security Key 147 IV 1 3 1 Windows 7 Vista 147 IV 1 3 2 Mac 149 IV 1 4 How to Find Your Router s IP Address 152 IV 1 4 1 Windows XP Vista 7 152 IV 1 4 2 Windows 8 154 IV 1 4 3 Mac 157 IV 2 Connecting to a Wi Fi network 159 IV 3 FAQs 161 V Glossary 165 ...

Page 5: ...kage Contents Before you start using this product please check if there is anything missing in the package and contact your dealer to claim the missing item s BR 6478AC V2 Ethernet Cable Quick Installation Guide Power Adapter CD ROM ...

Page 6: ...On Internet connection is ready Flashing Restoring to factory default state or Ethernet cable not connected or no Internet connection Wi Fi Blue On 2 4G and or 5G Wi Fi wireless activity transferring receiving data Flashing WPS is active Off Wi Fi not active USB Blue On USB connection is ready Off USB is not active ...

Page 7: ...3 I 3 Back Panel Internet WAN Port LAN Ports 1 4 Reset WPS Button USB Port ...

Page 8: ...damage will void the warranty of the device 5 The device contains small parts which are a danger to small children under 3 years old Please keep the device out of reach of children 6 Do not place the device on paper cloth or other flammable materials The device may become hot during use 7 There are no user serviceable parts inside the device If you experience problems with the device please contac...

Page 9: ...other end into an electrical socket 2 Check that the power LED displays on 3 Use a Wi Fi device e g computer tablet smartphone to search for a Wi Fi network with the SSID edimax setup or edimax setup5G and connect to it iOS 4 or Android 4 and above are required for setup on a smartphone or tablet ...

Page 10: ... setup and click Get Started to begin the setup process If you cannot access http edimax setup please make sure your computer is set to use a dynamic IP address 5 Choose if you want to use your BR 6478AC V2 in its default Wi Fi router mode or in a different mode Wi Fi Router Mode The device connects to your modem and provides ...

Page 11: ...r 5GHz network and repeats the wireless signal s Wi Fi Bridge Mode The device connects to a network device for example TV gaming console or media player via Ethernet cable and acts as a Wi Fi bridge allowing the network device to join your Wi Fi network WISP Mode The device connects wirelessly to your Wireless Internet Service Provider and provides 2 4GHz and or 5GHz Internet wireless and Ethernet...

Page 12: ...rd recommended to detect your Internet connection type or enter the settings manually Manual configuration is only recommended for advanced users 2 Connect the blue Internet port of your device to the LAN port of your modem using an Ethernet cable and then click Next ...

Page 13: ...ait a moment while the device tests the connection 4 Click Next to continue and configure the device s wireless network 5 Enter a name and password for your 2 4GHz 5GHz wireless networks then click Next to continue ...

Page 14: ... displayed as shown below Check that all of the details are correct and then click Next to proceed If you wish to backup the device s settings click Backup this configuration to open a new window and save your current configuration to a txt file ...

Page 15: ...t while the device applies your settings 8 A final congratulations screen will indicate that setup is complete You can now connect to the device s new SSID s which are shown on the screen then close the browser window ...

Page 16: ...12 9 The BR 6478AC V2 is working and ready for use Refer to IV 2 Connecting to a Wi Fi network if you require more guidance ...

Page 17: ...nu and click Next 2 Connect the network port of your BR 6478 AC V2 to the LAN port of your existing router using an Ethernet cable then click Next 3 Select whether to use the 5GHz wireless frequency 2 4GHz wireless frequency or both If you are not sure select both ...

Page 18: ...8 AC V2 If you are using a static IP enter the IP address subnet mask and default gateway Click Next to proceed to the next step Obtain an IP address automatically is the recommended setting for most users For more guidance on static IP addresses please refer to IV 1 Configuring your IP address ...

Page 19: ...ntinue 6 A summary of your configuration will be displayed as shown below Check that all of the details are correct and then click Next to proceed If you wish to backup the device s settings click Backup this configuration to open a new window and save your current configuration to a txt file ...

Page 20: ...a moment until the BR 6478 AC V2 is ready 8 A final congratulations screen will indicate that setup is complete You can now connect to the device s new SSID s which are shown on the screen then close the browser window ...

Page 21: ...17 9 The BR 6478 AC V2 is working and ready for use Refer to IV 2 Connecting to a Wi Fi network if you require more guidance ...

Page 22: ...nu and click Next 2 Please ensure your BR 6478 AC V2 is within Wi Fi range of your existing wireless router Click Next to continue 3 Select whether to use the 5GHz wireless frequency 2 4GHz wireless frequency or both If you are not sure select both and then click Next ...

Page 23: ...tain your router s maximum speed capacity as the Wi Fi signal is extended 5 Select the Wi Fi network name SSID which you wish to connect to for the specified frequency and click Next to continue If the Wi Fi network you wish to connect to does not appear try clicking Refresh ...

Page 24: ...n the next page as shown below 6 Enter your existing wireless network s security key password in the Security Key field and click Next to continue Device SSID will be the SSID of your extender s Wi Fi If using cross band technology this will be 5GHz Wi Fi for your router s 2 4GHz signal and vice versa ...

Page 25: ...omatically or Use the following IP address for your BR 6478 AC V2 If you are using a static IP enter the IP address subnet mask and default gateway Click Next to proceed to the next step Obtain an IP address automatically is the recommended setting for most users The IP address will be displayed in brackets ...

Page 26: ... repeat steps 4 7 for the 2 4GHz wireless frequency 10 A summary of your configuration will be displayed as shown below Check that all of the details are correct and then click Next to proceed The device will use the same wireless password security key as the existing wireless network ...

Page 27: ...you wish to backup the BR 6478 AC V2 s settings click Backup this configuration to open a new window and save your current configuration to a txt file 11 Please wait a moment until the BR 6478 AC V2 is ready ...

Page 28: ...24 12 A final congratulations screen will indicate that setup is complete You can now connect to the device s new SSID s which are shown on the screen then close the browser window ...

Page 29: ...25 13 The BR 6478 AC V2 is working and ready for use Refer to IV 2 Connecting to a Wi Fi network if you require more guidance ...

Page 30: ...ease ensure your BR 6478 AC V2 is within Wi Fi range of your existing wireless router Click Next to continue 3 Select the frequency 2 4GHz or 5GHz of your existing wireless network In wireless client mode the BR 6478 AC V2 can only connect to one wireless network frequency i e 2 4GHz or 5GHz ...

Page 31: ...sh to connect to and click Next to continue If the Wi Fi network you wish to connect to does not appear try clicking Refresh To connect to a hidden SSID check the Setup extender manually box and enter the details manually on the next page as shown below ...

Page 32: ...ext to continue 6 Wait a moment while the BR 6478 AC V2 tests the wireless connection 7 Select Obtain an IP address automatically or Use the following IP address for your BR 6478 AC V2 If you are using a static IP enter the IP address subnet mask and default gateway Click Next to proceed to the next step ...

Page 33: ...ayed in brackets 8 A summary of your configuration will be displayed as shown below Check that all of the details are correct and then click Next to proceed If you wish to backup the BR 6478 AC V2 s settings click Backup this configuration to open a new window and save your current configuration to a txt file ...

Page 34: ...30 9 Please wait a moment until the BR 6478 AC V2 is ready 10 A final congratulations screen will indicate that setup is complete Please close the browser window ...

Page 35: ...31 11 The BR 6478 AC V2 is working and ready for use You can now connect the BR 6478 AC V2 to your network device using an Ethernet cable and connect to your network as usual ...

Page 36: ...nu and click Next 2 Please ensure your BR 6478 AC V2 is within Wi Fi range of your WISP network and click Next to continue 3 Select whether to use the iQ Setup wizard recommended to detect your Internet connection type or enter the settings manually ...

Page 37: ...for advanced users 4 Select the wireless frequency 2 4GHz or 5GHz of your WISP network 5 Select the WISP SSID which you wish to connect to and click Next to continue If the Wi Fi network you wish to connect to does not appear try clicking Refresh ...

Page 38: ...en SSID check the Setup extender manually box and enter the details manually on the next page as shown below 6 Enter your existing wireless network s security key password in the Security Key field and click Next to continue ...

Page 39: ...35 7 Wait a moment while the BR 6478 AC V2 tests the wireless connection 8 Click Next to continue your Internet service type configuration ...

Page 40: ...36 9 Wait a moment while the BR 6478 AC V2 connects to the Internet 10 When the Internet is connected click Next to configure your wireless network ...

Page 41: ...and password for your 2 4GHz 5GHz wireless networks then click Next to continue 12 A summary of your configuration will be displayed as shown below Check that all of the details are correct and then click Next to proceed ...

Page 42: ... If you wish to backup the device s settings click Backup this configuration to open a new window and save your current configuration to a txt file 13 Please wait a moment until the BR 6478 AC V2 is ready ...

Page 43: ...that setup is complete You can now connect to the device s new SSID s which are shown on the screen then close the browser window 15 The BR 6478 AC V2 is working and ready for use Refer to IV 2 Connecting to a Wi Fi network if you require more guidance ...

Page 44: ... WPS 3 The devices will establish a connection Repeat for additional wireless devices Please check the instructions for your wireless device for how long you need to hold down its WPS button to activate WPS II 7 Reset to Factory Default Settings If you experience problems with your BR 6478 AC V2 you can reset the device back to its factory settings This resets all settings back to default 1 Press ...

Page 45: ...c IP address Refer to IV 1 Configuring your IP address for more information III 1 Login 1 To access the browser based configuration interface enter http edimax setup into the URL bar of a browser on a network device connected to the same Wi Fi network as the BR 6478 AC V2 If you can not access http edimax setup connect the device to a computer using an Ethernet cable and try again 2 You will be pr...

Page 46: ...42 3 You will arrive at the Status screen Use the menu down the left side to navigate ...

Page 47: ... Then click Click here to restart in order to restart the device and bring the changes into effect 3 To make several changes at once use the Save Settings button after each change and then click click here to restart after your final change Only one restart is necessary as long as each change is saved with the Save Settings button After you click click here to restart all saved changes will come i...

Page 48: ...he main menu displays different options depending on your device s operating mode For Range Extender mode WPS please refer to 2 4GHz Wireless 5GHz Wireless WPS Wi Fi Router Access Point Range Extender Wireless Bridge WISP ...

Page 49: ...ation shown on your screen will vary depending on your configuration You can click the orange Check the latest version button to open a new screen and automatically upgrade firmware to the latest version Click Firmware auto upgrade to begin the process It is recommended to backup the existing firmware version using the Save as File button before upgrading ...

Page 50: ...ice For guidance about using the setup wizard please refer to II Installation Switch to Router Access Point Range Extender Wireless Bridge WISP mode This wizard will help you to switch the device to a different operating mode Wi Fi router mode access point mode range extender wireless bridge or WISP mode see below Switch to Router Access Point Range Extender Wireless Bridge WISP mode 1 Follow the ...

Page 51: ...ard to setup your device in a different mode Refer to II Installation Step 3 onwards for help if needed If you don t see the Get Started screen try reconnecting to the edimax setup SSID and go to http edimax setup in a web browser ...

Page 52: ... screen below will be displayed Enable Disable Enable or disable your WISP connection SSID The name of the WISP network which your BR 6478 AC V2 is connected to Manually enter an SSID if you wish or use Site Survey below Site Survey Select wireless frequency and click Select Site List to open a new window and select your WISP network Security Setting Please refer to III 3 5 1 Basic for a ...

Page 53: ...49 description of security settings ...

Page 54: ...If you are unsure about your connection type contact your ISP In WISP mode only Dynamic IP Static IP PPPoE are available for WAN Connection Mode III 3 3 1 1 Dynamic IP Select Dynamic IP If your Internet service provider assigns IP address automatically using DHCP Dynamic Host Configuration Protocol ...

Page 55: ...tomatically enter your computer s MAC address DNS Address Select Obtain an IP address automatically or Use the following IP address Check with your ISP if you are unsure DNS Address 1 2 3 Enter the DNS address es assigned by your ISP here MTU Enter the maximum transmission unit MTU value of your network connection The default value is 1500 TTL Enable Disable time to live TTL function which limits ...

Page 56: ...Default Gateway Address Input the default gateway assigned by your ISP here Some ISPs may call this Default Route MAC Address For some applications you may need to designate a specific MAC address for the router Please enter the MAC address here If you are connecting the router to a computer press Clone Mac to automatically enter your computer s MAC address DNS Address 1 2 3 Enter the DNS address ...

Page 57: ...53 URL a DNS proxy server TTL Enable Disable time to live TTL function which limits the lifespan of network data to improve performance ...

Page 58: ... User Name Enter the user name assigned by your ISP here Password Enter the password assigned by your ISP here MAC Address For some applications you may need to designate a specific MAC address for the router Please enter the MAC address here If you are connecting the router to a computer press Clone Mac to automatically enter ...

Page 59: ...twork connection The default value is 1392 Connection Type Specify a connection type 1 Continuous Connected all the time 2 Connect on Demand Connect when you initiate an Internet connection 3 Manual Connect disconnect manually using the Connect and Disconnect buttons Idle Time Out Specify the amount of time the router waits before shutting down an idle connection Only available when Connect on Dem...

Page 60: ...3 1 4 PPTP Select PPTP if your ISP is providing you Internet access via PPTP Point to Point Tunneling Protocol Then select Obtain an IP address automatically or Use the following IP address depending on your ISP ...

Page 61: ...following IP address Check with your ISP if you are unsure DNS Address 1 2 3 Enter the DNS address es assigned by your ISP here DNS Proxy Enable or disable a DNS proxy server DNS Proxy Rules URL When DNS proxy is enabled enter the URL of a DNS proxy server Enable Dual WAN Access Enable disable dual WAN access When you enable dual WAN access select an IGMP source User ID Input the user name assigne...

Page 62: ... router waits before shutting down an idle connection Only available when Connect on Demand above is selected III 3 3 1 5 L2TP Select L2TP if your ISP is providing you Internet access via L2TP Layer 2 Tunneling Protocol Host Name Enter the host name of your computer here If required ...

Page 63: ...r ISP if you are unsure DNS Address 1 2 3 Enter the DNS address es assigned by your ISP here Enable Dual WAN Access Enable disable dual WAN access When you enable dual WAN access select an IGMP source and enter a Host Name and MAC Address User ID Input the user name assigned by your ISP here Password Input the password assigned by your ISP here L2TP Gateway Input the L2TP gateway assigned by your ...

Page 64: ...register for a DDNS account please visit the DDNS providers website s examples of which are listed below Enable Disable Enable or disable DDNS Provider Select DDNS service provider Domain Name Enter the domain name provided by the DDNS provider Account Email Please enter the DDNS registration account email Password Key Enter the DDNS service password key The following DDNS services are supported 3...

Page 65: ...61 DHIS http www dhis org CyberGate http cybergate planex co jp ddns NS2GO http www ns2go com NO IP http www noip com ...

Page 66: ...traffic to a proxy server in a different geographical location region DNS Proxy Enable or disable a DNS proxy server DNS Proxy Rules URL When DNS proxy is enabled enter the URL of a DNS proxy server Select Your Rules Enter the domain name provided by the DDNS provider ...

Page 67: ...s on your network devices including smartphones tablets and computers 1 Enable VPN server 2 Export your VPN server configuration file You can open this file on your network device smartphone tablet computer using VPN software app to automatically connect to your VPN on your device You can choose which kind of configuration file to export depending on your requirement Send All Traffic Over VPN ...

Page 68: ...our home network The 1st option will encrypt all Internet traffic through the VPN 3 Setup a login account for your VPN This is required to access your VPN on your network device 4 Send the exported configuration file to your network device e g via email cloud or USB Open the file using VPN software or apps which are widely available online and enter your login details to connect to your VPN You ca...

Page 69: ...he IP address here This IP address will be assigned to the BR 6478 AC V2 and will replace the default IP address Subnet Mask Specify a subnet mask The default value is 255 255 255 0 802 1d Spanning Tree Select Enable or Disable to enable disable 802 1d Spanning Tree This creates a tree of connected layer 2 bridges typically Ethernet switches within a mesh network and disables those links that are ...

Page 70: ...server s IP address leases Your device s DHCP server can be configured to assign static fixed IP addresses to specified network devices identified by their unique MAC address Enable Static DHCP Leases Enable disable static DHCP leases This must be enabled in order to assign any network device a static IP address MAC Address Enter the specified network device s MAC address here IP Address Assign a ...

Page 71: ...te Selected Delete All Delete selected or all entries from the table The LAN IP page will be displayed as below when your device is set to access point mode extender mode You can set the BR 6478 AC V2 to obtain an IP address automatically or you can specify an IP address ...

Page 72: ... guest Wi Fi network WPS access control and scheduling functions can also be managed from here In Access Point mode the Guest feature in the menu is replaced by Multiple SSID III 3 5 1 Basic The Basic screen displays settings for your primary 2 4GHz or 5GHz Wi Fi network Disable Wireless Check the box to disable the wireless function of your device Access Point Mode ...

Page 73: ...ually enter the SSID in order to connect A hidden disabled SSID is typically more secure than a visible enabled SSID Enable Wireless Clients Isolation Check the box to enable wireless clients isolation This prevents wireless clients connected to the BR 6478 AC V2 from communicating with each other and improves security Typically this function is useful for corporate environments or public hot spot...

Page 74: ...nected access points preferably on the WAN side WDS must be configured on each access point using correct MAC addresses All access points should use the same wireless channel MAC Address 1 4 Enter the correct MAC address for other access points in WDS mode Set Security Click Set Security to open a new window and enter the security settings for WDS shown below Click Save when finished Please ensure...

Page 75: ...71 ...

Page 76: ...ty Select an encryption type from the drop down menu WPA Pre shared Key is the recommended and most secure encryption type In WISP mode WPA RADIUS is unavailable for the wireless band that is used to connect to WISP s AP ...

Page 77: ...ing wireless encryption is not recommended When disabled anybody within range can connect to your device s SSID Enable 802 1x Authentication Check the box to enable the 802 1x authentication A RADIUS server is required to perform 802 1x authentication enter the RADIUS server s information in the relevant fields below ...

Page 78: ... a z and A Z or Hex any characters from 0 9 a f and A F Encryption Key Enter your encryption key password according to the format you selected above A complex hard to guess key is recommended Check the Hide box to hide your password from being displayed on screen Enable 802 1x Authentication Check the box to enable the 802 1x authentication A RADIUS server is required to perform 802 1x authenticat...

Page 79: ...make sure your wireless client supports your selection WPA2 AES is recommended followed by WPA2 Mixed if your client does not support WPA2 AES Pre shared Key Format Choose from Passphrase 8 63 alphanumeric characters or Hex up to 64 characters from 0 9 a f and A F Pre shared Key Please enter a key according to the format you selected above A complex hard to guess key is recommended Check the Hide ...

Page 80: ...PA2 AES is safer than WPA TKIP but not supported by all wireless clients Please make sure your wireless client supports your selection WPA2 AES is recommended followed by WPA2 Mixed if your client does not support WPA2 AES RADIUS Server IP address Input the IP address of the RADIUS authentication server here RADIUS Server Port Input the port number of the RADIUS authentication server here The defa...

Page 81: ...6478 AC V2 supports up to four additional SSIDs for each wireless band in access point mode Enable Guest SSID Check uncheck the box to enable disable the guest Wi Fi network Wireless Guest Name Enter a reference ID name for your guest wireless network Hide SSID Enable or disable hide SSID When disabled the SSID will be visible to clients as an available Wi Fi network When enabled the SSID will not...

Page 82: ...g and 802 11n wireless clients to connect to the BR 6478 AC V2 Channel Number Channel number for the guest network is the same as the main SSID and cannot be adjusted independently Encryption Please refer to III 3 5 1 Basic Wireless Security for details about security settings WPA RADIUS encyrption type is not available for the guest network MULTIPLE SSID The BR 6478 AC V2 supports up to four addi...

Page 83: ...ess clients connected to the BR 6478 AC V2 from communicating with each other and improves security Typically this function is useful for corporate environments or public hot spots and can prevent brute force attacks on clients usernames and passwords Band Displays the wireless standard used for the BR 6478 AC V2 s frequency band 2 4GHz B G N Allows 802 11b 802 11g and 802 11n wireless clients to ...

Page 84: ...maps workstations virtually instead of physically and allows you to group together or isolate users from each other VLAN IDs 0 4094 are supported Set wireless security for the specified SSID security settings are described in III 3 5 1 Basic ...

Page 85: ...PS Check uncheck this box to enable disable WPS WPS Status Displays Configured or unConfigured depending on whether WPS and SSID security settings for the device have been configured or not either manually or using the WPS button Self PIN Code Displays the WPS PIN code of the device SSID Displays the SSID of the device Authentication Mode Displays the wireless security authentication mode of the d...

Page 86: ...are unsure of its PIN code III 3 5 4 Access Control Access Point mode only Access Control is a security feature that can help to prevent unauthorized users from connecting to your wireless router This function allows you to define a list of network devices permitted to connect to the BR 6478 AC V2 Devices are each identified by their unique MAC address If a device which is not on the list of permi...

Page 87: ...dress of computer or network device manually without dashes or colons e g for MAC address aa bb cc dd ee ff enter aabbccddeeff Comment Enter a comment for reference identification consisting of up to 16 alphanumerical characters Add Click Add to add the MAC address to the MAC address filtering table MAC address entries will be listed in the table as shown below Select an entry using the Select che...

Page 88: ...ur extender s 5GHz network and vice versa The schedule feature allows you to automate the wireless radio to switch off at specified times Multiple schedules can be configured Check uncheck the box Enable Wireless Off Schedule to enable disable the wireless off scheduling function The BR 6478 AC V2 must have time date settings initially set to use scheduling ...

Page 89: ...nclude in the schedule Check Every Day as a shortcut for an every day schedule 2 Specify a start and end time hour and minute for the wireless off schedule using the drop down menu Add Add the schedule to the table of active schedules Delete Selected Delete All Delete selected or all entries from the table of active schedules ...

Page 90: ...opriate tools for your OS e g Windows File Explorer Network USB drives should be pre formatted to supported FAT32 or NTFS file systems before use with the USB port USB hubs are not supported III 3 6 1 Basic Settings Configure basic USB settings you can use the USB port for USB storage or for printer sharing For USB storage you can enable Network Neighborhood access for Windows and FTP access ...

Page 91: ...Enable Network Neighborhood Enable Network Neighborhood access for Windows if you can t find your USB storage on a Windows device when connected to the network FTP Server Enable FTP access to the USB storage Modify the port number if required FTP Server Internet Enable remote Internet FTP access to the USB storage Modify the port number if required ...

Page 92: ...e Edit the name of the USB storage in the network Workgroup Edit the name of the Network Neighborhood workgroup for your USB storage Share All Select to share all folders and content on your USB storage Require Authentication Select to use password authentication to access USB storage for all folders or only specified folders Click Add to setup authentication ...

Page 93: ...storage FAT32 NTFS are supported Share Name Set a reference name for this sharing configuration Folder Name Specify whether to share all folders or only selected folders Browse to choose a specific folder to share User Name Select a username Password Select a password Access Limit Select access limit for this USB storage ...

Page 94: ... III 3 5 4 Access Control Access Control is a security feature that can help to prevent unauthorized users from connecting to your wireless router This function allows you to define a list of network devices permitted or denied to connect to the BR 6478 AC V2 Devices are each identified by their unique MAC address or IP address Specific services can also be allowed denied for IP addresses Check un...

Page 95: ...91 ...

Page 96: ...own list and click to add its MAC address into the Client PC Mac Address field Click Refresh in the drop down menu to refresh the list of available MAC addresses If the address you wish to add is not listed enter it manually Comment Enter a comment for reference identification consisting of up to 16 alphanumerical characters Add Click Add to add the MAC address to the MAC address filtering table M...

Page 97: ... IP Filtering Check the box to enable IP filtering and select whether to Deny or Allow access for specified IP address Add PC Opens a new window to add a new IP to the list to deny or allow access services according to above ...

Page 98: ...heck the box for each service you wish to select Protocol Select protocol TCP or UDP or Both for a service not included in the Client PC Service list Port Range Enter the port range for the service not included in the Client PC Service list Enter a single port number e g 110 a range of port numbers e g 110 120 or multiple port numbers separated by a comma e g 110 115 120 Add Click Add to add selec...

Page 99: ...l since it opens the client up to unrestricted two way access Enable DMZ Check uncheck the box to enable disable the device s DMZ function Public Select Dynamic IP or Static IP here For Dynamic IP select an Internet connection session from dropdown menu For Static IP enter the IP address that you want to map to a specific private IP address Client PC Enter the private IP address that the internet ...

Page 100: ... Delete selected or all entries from the table III 3 7 4 DoS Denial of Service DoS is a common form of malicious attack against a network The router s firewall can protect against such attacks If you are not familiar with these functions it is recommended you keep the default settings ...

Page 101: ... Discard Ping from WAN Check this box and the router will not answer ping requests from the Internet Port Scan Intruders use port scanners to detect open Internet IP address ports Check each type of port scan to prevent Sync Flood Specify the frequency of sync flood packets which will trigger the DoS protection function ...

Page 102: ...erformance QoS is recommended to optimize performance for online gaming III 3 8 1 QoS Check uncheck the box Enable QoS to enable disable the QoS function Click Add to open a new window and setup a QoS rule The Current QoS Table displays all QoS rules Total Download Bandwidth Enter your total download bandwidth limit from your Internet service provider ISP in kbits Total Upload Bandwidth Enter your...

Page 103: ...2 Enter the bandwidth limit 3 Select whether the bandwidth is a Guarantee minimum or Max maximum Local IP Address Enter the IP address range to which the QoS rule will be applied Enter a starting IP address in the left field and the end IP address in the right field to define a range of IP addresses or enter an IP address in the left field only to define a single IP address ...

Page 104: ... g 110 120 Traffic Type Select traffic type as an alternative to specifying a port range above Protocol Select a TCP or UDP protocol type Save Click add button to add a new QoS rule detailed instructions will be given below QoS rule entries will be listed in the Current QoS Table as shown below Select a rule using the Select checkbox When using the Edit button only one rule can be selected each ti...

Page 105: ...omatically disabled Check uncheck the box Enable iQoS to enable disable the iQoS function and then enter your bandwidth limits and arrange the network application icons in priority order in the Current iQoS Table Icons with higher priority will be assigned bandwidth more efficiently for better performance Total Download Bandwidth Enter your total download bandwidth limit from your Internet service...

Page 106: ... P2P BT Downloads FTP Multimedia Online Gaming The iQoS table is ordered left to right high to low priority Click a small icon below the table to insert it into the table and click a large icon in the table to remove it All spaces in the priority table must be filled ...

Page 107: ... a method of configuring path selection of routers characterized by the absence of communication between routers regarding the current topology of the network The opposite of static routing is dynamic routing sometimes also referred to as adaptive routing You can configure static routing and manually add routes to the routing table shown below ...

Page 108: ...which leads to destination network Add Add the route to the current static routing table Static Routing Table entries will be displayed in the table shown below Delete Selected Delete All Delete selected or all entries from the table III 3 9 2 Port Forwarding This function allows you to redirect a single port or consecutive ports of an Internet IP address to the same port of a local IP address The...

Page 109: ... Select the type of connection TCP UDP or Both Port Range Input the starting port number in the left field and input the ending port number in the right field If you only want to redirect a single port number only enter a port number in the left field Comment Enter a comment for reference or identification Port Forwarding Table entries will be displayed in the table shown below Delete Selected Del...

Page 110: ... IP address of the computer on your local network Computer Name Select the name of a Windows computer from the drop down menu and click to auto input its IP address in the Private IP field Private Port Specify the private port you wish to use on the computer in your local network Type Select the type of Internet Protocol Public Port Specify a public port to access the computer on your local networ...

Page 111: ...r with these functions Fragment Threshold Set the Fragment threshold of the wireless radio The default value is 2346 RTS Threshold Set the RTS threshold of the wireless radio The default value is 2347 Beacon Interval Set the beacon interval of the wireless radio The default value is 100 Delete Selected Delete All Delete selected or all entries from the table ...

Page 112: ...hance of radio signal collisions between 802 11b and 802 11g wireless access points It s recommended to set this option to Auto Tx Power Set the power output of the wireless radio You may not require 100 output power Setting a lower power output can enhance security since potentially malicious unknown users in distant areas will not be able to access your signal WMM WMM Wi Fi Multimedia technology...

Page 113: ...the wireless radio The default value is 2346 RTS Threshold Set the RTS threshold of the wireless radio The default value is 2347 Beacon Interval Set the beacon interval of the wireless radio The default value is 100 DTIM Period Set the DTIM period of wireless radio The default value is 3 Data Rate Set the wireless data transfer rate The default is set to Auto N Data Rate Set the data rate of 802 1...

Page 114: ...this option to Auto Tx Power Set the power output of the wireless radio You may not require 100 output power Setting a lower power output can enhance security since potentially malicious unknown users in distant areas will not be able to access your signal WMM WMM Wi Fi Multimedia technology can improve the performance of certain network applications such as audio video streaming network telephony...

Page 115: ...r applications such as IPTV video streaming IGMP Snooping IGMP snooping monitors traffic between hosts and multicast routers to facilitate bandwidth conservation Select enable or disable IGMP Proxy IGMP proxy enables intelligent multicast forwarding based on IGMP snooping information Select enable or disable It is recommended to set IGMP Snooping and IGMP Proxy to Enable ...

Page 116: ...networking protocols which enables network devices to communicate and automatically establish working configurations with each other Select Enable or Disable III 3 9 8 Fast NAT Enable or disable fast NAT Network Address Translation for better network performance ...

Page 117: ...one Select the time zone of your country or region Time Server Address The travel router supports NTP Network Time Protocol for automatic time and date setup Input the host name of the IP server manually Daylight Saving If your country region uses daylight saving time please check the Enable Function box and select the start and end date ...

Page 118: ...urposes Please make a note of the new password In the event that you forget the password and are unable to login to the browser based configuration interface see II 7 Reset to factory default settings for how to reset the device Current Password Enter your current password New Password Enter your new password Confirmed Password Confirm your new password ...

Page 119: ... Access Check Enabled to enable the remote access feature and then enter the appropriate values Host IP Address Specify the IP address which is allowed remote access Port Specify a port number 0 65535 used for remote access ...

Page 120: ...of wireless information to your computer as a txt file III 3 10 5 Upgrade The upgrade page displays the current firmware version and allows you to upgrade the system firmware to a more recent version You can download the latest firmware from the Edimax website and upgrade manually using the Choose File button or you can click the Check the latest version button to check your version and automatica...

Page 121: ...at the router malfunctions or is not responding then it is recommended that you restart the device III 3 10 7 Logs You can view the system log and security log here Use the drop down menu in the top right corner to select which log to view ...

Page 122: ...118 ...

Page 123: ... to refresh the log and update any activity III 3 10 8 Active DHCP Client Information about active DHCP clients is shown in the table which displays the DHCP server assigned IP address MAC address and time expired for each computer or device on the local network III 3 10 9 Statistics Displays sent and received packet network statistics ...

Page 124: ... in order to access http edimax setup The BR 6478 AC V2 s default IP address is 192 168 2 1 The procedure for modifying your IP address varies across different operating systems please follow the guide appropriate for your operating system in IV 1 2 How to modify the IP address of your computer Static IP users please make a note of your static IP before you change it You can assign a new IP addres...

Page 125: ...t should be located in the lower left corner of your computer then click Control Panel Double click the Network and Internet Connections icon click Network Connections and then double click Local Area Connection The Local Area Connection Status window will then appear click Properties 2 Obtain an IP address automatically and Obtain DNS server address automatically should be selected ...

Page 126: ...122 ...

Page 127: ...etwork Status and Tasks then click Manage Network Connections Right click Local Area Network then select Properties The Local Area Connection Properties window will then appear select Internet Protocol Version 4 TCP IPv4 and then click Properties 2 Select Obtain an IP address automatically and Obtain DNS server address automatically should be selected ...

Page 128: ...124 ...

Page 129: ...indows 7 1 Click the Start button it should be located in the lower left corner of your computer then click Control Panel 2 Under Network and Internet click View network status and tasks 3 Click Local Area Connection ...

Page 130: ...126 4 Click Properties 5 Select Internet Protocol Version 4 TCP IPv4 and then click Properties ...

Page 131: ...127 6 Select Obtain an IP address automatically and Obtain DNS server address automatically should be selected ...

Page 132: ...rt screen you need to switch to desktop mode Move your curser to the bottom left of the screen and click 2 In desktop mode click the File Explorer icon in the bottom left of the screen as shown below 3 Right click Network and then select Properties ...

Page 133: ...129 4 In the window that opens select Change adapter settings from the left side 5 Choose your connection and right click then select Properties ...

Page 134: ...130 6 Select Internet Protocol Version 4 TCP IPv4 and then click Properties 7 Select Obtain an IP address automatically and Obtain DNS server address automatically should be selected ...

Page 135: ...131 ...

Page 136: ...and click on System Preferences 2 In System Preferences click on Network 3 Click on Wi Fi in the left panel and then click Advanced in the lower right corner 4 Select TCP IP from the top menu and Using DHCP in the drop down menu labeled Configure IPv4 should be selected ...

Page 137: ...133 ...

Page 138: ...interface Please make a note of your static IP before you change it IV 1 2 1 Windows XP 1 Click the Start button it should be located in the lower left corner of your computer then click Control Panel Double click the Network and Internet Connections icon click Network Connections and then double click Local Area Connection The Local Area Connection Status window will then appear click Properties ...

Page 139: ...played in the IP address field before you replace it Please make a note of this IP address subnet mask default gateway and DNS server addresses IP address 192 168 2 10 Subnet Mask 255 255 255 0 Preferred DNS Server 192 168 2 1 Click OK when finished ...

Page 140: ...ies window will then appear select Internet Protocol Version 4 TCP IPv4 and then click Properties 2 Select Use the following IP address and Use the following DNS server addresses then input the following values Your existing static IP address will be displayed in the IP address field before you replace it Please make a note of this IP address subnet mask default gateway and DNS server addresses IP...

Page 141: ...137 IV 1 2 3 Windows 7 1 Click the Start button it should be located in the lower left corner of your computer then click Control Panel 2 Under Network and Internet click View network status and tasks ...

Page 142: ...138 3 Click Local Area Connection 4 Click Properties ...

Page 143: ...server addresses then input the following values Your existing static IP address will be displayed in the IP address field before you replace it Please make a note of this IP address subnet mask default gateway and DNS server addresses IP address 192 168 2 10 Subnet Mask 255 255 255 0 Preferred DNS Server 192 168 2 1 Click OK when finished ...

Page 144: ... 1 From the Windows 8 Start screen you need to switch to desktop mode Move your curser to the bottom left of the screen and click 2 In desktop mode click the File Explorer icon in the bottom left of the screen as shown below ...

Page 145: ...141 3 Right click Network and then select Properties 4 In the window that opens select Change adapter settings from the left side ...

Page 146: ...142 5 Choose your connection and right click then select Properties ...

Page 147: ...server addresses then input the following values Your existing static IP address will be displayed in the IP address field before you replace it Please make a note of this IP address subnet mask default gateway and DNS server addresses IP address 192 168 2 10 Subnet Mask 255 255 255 0 Preferred DNS Server 192 168 2 1 Click OK when finished ...

Page 148: ... click on System Preferences 2 In System Preferences click on Network 3 Click on Wi Fi in the left panel and then click Advanced in the lower right corner 4 Select TCP IP from the top menu and select Manually from the drop down menu labeled Configure IPv4 then click OK ...

Page 149: ...d in the IP address field before you replace it Please make a note of this IP address subnet mask default gateway and DNS server addresses 5 In the IPv4 Address and Subnet Mask field enter IP address 192 168 2 10 and subnet mask 255 255 255 0 Click on OK ...

Page 150: ...146 6 Click Apply to save the changes ...

Page 151: ...your operating system If you are using Windows XP or earlier please contact your ISP or router manufacturer to find your network security key IV 1 3 1 Windows 7 Vista 1 Open Control Panel and click on Network and Internet in the top menu 2 Click on View network status and tasks which is under the heading Network and Sharing Center ...

Page 152: ...see the profile of your Wi Fi network in the list Right click on your Wi Fi network and then click on Properties 5 Click on the Security tab and then check the box labeled Show characters This will show your network security key Click the Cancel button to close the window ...

Page 153: ...der labeled Utilities and then open the application Keychain Access 2 Select Passwords from the sub menu labeled Category on the left side as shown below Then search the list in the main panel for the SSID of your network In this example the SSID is EdimaxWireless though your SSID will be unique to your network ...

Page 154: ...SID of your network and you will see the following window 4 Check the box labeled Show password and you will be asked to enter your administrative password which you use to log into your Mac Enter your password and click Allow ...

Page 155: ...work security password will now be displayed in the field next to the box labeled Show password In the example below the network security password is edimax1234 Please make a note of your network security password ...

Page 156: ...o find your router s IP address please follow the instructions appropriate for your operating system IV 1 4 1 Windows XP Vista 7 1 Go to Start select Run and type cmd then press Enter or click OK 2 A new window will open type ipconfig and press Enter ...

Page 157: ...153 3 Your router s IP address will be displayed next to Default Gateway ...

Page 158: ...From the Windows 8 Start screen move your curser to the top right corner of the screen to display the Charms bar 2 Click Search and enter cmd into the search bar Click the Command Prompt app which be displayed on the left side ...

Page 159: ...155 3 A new window will open type ipconfig and press Enter ...

Page 160: ...156 4 Your router s IP address will be displayed next to Default Gateway ...

Page 161: ...s and click on Network 2 If you are using an Ethernet cable to connect to your network your router s IP address will be displayed next to Router 3 If you are using Wi Fi click Wi Fi in the left panel and then Advanced in the bottom right corner ...

Page 162: ...158 4 Click the TCP IP tab and your router s IP address will be displayed next to Router ...

Page 163: ...p is complete follow the guide below Below is an example of how to connect using Windows Vista the process may vary slightly for other versions of Windows 1 Click the network icon or in the system tray and select Connect to a network 2 Search for the SSID of your BR 6478 AC V2 and then click Connect If you set a password for your network you will then be prompted to enter it ...

Page 164: ...160 3 After correctly entering your password you will be successfully connected to the BR 6478 AC V2 s wireless network ...

Page 165: ...p edimax setup and go to USB in the main menu 2 How do I share a printer a Go to USB Basic Settings at http edimax setup and enable USB Sharing and select Print Server Connect your printer to the device with a USB cable and ensure printer drivers are installed on computers that you wish to share the printer with Then install the Edimax Device Server Utility from the included CD the utility can als...

Page 166: ...k if you can access the internet If you can t please contact your Internet service provider for assistance 5 I can t open the web based configuration interface a Please ensure your computer is set to use a dynamic IP address 6 How do I reset my device to factory default settings a To reset the device back to its factory default settings press and hold the WPS Reset button for over 10 seconds until...

Page 167: ...ings and use the default username admin and default password 1234 Default settings are displayed on the product label on the back of the device as shown above 8 Do the blue WAN port and yellow LAN ports work the same when the device is in different modes No the WAN and LAN ports have slightly different functions depending on the operating mode of the device a In Wi Fi router mode the WAN port is f...

Page 168: ...164 ...

Page 169: ... user is sent to the proper IP address The DNS server IP address used by the computers on your home network is the location of the DNS server your ISP has assigned to you DSL Modem DSL stands for Digital Subscriber Line A DSL modem uses your existing phone lines to transmit data at high speeds Ethernet A standard for computer networks Ethernet networks are connected by special cables and hubs and ...

Page 170: ...or definition The ISP Gateway Address is an IP address for the Internet access point located at the ISP s office ISP Internet Service Provider An ISP is a business that provides connectivity to the Internet for individuals and other businesses or organizations LAN Local Area Network A LAN is a group of computers and devices connected together in a relatively small area such as a house or an office...

Page 171: ...ur ISP is a set of four numbers e g 255 255 255 0 configured like an IP address It is used to create IP address numbers used only within a particular network as opposed to valid IP address numbers recognized by the Internet which must be assigned by InterNIC TCP IP UDP Transmission Control Protocol Internet Protocol TCP IP and User Datagram Protocol UDP TCP IP is the standard protocol for data tra...

Page 172: ...User Interface GUI Many devices support a graphical user interface that is based on the web browser This means the user can use the familiar Netscape or Microsoft Internet Explorer to Control configure or monitor the device being managed ...

Page 173: ... sold or licensed as is Should the programs prove defective following their purchase the buyer and not this company its distributor or its dealer assumes the entire cost of all necessary servicing repair and any incidental or consequential damages resulting from any defect in the software Edimax Technology Co Ltd reserves the right to revise this publication and to make changes from time to time i...

Page 174: ...uncontrolled environment In order to avoid the possibility of exceeding the FCC radio frequency exposure limits human proximity to the antenna shall not be less than 2 5cm 1 inch during normal operation Federal Communications Commission FCC RF Exposure Requirements This EUT is compliance with SAR for general population uncontrolled exposure limits in ANSI IEEE C95 1 1999 and had been tested in acc...

Page 175: ... 1999 5 ES 2009 125 ES Deutsch Dieses Gerät erfüllt die Voraussetzungen gemäß den Richtlinien 1999 5 EC 2009 125 EC Español El presente equipo cumple los requisitos esenciales de la Directiva 1999 5 EC 2009 125 EC Italiano Questo apparecchio è conforme ai requisiti essenziali e alle altre disposizioni applicabili della Direttiva 1999 5 CE 2009 125 CE Nederlands Dit apparaat voldoet aan de essentië...

Page 176: ...rectives 1999 5 EC Spectrum ETSI EN 300 328 V1 8 1 2012 ETSI EN 301 893 V1 7 1 2012 EMC EN 301 489 1 V1 9 2 2011 09 EN 301 489 17 V2 2 1 2012 09 Safety LVD IEC 60950 1 2005 2nd Edition A1 2009 A2 2013 EN 60950 1 2006 A11 2009 A1 2010 A12 2011 A2 2013 Recommendation 99 519 EC EMF EN 62311 2008 Directives 2006 95 EC Safety LVD IEC 60950 1 2005 2nd Edition A1 2009 A2 2013 EN 60950 1 2006 A11 2009 A1 ...

Page 177: ...173 ...

Reviews: