background image

Safety

Operating Instructions 911-210-10 - 00.0 - 06/2020

11

Examples

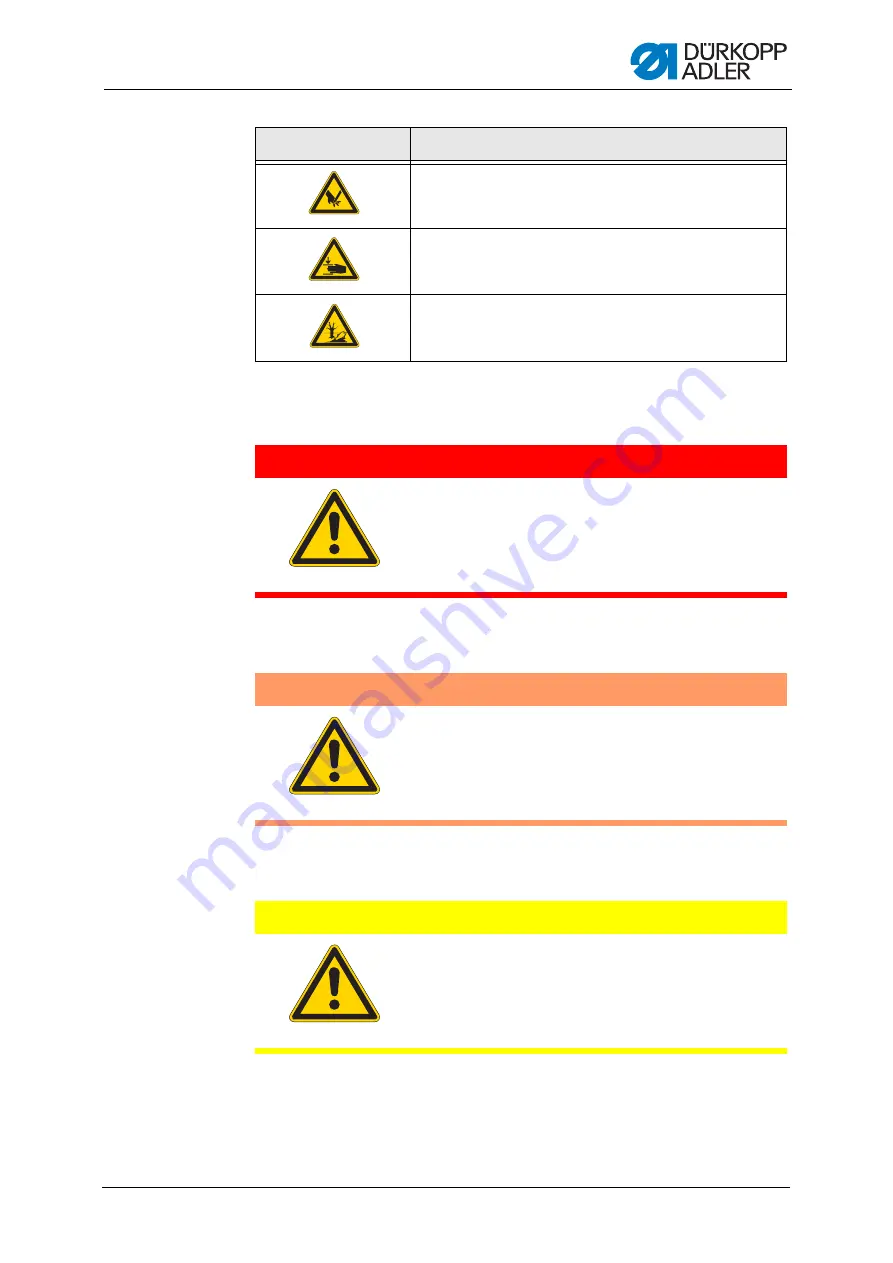
Examples of the layout of warnings in the text:

This is what a warning looks like for a hazard that will result in serious 
injury or even death if ignored.

This is what a warning looks like for a hazard that could result in seri-
ous or even fatal injury if ignored.

This is what a warning looks like for a hazard that could result in 
moderate or minor injury if the warning is ignored.

Puncture

Crushing

Environmental damage

Symbol

Type of danger

DANGER

Type and source of danger!

Consequences of non-compliance.

Measures for avoiding the danger.

WARNING

Type and source of danger!

Consequences of non-compliance.

Measures for avoiding the danger.

CAUTION

Type and source of danger!

Consequences of non-compliance.

Measures for avoiding the danger.

Summary of Contents for 911-210-3020-10

Page 1: ...911 210 10 Operating Instructions...

Page 2: ...er AG and protected by copyright Any reuse of these contents including extracts is prohibited without the prior written approval of D rkopp Adler AG Copyright D rkopp Adler AG 2020 IMPORTANT READ CARE...

Page 3: ...4 10 Thread tension 28 4 11 Swiveling the machine head up and down 30 4 11 1 Swiveling up the machine head 30 4 11 2 Swiveling down the machine head 31 5 Programming 33 5 1 Structure of the software...

Page 4: ...ate and time 77 5 12 4 Setting the brightness 78 5 12 5 Testing the touchscreen 78 5 13 Testing the functions of the machine 79 5 13 1 Testing inputs and outputs 79 5 13 2 Adjusting the stroke positio...

Page 5: ...rical connection 106 7 8 1 Checking the rated voltage 106 7 8 2 Establishing the electrical connection 106 7 9 Pneumatic connection 107 7 9 1 Assembling the compressed air maintenance unit 107 7 9 2 A...

Page 6: ...Table of Contents 4 Operating Instructions 911 210 10 00 0 06 2020...

Page 7: ...Specifically chapter Operation p 17 is important for the operators Specialists This group has the appropriate technical training for performing maintenance or repairing malfunctions Specifically the c...

Page 8: ...ay control panel Important Special attention must be paid to this point when performing a step Information Additional information e g on alternative operating options Order Specifies the work to be pe...

Page 9: ...e standards and regulations D rkopp Adler cannot be held liable for any damage resulting from Breakage and transport damages Failure to observe these instructions Improper use Unauthorized modificatio...

Page 10: ...About these instructions 8 Operating Instructions 911 210 10 00 0 06 2020...

Page 11: ...e Only use original parts from the manufacturer Transport Use a lifting carriage or stacker to transport the machine Raise the machine max 20 mm and secure it to prevent it from slipping off Setup The...

Page 12: ...mbols used in warnings Warnings in the text are distinguished by color bars The color scheme is based on the severity of the danger Signal words indicate the severity of the danger Signal words Signal...

Page 13: ...ven fatal injury if ignored This is what a warning looks like for a hazard that could result in moderate or minor injury if the warning is ignored Puncture Crushing Environmental damage Symbol Type of...

Page 14: ...n environmental damage if ignored This is what a warning looks like for a hazard that could result in property damage if ignored CAUTION Type and source of danger Consequences of non compliance Measur...

Page 15: ...00 0 06 2020 13 3 Machine description 3 1 Components of the machine Fig 1 Components of the machine 1 Machine head 2 Quick stop 3 Reel stand 4 Tabletop 5 Stand 6 Compressed air maintenance unit 7 Peda...

Page 16: ...s intended for industrial use The machine may only be set up and operated in dry conditions on well maintained premises If the machine is operated on premises that are not dry and well maintained then...

Page 17: ...911 210 10 00 0 06 2020 15 3 3 Declaration of Conformity The machine complies with European regulations ensuring health safety and environmental protection as specified in the declaration of conformi...

Page 18: ...Machine description 16 Operating Instructions 911 210 10 00 0 06 2020...

Page 19: ...reparing the machine for operation Complete the following steps in preparation of sewing before starting to work Inserting or changing the needle Threading the needle thread Threading or winding the h...

Page 20: ...tch on the machine 1 Turn the main switch 1 to the right into the I position The following message appears on the display Press the pedal backwards 2 Press the pedal back The machine performs a refere...

Page 21: ...op The quick stop switch 1 can be used to immediately stop all working steps on the machine e g after an operating mistake Fig 3 Switching on Quick stop To switch on quick stop 1 Press the quick stop...

Page 22: ...eedle into the needle bar 2 until it reaches the end stop Important The groove 3 must face toward the hook 5 Tighten the screw 4 WARNING Risk of injury from sharp and moving parts Puncture possible Sw...

Page 23: ...p The sewing feet are lowered The hook cover 2 is opened and lit Switching off threading mode To switch off threading mode 1 Press the button 1 again WARNING Risk of injury from sharp and moving parts...

Page 24: ...harp and moving parts Puncture or crushing possible Switch off the machine before threading the needle thread 1 Thread lever 2 Needle thread regulator 3 Guide 4 Guide 5 Needle thread monitor 6 Needle...

Page 25: ...edle thread clockwise around the tension 14 6 Feed the needle thread through guides 13 and 12 7 Guide the needle thread clockwise around the deflection 11 8 Feedtheneedlethreadunderthethreadtensioning...

Page 26: ...n sewing material low thread strengths small stitch lengths Proper setting The loop of the needle thread slides at low tension over the thickest point of the hook The largest amount of thread is requi...

Page 27: ...om through the rear hole and from bottom to top through the left hole 3 Feed the hook thread from top to bottom through the thread guide channel 2 4 Guide the hook thread counterclockwise around the w...

Page 28: ...ng material holder 1 for alternating clamps only 2 Press the threading mode 2 button The machine is in threading mode The button 2 lights up The sewing feet are lowered The hook cover 3 is opened and...

Page 29: ...h the slot 8 in the bobbin case retainer 7 Pull the hook thread under the tension spring 7 8 Feed the hook thread through the guide 6 and pull it approx 3 cm further until reaching the hook cover 9 Ho...

Page 30: ...ng and thread breaking Proper setting If the tension of needle thread and hook thread is identical the thread interlace lies in the middle of the sewing material Adjust the needle thread tension so th...

Page 31: ...the adjusting wheel 2 To adjust the hook thread tension 1 Turn the adjusting wheel 2 Increase the hook thread tension Turn the adjusting wheel 2 clockwise Reduce the hook thread tension Turn the adju...

Page 32: ...chine head Important The transport carriage 2 must be at the rear To swivel up the machine head 1 Release the locking lever 4 under the tabletop WARNING Risk of injury from moving parts Crushing possi...

Page 33: ...14 Swiveling down the machine head To swivel down the machine head 1 Hold the machine head in the head cover area 1 2 Release the latch 2 3 Swivel down the machine head carefully 4 Latch the locking l...

Page 34: ...Operation 32 Operating Instructions 911 210 10 00 0 06 2020...

Page 35: ...ad The screen is a touchscreen i e the buttons are displayed on the screen rather than provided as physical buttons Buttons or functions are activat ed by tapping the corresponding position on the mon...

Page 36: ...re is also used to define general settings that apply to all pro grams There are also technical menu items for testing and maintaining the machine 5 2 Overview of the menu structure The following tabl...

Page 37: ...45 Service Einstellungen Settings p 76 System Information System information p 83 Multitest Multi test p 79 Initialisierung und Update Initialization and update p 84 Hersteller nur f r DA Personal Ma...

Page 38: ...17 Start screen Structure of the start screen Title bar 1 This shows the version of the machine on the start screen It also contains information on the menu item currently selected in the various men...

Page 39: ...for creating and editing seam programs and for performing settings and tests on the machine An arrow 1 next to a menu entry indicates that pressing the entry will display further sub items Fig 18 Menu...

Page 40: ...Entering a password Depending on the setting see chapter Changing the password options p 76 a password is only required for accessing the techni cal menus or must be entered every time the machine is...

Page 41: ...Buttons that are not used in the current context are grayed out 1 Button Meaning At the upper right in the title bar of all windows The program jumps back by one navigation level OK CR In windows with...

Page 42: ...an the screen height To scroll the display 1 Drag the scrollbar 1 up or down 5 4 5 Selecting options from a list When selecting options a distinction is made between round radio buttons and square che...

Page 43: ...d option The selected option 1 is marked with a dot Selection with check boxes Fig 23 Selection with check boxes Square check boxes allow for the selection of multiple entries To select options using...

Page 44: ...yed You can use the filter functions to make the list more manageable To use file filters 1 Press the Dateifilter File Filter button under the list The file filter screen opens 2 Press the desired fil...

Page 45: ...ter the text Switching between uppercase lowercase To switch between uppercase and lowercase 1 Press the Aa 5 button Deleting the last character To delete the last character 1 Press the DEL 4 button A...

Page 46: ...onding parameter is displayed below the parameter name The prescribed value range 4 for the parameter is displayed below the symbol 3 The current valid value is displayed in the data entry field 5 bel...

Page 47: ...screen on and off 1 Press the menu items Extras Vollbild ein aus Full screen on off The display switches to the respective mode 5 4 10 Switching zoom on and off You can magnify the display in order t...

Page 48: ...he file selection screen is displayed All existing seam programs and seam sequences are displayed Information You can use the Dateifilter File Filter to make the list more manageable p 42 Fig 29 Openi...

Page 49: ...d seams until the machine is switched off Important If you wish to adopt the changes you must modify and save the program Otherwise the values are automatically reset to the original settings when the...

Page 50: ...button The value is adopted and used for all seams until the machine is switched off 5 7 Changing the bobbin managing a thread breaking The machine automatically detects when the hook thread has been...

Page 51: ...om the selected point 5 7 2 Bobbin change without a request from the program If you wish to independently insert a new bobbin without being requested to do so by the program you have to press the Spul...

Page 52: ...ror 1 Press the button Reparaturmodus Repair mode on the start screen The Reparaturmodus Repair mode window is displayed Fig 33 Continuing a seam in Repair mode after an error 2 Use the Vor Forwards a...

Page 53: ...Manage Thread Breaking Fig 34 Continuing a seam after thread breaking Continuing a seam To continue a seam after thread breaking 1 Re thread the needle thread 2 Use the Vor Forwards and Zur ck Back bu...

Page 54: ...bbin 7 Press the Einf delmodus Threading mode button on the machine head The hook cover closes 8 Press the pedal forwards The machine moves into the insertion position 9 Insert the transfer plate 10 P...

Page 55: ...e starting point 2 Define the starting point 1 Cursor position 2 Cursor 3 Arrow buttons 4 OK button Accept 5 Save button 6 Delete button 7 Parameter button 8 Line selection buttons Method Coordinate a...

Page 56: ...osition without sewing Straight seam A straight path is sewn Curved seam A curve is sewn After pressing the button for a straight or curved seam the correspond ing window for entering the sewing param...

Page 57: ...rmissible sewing field of the machine Especially with curved paths you should remember that the start and end points are not directly connected and that a curve is generated between these two points 8...

Page 58: ...p 56 5 10 2 Performing a contour test Perform a contour test every time after creating a new seam program or editing a seam contour to ensure that the contour you entered lies within the permissible s...

Page 59: ...ogram 1 OpentheseamprogramyouwishtomodifyviathemenuitemsDatei File ffnen Open The seam program opens on the start screen Changing the contour of a seam program To change the contour of a seam program...

Page 60: ...itch of the seam pattern is at the top and the last stitch is at the bottom 3 Press the Go To button The selected contour region is displayed in detail The stitching point 2 to be modified is marked i...

Page 61: ...sking if you wish to adopt the changes Confirm the query dialog with JA YES to save the modified contour Important Always perform a contour test after modifying a contour to ensure that the new seam p...

Page 62: ...20 Fig 41 Changing seam program parameters 2 Press the desired parameter group The individual parameters of this group are displayed 3 Press the desired parameter The window for modifying the paramete...

Page 63: ...ing The size of the contour is changed PP1 Configuration Symbol Meaning Seam name max 20 characters Minimum sewing foot stroke height min 1 0 max 10 0 Def 5 0 mm Sets this as the minimum value of the...

Page 64: ...pened in the loading position Pressing the pedal closes the left part of the two piece clamp for angle mounting Pressing the pedal again closes the right part Another press of the pedal starts the sew...

Page 65: ...Pressing the pedal opens the left part of the two piece clamp for angle mounting Pressing the pedal again opens the right part Mode 4 The clamp remains closed in the removal position Pressing the peda...

Page 66: ...e machine parameters A higher value makes the needle monitor less sensitive 99 Needle thread monitor switched off in this program only PP6 Thread consumption Symbol Meaning Sewing material thickness m...

Page 67: ...equence The window for selecting the seam program appears Fig 42 Selecting seam programs The existing seam programs are displayed at the right side of the screen The field Sequenz Sequence field on th...

Page 68: ...n Delete button The seam program is removed from the seam sequence Assigning a name to a seam sequence To assign a name to a seam sequence 1 Press the Namen eingeben Set name button The window for ent...

Page 69: ...new program that is similar to an existing program you do not need to create the entire program anew You can save the existing program under a new name and then change the details you wish to modify T...

Page 70: ...a suitable USB key from D rkopp Adler To copy a seam program or a seam sequence 1 Press the menu items Datei File Kopieren Copy The window for selecting the file to be copied appears Fig 44 Copying a...

Page 71: ...red can be deleted from the control To delete a seam program or a seam sequence 1 Press the menu items Datei File L schen Delete The window for selecting the file to be deleted appears Fig 45 Deleting...

Page 72: ...iting machine parameters 2 Press the desired parameter group The individual parameters of this group are displayed 3 Press the desired parameter The window for modifying the parameter value opens 4 Se...

Page 73: ...ssure to allow for better alignment on insertion Neat seam beginning Optional equipment activates stitch position optimization Additional Instructions Stitch Position Optimization Marking lamps Option...

Page 74: ...n in order to activate the quick start mode Push button In push button mode one sensor is used only for controlling the clamp motion up and down The other sensor is used for starting the sewing proces...

Page 75: ...Def 0 degrees The needle is reversed at this angle in order to increase the clearance to the clamp Edit times and routes This function is only for D rkopp Adler Service personnel MP3 Needle thread mon...

Page 76: ...he needle at which the thread cutting knife is switched off Thread tension during thread cutting min 00 max 100 Def 10 Thread tension of the cutting stitch Position for thread tension during thread cu...

Page 77: ...m sequence sewn Decrement seam sequence counter The counter is decremented after each seam sequence sewn Reset value for the counter min 0 max 9999 Def 0 Value to which the counter is set when a count...

Page 78: ...s 25483 You can change this password and also define whether the password only applies to the technical menu items or must always be entered after the machine is switched on Changing the password To c...

Page 79: ...chnical menu items only 3 Press the Aktivieren De aktivieren Activate Deactivate option to switch between each respective setting 4 Confirm with OK Important Switch off and on again the machine to ado...

Page 80: ...the value The changes are immediately visible on the display 5 12 5 Testing the touchscreen You can use the Extras Service Einstellungen Settings menu item to check that the touchscreen is functionin...

Page 81: ...Adler Service personnel 5 13 1 Testing inputs and outputs Important The instructions only provide an overview of the test possibilities The tests may only be performed by qualified specialists that h...

Page 82: ...rea The number of the element is displayed on the ausgew hlt selected button 4 TesttheelementusingtheEin Aus On Off orumschalten switchover buttons depending on the type of the input or output element...

Page 83: ...clamp Y8 Stitch position optimization Y9 Threading switch lamp on Y10 Oil level indicator warning light on Y25 Marking lamp 1 Z Y26 Marking lamp 2 Z Y27 Marking lamp 3 Z Y28 Marking lamp 4 Z WARNING R...

Page 84: ...een is displayed Fig 52 Testing the sewing motor Important Remove the thread from the needle and the thread lever before starting the test 2 Press the button The window for entering the speed opens Go...

Page 85: ...button The sewing motor runs at the entered speed 9 Press the button The sewing motor stops and the thread trimmer is actuated 5 13 4 Calling up log displays and error lists You can access the log set...

Page 86: ...with a new software version To initialize the control and perform updates 1 PressthemenuitemsExtras Service Initialisierung Initialization and Update The screen for initialization and update appears F...

Page 87: ...l resets all values to the factory default settings All changes are lost Only execute this option if you really want to return to the factory settings 1 Press the Initialisierung des Bedienfelds Initi...

Page 88: ...ific software version Contact the D rkopp Adler Service Hotline for this Displaying software version information The menu item displays information on the software currently installed on the machine T...

Page 89: ...g possible Prior to any maintenance work switch off the machine or set the machine to threading mode WARNING Risk of injury from moving parts Crushing possible Prior to any maintenance work switch off...

Page 90: ...ng particles Flying particles can enter the eyes causing injury Wear safety goggles Hold the compressed air gun so that the particles do not fly close to people Make sure no particles fly into the oil...

Page 91: ...emove any dust and thread residues using a compressed air gun or a brush 6 1 2 Cleaning the motor fan mesh The motor fan mesh must be cleaned once a month using a compressed air gun If very fluffy sew...

Page 92: ...k of injury from contact with oil Oil can cause a rash if it comes into contact with skin Avoid skin contact with oil If oil has come into contact with your skin wash the affected areas thoroughly NOT...

Page 93: ...marking and the maximum level marking Fig 58 Lubricating the machine head To lubricate the machine head 1 Check the oil level indicator every day 2 If the oil level is below the minimum level marking...

Page 94: ...k 1 while sewing After sewing a stretch of approx 1 m the blotting paper will have been sprayed with a thin and even film of oil Fig 59 Lubricating the hook To lubricate the hook 1 Turn the screw 2 mo...

Page 95: ...s Fig 60 Adjusting the operating pressure To adjust the operating pressure 1 Pull the pressure regulator 1 up 2 Turn the pressure regulator until the pressure gage 2 indicates the proper setting Incre...

Page 96: ...he collection tray 2 Fig 61 Draining the water oil mixture To drain the water oil mixture 1 Disconnect the machine from the compressed air supply 2 Place the vessel under the drain screw 3 3 Loosen th...

Page 97: ...screw the filter element 1 5 Blow out the filter element 1 using the compressed air gun 6 Wash out the filter tray using benzine 7 Tighten the filter element 1 8 Tighten the collection tray 2 9 Tighte...

Page 98: ...eplaced immediately Proper setting The toothed belt exhibits no cracks or fragile areas When pressed with a finger the toothed belt must yield no more than 10 mm 6 5 Parts list A parts list can be ord...

Page 99: ...after taking delivery WARNING Risk of injury from cutting parts Cutting injuries may be sustained while unpacking and setting up the machine Only qualified specialists may set up the machine Wear safe...

Page 100: ...llers must be transported with a lifting carriage or stacker WARNING Risk of injury from moving parts Crushing possible The machine is heavy ALWAYS use a lifting carriage or stacker for lifting the ma...

Page 101: ...s 1 so that the stand feet 2 remain upwards 4 Roll the machine to the desired setup location 5 Loosen the nuts 1 6 Rotate the stand feet 2 downwards so that the stand is supported evenly and firmly on...

Page 102: ...perty damage may occur Damage to the machine during transport NEVER transport the machine without the transport locks WARNING Risk of injury from moving parts The tabletop can sink under its own weigh...

Page 103: ...the tabletop Fig 64 Adjusting the working height for stands with rollers To adjust the working height for stands with rollers 1 Support the unit with a lifting carriage or stacker 2 Loosen the screws...

Page 104: ...5 Adjusting the working height for stands without rollers To adjust the working height for stands without rollers 1 Support the unit with a lifting carriage or stacker 2 Loosen the nuts 2 on the table...

Page 105: ...Adjusting the pedal The pedal can be freely positioned in front of the machine as far as the cable allows Fig 66 Adjusting the pedal To adjust the pedal 1 Position the pedal 1 in front of the machine...

Page 106: ...the reel stand 1 Insert the reel stand 1 into the hole in the tabletop 2 Assemble the reel stand 1 to the tabletop using the nuts 2 3 Assemble the thread reel holder 3 and the thread guide 4 onto the...

Page 107: ...he rear machine cover 911 210 6055 10 only Fig 68 Assembling the rear machine cover 1 To assemble the rear machine cover 1 Loosen the 4 screws 1 Fig 69 Assembling the rear machine cover 2 2 Slide the...

Page 108: ...check the rated voltage 1 Check the mains voltage before connecting the machine 7 8 2 Establishing the electrical connection To establish the electrical connection 1 Connect the power plug 2 Cover DA...

Page 109: ...t To assemble the compressed air maintenance unit 1 Connect the connection hose 2 to the compressed air supply using a hose coupling R 1 4 NOTICE Property damage from oily compressed air Oil particles...

Page 110: ...just the operating pressure 1 Pull the pressure regulator 1 up 2 Turn the pressure regulator until the pressure gage 2 indicates the proper setting Increase pressure turn clockwise Reduce pressure tur...

Page 111: ...d p 22 3 Insert the bobbin p 26 4 Switch on the machine The control is initialized 5 Press the pedal forwards The reference run starts The transport carriage moves to the reference position Informatio...

Page 112: ...Setup 110 Operating Instructions 911 210 10 00 0 06 2020...

Page 113: ...from soiling 6 Cover the control to protect it from soiling 7 Cover the entire machine if possible to protect it from contamination and damage WARNING Risk of injury from a lack of care Serious injur...

Page 114: ...Decommissioning 112 Operating Instructions 911 210 10 00 0 06 2020...

Page 115: ...cable national regulations When disposing of the machine be aware that it consists of a range of different materials steel plastic electronic components etc Follow the national regulations when dispos...

Page 116: ...Disposal 114 Operating Instructions 911 210 10 00 0 06 2020...

Page 117: ...not move freely or has excessive belt tension Replace cable Replace reference switch Check the freedom of movement and belt tension of the machine head 1052 Sewing motor excess current Sewing motor ca...

Page 118: ...nt Replace the stepper motor Replace control 2153 X axis stepper motor overvoltage Mains voltage too high Check mains voltage 2155 X axis stepper motor overload Feed system not moving freely Obstacle...

Page 119: ...l 2353 Stroke position stepper motor overvoltage Mains voltage too high Check mains voltage 2355 Stroke position stepper motor overload Feed system not moving freely Obstacles to the feed motion Elimi...

Page 120: ...witch off and on the machine Retrofit replace control 5301 Program cannot be sewn Copy program to DAC 6551 6554 6651 6653 6751 6761 Error in machine head position AD converter process error Internal e...

Page 121: ...e succeeded 8801 8805 8806 8890 8891 Error in test pins signal processing event processing Memory wrapper list functions Internal error Switch off and on the machine Software update Notify DA Service...

Page 122: ...thread tensions Thread guiding parts such as thread tube thread guide or thread take up disk are sharp edged Check threading path Throat plate hook or spread have been damaged by the needle Have part...

Page 123: ...wing material the sewing material thickness or the thread used Check thread tensions Needle thread and hook thread have not been threaded correctly Check threading path Needle breakage Needle thicknes...

Page 124: ...Troubleshooting 122 Operating Instructions 911 210 10 00 0 06 2020...

Page 125: ...h Nm Needle thread 10 3 Hook thread 20 3 Stitch length mm up to 12 7 dependent on seam pattern Speed maximum min 1 2700 intermittent 2000 intermittent Needle bar stroke mm 40 Clamp stroke mm 20 Sewing...

Page 126: ...Technical data 124 Operating Instructions 911 210 10 00 0 06 2020 11 2 Requirements for fault free operation Compressed air quality must conform to ISO 8573 1 2010 7 4 4...

Page 127: ......

Page 128: ...Germany Phone 49 0 521 925 00 Email service duerkopp adler com www duerkopp adler com Subject to design changes Part of the machines shown with additional equipment Printed in Germany D rkopp Adler AG...

Reviews: