E-55
6. Using On-Screen Menu
NOTE:
• To enable the Lens Memory feature, select [Ref. Adjust]
→
[Ref. Lens Memory]
and place a check mark next to “Yes” for [Use Point on Signal Change?].
• To store adjusted values common to all the input sources, use the Ref. Lens
Memory. See page E-56.
Signal Type
Select either the RGB signal type or the Component signal type.
RGB ............ RGB signal
Component .. Component signals such as Y/Cb/Cr, Y/Pb/Pr
NOTE: This feature is available on RGB only. If you do not get a better picture even
when you set "Signal Select" to "Component" in Setup, set this to "Component".
Ref. Adjust
3D Reform
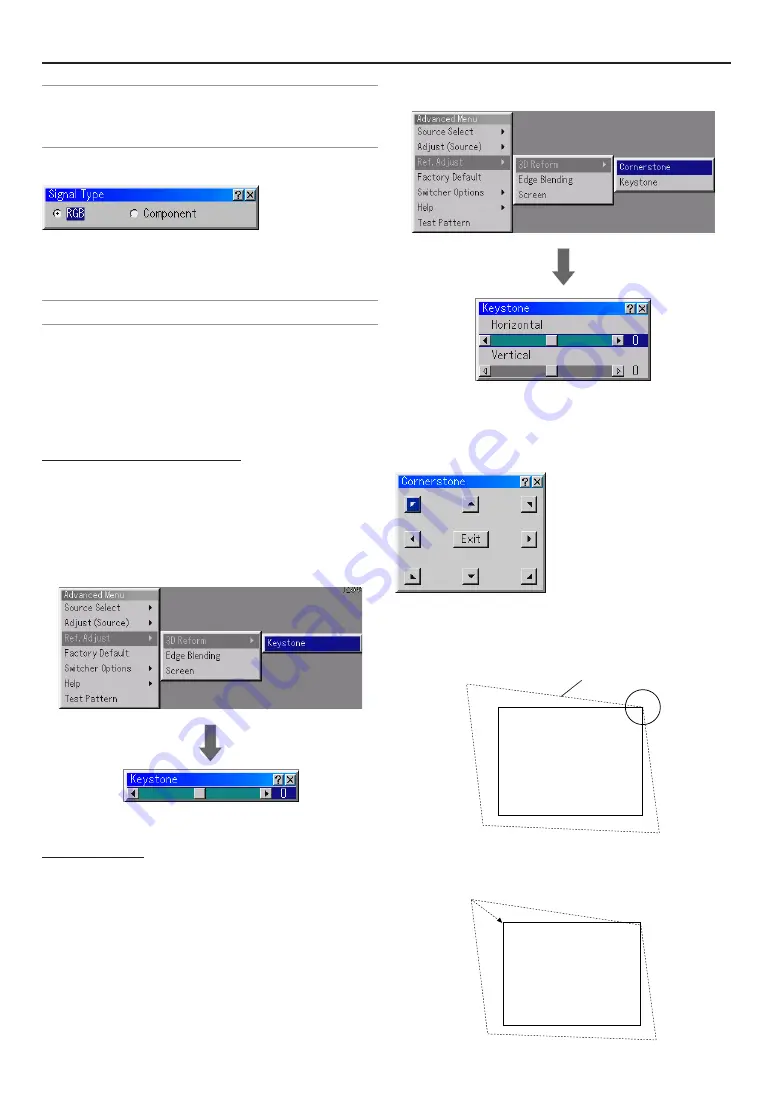
This feature corrects trapezoidal distortion so that the projected
image is rectangular.
Operation of 3D Reform is available whether MM-WARP (optional)
is used or not.
MM-WARP- not installed or not active
When MM-WARP is not installed (optional) or installed but not
active only vertical adjustment in Keystone Correction is pos-
sible.
(For de-activation set no check mark on “Projector Options”
→
“Setup”
→
“page 3”
→
“WARP Correction”.)
Keystone Correction
1. Press SELECT Button - Adjust screen size in vertial direction.
2. Press ENTER Button after adjusting screen size - Return to the menu.
MM-WARP - active
When MM-WARP (optional) is installed and active both vertical
and horizontal adjustment in Keystone Correction is possible.
(To activate set check mark on “Projector Options”
→
“Setup”
→
“page 3”
→
“WARP Correction”.)
Keystone Correction
1. Press SELECT Button - Adjust screen size in horizontal direction.
2. Press SELECT Button - Choose “Vertical”.
3. Press SELECT Button - Adjust screen size in vertical direction.
4. Press ENTER after adjusting screen size. - Return to the menu.
Cornerstone
1. Project an image so that the screen is smaller than the area of the
raster.
2. Pick up any one of the corners and align the corner of the screen with
the one of the image.
Screen
Projected image
Screen
(The drawing shows the upper right corner.)
3. Use the SELECT
GHFE
button to select one icon which points in the
direction you wish to move the projected image frame.
Summary of Contents for HIGHlite 10000Dsx+
Page 34: ...E 34...
Page 74: ...E 74 6 Using On Screen Menu...
Page 75: ...E 75 7 Maintenance 1 Cleaning the Cabinet and the Lens E 74...
Page 85: ...E 85 Unit mm 3 Cabinet Dimensions 8 Appendix HIGHlite 16000Dsx...
Page 86: ...E 86 Unit mm inch 8 Appendix HIGHlite 10000Dsx...
Page 94: ...E 94...
Page 95: ...E 95...
Page 96: ...E 96...


