E-28
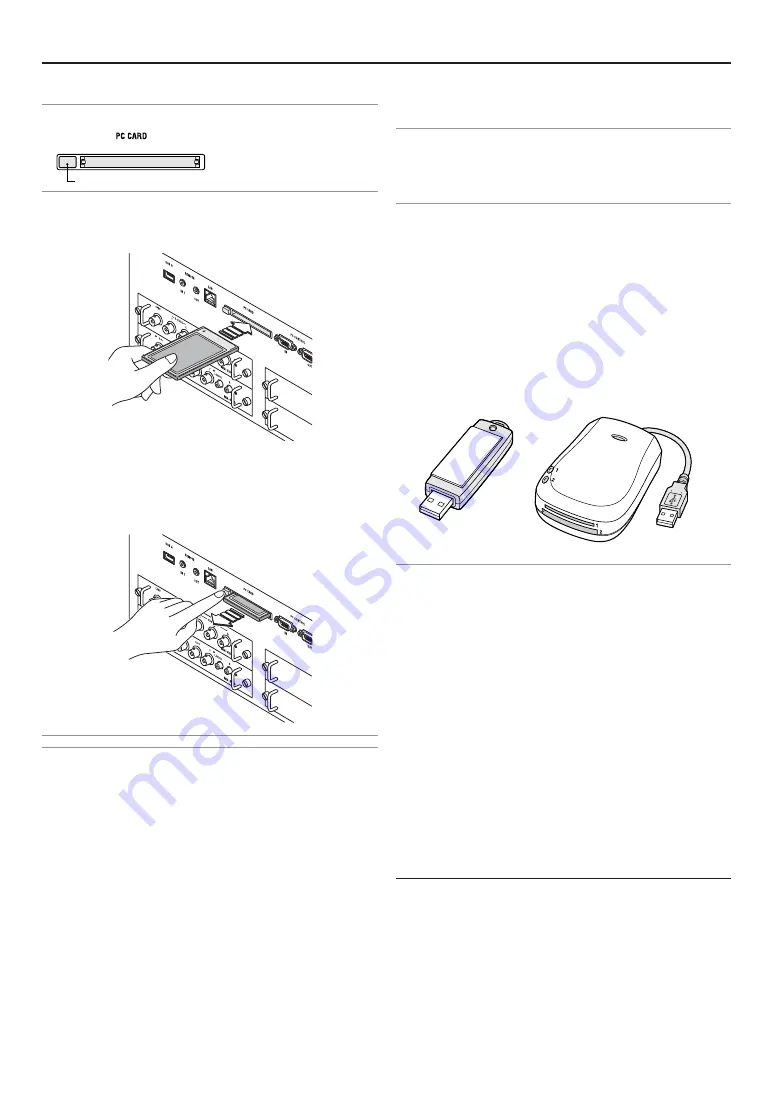
Removing the PC Card
Press the eject button slowly. The eject button card pops out a
little. Press the eject button slowly again. Grasp the edges of
the PC card and pull it out. Push and insert the eject button
fully until it stops.
NOTE: Do not eject the PC card while its data is being accessed.
CAUTION:
Make sure that the PC card or wireless LAN card is
removed during Standby mode or with the main power off.Failure
to do so may cause damage to the data on your PC card or
wireless LAN card, or may cause the projector to
malfunction.Should a malfunction occur, turn off the main power
and turn it back on.
Direction for Inserting the PC Card
The PC card has a top and bottom and must be inserted into the
PC card slot in a specific direction. It cannot be inserted back-
wards or upside-down. Attempting to force it into the slot in the
wrong direction may break the internal pin and damage the card
slot. Refer to the PC card's operating instructions for the proper
direction of insertion.
Inserting and Removing a PC Card
NOTE:
• Do not try to force the PC card into the slot.
Inserting the PC Card
•
Hold the PC card horizontally and insert it slowly into PC card slot
with its back facing up.
4
USB Memory Device or USB Memory Card
Reader Support
The projector is compatible with either a USB memory device or
USB memory card reader which supports the security features.
• To use a USB memory device or USB memory card reader,
connect the device to the USB port (type A).
• To use a USB memory device as a Protect key for Security
function, select one from the Drive icons in the Security set-
ting screen.
NOTE:
• Some USB memory devices (brands) or USB memory card readers
may not work.
• You cannot use USB memory device and a USB memory card reader
when connecting a USB mouse to the projector. Using a USB HUB
that allows multiple USB memory devices or card readers is not sup-
ported either.
• Do not do the following while the USB memory device or USB memory
card reader’s access indicator is lit or flashing (while data is being
accessed.) Doing so can damage your USB memory device or USB
memory card in the reader. Back up your data in case it will need to be
restored.
* Pulling out the USB memory device or USB memory card reader
from the USB port of the projector.
* Pulling out the memory card from the USB memory card reader.
* Turning off the main power switch or unplugging the power cable.
• The drive for ”USB 1-4” is displayed only when the USB memory de-
vice or USB memory card reader is connected to the projector. The
drive for “USB 1-4” may be displayed differently from the one in the
USB memory card reader.
• Some USB memory devices (brands) or USB memory cards cannot
be used as Protect key for the projector’s Security function.
PC CARD eject button
PC Card Type
The PC Card slot accepts PCMCIA Type II only.
NOTE: The projector does not support FAT32 or NTFS formatted flash memory
card or USB memory device.
Be sure to use a flash memory card or USB memory device formatted with the
FAT16 or FAT file system.
To format your flash memory card or USB memory device in your comouter, refer
to the document or help file that comes with your Windows.
2. Installation
Summary of Contents for HIGHlite 10000Dsx+
Page 34: ...E 34...
Page 74: ...E 74 6 Using On Screen Menu...
Page 75: ...E 75 7 Maintenance 1 Cleaning the Cabinet and the Lens E 74...
Page 85: ...E 85 Unit mm 3 Cabinet Dimensions 8 Appendix HIGHlite 16000Dsx...
Page 86: ...E 86 Unit mm inch 8 Appendix HIGHlite 10000Dsx...
Page 94: ...E 94...
Page 95: ...E 95...
Page 96: ...E 96...


