8.
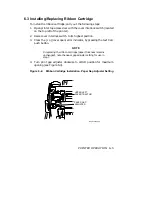
Tilt ribbon cartridge downward to the left and install left side first
(left edge of cartridge will guide ribbon between the ribbon guide and
shield as shown in Figures 6-5 and 6-6). Then lower right side onto
ribbon motor drive shaft. Turn knurled knob a few times to verify
that ribbon is running freely and to remove any remaining slack.
9.
Snap ribbon cartridge holddown in place over left side of ribbon
cartridge.
10. Reset print gap adjuster to original setting or to a setting appropriate
to new paper thickness.
11. Close door in printer top enclosure and press the ON LINE push
button.
12. Clear the "Striker Bar Open" [ S b o] fault indicator by pressing the
TEST CLR push button once.
13. Perform a printing self test. Refer to Section 5.2.2.
NOTE
When the printer quality starts fading, turn the re-inker
on (see Section 6.4).
6.4 Re-Inking Ribbon
Turn the ribbon re-inker on when the Ribbon Cartridge is installed. Once
turned on, leave it on for the life of the cartridge. To re-ink the ribbon:
1.
Open the top cover.
2.
Move the re-inking lever on the ribbon cartridge about one half-turn
clockwise.
3.
Close the cover.
PRINTER OPERATION
6–7


