5 - 11
5
Installation and Wiring
AC INPUT
L1 L2 L3
L1 L2 L3
L1 L2 L3
BYPASS INPUT
UPS OUTPUT
L1
N
L2
L3
L1
L2
L3
INPUT
BREAKER
OUTPUT
BREAKER
BYPASS
BREAKER
MANUAL BYPASS
BREAKER
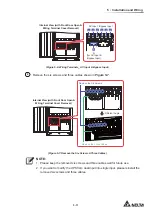
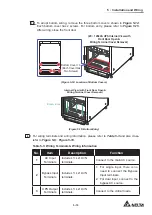
Internal View (with Front Door Open &
Wiring Terminal Cover Removal)
AC Input
N
(for AC Input &
Bypass Input)
Bypass Input
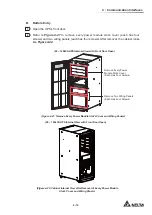
(Figure 5-6: Wiring Terminals_ AC Input & Bypass Input)
2
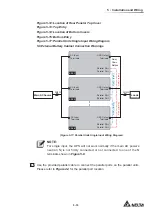
Remove the six screws and three cables shown in
Figure 5-7
.
AC INPUT
L1 L2 L3
L1 L2 L3
L1 L2 L3
BYPASS INPUT
UPS OUTPUT
AC INPUT
L1 L2 L3
L1 L2 L3
L1 L2 L3
BYPASS INPUT
UPS OUTPUT
INPUT
BREAKER
OUTPUT
BREAKER
BYPASS
BREAKER
MANUAL BYPASS
BREAKER
Internal View (with Front Door Open &
Wiring Terminal Cover Removal)
Remove the Six Screws
Remove the Three Cables
Different Angle
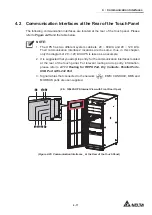
(Figure 5-7: Remove the Six Screws & Three Cables)
NOTE:
1. Please keep the removed six screws and three cables well for future use.
2. If you want to modify the UPS from dual input into single input, please reinstall the
removed six screws and three cables.
Summary of Contents for Modulon DPH series
Page 26: ......
Page 58: ......
Page 168: ......
Page 237: ...8 1 8 Optional Accessories 8 Optional Accessories...
Page 240: ......
Page 241: ...9 1 9 Maintenance Maintenance 9...
Page 243: ...A1 1 Appendix 1 7HFKQLFDO 6SHFL FDWLRQV Technical 6SHFL FDWLRQV A1 A1...
Page 246: ......
Page 247: ...A2 1 Appendix 2 Warranty Warranty A2 A2...
Page 250: ......

