192
Adding and Replacing Parts
NOTICE:
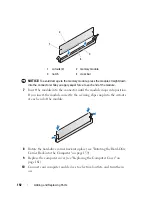
To avoid damage to the memory module, press the module straight down
into the connector while you apply equal force to each end of the module.
7
Insert the module into the connector until the module snaps into position.
If you insert the module correctly, the securing clips snap into the cutouts
at each end of the module.
8
Rotate the hard-drive carrier back into place (see "Rotating the Hard-Drive
Carrier Back into the Computer" on page 159).
9
Replace the computer cover (see "Replacing the Computer Cover" on
page 161).
10
Connect your computer and devices to electrical outlets, and turn them
on.
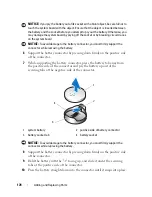
1 cutouts (2)
2 memory module
3 notch
4 crossbar
3
2
1
4
Summary of Contents for Precision NX046
Page 1: ...w w w d e l l c o m s u p p o r t d e l l c o m Dell Precision T5400 User s Guide Model DCTA ...
Page 18: ...18 Finding Information ...
Page 43: ...About Your Computer 43 ...
Page 44: ...44 About Your Computer ...
Page 88: ...88 Securing Your Computer ...
Page 120: ...120 Troubleshooting ...
Page 140: ...140 Troubleshooting Tools ...
Page 238: ...238 Adding and Replacing Parts 1 drive panel tabs 2 drive panel 2 Tower Orientation 1 ...
Page 286: ...286 Adding and Replacing Parts ...
Page 287: ...Adding and Replacing Parts 287 ...
Page 288: ...288 Adding and Replacing Parts ...
Page 296: ...296 Getting Help ...
Page 316: ...316 Glossary ...

