background image

Chapter 4.3 Access Points        

81


y


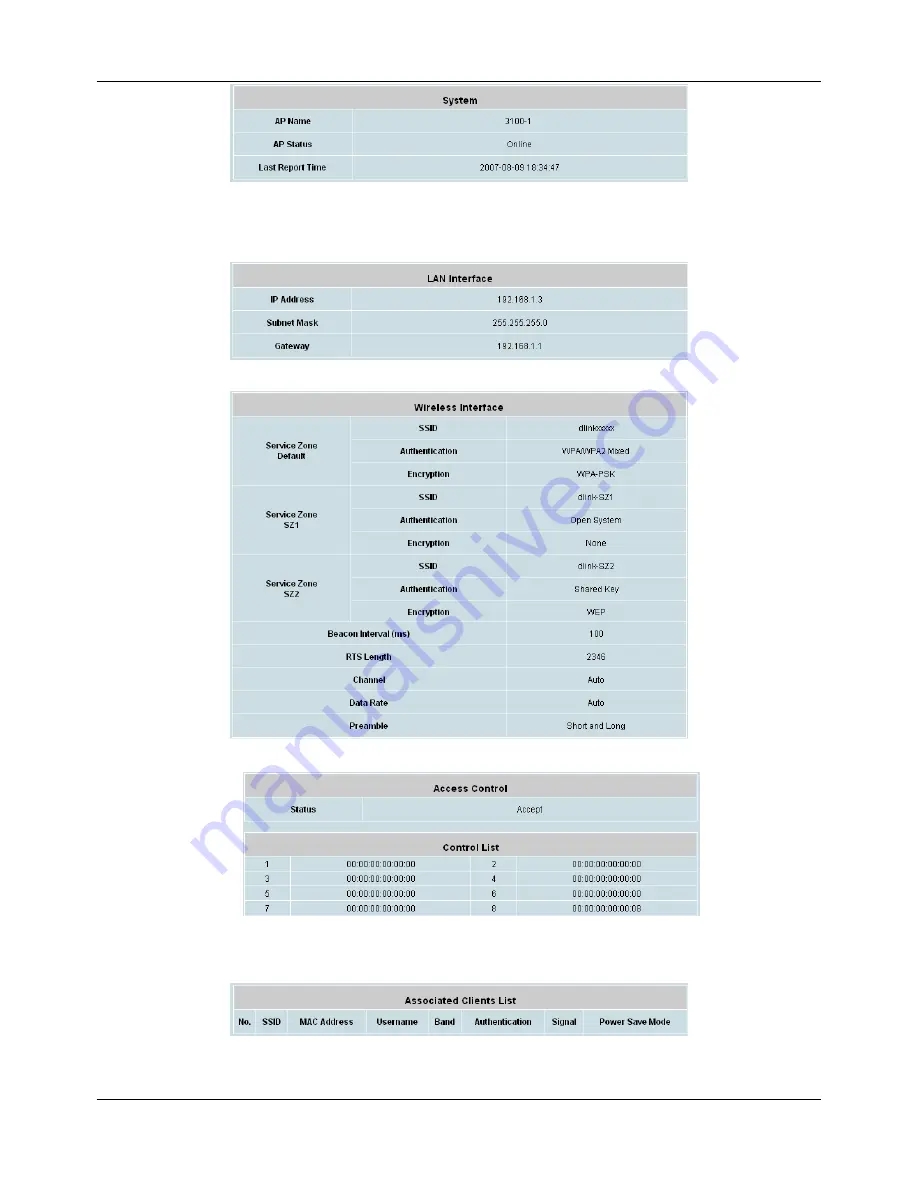
Last Reporting Time:

 The time when this summary is last updated. 


¾


LAN Interface Status:

 The table shows the information about 

IP Address

Subnet Mask

 and 

Gateway


¾


Wireless LAN Status: 

The table shows all of the related wireless information. 


¾


Access Control Status:

 The table shows the lists of MAC of clients under the control of the AP. 


¾


Associated Client Status:

 The table shows the clients connecting to the AP and the related information of 

the client.


Summary of Contents for DSA-3600

Page 1: ...DSA 3600 User Guide Version DSA 3600 3 00 December 2007 ...

Page 2: ... of D Link Corporation All other brand and product names are registered trademarks or trademarks of their respective holders Statement of Conditions In the interest of improving internal design operational function and or reliability D Link Corporation reserves the right to make any changes to products described in this document without notice D Link Corporation shall be indemnified against any li...

Page 3: ... 1 1 General 12 4 1 2 WAN1 14 4 1 3 WAN2 17 4 1 4 WAN Traffic 19 4 1 5 LAN Port Mapping 21 4 1 6 Service Zones 28 4 2 Users 43 4 2 1 Authentication 44 4 2 1 1 Authentication Database Local 44 4 2 1 2 Authentication Database POP3 49 4 2 1 3 Authentication Database RADIUS 50 4 2 1 4 Authentication Database LDAP 52 4 2 1 5 Authentication Database NT Domain 53 4 2 1 6 Authentication Database ONDEMAND ...

Page 4: ... 4 5 3 Routing Table 121 4 5 4 Online Users 123 4 5 5 User Logs 124 4 5 6 E mail SYSLOG 128 4 6 Tools 130 4 6 1 Setup Wizard 131 4 6 2 Password Change 138 4 6 3 Backup Restore 139 4 6 4 System Upgrade 141 4 6 5 Restart 142 4 6 6 Utilities 143 4 6 7 Quick Links 144 4 7 Help 148 Appendix A An Example of User Login 149 Appendix B Console Interface Configuration 151 Appendix C Proxy Configuration 154 ...

Page 5: ...Appendix G Network Configuration on PC 173 Appendix H Local VPN 178 Appendix I DHCP Relay 184 Appendix J Session Limit and Session Log 186 Appendix K Accepting Payments via PayPal 188 ...

Page 6: ......

Page 7: ...r cautionary statements or warning requiring special attention by readers a text box with italic font will be used Warning For security purposes you should immediately change the administrator s password When any of the button symbol shown below is selected the following action will be executed accordingly Log out the system Access Online Help interface Apply all settings configured Clear all sett...

Page 8: ... database servers User authentication is processed via the SSL encrypted web interface This interface is compatible to most desktop devices and palm computers The appended figures are typical examples of DSA 3600 deployed in a SMB environment Figure 2 2b shows DSA 3600 authenticating the users of its built in database as well as the users of external authentication database Both LAN and WLAN can b...

Page 9: ...Chapter 2 Overview 3 Figure 2 2a An example deployment using DSA 3600 Figure 2 2b An example of SMB environment using DSA 3600 ...

Page 10: ...console port a reset button and the power socket Front Panel 1 Power 3 LEDs WAN1 WAN2 5 Sign Link 2 Status 4 LEDs LAN1 LAN4 6 Sign Act 1 Power ON indicates that power is on and OFF indicates that power is off 2 Status While system power is on status OFF indicates BIOS is running BLINKING indicates the OS is running and ON indicates system is ready 3 WAN1 WAN2 LEDs OFF indicates no connection ON in...

Page 11: ...o WAN ports connected to an external network not managed by the DSA 3600 These ports may be used to connect to the ATU Router of an ADSL or the port of a Cable Modem or a Switch or Hub on the LAN of an organization 4 LAN1 LAN4 The four LAN ports connect to networks managed by DSA 3600 such as to clients networking devices or APs There are two modes for service zone supported by DSA 3600 Port Based...

Page 12: ... be ON to indicate a proper connection Warning Using a non certified power adapter may damage this product 2 Connect an Ethernet cable to the WAN1 Port on the rear panel Connect the other end of the Ethernet cable to a networking device such as an ADSL modem a cable modem a switch or a hub The LED of WAN1 port should light up to indicate a proper connection 3 Connect an Ethernet cable to any LAN P...

Page 13: ...sued or parameters are configured Tools Menu near the upper left corner provides the access to system utilities including Setup Wizard Password Change Backup Restore System Upgrade Restart Wake on LAN and Quick Links Menu Tree on the left side of the web interface allows administrators to traverse to various management functions of this system The management functions are grouped into five branche...

Page 14: ...s E mail SYSLOG Setup Wizard Password Change Backup Restore System Upgrade Restart Utilities Tools Quick Links Caution After finishing the configuration please click Apply and pay attention to see if a restart message appears at the bottom of the screen If the message appears the system must be restarted to allow the configurations to take effect All on line users will be disconnected during resta...

Page 15: ...connect the PC to the DSA 3600 via any LAN port An IP address will be assigned to the PC automatically via the DSA 3600 built in DHCP server Launch a web browser to access the web management interface of DSA 3600 by entering https 192 168 1 1 in the URL Note https is used for a secured connection Once the DSA 3600 has been connected the Administrator Login Page will appear Enter admin for both the...

Page 16: ...0 2 After successfully logging into the DSA 3600 the System Overview page of the web management interface will appear To logout simply click the Logout icon on the upper right corner of the interface to return to the Administrator Login Page ...

Page 17: ...m 11 4 1 System This section provides information on the following functions General WAN1 WAN2 WAN Traffic LAN Port Mapping and Service Zones It displays the information such as System Time Up Time and Firmware version ...

Page 18: ... For example if the Internal Domain Name is configured as ashop com the URL in the User Login page will be https ashop com loginpages login shtml y Homepage Redirect URL Enter a URL in this field When the clients are logged in to the DSA 3600 successfully their browsers will be directed to this URL regardless of the original homepage setting in their browsers when Local VPN is disabled y User Log ...

Page 19: ...om default IP address to the new IP as the format x x x x x y SNMP The DSA 3600 supports SNMPv2 When the function is enabled an implemented SNMP server is able to access the system s management information base y HTTPS Protected Login The system supports HTTPS encrypted and HTTP non encrypted when clients log into the system When this function is enabled the Secured Socket Layer SSL will be activa...

Page 20: ...ress The IP address of the WAN1 port Subnet Mask The subnet mask of the WAN1 port Default Gateway The gateway of the WAN1 port Preferred DNS Server The primary DNS Server of the WAN1 port Alternate DNS Server The substitute DNS Server of the WAN1 port This is optional y Dynamic IP settings assigned automatically Select the option when a DHCP server is available in the network implementation above ...

Page 21: ...U and Clamp MSS fields are required The Dial on Demand function is used to guard the idle time out of the connection The Maximum Idle Time field is required to enable this function When the idle time is reached the connection will be automatically disconnected y PPTP Select the option when PPTP Point to Point Tunneling Protocol is the connection protocol provided by the network service providers W...

Page 22: ...Chapter 4 Web Interface Configuration 16 ...

Page 23: ...above the WAN2 port of the system When Dynamic is selected the system works as a DHCP client and get an IP address for its WAN2 port automatically from the DHCP server y PPPoE Select the option when PPPoE is the connection protocol provided by the network service providers When Dial on Demand is enabled there is a Maximum Idle Time available The system will disconnect itself from the Internet auto...

Page 24: ...Chapter 4 Web Interface Configuration 18 ...

Page 25: ...hree Target IP or Domain Name These targets are used for the system as the detected targets of Enable Load Balancing and Warning of Internet Disconnection To enable WAN Failover at least one target must be configured y Enable Load Balancing Check this option to active the system s load balance function System will allot all traffic to WAN1 and WAN2 by the weight radio The weight radio between WAN1...

Page 26: ...over is enabled the traffic will be routed to WAN2 automatically when WAN1 connection fails A Fall back to WAN1 when WAN1 is available again function will appear when Enable WAN Failover check box is checked If Fall back to WAN1 when WAN1 is available again function is enabled the routed traffic will be back to WAN1 when WAN1 connection is recovered y Warning of Internet Disconnection An Internet ...

Page 27: ... by VLAN tagging Each LAN port of Port Based mode can be selected among Default to SZ1 SZ4 Supporting multiple service zones one D Link DSA 3600 system can behave virtually like multiple systems Each service zone is one to one mapped to a VLAN Messages to or from each service zone are sorted by the VLAN tag in the message frame y Tag Based For Tag Based service zone each LAN port is Hybrid port wh...

Page 28: ...eb management interface from the Menu Tree click System and then click LAN Port Mapping to verify that Tag Based service zone mode is selected Click System and then click Service Zones to enter the Service Zone Settings page as shown below Click the Configure button of Default Service zone to enter its Basic Settings page While in this Basic Settings page enter an IP address for Preferred DNS Serv...

Page 29: ...service zone Make sure only Server1 is checked Enabled for this service zone Click the Apply button to activate the changes for the default service zone We can restart the system later since we want to continue to configure a second service zone for the on demand users Following similar procedures click on Service Zones menu item on the Menu Tree again this time is to configure another service zon...

Page 30: ...ion requirement for this service zone and enable the On demand Users authentication options only Click Apply to activate the changes for the second service zone Now is the time to restart the system After the restart the system will be configured according to Figure 4 1 5a ...

Page 31: ...Zones Configuration Example After running through Setup Wizard on a factory default system the DSA 3600 is ready to use the default tag based VLAN for separating networks Log in to the web management interface and enter admin for both the default username and password in the Username and Password fields of the Administrator Login Page After logging in the web management interface from the Menu Tre...

Page 32: ...for LAN4 select only enabled service zones Click Apply and reboot the system In tag based mode each LAN port can serve traffic from any service zone because VLAN tags carried in message frame will not be modified In port based mode each LAN port can only service traffic of one service zone where all messages through the LAN port will be re tagged with the tag assigned to the port Compare Figure 4 ...

Page 33: ...Chapter 4 1 System 27 For single zone deployment use the Default service zone with port based mode Figure 4 1 5b An example using Port Based service zones ...

Page 34: ...ic control etc There are up to five Service Zones to be utilized by default they are named as Default SZ1 SZ2 SZ3 and SZ4 as shown in the table below For more details about Service Zones please refer to Appendix E and F Service Zone Name Mnemonic name of the Service Zone LAN Port Mapping When the system is set to Port based mode for Service Zones it shows the physical LAN ports that belong to the ...

Page 35: ...erver to disable the built in DHCP server when clients are assigned static IP addresses Select the radio button of Enable DHCP Server to enable the built in DHCP server When the Enable DHCP server is chosen the system will act as a DHCP server and assign IP addresses to its clients Select the radio button of Enable DHCP Relay when a service zone is connected to an external DHCP server When Enable ...

Page 36: ...one can reserve some IP addresses from predefined DHCP range to prevent the system from issuing these IP addresses to downstream clients The administrator can reserve some specific IP addresses for special devices with MAC address o Enable DHCP Relay Selecting the radio when a service zone is connected to an external DHCP server When Enable DHCP Relay is chosen the IP address of clients will be as...

Page 37: ...ation database except SIP Authentication can be assigned as Default for a service zone For authentication option assigned as default the postfix can be omitted while entering username Authentication Required for the Zone Enable or disable this feature Authentication Options Click the hyperlink of Auth Option the Authentication option page will appear options including Server1 to Server4 On demand ...

Page 38: ...henticated Click Enabled and Edit Mail Message to edit the message in HTML format Each service zone can has its own message Custom Pages There are five users login and logout pages that can be customized by administrators for each service zone Click the button Configure and the Login Logout page will appear with configuration options for Login Page Logout Page Login Success Page Login Success Page...

Page 39: ...Chapter 4 1 System 33 An example of Template Login Page ...

Page 40: ... xx jpg Click the Browse button to select the file to upload Then click Submit to complete the upload process Next enter or browse the filename of the images to be uploaded in the Upload Images field on the Upload Images Files page and then click Submit The system will show the used space and the maximum size of the image file of 512K If the administrator wishes to restore the factory default of t...

Page 41: ...ottom of this page The user defined login page must include the following HTML codes to provide the necessary fields for username and password For example the device name of one DSA 3600 is abc 3322 org then the first line of the html code would be https abc 3322 org loginpages userlogin shtml 2 Logout Page The administrator can apply their own logout page in the menu As the process is similar to ...

Page 42: ...e If restore to factory default setting is needed for the logout interface click the Use Default Page button 3 Login Success Page The administrators can apply their own Login Success page As the process is similar to that of the Login Page please refer to the Login Page instructions for more details y Login Success Page Æ Default Page Choose Default Page to use the default login success page y Log...

Page 43: ...ocess is completed and applied the new Login Success Page can be previewed by clicking Preview button at the bottom y Login Success PageÆ External Page Choose the External Page selection to get the Login Success Page from the specific website In the External Page Setting enter the URL of the external login page and then click Apply After applying the setting the new Login Success Page can be previ...

Page 44: ...ns on Login Page for more details y Login Success Page for On demand User Æ Default Page Choose Default Page to use the default login success page for On demand User y Login Success Page for On demand User Æ Template Page Choose Template to make a customized login success for On demand User Click Select to pick up a color and then fill in all of the blanks Click Preview to see the result y Login S...

Page 45: ...m 39 Choose Uploaded Page and get the login success page for On demand User by uploading Click the Browse button to select the Login Success Page file for instant upload Then click Submit to complete the upload process ...

Page 46: ... User can be previewed by clicking Preview button at the bottom of this page 5 Logout Success Page The administrator can apply their own Logout Success Page As the process is similar to that of the Login Page please refer to the instructions on Login Page for more details y Logout Success Page Æ Default Page Choose Default Page to use the default logout success page y Logout Success Page Æ Templat...

Page 47: ...pload process is completed and applied the new logout success page can be previewed by clicking Preview button at the bottom y Logout Success PageÆ External Page Choose the External Page selection and get the logout success page from the specific website Enter the website address in the External Page Setting field and then click Apply After applying the setting the new logout success page can be p...

Page 48: ...peated Security Each service zone can setup its own Authentication and Encryption support for AP security setting Authentication support WPA WAP2 WAP WAP2 Mixed Open System Shared Key and Open System Shared Key and encryption support WEP Managed AP s in this Service Zone Managed AP in this Service Zone List all APs belonging to this service zone ...

Page 49: ... This section provides information on the following functions Authentication Black List Policy and Additional Control It displays the information of the User such as the number of Total Online users and the number of On demand Users ...

Page 50: ...elected by the system For the Authentication Settings of each Service Zone please see 4 1 6 Service Zones y Authentication Option There are several authentication options supported by DSA 3600 Server 1 to Server 4 On demand Users and SIP Click the hyperlink of the respective Authentication Option to configure the authentication option Authentication Database There are different authentication data...

Page 51: ...ount listed in the black list is not allowed to log into the system the client s access will be denied The administrator may select one black list from the drop down menu and this black list will be applied to this specific authentication option y Authentication Database The system supports five types of authentication database that are Local POP3 RADIUS LDAP NT Domain and SIP authentication For a...

Page 52: ...ion please check section on Policy Configuration Click Apply to complete adding the user or users y Upload User Click this to enter the Upload User from File interface Click the Browse button to select the text file for uploading user account then click Upload to execute the upload process The file for uploading should be a text file containing in each line the following information Username Passw...

Page 53: ...rmation and then save it on disk y Search Enter a keyword of a username to be searched in the text filed and click this button to perform the search All usernames matching the keyword will be listed y Del All Click on this button to delete all the users at once and click on Delete to delete the user individually ...

Page 54: ...n will be available to define the authorized device with IP address Subnet Mask and Secret Key Please see more explanation above in the section for Roaming Out and the section for 802 1X Authentication Click the hyperlink Roaming out 802 1X Client Device Settings to enter the Roaming out 802 1X Client Device Settings interface Choose the desired type Disable Roaming Out or 802 1X and key in the 80...

Page 55: ...a z or A Z dash underline _ and dot within a maximum of 40 characters All other characters are not allowed y Postfix Set a postfix that is easy to distinguish e g Local for the server using numbers 0 9 alphabets a z or A Z dash underline _ and dot within a maximum of 40 characters All other characters are not allowed y Black List There are five sets of the black lists Select one of them or choose ...

Page 56: ...ator for external RADIUS servers Click the hyperlink Configure for further configuration The RADIUS server sets the external authentication for clients Enter the related information for the primary RADIUS server and or the secondary RADIUS server the secondary server is not required Information must be entered for fields with red asterisks These settings will be effective immediately after clickin...

Page 57: ...r of the system for the external RADIUS server y Class Policy Mapping This function applies the selected policy to specific clients grouped by the RADIUS class attribute The clients will be applied with the assigned policy while logging on to the system y Server The IP address of the external RADIUS server y Authentication Port Enter the authentication port of the RADIUS server y Accounting Port T...

Page 58: ...fective immediately after clicking the Apply button y Server The IP address of the external LDAP Server y Port The authentication port of the external LDAP Server y Base DN The Distinguished Name for the navigation path of LDAP account y Account Attribute The attribute of LDAP accounts y LDAP Policy Mapping This function is to apply selected policy to certain clients grouped by LDAP attribute The ...

Page 59: ...main authentication database y Server The IP address of the external NT Domain Server y Transparent Login Transparent Login means Windows NT Domain single sign on When Transparent Login is enabled clients will log in the system automatically after they have logged in the NT domain Thus clients only need to log in once ...

Page 60: ...tion database to be used for authentication when multiple databases are concurrently in use Enter the postfix used for on demand users y Monetary Unit Select the desired monetary unit or specified the unit by yourself y WLAN ESSID The administrator can enter the defined wireless ESSID in this field and it will be printed on the receipt for on demand users reference when accessing the Internet via ...

Page 61: ...d previewed on the screen y Receipt Header 1 2 The entered content will be printed on the header area These headers are optional y Receipt Footer The entered content will be printed on the footer area This footer is optional y Background Image Set the background image of the ticket here None No picture Default Image below show the default picture ...

Page 62: ...iguration 56 Uploaded Image click on edit button to upload the picture in the popup y Preview Click Preview button to see the ticket with the items that are customized above Please Note A dimension of 460x480 image is recommended ...

Page 63: ...mand users are allowed to access the network o Time Total period of time xx hrs yy mins during which On demand users are allowed to access the network o Volume Total traffic volume xx Mbytes up to which On demand users are allowed to transfer data o Cut off The time of day at which the on demand account is cut off made expired by the system on that day Please note that the Grace Period is an addit...

Page 64: ...or merchants to set up an external payment gateway to accept payments in order to provide wireless access service to end customers who wish to pay for the service on line Before setting up PayPal it is required that the merchant owners have a valid PayPal Business Account Please see Appendix K Accepting Payments via PayPal After opening a PayPal Business Account the merchant should find the Identi...

Page 65: ...alidate all the transactions Verify SSL Certificate This is to help protect the system from accessing a website other than PayPal Currency It is the currency to be used for the payment transactions Service Disclaimer Content View service agreements and fees for the standard payment gateway services here as well as adding new or editing services disclaimer Choose Billing Plan for PayPal Payment Pag...

Page 66: ...t will be displayed as a special notice to end customers in the page of Rate Plan For example it can describe the cautions for making a payment via PayPal 5 On demand Account Creation After one or more billing plans are configured and enabled in the Billing Plans page administrators including manager and operator accounts are able to create On demand user accounts in this page y Plan The number of...

Page 67: ...nfigure as show below First Open the internet Explorer and select Tools for the drop down menu then click on Internet Options Second Inside the internet option menu click on the Advanced tap scroll down and look out for the printing option and tick the box for the print background colors and images then click OK ...

Page 68: ...ount y Remaining Quota The remaining time or volume for which the user can continue to access the network or the cut off time until which the user are allowed to access the network y Status The status of the account Normal the account is not currently in use and also does not exceed the quota limit Online the account is currently in use Expired the account is not valid any more even when there is ...

Page 69: ... a fixed WAN interface Administrators are able to add up to four trusted SIP Registrars in order to authenticate SIP clients Also a policy can be chosen to govern the SIP traffic y SIP SIP authentication supports 4 Trusted SIP Registrar y IP Address The IP address of the Trusted SIP Registrar y Remark The administrator can enter extra information in this field for remark y Policy The Policy applie...

Page 70: ... option y Select Black List There are 5 lists supported by DSA 3600 for selections y Name Set the name of the black list and it will show in the pull down menu above y Adding User s After clicking Adding User s the Adding Users to Blacklist page will appear for adding users to the selected black list After entering the usernames in the Username field and the related information in the Remark field...

Page 71: ... and Privilege Profile Policy1 to Policy12 will be used and shared with the Service Zone default policy settings and Authentication Databases settings Once a policy is configured you may assign it to the default policy of a service zone Two service zones may share the same policy Policies can be selected in the Policy tab The administrator can select one of the defined policies to have policy base...

Page 72: ...cy When Specific Default Route is enabled all clients applied this policy will access the Internet through this default gateway Privilege Profile Include Maximum Concurrent Session for User from 10 to Unlimited A Firewall Profile Click Setting for Firewall Profile The Firewall Configuration will appear Click Predefined and Custom Service Protocols to edit the protocol list Click Firewall Rules to ...

Page 73: ...ule Name The rule name can be changed here Source Destination Interface Zone There are choices of ALL WAN1 WAN2 Default and the named Service Zones to be applied for the traffic interface Source Destination IP Address Domain Name Enter the source and destination IP addresses Domain Host filtering is supported but Domain name filtering is not Source Destination Subnet Mask Select the source and des...

Page 74: ...Log 4 2 3 2 Policy 1 Policy 12 Polices can be defined in the Policy tab The administrator can select one of the defined policies to apply it to the specific authentication option All clients belong to this authentication option will be bound by this policy A policy could be applied at zone level at group level or at user level User level policy overrides group level policy Group level policy overr...

Page 75: ...icy will access the Internet through this default gateway Schedule Profile The Schedule table in a 7X24 format is used to control the clients login time When Schedule is enabled clients applied policies are only allowed to login the system at the time which is checked in the applied policy QoS Profile Set up the information of Traffic Configuration including Traffic Class Total Downlink Individual...

Page 76: ...s a Predefined and Custom Service Protocols There are predefined service protocols available for firewall rules editing The administrator is able to add new custom service protocols by clicking Add and delete the added protocols with Select All and Delete operations b Firewall Routes Click the number of Filter Rule No to edit individual rules and click Apply to save the settings The rule status wi...

Page 77: ...on the encrypted traffic Service Protocol There are defined protocols in the service protocols list to be selected Schedule When schedule is selected clients assigned with this policy are applied the firewall rule only within the time checked There are three options Always Recurring and One Time Recurring is set with the hours within a week Action for Matched Packets There are two options Block an...

Page 78: ...are only allowed to login the system at the time which is checked in the applied policies D QoS Profile Click the button of Setting for QoS Profile to enter the Traffic Configuration Traffic Class Each login user will be categorized into a policy Each policy can choose its own traffic class There are four traffic classes Voice Video Best Effort and Background Voice and Video will be put into high ...

Page 79: ...ton of Setting for Privilege Profile to enter the Privilege Configuration including Maximum Concurrent Session and Change Password Privilege Maximum Concurrent Sessions The maximum number of concurrent sessions which is allowed to be established by each user Use the drop down list to select the maximum number of concurrent sessions which is allowed to be established by each user A session limit ca...

Page 80: ...s at the same time This function is not valid for On demand Users Account and RADIUS Account y Built in RADIUS Server Settings Session Timeout Define the time that how long users who are authenticated by the built in RADIUS server can access the Internet since they logged in The system will log out users after Session Timeout is reached Idle Timeout Define the time that the system will log out use...

Page 81: ...rted by the system to remind users that their accounts are about to cut off within the set time When Remaining Time Reminder is enabled there will be a message appearing on user s screen to remind them y MAC ACL Enter the MAC address of the network device When MAC ACL is enabled only the clients with their MAC addresses listed in this list can log into the system ...

Page 82: ...This section provides information on the following functions List Discovery Adding Templates Firmware and Upgrade It displays the information of the Access Points such as the number of Total Managed AP the number of Down AP and the number of Associated Clients ...

Page 83: ... AP Click the hyperlink of the AP Name to have more configurations There are four kinds of settings available General LAN Wireless LAN and Access Control Click the hyperlink of each individual setting to have further configurations y Service Zone After the AP is added into AP List the managed AP can be assigned to one or multiple service zone y Status Each AP s status will be shown in this column ...

Page 84: ...nk of AP Name General Setting Click Setting to enter the General Setting interface Revise the AP Name Admin Password and Remark here if desired Firmware information can also be viewed here LAN Click LAN to enter the LAN interface Input the data of LAN including IP Address Subnet Mask and Default Gateway of AP Wireless LAN Click Wireless LAN to enter the Wireless interface The data of Properties an...

Page 85: ...l from the list to correspond with the network settings for example 1 to 11 channels are suitable for the North America area y Data Rate The default is Auto Available range is from 1 to 54Mbps The rate of data transmission should be set depending on the speed of the wireless network Select from a range of transmission speed or keep the default setting Auto to make the Access Point automatically us...

Page 86: ...AP Status Summary and AP Status Details AP Status Summary includes AP Name AP Type LAN interface MAC address Wireless Interface MAC address Report Time SSID Number of Associated Clients and Remark AP Status Details include System Status LAN Status Wireless LAN Status Access Control Status and Associated Client Status y AP Name Mnemonic name of the specified AP y AP Type This is the supported type ...

Page 87: ...nformation about IP Address Subnet Mask and Gateway Wireless LAN Status The table shows all of the related wireless information Access Control Status The table shows the lists of MAC of clients under the control of the AP Associated Client Status The table shows the clients connecting to the AP and the related information of the client ...

Page 88: ...llowing Discovery Results list If there is a warning message showing below the Discovery Settings follow the instructions to change configurations Note Please refer to the datasheet for the supported APs and the firmware version as well as the hardware version Please fill in the required data Interface Select the default service zone of the interface where APs are connected and to be scanned Admin...

Page 89: ...he check box and click Add to add the discovered AP to the List For more information about the template please refer to 4 3 4 Templates y Background AP Discovery The system supports discovering APs periodically in background The New IP Address Assignment and Access to the AP Admin Interface configuration in Background Auto Discovery page are the same as in the Discovery Settings Click Configure an...

Page 90: ... Discover and IP Addresses of APs after Discovery configurations are the same as the settings mentioned above Check Enable to have more configuration Select Interval setting from the drop down menu to set the system to scan periodically according to this setting the default value is 10 minutes If Auto Adding AP to the list is enabled a new detected AP will be assigned an available IP address from ...

Page 91: ...ater the AP s status will become online or offline on the AP List y AP Type The type of supported AP y AP Name The mnemonic name of the specific AP y Admin Password The password of the AP for the system to access it y IP Address The IP address of the AP y MAC Address The Media Access Control MAC address of the AP y Remark The administrator can add some extra information for the AP in this field if...

Page 92: ...ate setting manually copy the configuration of an AP to the template by selecting a Copy Settings From and revise some settings is also acceptable Please select None if configuring the whole template from the draft is desired Enter the Name and Remark optional and click Configure to have further configuration After clicking Edit to enter the Details page revise the configuration on demands such as...

Page 93: ...work typically a router SNMP Public Community When SNMP is enabled modify the public community string Private Community When SNMP is enabled modify the private community string User Status Notification Select Enable or Disable the notification SYSLOG System Activity Select Enable to allow the logging of system actions such as logging a firmware upgrade Wireless Activity Select Enable to allow the ...

Page 94: ...less network Beacons are packets sent by an access point to synchronize a network Specify a beacon interval value DTIM Delivery Traffic Indication Message Enter a value between 1 and 255 DTIM is a countdown informing clients of the next window for listening to broadcast and multicast messages Preamble Select Long Only or Short and Long A short preamble is recommended for high traffic networks Tran...

Page 95: ...p to 11 Mbps users can migrate the system to the 802 11g standard on their own schedule without sacrificing connectivity Subnet Mask The default is 255 255 255 0 All devices in the network must share the same subnet mask Default Gateway The default is 192 168 1 1 Enter the gateway IP address for the network typically a router SNTP NTP The time server IP address time zone and the local time will be...

Page 96: ...ork Select from a range of transmission speed or keep the default setting Auto to make the Access Point automatically use the fastest rate possible Fragment Length The fragmentation threshold determines whether packets will be fragmented Enter a value between 256 and 2346 RTS Length Enter a value between 256 and 2346 When wireless clients would like to send a packet which is larger than this value...

Page 97: ...work Internal Station Connection Select either Enabled or Disabled The connection allows clients to communicate with each other when enabled Access Control by MAC Address This function provides to control the clients devices that are allowed to associate with the APs applied with the desired template setting Choose Disabled or Enabled in the Status column and enter the desired clients MAC addresse...

Page 98: ...P types and names DWL 3200AP v2 20 as DWL 3200AP v2 2 and DWL 3200AP v2 30 as DWL 3200AP v2 3 Moreover firmware upgrade from DWL 3200AP v2 20 to v2 3 is NOT supported by the system h Subnet Mask The default is 255 255 255 0 All devices in the network must share the same subnet mask Default Gateway The default is 192 168 1 1 Enter the gateway IP address for the network typically a router SNTP NTP T...

Page 99: ...1 to 54Mbps The rate of data transmission should be set depending on the speed of the wireless network Select from a range of transmission speed or keep the default setting Auto to make the Access Point automatically use the fastest rate possible Fragment Length The fragmentation threshold determines whether packets will be fragmented Enter a value between 256 and 2346 RTS Length Enter a value bet...

Page 100: ...Enter the number of the limit of load balancing users from 0 64 Link Integrate Enable or disable the feature Internal Station Connection Select either Enabled or Disabled The connection allows clients to communicate with each other when enabled If this is disabled wireless stations of the selected band are not allowed to exchange data through the access point Access Control by MAC Address This fun...

Page 101: ...1b and 802 11g standards the DWL 8200AP can connect with existing 802 11b 802 11g or 802 11a compliant wireless network adapter cards It is compatible with the 802 11b standard to provide a wireless data rate of up to 11Mbps Subnet Mask The default is 255 255 255 0 All devices in the network must share the same subnet mask Default Gateway The default is 192 168 1 1 Enter the gateway IP address for...

Page 102: ...ormation with the site survey software and get unauthorized access to a private network With this disabled network security is enhanced and can prevent the SSID from being seen on networked Internal Station Connection between 802 11a 802 11g Enabling this feature allows devices on the 802 11a network to exchange data with devices on the 802 11g network through Access Point If disabled a partition ...

Page 103: ...er packets will be fragmented Enter a value between 256 and 2346 RTS Length Enter a value between 256 and 2346 When wireless clients would like to send a packet which is larger than this value it transmits an RTS and waits for reply Beacon Interval ms Enter a value between 20 and 1000 msec The default value is 100 milliseconds The entered time means how often the beacon signal transmission between...

Page 104: ...hapter 4 Web Interface Configuration 98 Status column and enter the desired clients MAC addresses in the MAC Address List When this function is enabled please make sure the MAC Address List is not empty ...

Page 105: ...The name of the AP firmware to be uploaded Click Browse to select an AP firmware file to upload o Upload Click Upload button to upload the file from a local disk to the system y List All uploaded firmware will be listed here o File Name The name of the AP firmware has been uploaded o Checksum The automatically detected security identification of the firmware o AP Type The AP type of the firmware o...

Page 106: ... APs in Selection column Note that both the version before upgrade and the next version must be ones that have been integrated with the system Check the APs which need to be upgraded and select the upgrade version of firmware and click Apply to upgrade firmware y Last Upgraded Time The time when the AP was last upgraded y Next Version The firmware version to be upgrade to the AP ...

Page 107: ...AT Privilege Monitor IP Walled Garden Proxy Server DDNS Client Mobility and VPN It displays the information of the interfaces For WAN1 and WAN2 it will show the IP Address and the connection Status For LAN Ports it will show the IP Address SSID and Status of each Service Zone ...

Page 108: ...dress For Static Assignments enter Internal and External IP Addresses as a set and choose to use WAN1 or WAN2 for the External Interface from the drop down menu These settings will become effective immediately after clicking the Apply button Public Accessible Server The administrator can set up virtual servers using this function so that the computers not belonging to the managed network can acces...

Page 109: ...l be converted and redirected to the port of the Translated to Destination IP Address Enter the IP Address and Port of Destination and the IP Address and Port of Translated to Destination accordingly Depending on the different services selected choose the TCP protocol or UDP protocol These settings will become effective immediately after clicking Apply ...

Page 110: ...re allowed to access the Internet directly without authentication Remark is optional but useful for tracking purpose These settings will be effective immediately after clicking Apply Warning Permitting specific IP addresses to have network access rights without going through standard authentication process may result in security problems MAC Address List Clients in the MAC Address List are allowed...

Page 111: ...Chapter 4 4 Network 105 Warning Permitting specific MAC addresses to have network access rights without going through standard authentication process may result in security problems ...

Page 112: ...dministrator wants to monitor and click the Apply button When the administrator logs in the system click the Monitor Now button to execute the monitor action manually and a new page with status of monitored devices will appear The red dots mean the devices are unreachable and the green dots mean the devices are reachable and alive A notification e mail of the monitored status can be set to notify ...

Page 113: ...7 When the Monitor Now button is clicked Monitor IP Results page will appear If the entered IP address is unreachable a red dot under Result field will appear A green dot indicates that the IP address is reachable and alive ...

Page 114: ... Domain Name of the websites in the list The settings will be effective immediately after clicking Apply The Walled Garden supported by the system provides free surfing areas for clients to access before they are authenticated by the system For example on demand users without the network access right in hotels can still have a chance to experience the actual network service free of charge Caution ...

Page 115: ...oxy setting of the External Proxy Servers list to the clients proxy setting if the setting is found in their browsers If no matching is found the clients will not be able to get the login page nor access the network If a matching is found the clients will first be directed to the system for authentication and upon successful authentication redirect the clients back to the desired proxy servers y R...

Page 116: ...ddress regularly to the DNS server if the WAN1 interface is set to Dynamic These settings will become effective immediately after clicking Apply y DDNS Dynamic DNS choose to enable or disable this function y Provider Select the DNS provider y Host name The IP address domain name of the WAN port y Username E mail The register ID username or e mail for the DNS provider y Password Key The register pa...

Page 117: ...ugh the DSA 3600 to access the network By enabling IP PNP a PC with a static IP address will be able to access the network even if the system enables the built in DHCP server No TCP IP reconfiguration is needed y IP PNP When IP PNP is enabled a PC with a static IP address can still access the network even the system enables built in DHCP server No TCP IP reconfiguration is needed ...

Page 118: ...igured as Local VPN required Local VPN Local VPN allows a user to create the VPN tunnel between the user s device and DSA 3600 to encrypt the data transmission In addition only when this function is enabled Active here do users of the entire system are able to use Local VPN Local VPN users can also be isolated from each other when VPN Client Isolation is enabled For more information on Local VPN p...

Page 119: ...ystem will enable the IPSec VPN tunnel between two remote networks sites to encrypt the data transmission Click Add a Remote Site button to set the configuration about remote VPN capable devices such as a VPN gateway Click Add a Local Site button to set the configuration of the local site An IPSec tunnel can be constructed and used to connect to other IPSec capable devices on the Internet Click Ad...

Page 120: ...Chapter 4 Web Interface Configuration 114 Click Add a Local Site to enter the Local Site Information page for further configuration Click Add a New Host to enter the screen of Remote VPN Gateway ...

Page 121: ...Chapter 4 4 Network 115 ...

Page 122: ...Status This section covers the description of system status information and online user status which include System Interface Online Users User Logs and E mail SYSLOG An overview of the system is also provided here for the administrator s reference ...

Page 123: ...Chapter 4 5 Status 117 4 5 1 System This section provides an overview of the system administration ...

Page 124: ... Internet Disconnection Enabled Disabled stands for the connection at WAN is normal or abnormal and all online users are allowed disallowed to log in the network WAN Failover Shows the connection status of WAN1 and WAN2 SNMP Enabled Disabled stands for the current status of the SNMP management function Retained Days The maximum number of days for the system to retain the users information User Log...

Page 125: ... an overview of the all interfaces for the administrator such as WAN1 WAN2 Service Zone Default Service Zone Default DHCP Server Each service zone represents a virtual system Therefore the information of the system s network interface is grouped by service zone ...

Page 126: ...nts in bytes of WAN1 and WAN2 are displayed the delta counts current last are also displayed and it count and display the time during the period when page is being refresh only Mode The mode address of the default service zone MAC Address The MAC Address of the default service zone IP Address The IP address of the default service zone Service Zone Default Subnet Mask The Subnet Mask of the default...

Page 127: ...oute rules will be listed here Also it will show the System Route rules specified by each interface y Policy 1 8 Shows the information of the individual Policy from 1 to 8 y Global Policy Shows the information of the Global Policy y System Shows the information of the system administration ...

Page 128: ...ination IP address of the device Subnet Mask The Subnet Mask IP address of the port Gateway The Gateway IP address of the port Interface The choice of interface network including WAN1 WAN2 Default or the named Service Zones to be applied for the traffic interface ...

Page 129: ...here The administrator can use this function to force a specific online user to log out or terminate any user session by clicking the hyperlink of Logout button Click Refresh to renew the current users list A user may register with SIP Register after authentication In Online User List this user is shown as a UAM user User Authentication Management While monitoring online SIP users the page should ...

Page 130: ... history is saved in the DRAM if you need to restart the system and also keep the history then please manually copy and save the information before restarting If the Receiver E mail Address for System Log has been entered under the E mail SYSLOG page then the system will automatically send out the history information to that e mail address y Users Log The Users Log provides users login and logout ...

Page 131: ...te Type Name NAS ID NASIP NASPORT UserMAC Session ID Session Time Packets In and Packets Out Bytes In Bytes Out Message Type The authentication and accounting type of the external RADIUS server There is a type called Accept for authentication There are three types of accounting Start Interim update and Stop Name The user name of roaming out user NASID The System ID of the system Usually NASID is t...

Page 132: ...t The traffic amount of inbound outbound traffic based on byte Pkts In Out The traffic amount of inbound outbound traffic based on packet Message The system response of why the client stops this session y SIP Call Usage Log The SIP Call Usage Log provides the login and logout activities SIP users such as Start Time Caller Callee Receiver and Duration seconds A user may register with a SIP Registra...

Page 133: ...ername of the local user account Connection Time Usage The total time used by the user Pkts In Pkts Out The total number of packets received and sent by the user Bytes In Bytes Out The total number of bytes received and sent by the user ...

Page 134: ...ify FTP server y Notification E mail Settings Receiver E mail Address es The e mail address of the person whom the history e mail is for This will be the receiver s e mail Check which type of report to be sent Monitor IP Report System Log On demand Users Log and AP Status Change Interval The time interval to send the e mail report Choose a proper number from the drop down box SMTP Setting Test Tes...

Page 135: ...and from where the report should be sent to Note When the number of a user s sessions TCP and UDP reaches the session limit specified in the policy a record will be logged to this SYSLOG server For more information about Session Limit please refer to Appendix K y FTP Server Settings Session Log Log each connection created by users and tracking the source IP and destination IP If SYSLOG is enabled ...

Page 136: ...Configuration 130 4 6 Tools This section provides information on utilities used for customizing and maintaining the system including Setup Wizard Password Change Backup Restore System Upgrade Restart Utilities and Quick Links ...

Page 137: ... Restart The Setup Wizard is to provide express setup procedures for DSA 3600 Follow the instructions given at each step to change the system admin password select time zone configure WAN1 interface and create local user account Upon completing the Setup Wizard procedures the system has to be restarted to have the setting take effort The system is ready for operation after restart Please refer to ...

Page 138: ...enu to set the system time Click Next to continue Step 2 WAN1 Interface Select the Connection Type for WAN1 Port Select an Internet connection type for WAN1 interface Contact your ISP or the network administrator to make sure the connection type for WAN1 There are three connection types provided by DSA 3600 Static Dynamic and PPPoE Enter the Username and Password provided by the ISP Click Next to ...

Page 139: ...Set WAN1 Port s Static IP Address Enter the IP Address Subnet Mask and Default Gateway provided by the ISP Click Next to continue PPPoE Set PPPoE Client s Information Enter the Username and Password provided by the ISP Click Next to continue ...

Page 140: ...and Password e g testuser of the desired new account to add a new local account into the system Click Skip to exit step 3 or click Next to validate added local accounts and continue Step 4 Confirm and Restart Click Finish button to save the current settings and restart the DSA 3600 A confirming message will appear after clicking Finish Click OK to continue The Setup Wizard is now completed ...

Page 141: ...g the DSA 3600 restarting a Confirm and Restart page will appear on the screen Please do not interrupt the DSA 3600 until the DSA 3600 Administrator Login Page reappears This indicates that the restart process has been completed ...

Page 142: ...me admin and the selected password After logged in the web management interface click System and then click Service Zones to enter the Basic Settings page Next click the Server 1 hyperlink The DSA 3600 uses Virtual LAN VLAN along with a SSID to separate service zones At this stage the system is ready for use in minimum configuration The factory default configuration uses tag based VLAN The Default...

Page 143: ...Chapter 4 6 Tools 137 Figure 4 6 1a An example using Tag Based service zones ...

Page 144: ... but has no permission to change the settings of the profiles for Firewall Specific Route and Schedule User Name manager Password manager Operator The operator can only access the configuration page of Create On demand User to create and print out the new on demand user accounts User Name operator Password operator The administrator can change the passwords here Please enter the current password a...

Page 145: ...ing Click Backup button to save the current system configurations to a backup file on a local disk of the management console The backup file keeps the current system settings as well as the local user accounts information y Restore System Settings Click Browse to search for a db database backup file created by the DSA 3600 and click Restore to restore to the same settings at the time the backup fi...

Page 146: ...file is not compatible with current firmware as shown below y Reset to the Factory Default Click Reset to load the factory default settings of the DSA 3600 Note that a Reset action will wipe out the existing local user accounts To back up the local user accounts please export the local user accounts to a text first Please refer to the section on Local User List for more details Caution Resetting t...

Page 147: ...trator to restart the system upon successful firmware upgrade Warning 1 Firmware upgrade may sometime result in loss of some data Please ensure you read the release notes to understand the limitations before upgrading the firmware 2 Please restart the system after upgrading the firmware Do not interrupt upgrade process such as power on off the system during the upgrade or the restart process as it...

Page 148: ...o back to the previous screen If turning off the power is necessary restart the DSA 3600 and wait for it to complete the restart process before turning off Click Restart to restart the system Please wait for the blinking timer to finish before accessing the system web management interface again Note The connection of all online users on the system will be disconnected when the system is in the pro...

Page 149: ...s of the desired device and click Wake Up button to execute this function y Ping The Ping function let administrator to detect a device with IP or Host domain name that it is alive or not y Trace Route It lets administrator to find out the real path of packets from our gateway to a destination with IP or Host domain name that it will show all the nodes between gateway and destination y ARP Table I...

Page 150: ...ght links for administrators to directly access frequently used functions of the web management interface The eight functional links are System Status Local User Management Policy Management AP Management Online User List On demand Account Management Authentication Configuration and Firmware Management ...

Page 151: ...section This list provides to the administrator at a glance all the users online for easy termination of any user session Please refer to the section on Online Users for details Link 3 Local User Management Local User Management provides information from the Local User List a shortcut to 4 3 1 List in Access Points sections and 4 1 6 Service ZoneÆAuthentication Settings as well as Authentication d...

Page 152: ...s the customers use wireless Internet with username and password from retail environment for access Please refer to the section on On demand Account Configuration for details Link 5 Policy Management Policy provides information from the Policy Configuration a shortcut to 4 2 3 Policy in Users sections It lets the administrator select one of the defined policies to apply to specific authentication ...

Page 153: ...ils Link 7 AP Management AP Management provides information from the AP List a shortcut to 4 3 1 List in Access Points It lets the administrator add supported APs from Discovery or from the Adding menu tab reboot enable disable delete the managed APs apply template or apply service zone Please refer to the section on AP List for details Link 8 Firmware Management Firmware Management provides infor...

Page 154: ...b Interface Configuration 148 4 7 Help The Help button is at the upper right corner of the DSA 3600 display screen Click Help for the Online Help window then click the hyperlink of the relevant information required ...

Page 155: ...pear in the browser Enter the username and password for example we use a local user account test local here and then click Login button If wanted the computer to remember your Username and Password the next time u login in Tick the Remember me before clicking Login Note If you see the Certificate Error please press Continue to this website to continue or reference Appendix D Certificate Settings f...

Page 156: ...the Internet In this example it is an account of Cut off type that will be expired by 2007 12 07 12 30 2 Redeem When the remaining quota is insufficient the user can add up the quota by purchasing an additional account Please enter the new username for example we use 23eh ondemand here and password in the Redeem Page and click Enter button to merge the two accounts As a result there will be more q...

Page 157: ...menu driven text interface with dialog boxes Please use arrow keys on the keyboard to browse the menu and press the Enter key to make selection or confirm what you enter 3 Once the console port of the DSA 3600 is connected properly the console main screen will appear automatically If the screen does not appear in the terminal simulation program automatically press the arrow keys of the keyboard to...

Page 158: ...tatic Route settings Display ARP table The internal ARP table of the system is displayed Display system up time The system live time time for system being turned on is displayed Check service status Check and display the status of the system Set device into safe mode Used when the administrator is unable to access the Web Management Interface via the browser or when it fails inexplicitly The admin...

Page 159: ... can be changed If the password cannot be remembered and the management interface cannot be accessed from the web or the remote end of the SSH the console cable can still be used to connect the console management interface where the administrator can then reset the password 3 Reload factory default Choose this option to reset the system configuration to the factory default settings 4 Restart the D...

Page 160: ... resources more quickly This section presents basic examples for configuring the proxy server settings of the DSA 3600 Using Internet Proxy Server The first scenario is that a proxy server is placed outside the LAN environment or in the Internet For example the following diagram shows that a proxy server of an ISP will be used ...

Page 161: ...ver settings match with at least one of the proxy server setting of the DSA 3600 for example in this case 203 125 142 1 3128 matches with blank 3128 Note 1 It is required that the proxy server setting of the clients match with at least one of the proxy server setting of the DSA 3600 Otherwise users will not be able to get the Login page for authentication via browsers and it will show an error pag...

Page 162: ...Appendix C Proxy Configuration 156 setting ...

Page 163: ...ll be used Note A special scenario is that a proxy server is placed in a zone like Intranet where users can reach each other without going through the DSA 3600 In this case whenever any one of users in the Intranet has been authenticated and connects to the network via the proxy server other users using the same proxy setting in their browsers will be able to access the network without any authent...

Page 164: ... save the settings Step 3 Make sure that clients use the same proxy server settings Please also configure appropriate exceptions if there is any traffic which is not needed to go through proxy server for example there is no need to use proxy server for the Default Gateway 192 168 1 254 Note It is required that the proxy server setting of the clients match with the proxy server setting of the DSA 3...

Page 165: ...each normal user when deploying the DSA 3600 Secure Certificate setting for both IE6 and IE7 For the company with its own Certificate Authority CA the certificate of the company should be trusted by all his employees computers and the certificate should be delivered through a trusted media For example the MIS staff should install the CA certificate in each computer The company CA will issue a cert...

Page 166: ...not being trusted by IE7 the following steps may be taken to provide a workaround or to bypass the issue 1 Open the IE7 browser and you will be redirected to the default login page If the certificate is not trusted the following page will appear Click Continue to this website 2 The default User Login Page will appear and the users can then login normally ...

Page 167: ...IE7 161 For installing a trusted certificate to solve the IE7 certificate issue please follow the instructions stated below 1 When the User Login page appears click Certificate Error at the top 2 Click View Certificate 3 Click Certification path ...

Page 168: ...Appendix D Certificate Settings for IE6 and IE7 162 4 Select root certification then click View Certificate 5 Click Install Certificate ...

Page 169: ...Appendix D Certificate Settings for IE6 and IE7 163 6 Click Next 7 Select Automatically select the certificate store based on the type of certificate then click Next 8 Click Finish ...

Page 170: ...ndix D Certificate Settings for IE6 and IE7 164 9 Click Yes 10 Click OK 11 Launch a new IE7 browser The certificate is now trusted via IE7 according to the key symbol shown at top next to the address field ...

Page 171: ...to IE6 certificate error the following information provides the step to take when the certificate publisher is not trusted by IE6 1 Open an IE6 browser the Security Alert message will be appeared if the certificate is not trusted Click Yes to proceed 2 The User Login Page will appear 3 The user can now login normally ...

Page 172: ...Typical Application Scenario Employees vs Guests Typical service zone settings will separate users groups into Employee and Guests for the purpose of different authentication level Application Network Diagram As shown in the diagram assign service zone 1 to Employees and service zone 2 to Guest ...

Page 173: ...ve a unique Session ID to authenticated users when they start new sessions 3 Both groups Employees and Guests will be redirected to different login portal pages and will be authenticated against different authentication database 4 Apply different access control policies to separated groups Employee and Guests Solution and Configuration in DSA 3600 Configure two service zones to map to the two grou...

Page 174: ...rvice Zones Deployment Examples 168 Step 3 Configure the service zone accordingly Configure the SSID Choose the authentication option and configure the login page Choose the appropriate policy for this service zone ...

Page 175: ...ished Configuration Service Zone Settings Once the settings of two service zones are completed the configured result will be displayed on screen in the Service Zone Settings The name of the service zone and the enabled status should appear in the display ...

Page 176: ... and centrally managed via the DSA 3600 The Service Zone and Centralized AP Management provide an ideal solution using the DSA 3600 together with DWL 2100AP for quick creation and extension of wireless local area network WLAN in offices and other workplaces including hotspots Best Practice for Wireless Settings of DWL 2100AP To use multiple SSIDs in DWL 2100AP creation and configuration of differe...

Page 177: ...ss security of the associated Service Zones is set in the modes which use RADIUS those SSIDs cannot be mapped to the Service Zones that have different sets of RADIUS Server settings in the DSA 3600 Availability of WEP Keys When an SSID of the DWL 2100AP is set in WPA related modes such as WPA EAP WPA2 EAP WPA Auto EAP WPA PSK WPA2 PSK and WPA Auto PSK it will disable the availability of WEP Key2 a...

Page 178: ... System or Shared Key Availability of WPA Pre Shared Keys WPA When an SSID of the DWL 2100AP is set in the mode of WPA WPA2 and WPA WPA2 Mixed in DWL 2100AP Passphrase is the only available Key type for Pre Shared keys PSK In addition the length of Passphrase for the SSID of Guest type is 8 to 34 characters Caution The HEX the other Key type should NOT be enabled in DSA 3600 if any DWL 2100AP exis...

Page 179: ...ons must be set up on the PC Internet Connection Setup and TCP IP Network Setup Internet Connection Setup If the Internet Connection of this client PC has been configured as use local area network already you can skip this setup Windows XP 1 Choose Start Æ Control Panel Æ Internet Option 2 Choose the Connections label and then click Setup ...

Page 180: ...Network Configuration on PC 174 3 Click Next when Welcome to the New Connection Wizard screen appears 4 Choose Connect to the Internet and then click Next 5 Choose Set up my connection manually and then click Next ...

Page 181: ...pleted the setup TCP IP Network Setup In the default configuration the DSA 3600 will assign an appropriate IP address to a client PC which uses DHCP to obtain IP address automatically Windows 95 98 2000 XP configures IP setup to Obtain an IP address automatically in default settings To check the TCP IP setup or use a static IP to connect to the DSA 3600 LAN port please follow the following steps ...

Page 182: ...rol Panel Æ Network Connection 2 Click the right button of the mouse on the Local Area Connection icon and select Properties 3 Select General label and choose Internet Protocol TCP IP and then click Properties Now you can choose to use DHCP or specific IP address please proceed to the following steps ...

Page 183: ...ess is obtained from the DSA 3600 5 Using Specific IP Address To use specific IP address please request from your network administrator the following information of the DSA 3600 IP address Subnet Mask New gateway and DNS server address Choose Use the following IP address and enter the information given from the network administrator in IP address Subnet mask and the DNS address es and then click O...

Page 184: ...a so called clientless IPSec VPN setting is then configured automatically At the end of this setup a build in IPSec VPN feature will be enabled and ready to serve once it is launched for setup The goal of this design is to eliminate the configuration difficulty from IPSec VPN users At the client side the IPSec VPN implementation of the DSA 3600 is based on ActiveX and the built in IPSec VPN client...

Page 185: ...ection beyond this The DSA 3600 s IPSec VPN feature is designed to solve possible data security leak between client and the controller via either wireless or wired connection without extra hardware or client software installed 2 Limitations The limitation on the client side due to ActiveX and Windows OS includes a Internet Connection Firewall of Windows XP or Windows XP SP1 not being compatible wi...

Page 186: ... Windows XP SP2 4 ICMP and Active Mode FTP On Windows XP SP2 that is without patch KB889527 ICMP packets will be dropped from IPSec tunnel This issue can be fixed by upgrading patch KB889527 Before enabling IPSec VPN function on client device please access the patch from Microsoft s web at http support microsoft com default aspx scid kb en us 889527 This patch also fixes issues of supporting activ...

Page 187: ...r s browser can be avoided in order to maintain the built IPSec VPN tunnel always alive Reasons why Internet Explorer may cause ActiveX to stop unexpectedly are as follows a The crash of Internet Explorer on running ActiveX Suggestion Please reboot client s computer once Windows service is resumed Go through the login process again b Terminate the Internet Explorer Task from Windows Task Manager S...

Page 188: ...the other application e g e mail of Outlook that occupies this existing Internet Explorer All these will cause the termination of IPSec VPN tunneling if the user chooses to click Yes The user has to log in again to regain the network access Suggestion Click Cancel if you do not intend to stop the IPSec VPN connection yet 6 Non supported OS and Browser Currently Windows Internet Explorer is the onl...

Page 189: ...ec2k exe stop b How to remove ActiveX component in client s computer ANS 1 Uninstall and delete ActiveX component 2 Close all Internet Explorer windows 3 Open a command prompt window and type the commands as follows C cd windir system32 C regsvr32 u VPNClient_1_5 ocx C del VPNClient_1_5 ocx c What can I do if unable establish IPSec connection for Windows XP SP1 ANS Disable Windows XP firewall ...

Page 190: ...on back to the relay agent in server to client replies and strip off the option before forwarding the reply to the client A graphic example of connecting 2 gateways with an external DHCP server Please note that the Router and Gateway 1 connected to the DHCP Server have to be under the same network segment as the DHCP Server When a client requests IP address from Gateway 1 Public LAN through the bu...

Page 191: ...ction being enabled in the DSA 3600 sends a Circuit ID 00 90 0B 07 60 91_192 168 1 254 to the external DHCP server When the DHCP server gets the Circuit ID it recognizes that the request is sent from g1_public_lan and thus assigns the client a DNS server of 169 95 1 1 an IP that is in the range of 192 168 1 30 and 192 168 1 50 a default gateway of 192 168 1 254 and a subnet mask of 255 255 255 0 ...

Page 192: ...n daily operation Session Log The system can record connection details of each user accessing the Internet In addition the log data can be sent out to a specified Syslog Server Email Box or FTP Server based on pre defined interval time The following table shows the fields of a session log record Field Description Date and Time The date and time that the session is established Session Type New This...

Page 193: ...7 New user1 local TCP MAC 00 09 6b cd 83 8c SIP 10 1 1 37 SPort 1628 DIP 203 125 164 142 DPort 80 Jul 20 12 35 06 2007 New user1 local TCP MAC 00 09 6b cd 83 8c SIP 10 1 1 37 SPort 1629 DIP 203 125 164 142 DPort 80 Jul 20 12 35 07 2007 New user1 local TCP MAC 00 09 6b cd 83 8c SIP 10 1 1 37 SPort 1630 DIP 67 18 163 154 DPort 80 Jul 20 12 35 09 2007 New user1 local TCP MAC 00 09 6b cd 83 8c SIP 10 ...

Page 194: ... via PayPal This section is to show independent Hotspot owners how to configure related settings in order to accept payments via PayPal making the Hotspot an e commerce environment for end users to pay for and obtain Internet access using their PayPal accounts or credit cards ...

Page 195: ...ness Account and login Here is a link https www paypal com cgi bin webscr cmd _registration run Step 2 Edit necessary settings in Website Payment Preferences Click Profile Æ Click Website Payment Preferences in the Selling Preferences section Administrators should scroll down to edit each setting as shown in the table below To activate all the changes please click Save at the end of the page ...

Page 196: ...Pal 190 Settings Screenshots Auto Return On Return URL Redirect Webpage Type http www www com or other URL Payment Data Transfer On Block Non encrypted Website Payment Off PayPal Account Optional Off Contact Telephone Number Off Click Save ...

Page 197: ...a PayPal 191 1 2 Configure DSA 3600 with a PayPal Business Account Please log in DSA 3600 Users Æ Authentication Æ Click the Option On demand User Æ External Payment Gateway Æ Click Configure Æ External Payment Gateway Æ Select PayPal ...

Page 198: ...Data Transfer optional Copy the Identity Token in the above page to the section PayPal Payment Page Configuration of DSA 3600 1 3 Requirements for Building a Secure PayPal based E Commerce Site To deploy the PayPal function properly it is required that the merchant register an Internet domain name for example www StoreName com for this subscriber gateway device In addition it is necessary to sign ...

Page 199: ...and click Process Refund b To remove the specific account from DSA 3600 please log in DSA 3600 Users Æ Authentication Æ Click the Option On demand User Æ On demand Account ListÆ Click View Æ Click Delete on the record with the account ID Click Delete All to delete all users at once 2 2 Find the username and password for a specific customer a To find the username please log in PayPal Æ Click Histor...

Page 200: ...e automatically sent to the customer via PayPal To change the information on the receipt for customer please log in DSA 3600 Users Æ Authentication Æ Click the Option On demand User Æ On demand User Server Configuration Æ External Payment Gateway Æ Click Configure Æ Select PayPal Æ Go to Client s Purchasing Record section Æ Type in information in the text boxes Starting Invoice Number and Descript...

Page 201: ...ria Æ Specify the dates From and To fields for the period Æ Click Search 3 2 Search for the transaction details for a specific customer Please log in PayPal Æ Click History Æ Click Advanced Search Æ Enter the name for a specific customer as criteria in the Search For field and Choose Last Name or Last Name First Name in the In field Æ Specify the time period Æ Click Submit Æ Click Details to view ...

Page 202: ...ments via PayPal Step 1 Click the link below the login window to pay for the service via PayPal Step 2 Choose I agree to accept the terms of use and click Next Step 3 Please fill out the form and click Buy Now to send out this transaction There will be a confirm dialog box ...

Page 203: ...Appendix K Accepting Payments via PayPal 197 Step 4 You will be redirected to PayPal website to complete the payment process ...

Page 204: ...payments securely online using PayPal account a credit card or bank account Clicking on Buy Now button you will be redirected to PayPal s site to make payment 2 Please do not manually close the browser when you reach PayPal s payment confirmation page It takes about 30 seconds or more before you are automatically redirected back to our website with a set of Login ID and Password ...

Reviews: