Non-Overhaul Removal and Replacement
Teledyne Continental Motors, Inc.
TM
10-26
IOF-550 Permold Series Engine Maintenance Manual
1 April 2007
connector pin references are correct and repeat the measurement. Repairing a single
segment if the circuit remains open will not resolve a wiring malfunction.
CAUTION: If the shield splice is not placed over the wires before
Step 22, the splice repair cannot be correctly completed without
removing the heat shrink tubing.
19.
Slide a shield splice onto one of the sensor leads, allowing sufficient work space for
splicing the wires.
20.
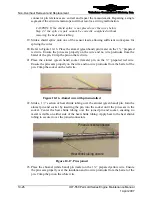
Refer to Figure 10-16. Place the alumel (green band) pin (male) on the 1
⅝
” prepared
red wire. Ensure the pin seats properly on the wire and no wire protrudes from the
barrel of the pin. Crimp the pin on the red wire.
21.
Place the alumel (green band) socket (female) pin on the
⅝
” prepared red wire.
Ensure the pin seats properly on the wire and no wire protrudes from the barrel of the
pin. Crimp the socket on the red wire.
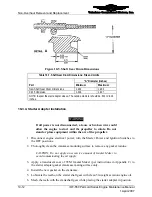
Figure 10-16.
Alumel wire with pins installed
22.
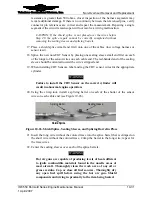
Slide a 1 ½” section of heat shrink tubing over the alumel (green band) pin. Join the
alumel pin and socket by inserting the pin into the socket until the pin seats in the
socket. Center the heat shrink tubing over the joined pin and socket, ensuring no
metal is visible on either side of the heat shrink tubing. Apply heat to the heat shrink
tubing to secure it over the joined connectors.
Pin and socket connected
Heat shrink tubing on wire
Pin and socket connected
Heat shrink tubing on wire
Figure 10-17.
Pins joined
23.
Place the chromel (white band) pin (male) on the 1
⅝
” prepared yellow wire. Ensure
the pin seats properly over the insulation and no wire protrudes from the barrel of the
pin. Crimp the pin on the white wire.

