6
Safe Manager
Project
View
Tools
Windows Help
Options
Updating firmware...
Control unit check (Real Time)
Scan System...
Send audio
Receive events log
Options
Communication type
OK
Cancel
Communications
Options
TCP-IP
Serial port
TCP/IP
Host name or IP address
192.168.1.230
Port
10022
Safe Manager
Project
View
Tools
Windows
Help
Toolbar
Status strip
Central unit firmware version
Central unit firmware version
Read
Close
Firmware version
Installer authorisation
Execute
Central unit firmware version
Read
Firmware version
Installer authorisation
Login
Login
Cancel
Request code
Enter access code
******
Central unit firmware version
Read
Firmware version
Installer authorisation
HARDWARE_ID:MuTy - (Vedo68)
HARDWARE_BOOT_VER: 0x2
VERSION_CODE: 0x0
COMMIT#/stable/Vedo-x.x-2.4.x@4467
Central unit firmware version
Read
Firmware version
Installer authorisation
HARDWARE_ID:MuTy - (Vedo68)
HARDWARE_BOOT_VER: 0x2
VERSION_CODE: 0x0
COMMIT#/stable/Vedo-x.x-2.4.x@4467
Alarm control
unit
New project
Ok
Cancel
Categories:
2.2.x
Vedo 10
Vedo 34
Vedo 68
Vedo 200
2.6.x
Standard
Standard
Standard
Standard
2.6.x
2.6.x
2.6.x
10
2
34
8
8
68
16
200
2.4.x
2.5.x
2.6.x
Default
Description
FW
Zones Areas
Project type:
Ok
Cancel
2.2.x
Vedo 10
Vedo 34
Vedo 68
Vedo 200
2.6.x
2.6.x
2.6.x
2.6.x
10
2
34
8
8
68
16
200
Basic
Standard
Alarm control
unit
New project
Categories:
Description
Project type:
Default
FW
Zones Areas
Standard
Standard
Standard
Standard
Safe Manager
Project
View
Tool
Windows
Help
Alarm control
unit
New project
Ok
Cancel
Categories:
Project type:
Description
FW
Zones Areas Default
Vedo 10
Vedo 34
Vedo 68
Vedo 200
2.6.x
Standard
Standard
Standard
Standard
2.6.x
2.6.x
2.6.x
10
2
34
8
8
68
16
200
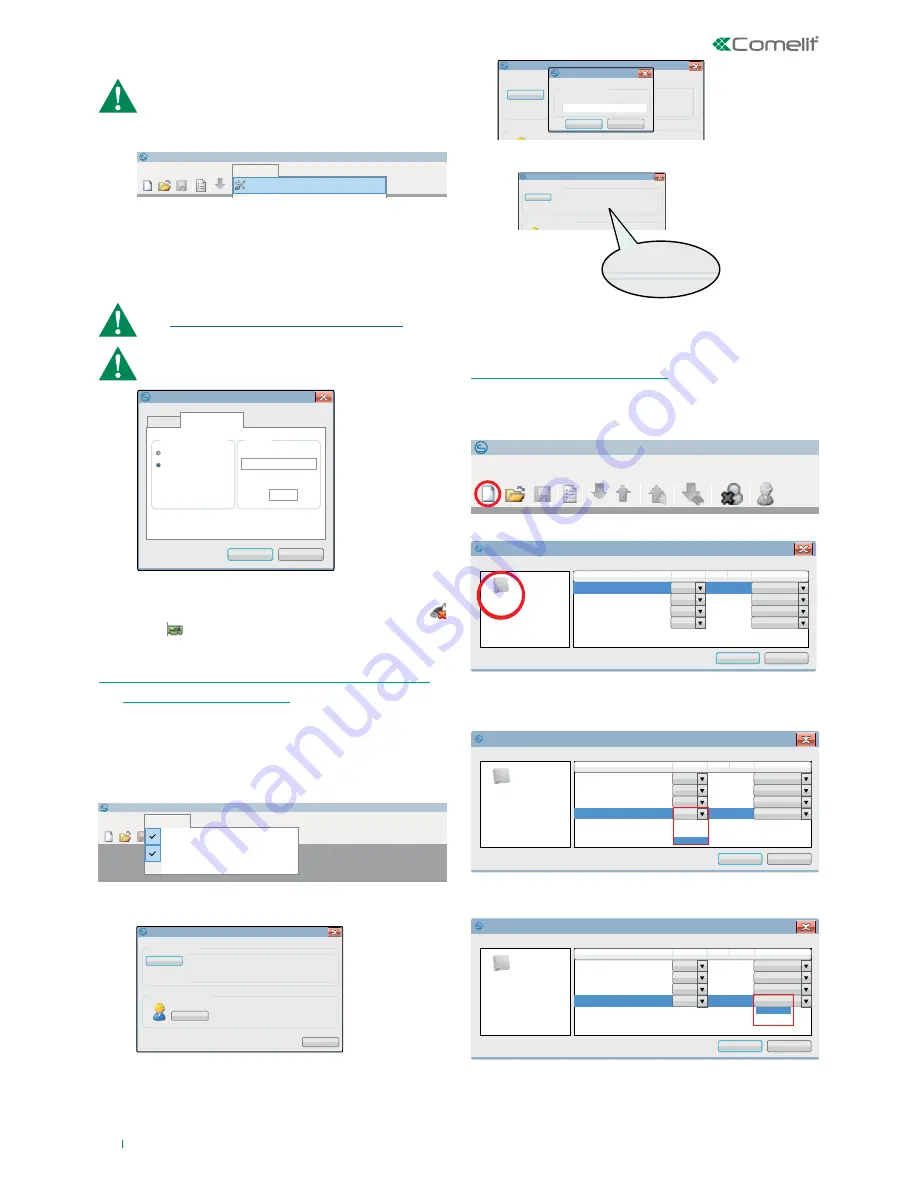
1.4.2 Set communication via TCP/IP
√ Before carrying out the following procedure, make sure that
the PC used and the Vedo series control panel are both on
the same network.
This is necessary when you want to know which firmware version is
installed on the control panel, as some procedures need this information in
order to be carried out fully (creating a new system, for example).
This procedure enables you to create a new archive, which will contain all
the data relating to the new system that you want to configure.
1. Press the New icon.
2. Press the
Alarm control panel
icon.
3. Select your control panel from the list and, from the drop-down menu,
select the software version installed on the control panel (see "1.5 Viewing
the installed firmware version of the control panel" on page 6).
4. Use the drop-down menu to select whether you wish to create a project
with the "Basic" default settings or the "Standard" default settings.
» A system with default parameters will be created. These parameters do
not necessarily correspond to the installed system.
5. Click OK.
1. Click the View menu.
2. Click the Control panel firmware version menu.
3. If necessary, enable the installer (see
"Installer authorisation" on page
72
) and click Read.
4. Enter the installer access code. The default code is 001961
5. Click Login.
» The box will display the control panel data.
For remote connection, the port on the router must be opened
(see
“Port forwarding (for Remote connection” page 78
).
IP card expansion modules are programmed with the IP
address
192.168.1.230
by default. Vedo series control panels
communicate using port number
10022
by default.
1. Click the Tools menu.
2. Click the Options menu.
3. Click the Communications tab.
4. Select TCP/IP under the option Communication type.
5. Enter the IP address of the IP card expansion module in the
Host name or IP address field.
6. Insert the number of the communication port in the Port field
(the value must be the same as the one set for the tls port in
the IP Options).
7. Click Ok to confirm the changes you have made.
8. Make sure the TCP/IP connection status icon (in the bottom
right-hand corner of the main window) has changed from
to
.
1.5 VIEWING THE INSTALLED FIRMWARE VERSION
OF THE CONTROL PANEL
1.6 CREATING A NEW SYSTEM
»
2.4.x
--> The first 2 digits (
2.4
) indicate the control panel firmware
version, while the third digit (
x
) increases progressively with routine
bug fixes. The same rule applies for the naming of the firmware used
by peripherals.
Summary of Contents for VEDO 2.6 Series
Page 99: ...99...


