background image

Chapter 3

40

Creating a schedule

Creating a schedule

You can create a schedule using the HDMA Scheduler.

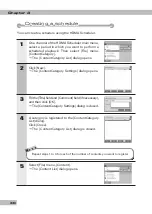
1

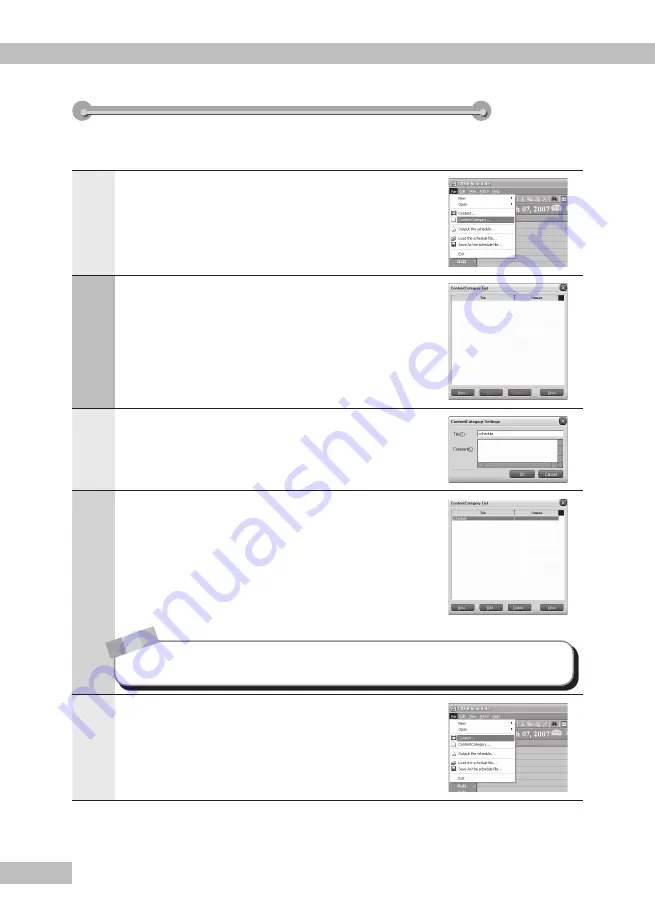
On a channel of the HDMA Scheduler main menu, 
select a period in which you want to perform a 
scheduled playback. Then select [File] menu, 
[ContentCategory].

 The  [ContentCategory List] dialog opens.

2

Click [New].

 The [ContentCategory Settings] dialog opens.

3

Fill the [Title] field and [Comment] field (if necessary), 
and then click [OK].

  The [ContentCategory Settings] dialog is closed.

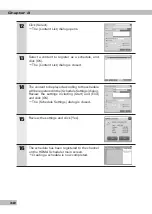
4

A category is registered to the [ContentCategory 
List] dialog.
Click [Close].

 The  [ContentCategory List] dialog is closed.

N o

t e

Repeat steps 1 to 4 for each of the number of contents you want to register.

5

Select [File] menu, [Content].

 The [Content List] dialog opens.

Summary of Contents for HDMA-4000

Page 1: ...HDMA 4000 User Guide Engineered by Canopus Co Ltd...

Page 2: ...Canopus is not responsible for any lost profits lost savings or other incidental or consequential damages arising out of the use of or inability to use this product This includes damage to property a...

Page 3: ...ch operation may result in fire or malfunction Handle the AC adapter cord carefully Do not place heavy objects on top of the cord or place it near hot objects Doing so may damage the cord and result i...

Page 4: ...an area exposed to direct sunlight or near a heating apparatus The heat can accumulate causing burns fire or damage Also the unit may become deformed or change color CAUTION The following conditions...

Page 5: ...juries or malfunction of the product Precautions for use of AC adapter The supplied AC adapter and power cord are for exclusive use of this product Do not operate the product with other AC adapter or...

Page 6: ...s operated in a commercial environment This equipment generates uses and can radiate radio frequency energy and if not installed and used in accordance with the instruction manual may cause harmful in...

Page 7: ...gistered trademarks of OMRON Corporation 9 Pioneer and its logo are registered tradmarks of Pioneer Corporation 10 Microsoft and Windows are registered trademarks of Microsoft Corporation USA Other pr...

Page 8: ...0 HDMA 4000Sync 15 Features of HDMA 4000Sync 15 Chapter 2 HDMA 4000 Part Names 18 HDMA 4000 HDMA 4000Sync Front Panel 18 HDMA 4000 Rear Panel 20 HDMA 4000Sync Rear Panel 21 Remote Controller 22 Ferrit...

Page 9: ...ce 1 Contents update 52 Contents update via a network 52 Contents update via USB 55 Description of the contents update control file 56 Description examples 57 Reference 2 How to create contents 60 Out...

Page 10: ...dating firmware 118 How to update 118 Maintenance Mode 119 Maintenance Mode overview 119 Firmware recovery 121 If you have forgotten the user name or the password 123 Reference 5 Sync playback using t...

Page 11: ...This chapter describes the things to check before This chapter describes the things to check before setting up HDMA 4000 setting up HDMA 4000 Introduction Introduction HDMA 4000 HDMA 4000 Chapter 1 C...

Page 12: ...IBILITY WITH RESPECT TO THE USE OF THIS PRODUCT HEREUNDER FURTHER CANOPUS MAKES NO WARRANTIES OF PROPER OPERATION OF THIS PRODUCT UNDER OTHER USAGE ENVIRONMENT THAN THAT RECOMMENDED BY CANOPUS FOR THI...

Page 13: ...ee software that uses GNU General Public License hereinafter GPL or GNU Lesser General Public License hereinafter LGPL in a part of the software Replacement of the HDD and fan Replacement of the HDD a...

Page 14: ...o output Coaxial digital Composite analog System controller DU 100P Data is updated with a USB memory device Direct Playback of the contents of an external drive FAT32 is supported In addition to the...

Page 15: ...ile When the HDMA 4000 is connected via a network the workflow from editing to playback can be consolidated Supports DVD LD player compatible command controls Commands compatible with the Pioneer DVD...

Page 16: ...Chapter 1 16...

Page 17: ...ions of the This chapter describes the functions of the HDMA 4000 HDMA 4000 HDMA 4000 Part Names HDMA 4000 Part Names Connecting the HDMA 4000 Connecting the HDMA 4000 Contents of the product CD Conte...

Page 18: ...ower is not on Lit Operating Blinking Starting up Shutting down 3 STORAGE LED Lights up when the internal HDD is being accessed 4 LINK LED Lights when HDMA 4000 and or HDMA 4000Sync is connected to a...

Page 19: ...nel names defined in the schedule file the content corresponding to KEY 1 will be played 9 F2 Key Depending on the channel names defined in the schedule file the content corresponding to KEY 2 will be...

Page 20: ...S VIDEO OUT S video signal output 6 DVI D DVI D terminal 7 COMPONENT VIDEO OUT Component video Y Pb Pr signal output 8 USB Port Port for connecting a USB device 9 LAN Port for connecting an Ethernet c...

Page 21: ...Composite video signal output 5 S VIDEO OUT S video signal output 6 DVI D DVI D terminal 7 COMPONENT VIDEO OUT Component video Y Pb Pr signal output 8 USB Port Port for connecting a USB device 9 LAN...

Page 22: ...multiple files registered in the current schedule file use the button to play the next file When a file is being played repeatedly playback jumps to the top of the file button Pauses the playing conte...

Page 23: ...23 Chapter 2 HDMA 4000 Part Names Ferrite core Ferrite core Attach the ferrite core to the Ethernet and AC cable in the position shown below HDMA 4000 side...

Page 24: ...or TV monitor component input N o t e Connecting the AC adapter will turn on the HDMA 4000 and will also start connecting to the network with certain settings Therefore connect the AC adapter after en...

Page 25: ...g the front panel or Setup using Web browser in Reference 4 and modify the settings to suit your TV monitor N o t e For more information on network settings see Setup using the front panel or Setup us...

Page 26: ...on the HDMA 4000 Schedule files Schedule file samples to be used on the HDMA 4000 Sample movies Movie samples that can be played on the HDMA 4000 HDMA Scheduler Software to register create output a v...

Page 27: ...he Reference 1 see the Reference 1 HDMA Scheduler Overview HDMA Scheduler Overview Installation Installation Uninstallation Uninstallation Using HDMA Scheduler Using HDMA Scheduler Updating contents U...

Page 28: ...below OS Microsoft Windows XP Home Edition Professional Service Pack2 or later CPU Intel Pentium 4 2 4GHz or higher Memory 256MB or larger Graphics Support for resolution of higher than 1024 x 768 do...

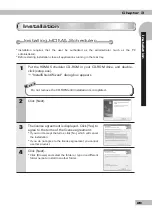
Page 29: ...your CD ROM drive and double click setup exe InstallShield Wizard dialog box appears N o t e Do not remove the CD ROM until installation is completed 2 Click Next 3 The license agreement is displayed...

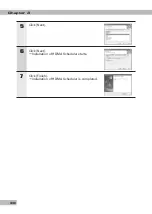
Page 30: ...Chapter 3 30 5 Click Next 6 Click Next Installation of HDMA Scheduler starts 7 Click Finish Installation of HDMA Scheduler is completed...

Page 31: ...install it Uninstallation requires that the user be authorized as the administrator such as a PC administrator Before starting uninstallation close all the other applications running in the task tray...

Page 32: ...Chapter 3 32 6 Click X Uninstallation is completed...

Page 33: ...uler Starting HDMA Scheduler 1 From Start menu select Allprograms Canopus HDMAScheduler andclick Scheduler Otherwise double click the HDMA Scheduler icon on the desktop HDMA Scheduler will start N o t...

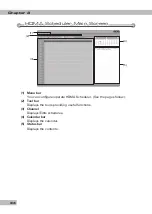
Page 34: ...in Screen 1 3 4 2 5 1 Menu bar You can configure operate HDMA Scheduler See the pages follow 2 Tool bar Displays the tools providing useful functions 3 Channel Displays Edits schedules 4 Calendar bar...

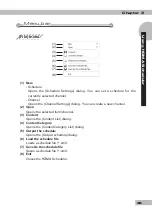
Page 35: ...hannel Opens the Channel Settings dialog You can create a new channel 2 Open Opens the selected item channel 3 Content Opens the Content List dialog 4 ContentCategory Opens the ContentCategory List di...

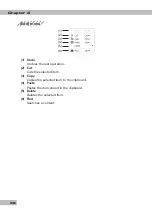
Page 36: ...1 2 3 4 6 5 1 Undo Undoes the last operation 2 Cut Cuts the selected item 3 Copy Copies the selected item to the clipboard 4 Paste Pastes the item stored in the clipboard 5 Delete Deletes the selecte...

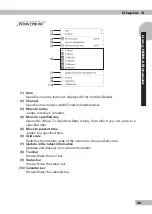
Page 37: ...dar 4 Move to specified day Opens the Move To Specified Date dialog from which you can jump to a specified date 5 Move to present time Jumps to a specified time 6 Grid scale Switches the timeline grid...

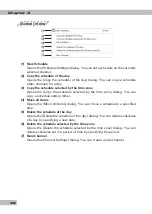
Page 38: ...cted by the time zone dialog You can copy a schedule setting time 4 Move all items Opens the Move All Items dialog You can move a schedule to a specified time 5 Delete the schedule of the day Opens th...

Page 39: ...39 Chapter 3 Using HDMA Scheduler Help menu Help menu 1 1 About Scheduler Displays the HDMA Scheduler version...

Page 40: ...ContentCategory List dialog opens 2 Click New The ContentCategory Settings dialog opens 3 Fillthe Title fieldand Comment field ifnecessary and then click OK The ContentCategory Settings dialog is clos...

Page 41: ...8 Select a content to register and click Open The Open dialog is closed 9 Click OK The Edit content dialog is closed 10 The content has been registered to the list Click Close The Content List dialog...

Page 42: ...he content to be played according to the schedule will be registered in the Schedule Settings dialog Review the settings including Start and End and click OK The Schedule Settings dialog is closed 15...

Page 43: ...to the number keys 0 9 on the HDMA 4000 Remote Controller To configure the channel settings select File menu New Channel and open the Channel Settings dialog Place a checkmark on KEY on the Channel S...

Page 44: ...ens 2 Click Edit The Output list dialog opens 3 Click New The Output Settings dialog opens 4 Type in the title you want to export and specify the destination To export onto an HDMA 4000 enter the dest...

Page 45: ...aving a schedule Saving a schedule You can save a created schedule file 1 Select File menu Save As the schedule file The Save As dialog opens 2 Specify the destination and the file name and click Save...

Page 46: ...ding a schedule Loading a schedule You can load a saved schedule file 1 Select File menu Load the schedule file The Open dialog opens 2 Select a schedule file to load and click Open Loading a schedule...

Page 47: ...00 This chapter provides details on how to startup This chapter provides details on how to startup shutdown the HDMA 4000 shutdown the HDMA 4000 Startup and shutdown Startup and shutdown Chapter 4 Cha...

Page 48: ...000 has started the POWER LED will be on the main menu will be displayed on the LCD and the content will start playing The main menu displayed will differ according to the LCD information settings HDM...

Page 49: ...ettings menu and select Power off in SHUTDOWN The POWER LED on the HDMA 4000 unit will blink Shutdown will be displayed on the LCD and the HDMA 4000 will shut down Shutdown N o t e Do not shut the HDM...

Page 50: ...HDMA 4000 rear panel set to ON to activate the WOL Wake on LAN feature N o t e If the DIP switch is changed while the HDMA 4000 is turned off the changed setting will not be reflected Start the HDMA...

Page 51: ...HDMA 4000 Contents update Contents update Reference 1 Reference 1...

Page 52: ...hared folder 1 Run Internet Explorer or Explorer enter the IP address E g 192 168 0 16 in the address bar and press the RETURN key The IP address can be checked via the setting menu 2 Open the content...

Page 53: ...are on the product CD ROM content update folder in the samples folder Content update control file for scheduled playback samples folder content update folder Schedule folder For more information see...

Page 54: ...stored in the following folders backup Folder Moves the contents that have been stored in the HDMA 4000 to a backup folder and downloads the new contents The contents in the backup folder will not be...

Page 55: ...s with a USB device copy the content movie file schedule file Schedule txt and content control file update ctl to a USB device Attach the USB device that contains all the required files for updating t...

Page 56: ...e HDMA 4000 firmware restarts the unit once the update has been completed Write the copy method after Copy on the second line This section is required when Update is Schedule or Serial Copy copytype C...

Page 57: ...ta copy file backup restore Write one of these Delete backup Script script01 script02 script03 script04 Executes scripts one by one Description examples Description examples Restoring the most recent...

Page 58: ...chedule Copy file file sample1 m2t file sample2 m2t Delete sample3 m2t Updating serial control files Update Serial Copy copy Playing contents directly without copying Update Play Playing all the files...

Page 59: ...e To create a movie that can be played example To create a movie that can be played on the HDMA 4000 unit it must be encoded with on the HDMA 4000 unit it must be encoded with proper settings proper s...

Page 60: ...oCoder 3 Canopus ProCoder 3 2 Confirm that Source is selected in the left field of the window Click Add and choose the clip to convert 3 The source clip is added to the list 4 Click the Target button...

Page 61: ...udio layer2 Interlacing Upper Top Field First Profile Level MP HL The HDMA 4000 supports MP HL MP H14 and MP ML Video Bitrate Up to 40Mbps is recommended Check Put Sequence Header on each GOP 9 Click...

Page 62: ...h Schedule it describes the channel name and its schedule When multiple channels schedules are written the first channel will be executed default setting Write the channel name and the date of the sch...

Page 63: ...nd of the content name in the schedule definition block See 2 below The volume values can be specified in the range 0 50 When a volume value is not specified the current volume setting is used Please...

Page 64: ...ant key is pressed on the remote control front panel or USB keyboard The channel names KEY1 KEY0 correspond to the following keys KEY1 Button 1 on the remote control F1 on the Front panel 1 on a USB k...

Page 65: ...en the content specified in the schedule definition block cannot be found in the content definition block Playback will be stopped When the end time is earlier than the start time in the schedule defi...

Page 66: ...ment where the contents are stored as follows Content folder for scheduled playback Schedule txt movie0 m2t movie1 m2t movie2 m2t Repeating the playback of files Contents HDMAContents movie0 m2t movie...

Page 67: ...to 23 59 When the end time is omitted the schedule is considered as having 23 59 59 specified as the end time When multiple schedules contradict each other the last one will be used When no content n...

Page 68: ...s0 The content names and the repeat flags have to be the same Playing a different schedule on a specified date only Contents HDMAContents0 movie0 m2t HDMAContents1 movie1 m2t HDMAContents2 movie2 m2t...

Page 69: ...59 59 1 HDMAContents2 22 00 00 23 59 59 1 HDMAContents2 30 30 Changes volumes according to the schedule Specifying the time to shut the unit down Contents HDMAContents movie m2t Schedule Default 00 0...

Page 70: ...he channel corresponding to the key is executed If no channel in the schedule corresponds to a key nothing will happen If the date is not specified the time is set to and the repeat flag is set to 0 a...

Page 71: ...HDMA 4000 Serial control Serial control Reference 3 Reference 3...

Page 72: ...settings are 9600bps 8bits no parity stop bits 1 The settings can be modified with a WEB browser See Reference 4 Command The two characters CR 0x0d are required at the end of the command line When th...

Page 73: ...rts playback from a specified address adrs SM Sets a stop marker at a specified address CL Cancels auto play mode and the stop marker FR Uses a frame for the address mode If the ContentFrame idx file...

Page 74: ...me Style YYMMDDWWHHMMSS WW CR Specify this as YYMMDDWWHHMMSS CR arg MS Specifies repeat mode 0MS Does not repeat Stops at the last title 8MS Repeats the chapter 16MS Repeats the title 24MS Repeats all...

Page 75: ...ives A D O Returns the volume settings Style LLRR LL Left volume RR Right volume L Number of contents U Number of sync lists Available to communicate Total number For units other than the HDMA 4000Syn...

Page 76: ...d is executed stops with the first image displayed 1 When the adrsSE command is executed stops with a blank screen displayed Playback will not start internally In sync mode regardless of this setting...

Page 77: ...E06 Invalid parameter E11 Disk not present E12 Search address cannot be found E15 Picture stopped E16 Control from key remote controller remote serial detected while a command is in progress E99 A fa...

Page 78: ...idx files do not exist all serial controls based on the frame timecode will return errors FR command In order to use the FR command create a ContentFrame idx file in the serial folder The description...

Page 79: ...of file names Also note that in the above example the following six content files must be placed in the serial folder file 01 m2t Content that substitutes for frames 1 to 1000 file 02 m2t Content tha...

Page 80: ...fication mode 60SE Plays the frame that corresponds to 60 second 100PL Plays to the frame that corresponds to 100 second and stops 3600SE Plays the frame that corresponds to 3600 second 3800PL Plays t...

Page 81: ...m2t Content that corresponds to 3600 to 3800 second file2 01_stop m2t Dummy file 1 for specifying the stopping position file2 02_stop m2t Dummy file 2 for specifying the stopping position For dummy f...

Page 82: ...digits MMMM SS Time Not supported Always returns 0 R Returns the title number at the current position Style TT Title number 2 digits C Returns the chapter number at the current position Style CC Titl...

Page 83: ...Network drives A D O Returns the volume settings Style LLRR LL Left volume RR Right volume I Returns the IP address Returns R when an IP address is not specified The characters enclosed in can be omit...

Page 84: ...ommand CH SE to the content you want to play and move to it Send TI2SECH3SE to move to Title 2 Chapter 3 3 Send a command PL to start playback 4 Set the repeat mode with the MS command if necessary 5...

Page 85: ...folder and content files can be placed in a content folder for serial controlled playback Chapters correspond to the content files while titles correspond to the folders where multiple content files a...

Page 86: ...g 02Chapter m2t 02Title mpg Chapter Chapter A content file in a title folder is regarded as a chapter A sub folder in a title folder is also regarded as a chapter The files in the title folder are sor...

Page 87: ...r sequential playback When content is skipped because of a command seamless playback will not be performed To enable seamless playback the files have to be encoded in the same format and have the same...

Page 88: ...Reference 3 88...

Page 89: ...4000 Setup using the front panel Setup using the front panel Setup using Web browser Setup using Web browser Updating firmware Updating firmware Maintenance Mode Maintenance Mode Reference 4 Referenc...

Page 90: ...effect 1 VIDEO Specifies the video format 2 NETWORK Configures the network settings 3 SYSTEM Configures date time remote control ID and LCD information settings 4 CONTENTS DRIVE Specifies the default...

Page 91: ...VIDEO 1080 50i Outputs a 1080 50i HD signal VIDEO 720 50p Outputs a 720 50p HD signal VIDEO 1080 59 94i DVI Outputs a 1080 59 94i DVI signal VIDEO 720 59 94p DVI Outputs a 720 59 94p DVI signal VIDEO...

Page 92: ...ay method for the monitor at an aspect ratio of 4 3 Display mode Letter box The top and bottom of the screen is black when the content aspect ratio is 16 9 Display mode Panscan The sides of the video...

Page 93: ...enu IP configuration AUTOIP Detects an available address on the network and uses it IP configuration Manual Specifies the IP address manually Pressing the ENTER key or key opens the sub menu Manual se...

Page 94: ...address is specified by DHCP this setting is ignored DNS Configuration 1 Preferred DNS Specifies the preferred DNS Preferred DNS 192 168 1 1 DNS Configuration 2 Alternate DNS Specifies the alternate D...

Page 95: ...ID Specifies the remote control ID For more information on the Remote Control ID see Remote Control ID setting in the Appendix Remocon ID ID0 Sets the remote control ID to 0 Remocon ID ID1 Sets the r...

Page 96: ...D LCD information Player status Displays the operational status of the HDMA 4000 on the LCD LCD information IP address Displays the IP address on the LCD LCD information Date Displays the date and the...

Page 97: ...twork B Specifies network drive B as the default content drive Schedule Network C Specifies network drive C as the default content drive Schedule Network D Specifies network drive D as the default con...

Page 98: ...Reference 4 98 Serial Control Network C Specifies network drive C as the default content drive Serial Control Network D Specifies network drive D as the default content drive...

Page 99: ...e alternate DNS Operating time 7 days Displays the duration of internal HDD usage dates System Version 1 5 0 Displays the system version 6 SHUT DOWN 6 SHUT DOWN MENU 6 SHUTDOWN SHUTDOWN Power off Shut...

Page 100: ...he Web console Required system Required system Operations are checked only with Internet Explorer 6 IE6 Use a Windows XP PC on which IE6 is available PC settings PC settings The PC has to be on the sa...

Page 101: ...onform to the address bar of IE6 The IP address of the unit can be checked by selecting INFORMATION in the settings menu of the front panel Password Password A user ID and password are required to cha...

Page 102: ...You can also use this to check local settings it displays values that have been saved locally Date time settings Sets the system clock of the HDMA 4000 Advanced Settings Use this to check the interna...

Page 103: ...erations from the front panel Remote control operation Displays the setting status of operations from the remote controller Enable automated unit detection Displays the status of automatic detection o...

Page 104: ...isplays the subnet mask address Default gateway Displays the default gateway address DNS server settings Displays the current DNS server settings Preferred DNS server Displays the preferred DNS server...

Page 105: ...l control Serial controls operation mode Displays the current serial controls operation mode Playback delay from the start command PL Displays the delay before the HDMA 4000 starts playback after a PL...

Page 106: ...Reference 4 106 Status Status The Internal status and the operation log of the HDMA 4000 are displayed...

Page 107: ...HDMA 4000 responds Choose Disable to disable the remote control For information on how to specify the ID of the remote control see the Appendix to this manual Front panel operation Enables Disables o...

Page 108: ...take additional time before the HDMA 4000 starts up Internal drive spindown time Specifies the time duration before stopping the internal HDD when it has not been accessed Once the HDD has been stoppe...

Page 109: ...view the Schedule contents or Serial control contents directly Schedule Contents drive Specifies the drive where the default contents of the scheduled playback are stored Options are the internal driv...

Page 110: ...ts playback after a PL command has been issued Playback mode setting Cue up Specifies the stopping position when a file is stopped with a command including the SE and SL commands Genlock Enables Disab...

Page 111: ...ings User name Enter your user name The default user name is admin Password Enter your password No password is set in the default setting Year Month Date Hour Minute Second Sets the system clock of th...

Page 112: ...er name Enter your user name The default user name is admin Password Enter your password No password is set in the default setting Check internal drive and repair Checks the internal drive of the HDMA...

Page 113: ...ser Restart Restart Restarts the system A user name and the password are required to restart the system User name Enter your user name The default user name is admin Password Enter your password No pa...

Page 114: ...Resets the system to the default factory state A user name and the password are required to change these settings User name Enter your user name The default user name is admin Password Enter your pass...

Page 115: ...your user name The default user name is admin Password Enter your password No password is set in the default setting Current firmware version Displays the current firmware version Update file name Sp...

Page 116: ...o modify settings User name and the password are required to change settings User name Enter the current user name Password Enter the current password New User name Enter the new user name to register...

Page 117: ...117 Reference 4 Setup using Web browser Software License Software License Displays the license information for the software used on the HDMA 4000...

Page 118: ...or USB Firmware update via network or USB 1 Copy the firmware archive file and the firmware update control file to a USB device or to the content update folder For more information on the control file...

Page 119: ...Firmware updates in this case are performed in a special Maintenance Mode with a firmware binary file rather than an archive file Connections and Settings Connections and Settings 1 Use a serial cross...

Page 120: ...ode is displayed POLARIS login will be displayed on the terminal program s screen 1 Then enter as follows POLARIS login root Password polaris Nothing is displayed on the screen even when you are enter...

Page 121: ...aris home ifconfig Firmware download Firmware download Download the firmware via a Web server an FTP server or a USB device to be used in Maintenance Mode In this example 192 168 0 2 is the FTP server...

Page 122: ...aris tmp tar zxvf maintenance tgz root polaris tmp up Do not perform any operations until root POLARIS tmp is displayed again Restart HDMA 4000 Restart HDMA 4000 Restarts HDMA 4000 1 To restart HDMA 4...

Page 123: ...password If you have forgotten the user name or the password you can initialize the HDMA 4000 Once the HDMA 4000 is initialized the user name will be admin with no password set Once the HDMA 4000 is...

Page 124: ...Reference 4 124...

Page 125: ...HDMA 4000 Sync playback using the HDMA 4000Sync Sync playback using the HDMA 4000Sync Reference 5 Reference 5...

Page 126: ...ifier Dolby Digital decoder Projector Three screen multi monitor Speaker 5 1 ch Video output HDSC1 Note 1 Set one of the three HDMA 4000Sync units as the master and the others as slaves For instructio...

Page 127: ...via a Web browser Setup via a Web browser Set up the three HDMA 4000Sync units as follows using a Web browser For items displayed in the Web browser see Reference 4 Items not described below will be...

Page 128: ...ayback contents must be placed in the serial folders of all three HDMA 4000Sync units To use the FR command setting files named ContentFrame idx which describe the same frame constructions are require...

Page 129: ...129 Reference 5 Available Combination of HDMA 4000Sync Available Combination of HDMA 4000Sync units for external sync units for external sync Sync playback using the HDMA 4000Sync...

Page 130: ...Reference 5 130...

Page 131: ...HDMA 4000 Appendix Appendix...

Page 132: ...tched load impedance 75 Ohm 1080 59 94i 1080 50i 720 59 94p 720 50p HD signal Connector Component output BNC connector x3 Matched load impedance 75 Ohm 1080 59 94i DVI 1080 50i DVI 720 59 94p DVI 720...

Page 133: ...plug Exclusive use with Infrared wireless remote control Generic I O Serial port Format EIA 232 Connector D SUB 9 pin male x1 USB port Format USB 2 0 Connector USB type A x1 Specification Voltage AC...

Page 134: ...59 94i DVI 1080 50i DVI 720 59 94p DVI 720 50p DVI Digital signal Phases during the sync operation are not locked Connector DVI D connector x1 Audio output Analog audio output Format Stereo line outp...

Page 135: ...its usage environment HDDs are devices that deteriorate over time When used in an environment with an ambient temperature of 25 degrees C problems such as writing errors may occur within the first 20...

Page 136: ...000Sync unit HDMA 4000 HDMA 4000Sync unit 420 Width Required space for installation 215 5 Required space 100 Required space 44 8 Height mm 270 Depth Required space for installation 246 4 AC adapter AC...

Page 137: ...1 2 3 4 OFF ID fixed to 0 Set only SW1 to ON ON 1 2 3 4 OFF ID fixed to 1 Set only SW2 to ON ON 1 2 3 4 OFF ID fixed to 2 Set only SW3 to ON ON 1 2 3 4 OFF ID fixed to 3 Set only SW4 to ON To assign t...

Page 138: ...perations 2 Operations Run a Web browser select Local settings UPS mode and Battery running time or Remaining battery then the UPS unit will shut down within one minute of the HDMA 4000 HDMA 4000Sync...

Reviews: