


Move the slider to the right to sharpen the image.
Blur
Blurs the outline of the subjects to soften the image.
Move the slider to the right to soften the image.
Show-through Removal
Removes show-through of text from the reverse side or removes the base color. Adjust the show-
through level to prevent text on the reverse side of thin document or the base color of the document
from appearing on the image.
Move the slider to the right to increase the show-through removal effect.
Defaults
Resets each adjustment (brightness, contrast, sharpness, blur, and show-through removal).
Reset Selected Image
Cancels all adjustments applied to the selected image.
Save Selected Image
Saves the selected image in the list that applied adjustments.
Save All Corrected Images
Saves all the images that applied adjustments displayed in the list.
Exit
Click to close the Correct/Enhance Images window.
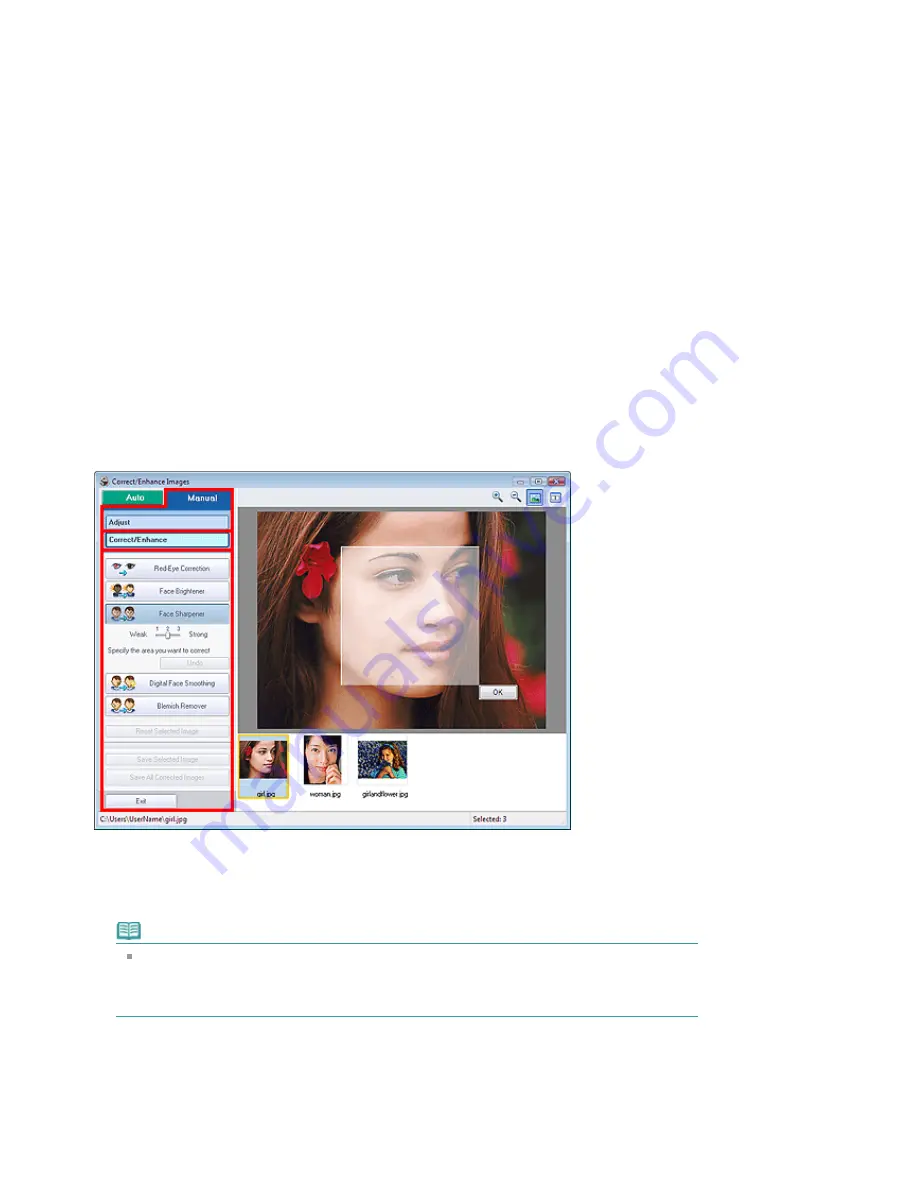
Correct/Enhance
Red-Eye Correction
Corrects red eyes.
You can specify the area you want to apply the effect to. You can adjust the effect level using the
slider.
Note
For Photo Print, red eyes are automatically corrected when Enable Auto Photo Fix is selected in
Color correction for printing on the Advanced tab of the Preferences dialog box and the Enable
Red-Eye Correction checkbox is selected. To disable the automatic correction, deselect the
checkbox.
Face Brightener
Corrects the entire image so that the selected facial area is brightened.
You can adjust the effect level using the slider.
Face Sharpener
Sharpens out-of-focus faces.
You can specify the area you want to apply the effect to. You can adjust the effect level using the
Page 171 of 541 pages
Correct/Enhance Images Window
Summary of Contents for Pro9500 Mark II Series
Page 26: ...Page top Page 26 of 541 pages Printing Documents Macintosh ...
Page 41: ...Page top Page 41 of 541 pages Loading Paper in the Front Tray ...
Page 55: ...Page top Page 55 of 541 pages When Printing Becomes Faint or Colors Are Incorrect ...
Page 113: ...Page top Page 113 of 541 pages Selecting the Paper ...
Page 123: ...Note See Help for details on the Edit screen Page top Page 123 of 541 pages Editing ...
Page 125: ...Page top Page 125 of 541 pages Printing ...
Page 130: ...Page top Page 130 of 541 pages Selecting the Paper and Layout ...
Page 133: ...Page top Page 133 of 541 pages Editing ...
Page 135: ...Page top Page 135 of 541 pages Printing ...
Page 142: ...Page top Page 142 of 541 pages Printing ...
Page 149: ...Page top Page 149 of 541 pages Printing ...
Page 186: ...Page top Page 186 of 541 pages Cropping Photos Photo Print ...
Page 190: ...Page top Page 190 of 541 pages Printing an Index ...
Page 282: ...Page top Page 282 of 541 pages Stamp Background Printing ...
Page 298: ...Adjusting Tone Page top Page 298 of 541 pages Printing a Color Document in Monochrome ...
Page 325: ...Page top Page 325 of 541 pages Reducing Photo Noise ...
Page 341: ...a flat place Page top Page 341 of 541 pages Attaching Removing the CD R Tray ...
Page 412: ...Page top Page 412 of 541 pages Colors Are Uneven or Streaked ...
Page 444: ...Page top Page 444 of 541 pages Before Printing on Art Paper ...
Page 483: ...Next Page top Page 483 of 541 pages Overview of Printing from Computers ...
Page 488: ...Page 488 of 541 pages Printing from Other Applications ...
Page 532: ...Page top Page 532 of 541 pages Adjusting Colors before Printing ...


